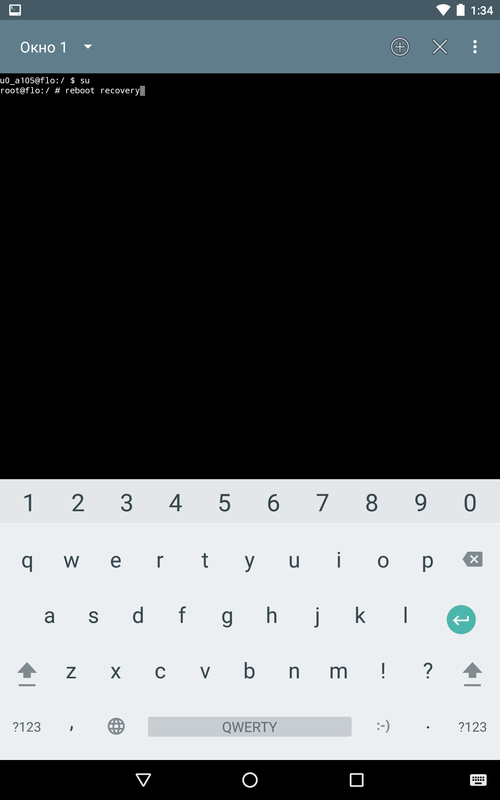
Recovery android menu - this is a special mode, upon transition to which you can flash Android again, reset the device settings or obtain superuser rights (ROOT).
Turn on Recovery on Android
How to run Recovery on Android? Indeed, through standard inclusion in this menu you will not get. In smartphones and tablets of different brands, this is done in this way. You will need to turn off your device and disconnect the charger and USB cable from it. Then you need to hold simultaneously one of the button combinations:
- volume up and on / off;
- central button and ON-OFF;
- central button, ON-OFF and volume up;
- volume down and on-off
How to open Recovery menu on Android? After starting, in the window that appears, select the “Recovery” item with the volume rocker, and this special menu opens with the power button. Also, the ON / OFF button is used to confirm the selection of any item (like the Enter key in Windows).
How to restore firmware on Android: Video
The benefits of backup in devices
Many people have encountered such an unpleasant phenomenon as the loss of the necessary files on their mobile device. So that incidents of this kind do not overshadow users, there is Backup - backing up various kinds of documents. The necessary folders are saved to external media, as you know, just in case.
Suddenly the virus will appear harmful or something else, and you are fully armed and with a copy of the precious information. Let's look at how to make Backup Android through Recovery, which we already know how to enter. I would like to note right away that we will talk about the backup of programs and settings of the Android OS itself, since an operating system that works well and without glitches is already important information.
For this we need:
- Get Root rights (they will allow you to act on your smartphone as an administrator);
- Download the Titanium Backup program on Google Play using the link and install it on your device.
When installing software for the first time, you will see a Root-rights request, which will have to be answered with the “Allow” button, and marking the “Remember” option with a flag will simplify the subsequent possible settings. We pay special attention: do not press various buttons, not surely knowing their actions.
The program Titanium backup completely "tough" disabling your smartphone with inept handling of the utility.
How to get ROOT rights: Video
Backup algorithm
- Run the program, select the option “Backups”.
- In the window that opens, opposite the “Full copy of user data, programs and settings” item, click the “Start” button.
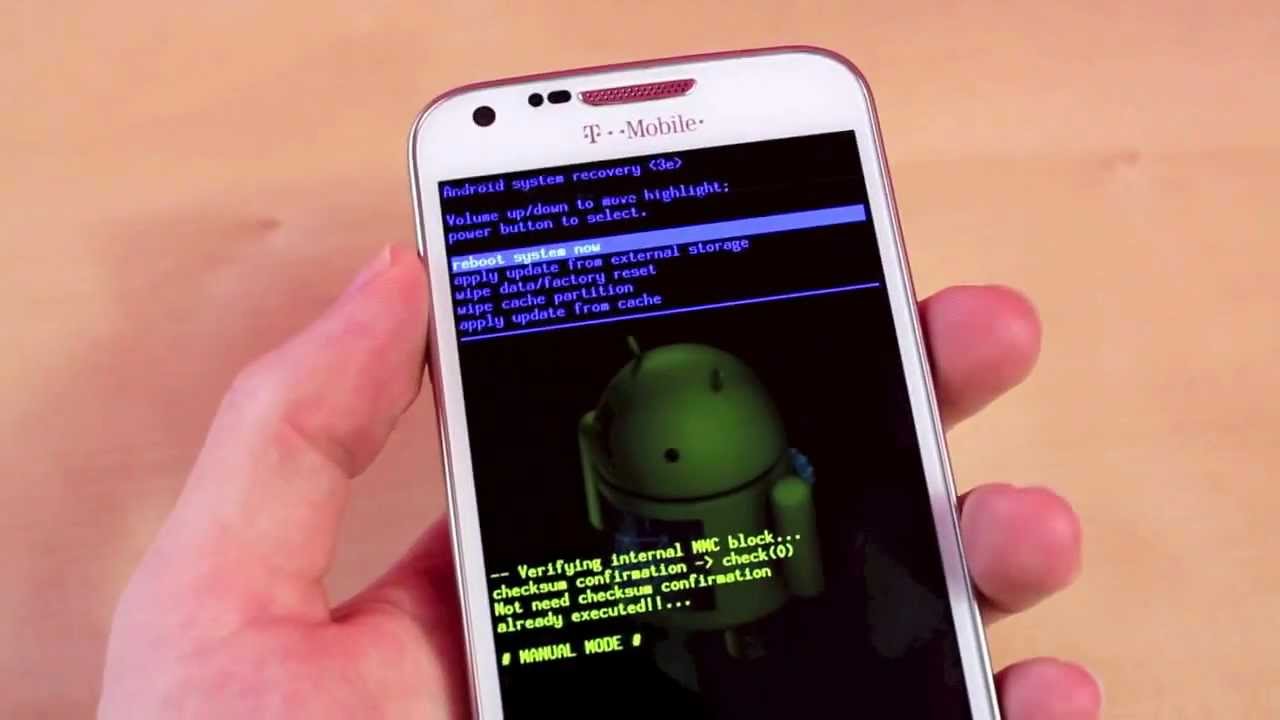
Many users of Android devices sometimes need to completely clean their gadget or to restore it. You can do this using standard tools or using a specialized tool - Android system Recovery 3e.
Activate this mode settings can be as follows - turn off the device, then hold down the volume control rocker, Home button and on / on button. Holding these buttons down, users will see a menu with a green robot on the screen of their gadget.
Menu System recovery quite diverse, and in order not to damage the device, you should know the purpose of each of the many points.
Reboot now will allow users to quickly reload their gadget.
You can install the CWM package with an arbitrary file name in the "Instal from sdcard" menu. Selecting this item, you will find yourself in the next subsection, where you can:
- Install CWM, which is located on the memory card - Choose zip from sdcard;
- Check md5sum file - Check md5sum a file;
- Verify the signature of the CWM package - Toggle Signature Verification;
- Check the package for compatibility with the device - Toggle Sclipt Assert.
Device users can turn a memory card into external storage USB to PC. If necessary, click on Toggle USB strage. Unmount will allow you to leave the subsection.
The Wipe / Format menu provides many options:
- Reset device data - Wipe data / factory reset;
- You can delete the cache in Wipe Cache;
- Dalvik cache can be cleared in Wipe dalvik chache;
- To clear usage statistics, use the Wipe battery stat;
- Delete all system files - point Format System;
- You can format the / data section in Format Date;
- You can delete the cache data in Format cache;
- Clear cache data - Format boot;
- Using the Wipe all partitions item, users will fully format the device.
To go to the recovery menu and reserve copy, you need to use Backup / restore, where there are many points:
- You can make a backup copy of the firmware in the Backup item;
- In Restore - restore firmware;
- Advance Restore will restore some partitions;
- You can copy partitions in Advanced Backup.
To enter the special menu designed to switch from EXT4 to EXT3 and vice versa, you must select the EXT3-4EXT-EXT4 section. In this section you can execute different kinds converting to EXT4 and EXT3:
- Device System - Convert / change a backup;
- DATA– Convert Data;
- Backup sections - Change one of you backup;
- Cache - Convert Cache;
- All sections - wipe data / factory reset (wipe / format is executed);
- System - format system, in the opposite direction - format data;
- cache– format cache;
- To convert EXT3, the same commands are used as in the case of EXT4.
The next menu item (mouts | strage) is responsible for mounting each section. The name of the required partition is added to the mount (unmount) general command: cache, data, sdcard, system.
Advanced - an item in the menu responsible for various functions:
- To check system files - File System Check -\u003e;
- Logo display and analysis - Print Partition Info;
- Saving copies of the log recovery - Copy recovery.log to sdcard;
- Opening ext and ext2 on the SD card - Partition SD Card -\u003e;
- Stop Partition Opening - No - save my fat32 partition !;
- Fixes of rights to files in directories / data / data - Fix Permission.
The last item is the power menu:
- Reboot - Reboot Recovery;
- In Bootloader - Reboot into Bootloader;
- The usual way is Reboot;
- Off - Power Off.
System Recovery recovers mobile device and provides additional features to the user.
In this article we will talk about what recovery mode ( Recovery mode) on Android, how to enter it on various models of popular manufacturers, as well as answer some frequently asked questions.
What is Recovery (Recovery)
Recovery mode is the so-called "recovery mode" android systems. Factory Recovery, which comes to the device “out of the box”, has limited functionality, but even from it you can implement or.
With the modified Recovery (or), a number of new functions appear, including the ability to obtain root rights, creating backups systems and recovery from backups, as well as other interesting options about which we will discuss in a separate article.
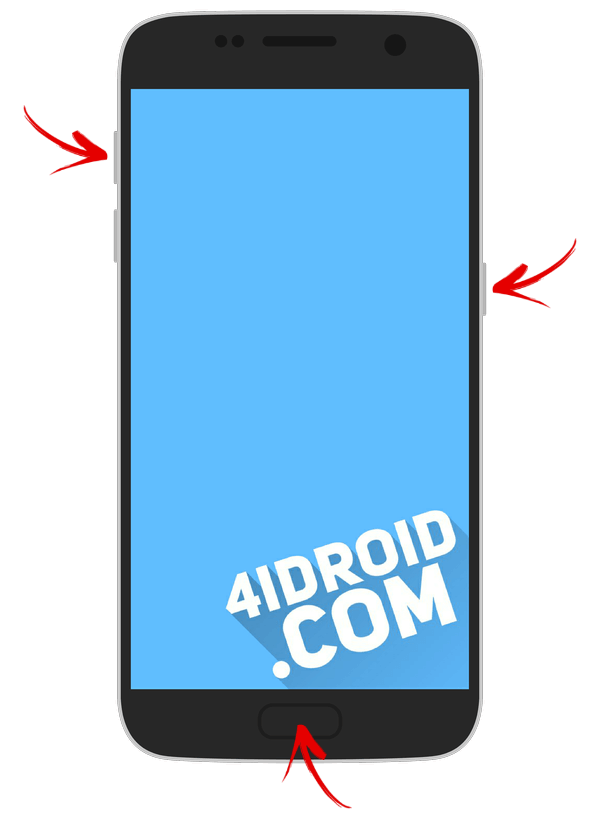
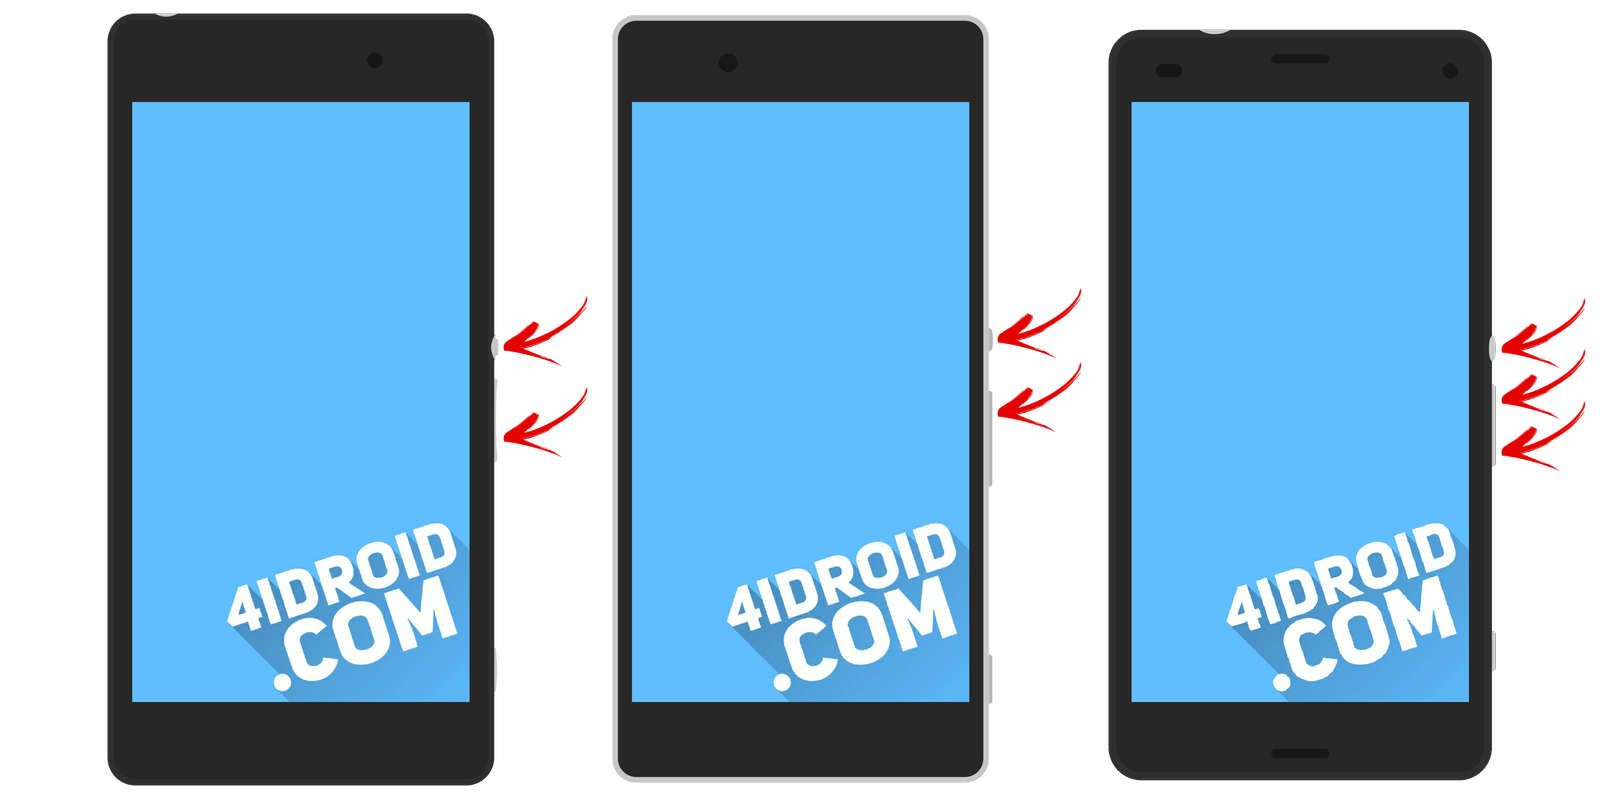
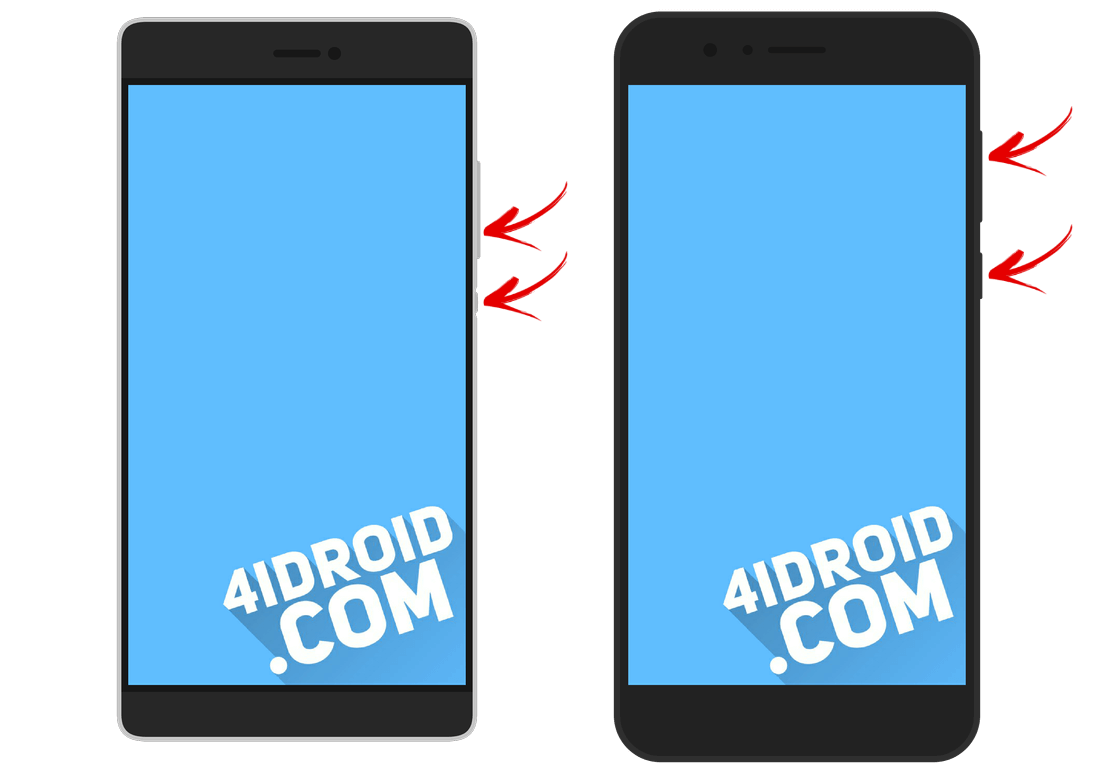
How to enter Recovery: instructions
To get into Recovery on Android devices, you first need to turn off the device, and then press and hold a certain key combination until the screen lights up. Unfortunately, there is no one single combination with which you can enter the Recovery menu as samsung smartphonesand on HTC, LG, Xiaomi, etc. Therefore, below we have compiled instructions for various models.
(!) True, there are three practically universal methods - more about each is written at the end of the article:
- By connecting the Android device to the computer, you can put it into recovery mode via command line Windows using ADB.
- Special applications allow you to enter recovery menu from the system.
- Through the Terminal, entering the command (ROOT rights are needed).
(!) There you will find information on what to do when a lying Android appears on the screen with exclamation mark in the belly and the inscription "No command".
(!) Also, in some smartphones and tablets there is no Recovery. In this case, you will have to install it yourself (unless, of course, there is a custom recovery for this model) - there are links to instructions above.
Moving through the menu is carried out with the volume up and down keys, the choice is made with the power / lock button. In new devices, CWM and stock recovery can be touch-sensitive.
Lenovo
On off lenovo smartphone hold and hold at the same time:
- Volume “+” and “ON”
If it doesn’t work, use:
- Volume “+”, Volume “-” along with the power button
Nexus
If you have a tablet or google smartphone Nexus, First you have to go into Fastboot mode, and from there go to recovery. To do this, hold:
- Volume "Down" + inclusion
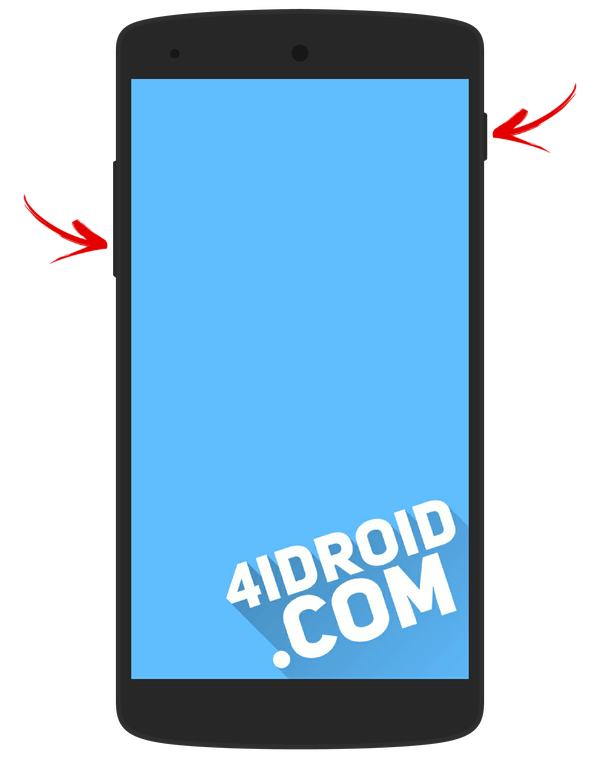
Then use the volume keys to switch to "Recovery mode" and select by pressing the power / lock button.
HTC
Use a combination of:
- Volume "Down" + launch
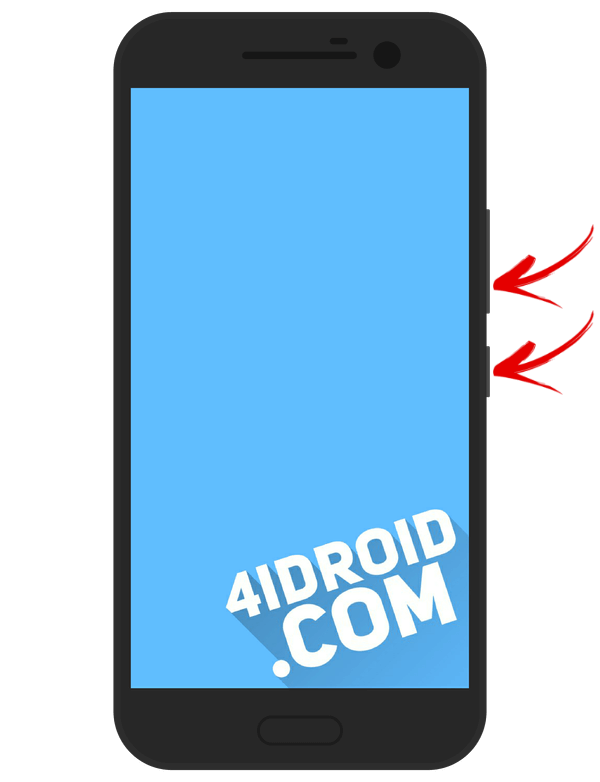
In some (you’ll go straight to Recovery):
- Volume "UP" + launch
On most HTC devices, you will first get into Bootloader, and only then, using the volume keys, you will need to go down to the “Recovery” item and go to it by pressing the power button.
In the Bootloader menu there is an item " Factory reset», Responsible for resetting all phone settings to factory defaults.
In all modern Samsung models, the following key combination is used to enter recovery mode:
- Home Button + Volume Up + Power On
On older devices:
- "Home" + inclusion
On old Samsung tablets:
- Volume Up + Power On
Meizu
There is no recovery in Meizu smartphones, but there is a menu there from which you can install firmware or reset to factory settings.
To get into it, use the following combination:
- “ON” + Volume “UP”
LG
- Hold down the Volume Down and Power keys until the LG logo appears.
- Then quickly release them and hold them again.
- Wait for the menu to load.
On off xiaomi phone hold these keys:
- Plus volume + inclusion
Xiaomi's recovery menu is available in several languages \u200b\u200band at the entrance you will be asked to select one of them. After that, go to the main functions.
Sony
In many sony phones the stock Recovery has not been installed (you have to install TWRP - a link to the FAQ is at the beginning of the article) and only in some models is it present. You can enter using one of the combinations (try one by one):
- “ON” + volume down
- “ON” + short press of the “Up” Volume until the SONY logo appears, then again quickly the “Plus” Volume
- “ON” + volume down + volume up
Huawei
For phones and tablets of the Chinese manufacturer Huawei:
- Volume "Down" + Power
- Volume "UP" + Power
Motorola
- Hold and hold the power key and Volume Down for 2-3 seconds, then release them.
- You will be taken to Fastboot Flash Mode. Use Volume “Down” / “UP” to change the option to “Recovery Mode”.
- Confirm your selection with the power button.

Fly
Hold one of these combinations until the “Fly” logo or vibration appears - it depends on the specific model:
- Volume "Down" + inclusion
- Volume "UP" + inclusion
Asus
- Hold down the power key and Volume “+” (second option: power and Volume “-”).
- After vibration, release the power button while continuing to hold the Volume until Recovery appears.
We put the device into recovery mode via a computer: a universal way
Connect the Android device to the computer via USB,. Launch ADB and enter at the command prompt:
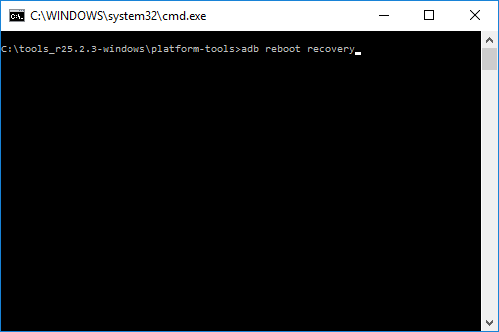
Press "Enter", after which the device will reboot into Recovery mode.
We use a useful application
Exist special programs thanks to which in one click you can transfer the device to Recovery Mode. For example, Boot Droid. It is enough to select “RECOVERY” in the list of options, and then confirm your choice by pressing “YES”.
![]()
Entering Recovery Mode via Terminal Emulator
Download Android Terminal and type the following command:
Press "Enter", a request for root access will appear, provide.
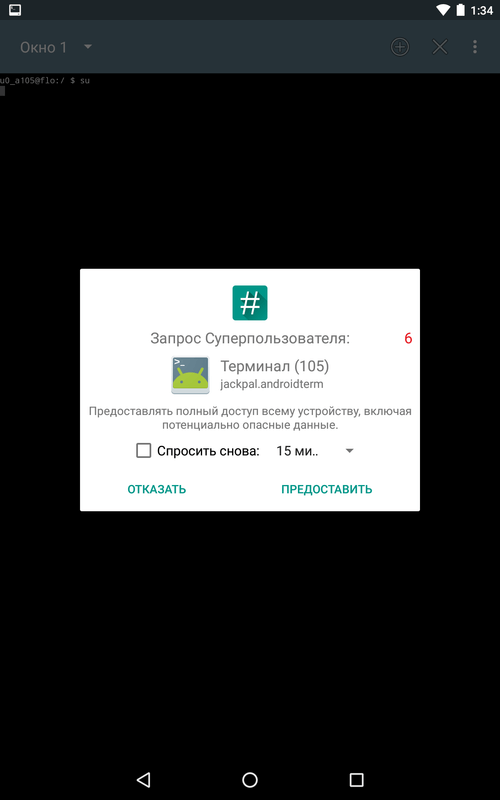
Then enter:
Click “Enter” again and the phone will instantly reboot into Recovery Mode.
He writes "No Command": what to do?
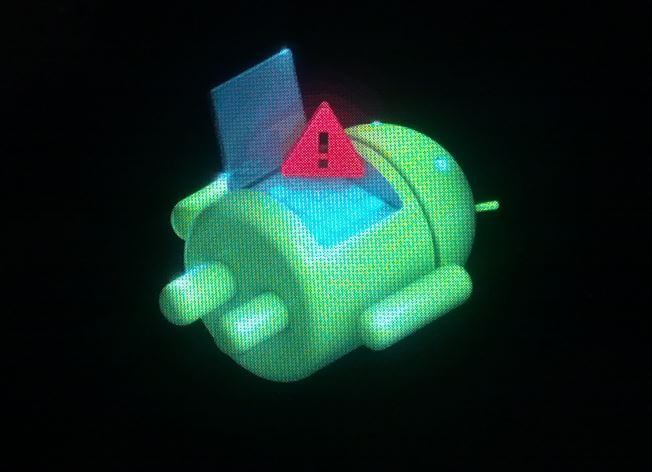
If such an inscription and a recumbent Android appear on the screen, try quickly pressing the 2 buttons: “ON” and Volume “+”. After that, the Recovery menu should appear.
Every novice user Android tabletor on the phone, traveling on thematic sites and forums, sooner or later comes across a mention of the mysterious, which is especially often mentioned in the instructions for flashing, replacing the kernel of the system and other “hacker” things.
So what is it, what is it for, and how to handle it properly? I will try to answer these questions in this article, which contains full instructions to work with ClockworkMod Recovery.
In a nutshell, or Clockworkmod or simply Cwm Is an alternative recovery for Android devices. ClockworkMod Recovery instructions include the following sections:
What is recovery?
Each Android tablet or phone has a factory recovery, which can be downloaded when the device is turned on by pressing a specific key combination. Factory recovery, usually knows how to install system updates from the update.zip file and do a system cleanup.
Introduction to Alternative Recovery ClockworkMod
- This is a much more powerful, compared to the factory, utility (menu) for system recovery, which allows you to make full backups of the entire system of the device, install software, firmware, kernels and much more on it, which usually does not allow for factory recovery. ClockworkMod, installed in a special system partition internal memory tablet or phone, to the place of the factory recovery menu.
ClockworkMod Recovery can help you out in some seemingly hopeless situations. Even if your tablet or phone cannot boot, in many cases using CWM you can restore the system with all its settings and applications.
Here is a sample list of what you can do with ClockworkMod Recovery:
Install custom firmware and unofficial kernels
Install factory system updates, additions, and corrections
Connect to a computer via USB in removable storage mode
Connect to a computer via USB to work with the ADB program
Create a full backup of the current firmware and its individual parts (system, settings, applications)
Restore device from previously created backup
Reset to factory settings (Wipe - data / factory reset), clear the cache (wipe cache), clear the dalwick cache (wipe Dalvik-cache), clear the battery statistics (wipe battery stats)
Create partitions on a memory card and format them
Created by Koushik Dutta (also known as Koush) and there are CWM versions for most Android phones and tablets.
Install ClockworkMod Recovery
For many smartphones and some tablets, installing ClockworkMod Recovery is a very simple procedure, just install the program from the Market ROM Manager and the first item on her menu will be clockworkMod installation. Separate utilities similar to the application may exist for other devices. Acer Recovery Installer for the Acer Iconia Tab tablet, or ClockworkMod Recovery is installed on them using the program adb .
Launch ClockworkMod Recovery
There are several ways to upload a tablet or phone to ClockworkMod Recovery.
1.
Using the program ROM Manager, selecting in its menu item "Download Recovery Mode".
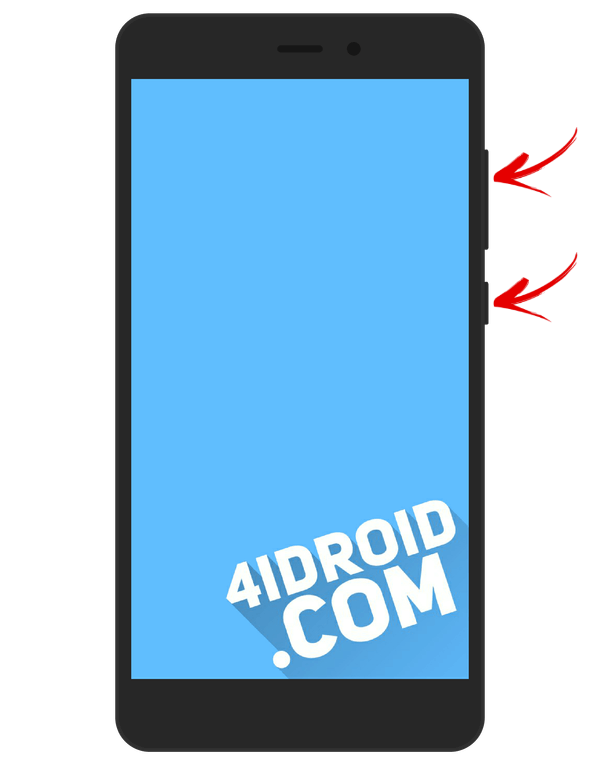
2. By pressing a specific key combination when turning on the device. This combination is device model dependent. On many devices, you can get into recovery by pressing the volume down and power on buttons at the same time when they are turned on.
Install firmware, updates, kernels, and more on an Android device using ClockworkMod
All alternative firmware, custom kernels, crack, add-ons, decorations, application packages that can be installed on a tablet or phone using ClockWorkMod recovery- are packaged as a zip file.
Before you install anything on your device, do not forget to make a full backup of the current firmware so that you can then safely return your tablet or phone to its original state.
Make sure your device’s battery is fully charged and disconnect it from the computer and charger.
Copy the file you want to flash to the memory card, best of all to its root, NOT UNPACKING IT. Make sure that the file name consists only of Latin letters and numbers and does not contain spaces or special characters.
If you install new firmware, be sure to do a full cleaning using the " wipe data / factory reset"
Getting to the firmware :
Insert the memory card into the device
Rebooting the device in ClockWorkMod recovery
Select item " install zip from sdcard".
Open item " choose zip from sdcard".
In the window that opens, we find our file, it will be located below, after the list of folders (if they are on the memory card)
Confirm your selection by going to " Yes".
After the end of the firmware, we return to the previous menu using the “ +++++ Go Back +++++»
Related materials:
A description of the functions and capabilities of ClockworkMod Recovery (CWM), as well as an example of creating and restoring a firmware backup and installing a .zip archive.
What is CWM?
CWM is a custom recovery that allows you to do firmware backup and user data. In addition, the utility can install third-party software, custom OS builds, and other modifications on the device. ClockworkMod can be installed in place of the factory recovery menu, or in the neighborhood, making it possible to work with both recovery.
A sample list of ClockworkMod Recovery features:
- firmware of various software (from OS builds to simple application updates);
- installation of official updates, as well as third-party modifications and system fixes;
- pC connection in mass storage mode;
- connection to a PC for debugging in the ADB terminal;
- backup and recovery of firmware and certain areas of the device’s memory (system, settings, applications and data);
- resetting the system to factory settings, clearing the cache and dalwick cache, clearing battery statistics;
- work with a memory card.
Where to download and how to install CWM Recovery?
You can download CWM Recovery on the official website of clockworkmod.com, or using the recovery constructor for your model at http://builder.clockworkmod.com/
Also for download and cWM installations Recovery, you can use the proprietary application CWM ROM Manager.
Description of CWM Menu Items
Depending on the version of recovery, the menu items may vary. However, below are all the main sections and functions of CWM that are present in most assemblies:
- apply update.zip from sdcard - Installation of the “update.zip” archive (should be located in the root of the memory card);
- wipe data / factory reset – full reset settings, data and cache and return to the factory state;
- wipe cache partition - cleaning the storage area of \u200b\u200btemporary files;
- install zip from sdcard - installation of the zip archive from the memory card (you can select the archive with any name in any directory of the memory card). Items on this menu:
- apply update.zip - completely similar to “apply update.zip from sdcard”;
- chooze zip from sdcard - select .zip on a removable drive;
- toggle signature veritification - enable and disable verification of the archive signature;
- toggle script - enabling or disabling the approval script, allowing you to select priority actions (not intended for everyday tasks).
- backup and restore - Creation and restoration of data backup from various memory areas of the device. Items on this menu:
- Backup - Create backup firmware and user data.
- Restore - restore backup.
- Advanced restore - recovery of files from a specific area of \u200b\u200bmemory in backup.
- mounts and storage - opening access for recording, working with the device’s drive and system sections. Items on this menu:
- mount / system - mounting the main section of the firmware;
- unmount / data - unmount the data section;
- unmount / cache unmounting the temporary file storage partition;
- mount / sdcard - mounting the drive;
- mount / sd-ext - mounting the Linux partition of the drive;
- format boot - cleaning the boot partition;
- format system - cleaning the system partition;
- format data - clearing the data section;
- format cache - clearing the temporary files section;
- format sdcard - drive cleaning;
- format sd-ext - cleaning the Linux partition of the drive;
- mount USB storage - connecting the device to a computer in mass storage mode.
- advanced - additional functions. Items on this menu:
- Reboot recovery - restarting the recovery (if CWM is installed next to the stock, the stock recovery will be loaded);
- Wipe Dalvik Cache - flushing the Dalvik cache (in the ART execution environment - useless);
- Wipe Battery Stat - reset battery statistics (recommended after updating or installing a new firmware to create a new calibration file);
- Report Error - creating a report on a memory card;
- Key test - display key encoding;
- Restart adb - rebooting the ADB terminal (useful if errors occur when working with the debugger).
- +++++ Go Back +++++ - in all menus it executes the “back” command.
* Partition mount points indicate the commands that will be executed after selecting the appropriate item. Thus, if “mount / system” is written, then the system partition is not mounted at the moment and you need to run the mount command.
Backup system and user data through CWM
Making a backup is quite simple:
- reboot into CWM;
- select “ backup & restore“;
- click “ backup“;
- confirm the selection in paragraph “ Yes”And wait;
- exit CWM using the “ reboot system now“.
Along the way memory card root / clockworkmod / backup, your backup will be posted. Depending on the version of CWM, this may be a folder or archive with .img or .tar files. The name of the backup, by default, consists of the date and time of the operation. You can add notes to the name, but only in Latin letters and numbers (otherwise, the recovery will knock out an error).
Firmware recovery from backup via CWM
The recovery procedure is also simple:
- we start CWM;
- select “ Backup & restore“;
- click “ restore”And look for the desired backup;
- confirm the selection in paragraph “ Yes“.
If you need to restore data from a specific memory area, do the following:
- launch CWM recovery;
- select “ Backup & restore“;
- click “ Advansed Restore“;
- we are looking for the desired backup in the list;
- mark the necessary section ( boot, system, data, cache, sd-ext);
- confirm the selection in paragraph “ Yes“.
Install firmware, kernels and updates through CWM
Before installing anything, be sure to backup the current firmware. Make sure that the battery of the device is more than half charged. Disconnect your smartphone or tablet from the PC or charger. Place the file that you want to install on the memory card (preferably in the root, to make it easier to search). If you are installing a new firmware, be sure to clear the user data section with “ wipe data / factory reset“. Instruction:
- install the drive into the device;
- we start CWM;
- select “ install zip from sdcard“;
- then click “ choose zip from sdcardd ”and select the required archive;
- confirm your intentions with the “ Yes”And expect the installation to finish;
- then do Wipe cash and advansed / Wipe dalvik-cash;
- go to the main menu and click reboot system now.
That's all. More detailed instructions for working with CWM, look in the description of the necessary operations in the themes of your devices on


