Greetings to all readers of the blog site. Today I will tell you how to restore windows 7. In case we encounter a certain problem with the PC, for example, its speed has deteriorated significantly, or some applications do not start, then first of all, try to complete the rollback procedure operating systemwhich is a great alternative. Thus, we will return the original configuration data and system files from the "reserve".
This is a great opportunity to instantly repair a PC and ensure its high-quality operation. This article will show you several ways to roll back Windows 7.
- How to roll back directly from under the system.
- Restore the OS using safe mode.
The first method is useful when the PC turns on and functions, with or without glitches, most importantly - it works. For example, either driver problems. You completely leveled the product, but the computer just didn’t work better. In this case, a rollback would be a good solution to the problem.
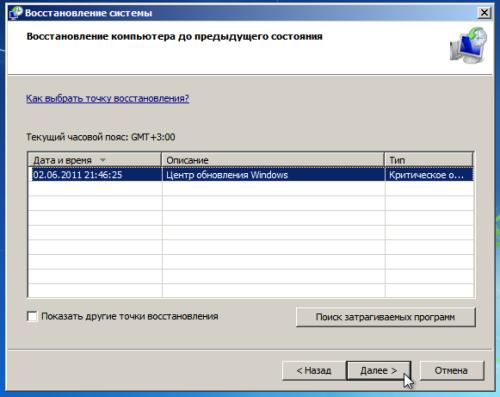
So, go to the start menu and in search bar write the word "Recovery". In the displayed window, find the standard windows program "System Restore".

Then it is necessary to highlight the recovery point, from which, in fact, the rollback will occur. Click "Next."
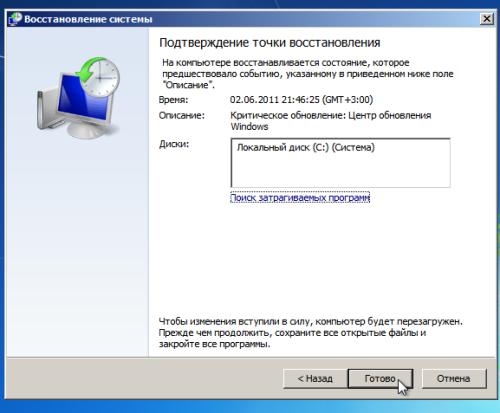
Click Finish.
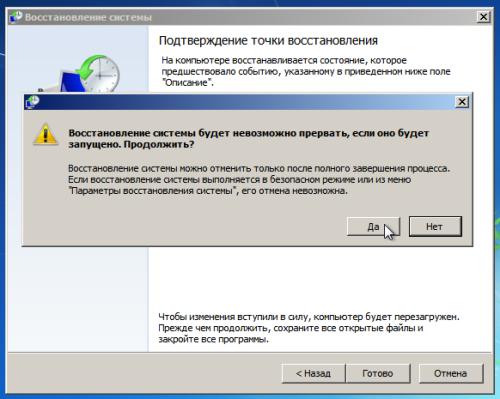
Here you will come across another warning - click “Yes”.
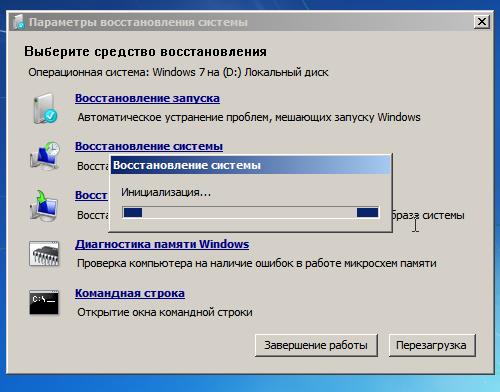
A window will appear with the preparation process, at the end of which the PC will reboot, and you will see a message with the text: "OS recovery completed successfully."

If this does not bring any result, then try to roll back to another point.
How to recover windows 7 system using safe mode.
You can also rollback your setup data and files using this modewhen, for example, the OS does not want to boot normally. This method repeatedly helped many users.
First you need to boot the system in safe mode (after turning on the PC, periodically press the F8 key and select the appropriate item).

You must wait for the computer to complete the download. In the future, all operations are performed similarly with the first method.
Since I recently rolled back the OS, I saw an item with the ability to disable the recovery process. Find the item "Choose another point ..." and click on the "Next" button.
We find the necessary point for the rollback and click "Next" as well.
Click Finish.
We respond to the newly raised warning by clicking on “Yes”. The PC will reboot, and will already work in normal mode.
That's all for me! I hope you now know how to restore windows 7. If you have any questions for me, be sure to ask them in the comments. I also won’t refuse warm words to my side) I wish good health to all my readers and guests!
With uv. Evgeny Kryzhanovsky
Consider how to start recovery windows systems 7.
In the second half of 2017, the company plans to officially stop supporting the seventh windows versions. In this regard, many users try to find options for independently solving many errors and problems.
According to the latest company data, updates for the OS come out much less often, and user support is provided only in really important cases. The corporation focuses on improvement. Insufficient system support leads to bugs and freezes.
Often, user actions also cause the OS to run too slowly. Installation of "heavy" games, programs, reboot random access memory and hard drive - These are the main factors of system failure. If you encounter a sharp deterioration in computer performance, a recovery should be performed. After this procedure, all PC functions will be fixed.
There are three basic recovery methods:
Standard Recovery Utility
- Turn on the PC. Then press the power key again;
- Open the start menu by holding the F8, F12 or Escape key, depending on the model of your PC;
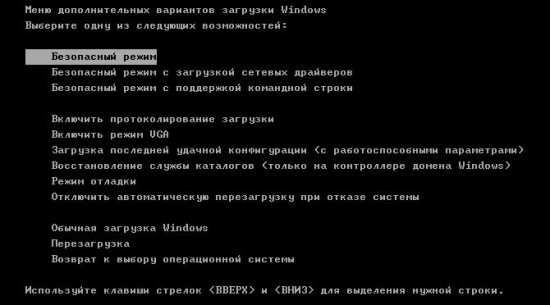
- After a few seconds, the boot options window for Windows 7 appears;
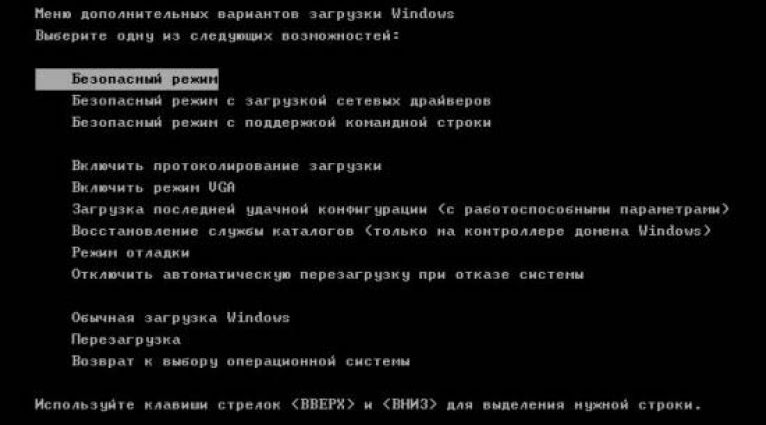
Fig. 4 - system boot options window
- Select item « Safe mode» by pressing the up and down keys, as indicated in the figure above;
- Press Enter to complete the action.
After rebooting the PC, you get to the working windows table 7, where you can perform recovery through the access point.
Remember! In this mode, it is not possible to use a connection to the global network. If you need access to the Internet to configure the normal operation of the system, in the advanced settings window, select Safe Mode with Network Component Support.
Auto Troubleshoot
Using the boot options, you can also enable the troubleshooting option. It allows you to reset all errors in auto mode. Also, users have the opportunity to enable the latest normal configuration of Windows 7. After selecting this function, the OS desktop will load as the last successful copy of the settings.
Follow the instructions:
- At the stage of turning on the computer, start the system menu of power-on parameters, hold and try to execute windows launch 7;
- When unsuccessful attempt power on, go back to the system menu and select "Troubleshooting";
- The operating system will launch the utility to automatically fix all errors. After that, Windows 7 should start in an already restored form.
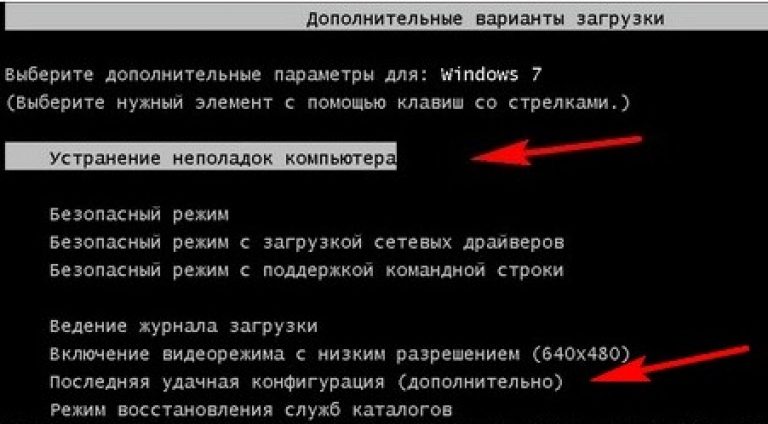
Fig. 5 - troubleshooting and launching a successful windows configuration 7
Command line recovery
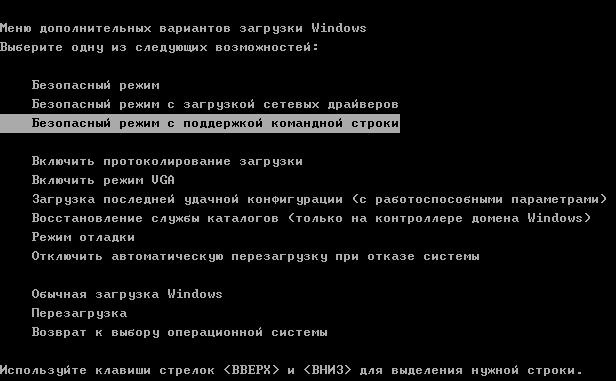
This option is suitable if there are no saved restore points on the computer, but you manage to start Windows 7.
Turn on your PC in safe mode with command line support. This will allow you to open the CMD window and work with basic commands.

Fig. 6 - choice of OS startup option
After turning on windows 7, open the Run window and enter the command below in the field. She will allow to launch a line.

Fig. 7 - Run window in Windows 7
In the window that opens, type the command shown in the figure and press Enter. After a few minutes, a message appears stating that the PC recovery was successful. Reboot it to exit safe mode.
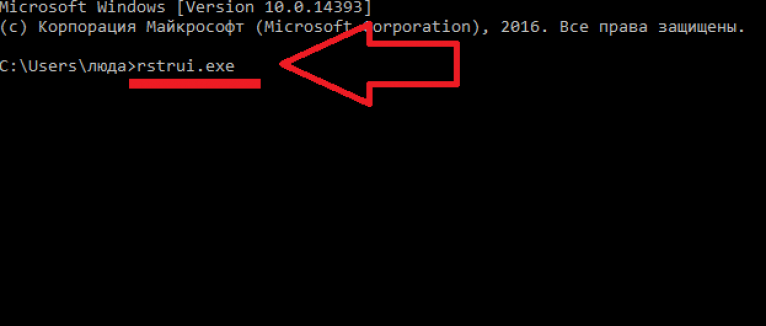
Fig. 8 - system fix using Command Line
Recovery using a flash drive or disk
Due to fatal errors in Windows 7, users are unable to start the system using safe mode. In this case, you can restore Windows using a boot disk or USB flash drive.
Bootable media is a removable device (usually a CD or flash drive) onto which the installation copy of the Windows operating system is downloaded. You can create such media on another PC using programs, Daemon Tools, and other utilities. If you still have the official drive copy of windows, it can also be used to roll back the system.
Note! The versions of Windows 7 on the boot disk and on the computer must be the same. Otherwise, the restore will fail.
Before you start fixing work using removable media, you should configure the queue - the computer should not load the installed version of Windows 7, but the one that is on the drive:
- by pressing the F8 or F12 keys immediately after turning on the PC;
- Go to the Boot tab;
- In the window that opens, find the “Boot Priority” items - each of them means a specific order of loading the PC components. First place your type bootable media. In our case, the recovery will be carried out from a flash drive, so in the first column "Boot Priority" select " USB storage". If you are working with a disk, put the Hard Drive component first;
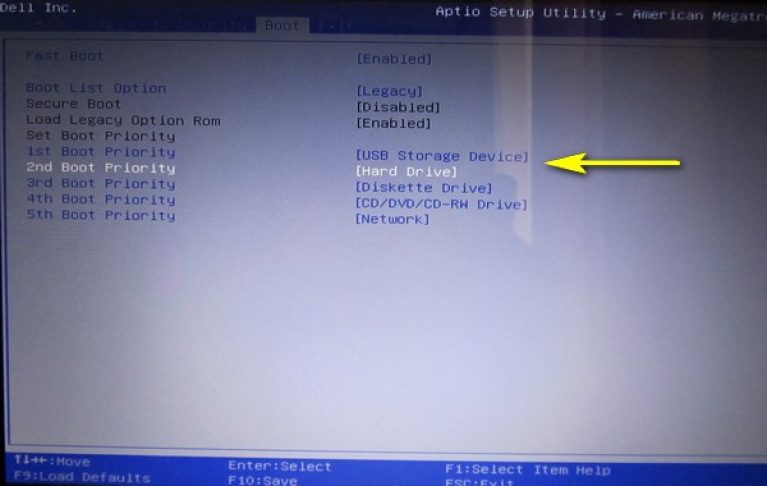
Fig. 9 - boot order selection removable media in BIOS
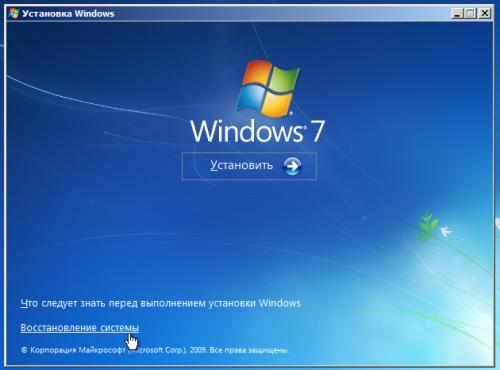
- Now, as a result of starting the computer, you will see a window windows installation Find item "System Restore" and click on it;
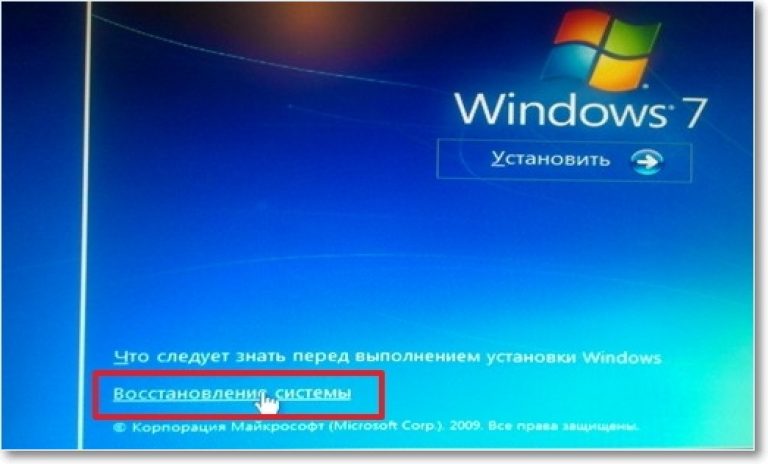
Fig. 10 - recovery from bootable media
- Confirm the action again as shown in the figure below:
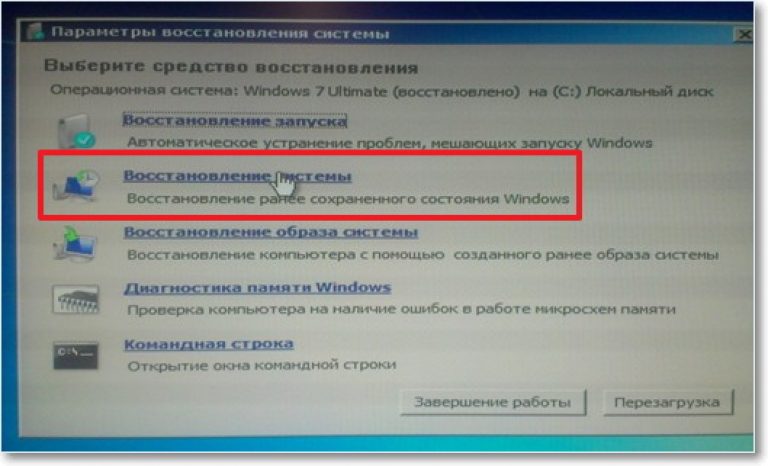
Fig. 11 - recovery option selection
- Press the “Next” key and select the access point, as described in the first section of the article.
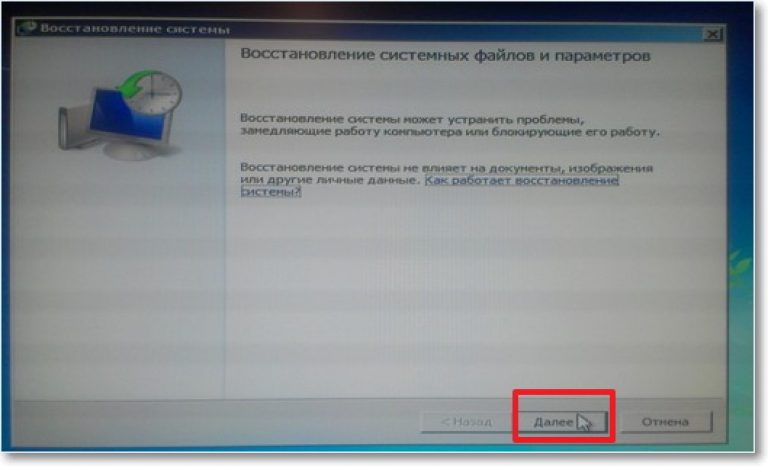
Fig. 12 - launch of the standard utility

System recovery is relevant in the event of a sudden slowdown of the PC, incorrect optimization, and a number of other reasons, to understand which there is no time or desire. Let's look at the basic ways to recover Windows 7.
How to restore windows 7
It is worth noting that when restoring the system, the user does not lose personal files, so you can not worry about the safety of your documents, photos and other content.
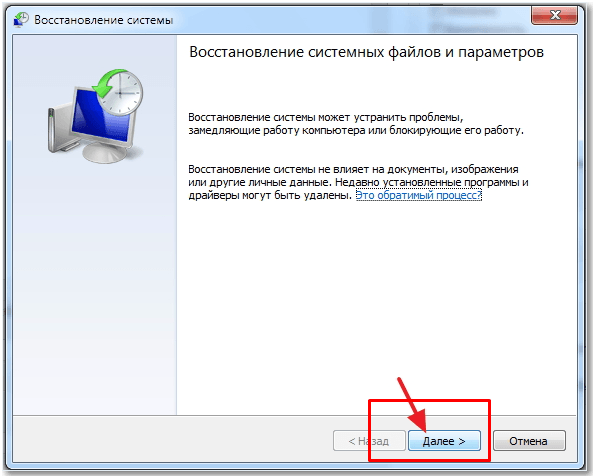
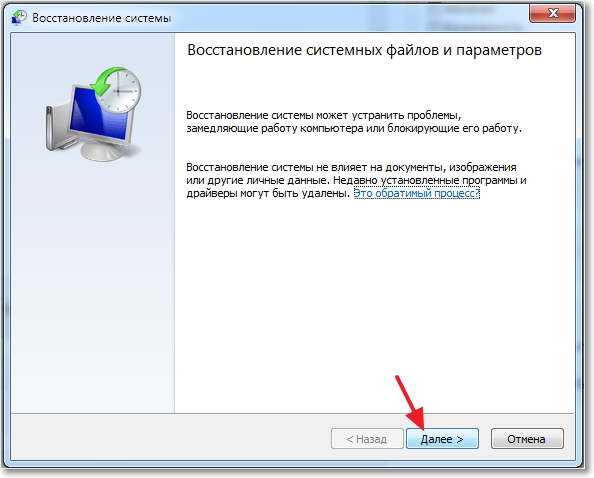
First way : system restore system utility.
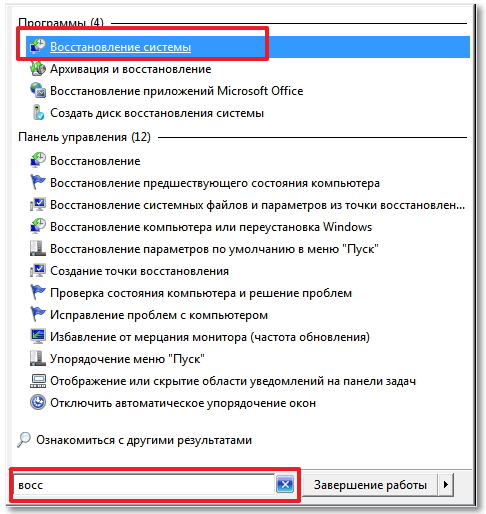
This is a component of Windows that is as easy to manage as possible, so there should not be any difficulties during operation. In order to start it, click Start and in the search bar we begin to register System Restore. The search engine must find this phrase before you add it. We open.

The window that opens introduces you to the System Restore Wizard. Click Further.
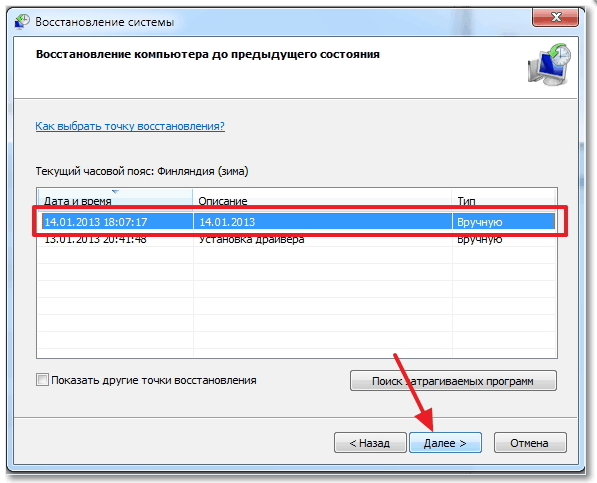
Select the recovery point closest in date to the current one and click Further.
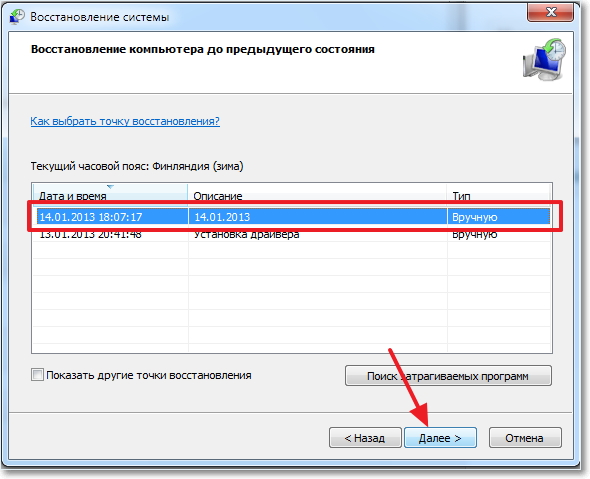
Note: If you are worried about what will change when you roll back to the selected point, then you can see what will change during recovery. To do this, select the desired restore point and press the button Search for affected programs.
If the displayed recovery point does not suit you, check the box next to the option Show other recovery points.
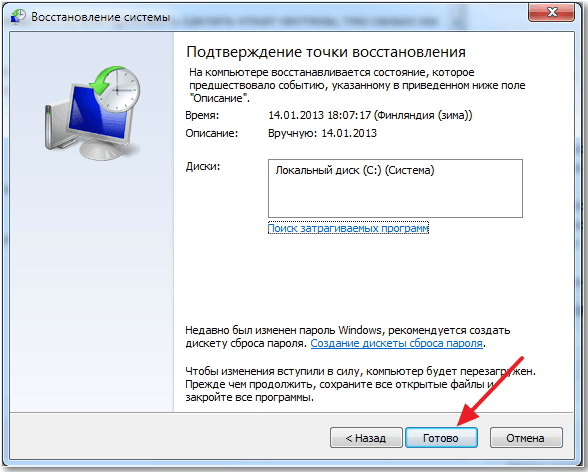
After you have selected a point, the wizard will require you to confirm that the action has been performed with this window.
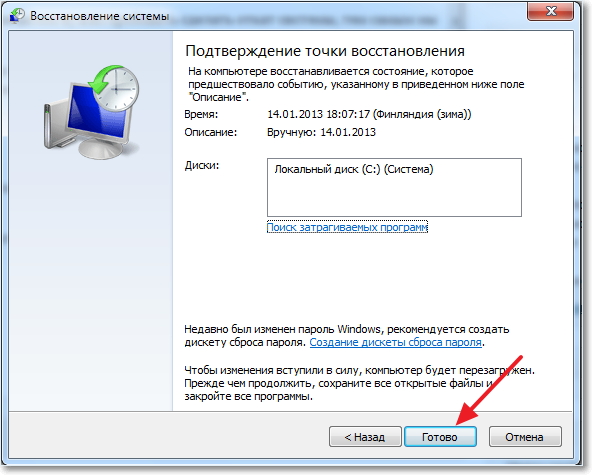
Click Done.
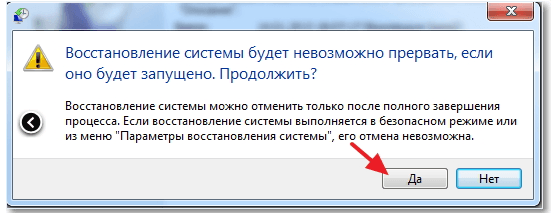
Click Yes.
Now it remains to wait a while until the system configures everything by itself.
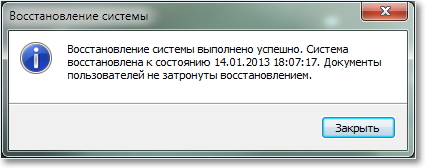
After a reboot, the system will notify you that the operation was successful.
If the system notifies you of an error during recovery, or the action did not bring the expected result, select another recovery point.
Second way : system recovery through safe mode. It will help if the system refuses to start in normal mode. To go into safe mode, start the PC, and as soon as it starts to boot, keep pressing F8 on keyboard. From the opened black window with boot options, select Safe mode.
After downloading, do the same thing that is written in the first method.
Instead of safe mode, you can choose Safe mode with command line support.
As soon as the command line opens, write in it rstrui.exe. A window will open with the System Restore Wizard. How to work with it is described in detail in the first method.
Third way : system recovery through a boot disk. It is suitable only for those users who have the installed operating system located on a CD / DVD disc. To do this, insert the disc into the drive, in the BIOS settings, set the boot from the CD / DVD disc
Note: BIOS versions may vary. For each version, PC boot settings may vary. But for most users, the algorithm is the same. First, start your PC and immediately start pressing the Delete or F2 key on the keyboard. Then:
- In the window, go to the Advanced BIOS Features - Boot Sequence - First Boot Device chain and select CD / DVD.
- Press Esc, then F10. A window appears confirming the saving of the settings. Press Y.
- Go through the Boot - Boot Device Priority - 1st Boot Device chain and select CD / DVD.
- Press Esc, then F10. A window appears confirming the saving of the settings. Click Ok.
- Go to the Advanced tab, select the First Boot Device option and set the boot from the CDROM.
- Go to the Exit tab and select Save & Exit Setup. A window appears confirming the saving of the settings. Press Y.
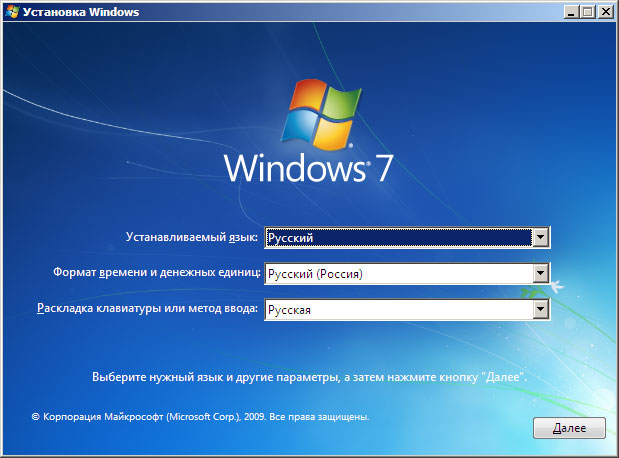
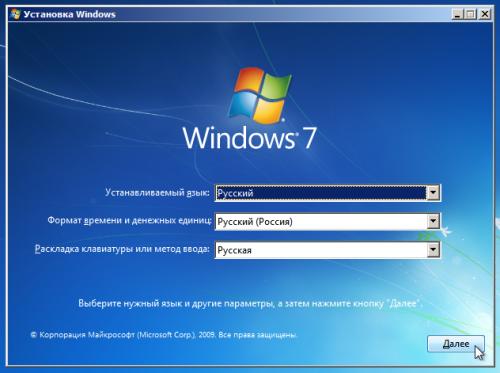
After that, it should run with boot disk. In the window that appears, select the language and click Further.
After that, press the button System Restorethat is at the bottom of the window.

A window opens with recovery options. Choose System Restore and click Further.
We select the recovery point (it is described in more detail in the first method) and click Further. The recovery wizard will ask for confirmation of action, click Done and wait for the system to recover.
16099 read
Most computer and laptop users must have run into problems more than once. windows boot 7. That is, their operating system simply simply refused to boot in normal mode and issued an error. In such situations, it is not even possible to enter Safe Mode with the F8 key.
The first action that may come to mind in such a situation is a banal reinstallation of the Windows 7 OS itself. Such a procedure is quite simple and correctly described in the following instructions:, and in many others.
Reinstallation will certainly solve the problem with loading the operating system, but not everyone wants to lose important documents, programs and saved settings of various programs. If using the Linux operating system you can somehow get documents out and save them (manual:), then reinstalling applications and hardware device drivers, as well as setting them up, will take a large number of time.
Note: this manual does not address computer hardware problems, such as a device failure, problems with turning on the laptop, image problems and the like.
To your luck, the problem of starting the operating system seems to be much easier to solve. Typically, the cause of a malfunctioning OS boot is damage to the Windows boot loader, damage to the MBR (master boot record). To restore the OS, you must restore windows bootloader and MBR. How to do this will be described later.
Restore regular boot Windows 7
Method mBR recovery (main boot record) and the bootloader in Windows 7 is almost completely similar to that for Windows Vista. This means that the recommendations described below can be safely used to restore Windows Vista.
Let's get started. For starters, you will need boot DVD or a flash drive with a Windows 7 distribution kit. How to prepare devices with a distribution kit is described in detail in the following instructions: How to install Windows 7 from a flash drive using WinToFlash.
Now you need to click on "System Restore" below:
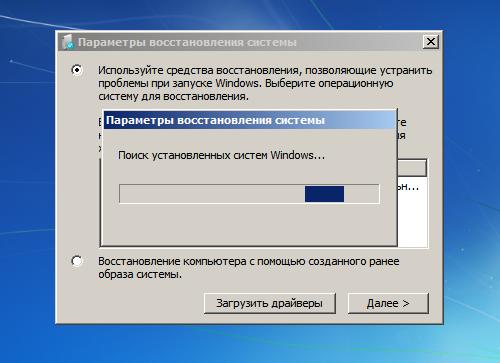
After that, the search for already installed versions of Windows on the computer’s hard drive will begin:
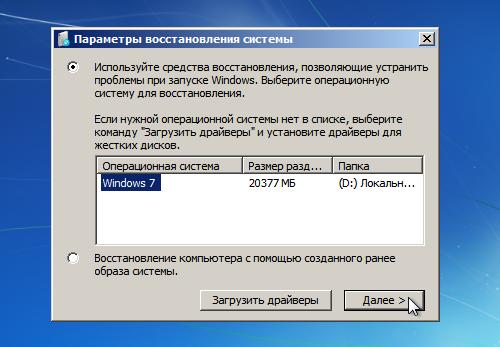
As a result, the program should find earlier installed versions Windows 7. Select it and click "Next":
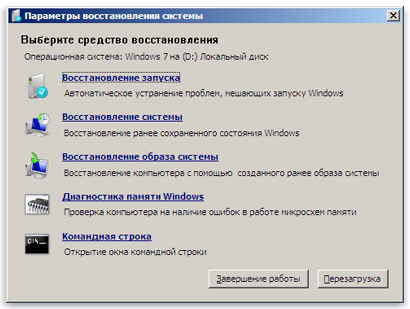
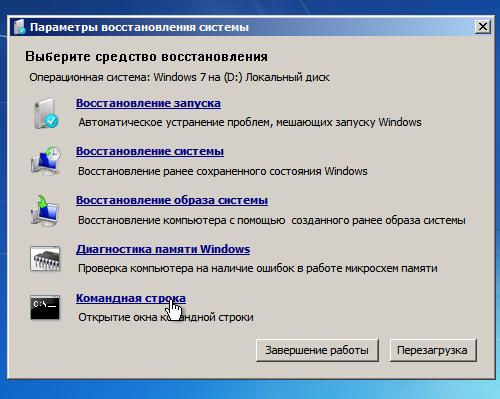
The Windows OS recovery menu should now open:
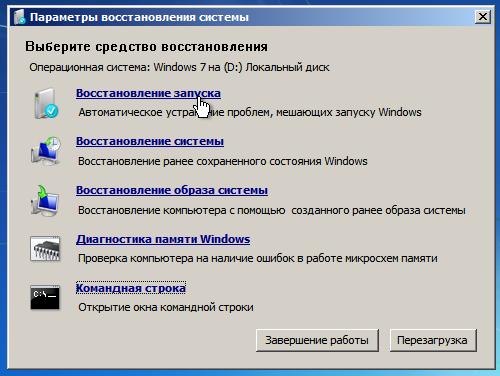
Consider all the items on the recovery menu:
- Startup Recovery - auto recovery Windows boot loader and system data.
- System Restore - restore the OS using the previously created restore points. These recovery points are created by themselves during important changes in the system, installation windows Updatesas well as independently by the computer user.
- System image recovery - fixing Windows using an image on a storage device.
- Diagnostic tool windows memory - memory test for errors. A very useful thing.
- The command line is a console for self-repairing the OS.
You will need only the first two points, as well as the last point. First, take a look at Launch Recovery. This is the easiest way to restore regular system boot. Click on the inscription. The OS diagnostics should start:
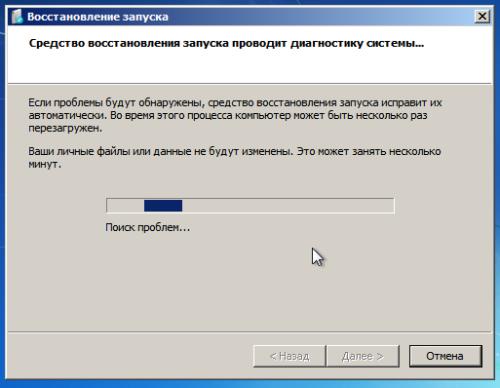
After some time, the problem will be detected (or will not) and fixed:

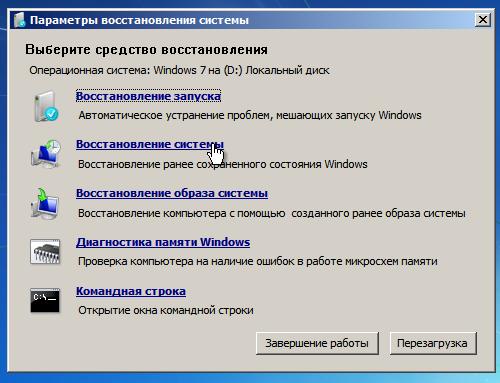
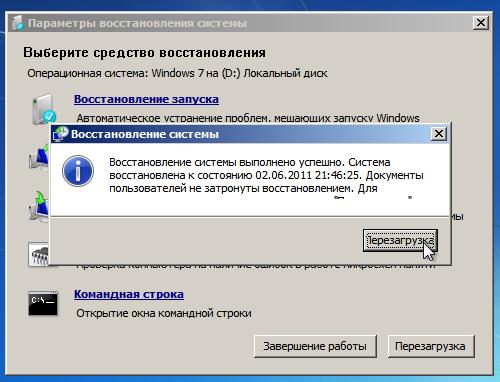
Now take a look at the next menu item - System Restore. We will try to restore the system using one of the recovery points. To do this, click on the inscription "System Restore":
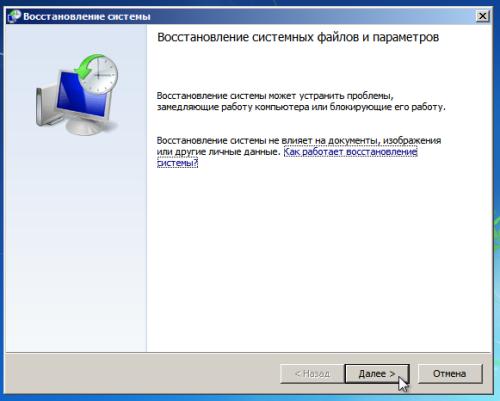
Then select the latest system restore point and click “Next” again:
Click "Finish" and agree to the warnings:
Now you need to restart your laptop or computer:
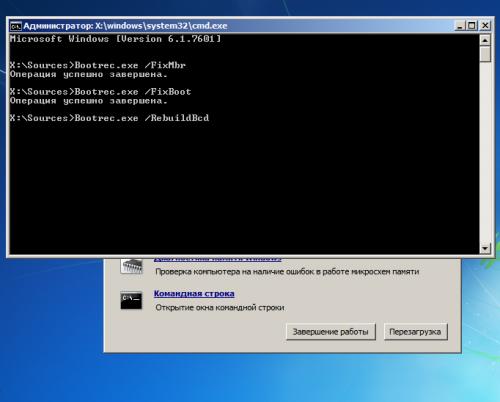
If the described actions did not bring the desired result, then run the "Command Line":
To restore the MBR, type in command line the following: Bootrec.exe / FixMbr:
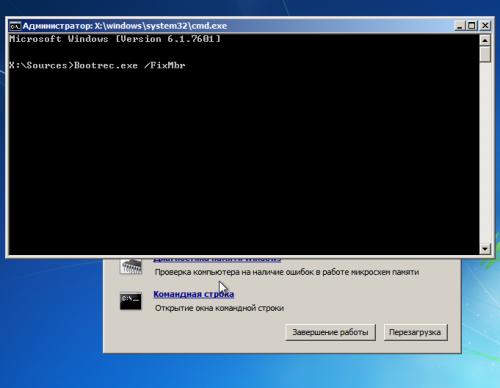
To restore the bootloader, enter the following at the command prompt: Bootrec.exe / FixBoot:
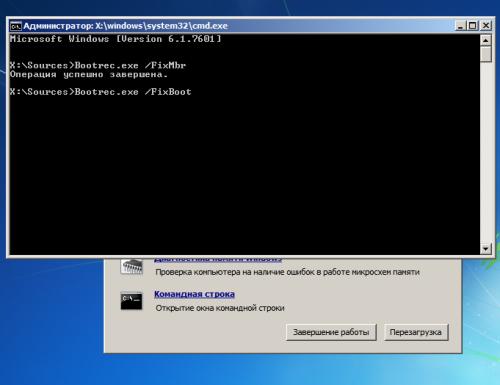
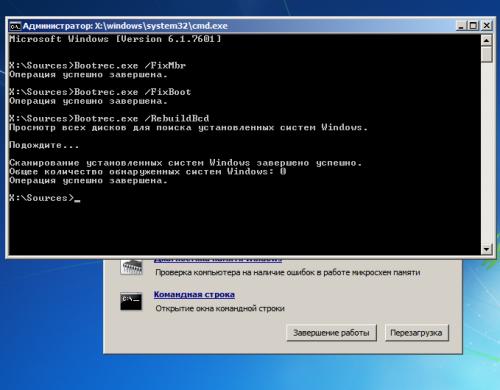
To restore the boot of several operating systems in normal mode or in case of errors with partitions, you must use the following command: Bootrec.exe / RebuildBcd:
As a result, you should get something like this report:
This article is over, I hope windows recovery 7 is described here more than enough, thanks for your attention.


