First you need to add up the initial impression of what the bootloader is. Expressing themselves in simple words We can say that the bootloader is a utility that helps Windows start immediately after the computer boots. This program called MBR and contains code for initial system startup.
Accordingly, without such code, or if it is damaged, you will encounter errors containing the word Bootmgr. This is the dispatcher that responds to Windows boot processing. All this boils down to a complete system lock, so you can’t get to the desktop and even safe mode will be unavailable.
Microsoft has prudently introduced special commands to restore the recording, which provides significant relief in resolving the problem. Besides this, there is a large number of programs with a similar effect. Both cases will be considered which will help to put things in order at system startup.
Before you begin, you should write that if Windows starts, and crashes start afterwards, then the reason is not in the MBR. Here you need to restore other files, so this instruction is not for you.
MBR recovery in a standard way
In Windows 7, restoring the bootloader is quite simple, but a prerequisite is the presence of an installation flash drive or disk with the system. Otherwise, we can’t get further than the error window. If you do not have one, use the following method.
Having found the installation disk, it is not fundamentally important that it was with your native Windows, you can use different builds. Plug in the USB or insert the disk into the computer, after that:
- Go into BIOS or UEFI using Del (or your option);
- You should find a section called “boot priority”, most likely it will only be part of the name;
- Set your drive with the system to First and restart;
How to clean windows registry 7? detailed instructions

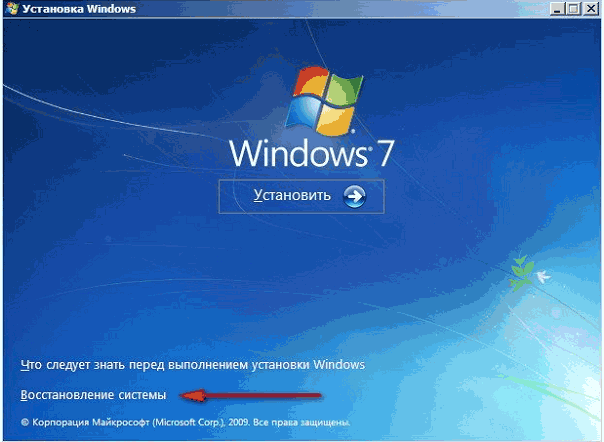
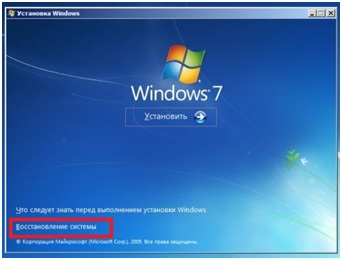
- Now you will be taken directly to the installation distribution, where you need to select the link below “System Restore”;
- Will happen windows search, and then select it;
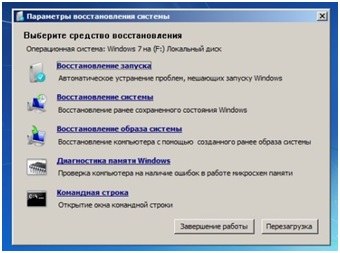
- Click "Startup Recovery". Troubleshooting will occur automatically, it doesn’t always help, but it’s very simple to use. If it helps you, no further action is required;
![]()
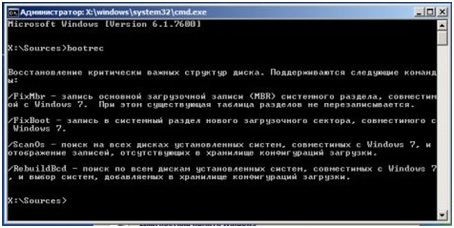
- Go back to the same section, just select "Command Prompt";
- Now make bootrec / fixmbr - allows you to write the master record for the bootloader, although it does not change the partition table;
- Insert bootrec / fixboot again - there is a high probability that you can stop and boot the system at this stage;
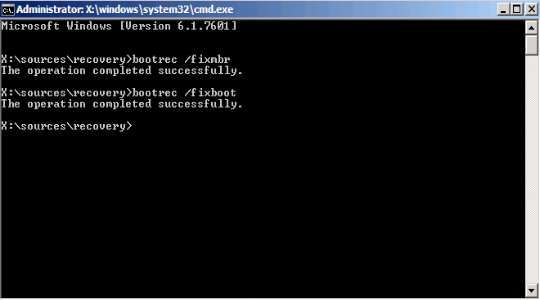
- Also control command bootrec.exe / rebuildbcd;
- An additional method when using another utility bcdboot.exe c: \\ windows.
All the above methods are already built into the system and do not require additional installation of the application, although sometimes you can not do without their help.
Bootloader recovery using software
Restore bootloader after windows installation also easy to use utilities from the side. The main advantage is that there is no need for a Windows installation disc.
You will need one of the LiveCD programs, which also needs to be burned to disk or a USB flash drive. For example, we will use a utility that has proved to be a powerful and simple tool - Hiren’s Boot CD. It includes many programs for recovering and diagnosing hardware and Windows, including for working with MBR.
Having created the media with the utility, you need:
- In the same way as in the previous method, set autorun from the media through the BIOS;
- Select "DOS Programs";
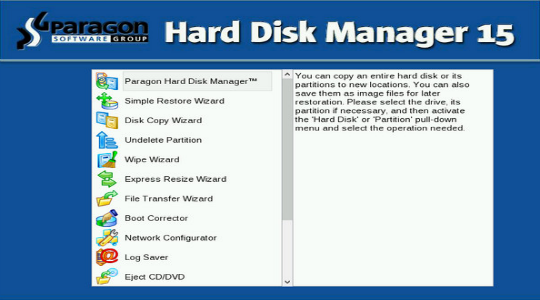
- Now find the "Disk Partition Tools", which will be "Paragon ...";
Microsoft has been improving the operating system recovery system for many years. windows systemsin both Windows 7 and Windows Vista she works practically in auto mode. If you boot from the installation windows drive 7 and click on “System Restore” (System Repair) recovery windows will be launched and will try to fix all the errors that it finds. It can fix a large number of problems, however, it is quite likely that the boot loader is damaged, and the recovery system cannot cope with this problem. In this case, you can manually restore the bootloader using the Bootrec.exe utility.
Bootrec.exe application is used to fix errors related to bootloader corruption and, as a result, inability to start operating systems Windows 7 and Windows Vista.
Sequencing
1. Configure BIOS settings so that the first boot device is a DVD drive
2. Insert the installation CD with Windows 7 and boot from it to this window:
3. Click "Repair your computer".
4. Select the operating system that you want to restore, and click "Next".
5. In the "System Restore Options" window (" System recovery Options ") select" Command Prompt ".
The interpreter window will open. command line cmd.exe, where you should enter:
Bootrec.exe
Description of Bootrec.exe utility startup keys
Bootrec.exe / FixMbr
Launched with the / FixMbr switch, the utility writes the Windows 7 and Windows Vista compatible Master Boot Record (MBR) to the system partition. Use this option to resolve issues related to damage to the main boot record, or if you want to remove a non-standard code from it. The existing partition table is not overwritten in this case.
Bootrec.exe / FixBoot
Launched with the / FixBoot switch, the utility writes a new boot sector compatible with Windows 7 and Windows Vista to the system partition. Use this option in the following cases:
1. Boot windows sector Vista or Windows 7 has been replaced by non-standard.
2. The boot sector is damaged.
3. The previous version of the Windows operating system was installed after installing Windows Vista or Windows 7. For example, if Windows XP was installed, NTLDR (Windows NT Loader, Windows NT loader) will be used, the NT 6 bootloader code (Bootmgr) will be overwritten by the installation program Windows XP
It should be noted that a similar effect can be achieved using the bootsect.exe utility, also located on the Windows 7 bootable media. To do this, you need to run bootsect.exe with the following parameters:
bootsect / NT60 SYS
The boot sector of the system partition will be overwritten with BOOTMGR compatible code. You can learn more about using bootsect.exe by running it with the / help option.
Bootrec.exe / ScanOs
Launched with the / ScanOs switch, the utility scans all disks for installed operating systems Windows Vista and Windows 7. In addition, using it displays a list of found systems that are not currently registered in the Windows Boot Configuration Data (BCD ) Store).
Bootrec.exe / RebuildBcd
Launched with this key, the utility scans all disks for installed operating systems Windows Vista or Windows 7. Found OSs are displayed in a list from which they can be added to the Windows Boot Configuration Data Store. Use this option if you want to completely rebuild the boot configuration data store. Before that, you must delete the previous storage. The set of commands can be as follows:
bcdedit / export C: \\ BCDcfg.bak
attrib -s -h -r c: \\ boot \\ bcd
del c: \\ boot \\ bcd
bootrec / RebuildBcd
In the above example, the current boot configuration repository is exported to the file C: \\ BCDcfg.bak, the system, hidden and read-only attributes are removed from it, then it is deleted with the DEL command and rebuilt with the bootrec / RebuildBcd command.
Of course, the Bootrec.exe utility is very functional, however, it will not help if, for example, a file windows bootloader bootmgr is corrupt or physically missing. In this case, you can use another utility, which is also part of the distribution windows media 7 - bcdboot.exe.
Restoring a boot environment using BCDboot.exe BCDboot.exe is a tool that is used to create or restore a boot environment located in the active system partition. The utility can also be used to transfer download files from one hard drive or section to another.
The command line in this case may look like this:
bcdboot.exe e: \\ windows
Replace e: \\ windows with the path that matches your system.
This operation will repair the damaged boot environment of Windows, including the boot data configuration store (BCD) files, including the bootmgr file mentioned above.
The syntax for the bcdboot command-line options The bcdboot.exe utility uses the following command-line options:
BCDBOOT source]
a source
Specifies the location of the Windows directory used as the source when copying boot environment files.
/ l
Optional parameter. Specifies the language of the boot environment. The default is English (United States).
/ s
Optional parameter. Specifies the drive letter of the system partition where the boot environment files will be installed. By default, the system partition specified by the BIOS firmware is used.
/ v
Optional parameter. Enables the detailed logging mode of the utility.
/ m
Optional parameter. Combines the parameters of a newly created and already existing boot record of the storage and writes them to a new boot record. If the boot loader GUID is specified, combines the boot loader object with the system template to create a boot record.
Windows 7 doesn’t always cure standard ways without using additional bootable media. The most convenient option is to use a bootable USB flash drive as the last one, which is recorded both by the OS’s own means and by third-party utilities. Also, before performing the recovery procedure, you must prepare the BIOS accordingly.
Creating a bootable Windows 7 flash drive
The easiest way to make a bootable drive is offered by Microsoft in its windows utility 7 USB / DVD Download Tool. It is downloaded from the company’s website and requires Microsoft .NET Framework 2.0 and an OS ISO image to work. To create bootable media using this utility, do the following:
This is just one way to create a USB drive to solve system problems. It can also be recorded using the UltraISO program - although paid, but with a trial period.
We use UltraISO for the boot drive
After installing and starting the program, the user will be required to take a minimum of steps to write the installation media:
Preparing a laptop or PC for use with a USB drive
Modern devices allow inexperienced users to not get into the BIOS so that they can boot from a hard drive. To do this, there is a boot menu, which is usually called with the keys F12, F10, F8, etc. (depending on the BIOS version and the manufacturer of the board) immediately after switching on. On laptops, F12 is most often used.
If this mode is not available to you, you will have to change the BIOS settings.
You can usually enter the configuration change window by pressing the Del key before booting windows. In the window that opens, you will need to select the item that may be called Boot, Boot Menu, Boot Manager, etc., and then change the boot priority from HDD to USB.
Restore Windows 7
After loading the information from the USB drive, the OS installation window will open. You can reinstall the system, but this method needs to be reserved for the most extreme case, since some or all of the user information on the disk after this may not be saved, and it will take a lot of time to reinstall. Therefore, first try to restore Windows meansthat you have:
Here are a few tools that often help to cure the system, even with very severe failures.
Startup Recovery
This tool also works in automatic mode and is often not able to provide regular work. However, often she manages to solve such malfunctions that may occur during installation previous versions OS, for example, XP as a backup along with Seven.
In this case, the MBR boot record is overwritten and the newer OS simply does not boot. After starting this utility, if a malfunction is detected, the user will see a window offering to fix it. After rebooting, the system can be started as expected.
System Restore
This item assumes that the OS configuration is returned to one of the previously saved states, i.e., it can be used to roll back to the last or earlier control points. For this:
- Open the corresponding item, after which a new window will appear. It displays the last of all the points that Windows was able to create.
- You can select an earlier one if you select the checkbox to enable the display of all points.
- Click "Next", in the next window - "Finish", after which the OS will roll back to the recovery point of your choice.
If not only boot disk, but also the image of the system that you store on a separate medium or in another section of the hard disk, you can use the option "Restore the system image". With it, you can not reinstall Windows, but deploy the image along with all the drivers, programs, etc. installed at the time of recording. To do this, you just need to specify the location of the image and the disk on which to deploy it in the appropriate windows.
MBR (in Russian - the main boot record) - a specific set of data, lines of code, a table of sections and signatures. It is required to boot the Windows operating system after turning on the computer. There are cases when, as a result of various hardware and system failures, the ICBM is damaged or erased, which makes it impossible launch windows. Similar problems are solved by restoring the boot record of the Windows 7 MBR. This article discusses several simple ways in which you can restore records.
Bit of theory
After turning on computer BIOS selects the storage medium from which the download will be carried out. At this point, the device needs to know which one hard section disk contains system files Windows MBR - a small program that is stored in the first hDD sector and points the computer to the correct partition to start the system.
If you incorrectly install the second operating system, the partition table may be damaged and the start of the first Windows will be impossible. The same thing sometimes happens during a sudden power outage. If this happens - do not despair, damaged data can be completely restored.
Boot Record Recovery
In order to restore the MBR, you will need the installation disk from which you installed Windows (or any other). If there is no disk, you can create a bootable USB flash drive with Win7. Action algorithm:
Auto Recovery
For starters, it’s worthwhile to fix MBR with Microsoft standard tools. Select "Restore Startup". Nothing more needs to be done, some time will pass, and the computer will inform you of the completion of the process. Try to start Windows. If all else fails, then it is necessary to manually restore the ICBMs.
Command line
This path requires entering a few.
- In the system recovery menu, select "Command Prompt."
- Now you need to enter "bottrec / fixmbr". This command is used to record a new MBR compatible with Win 7. The command will delete non-standard parts of the code, fix the damage, but will not affect the existing partition table.
- Next, enter “bootrec / fixboot”. This command is used to create a new boot sector for windows.
- Next up is bootrec / nt60 sys. This command will update the MBR boot code.
- Close the console, restart the computer and try to start the system. If the problem is still not resolved, you need to enter a few more commands.
- Launch the console again and enter “bootrec / Scanos” and “bootrec / rebuildbcd”. Using these utilities, the computer will scan hDD for the presence of operating systems, and then brings them to the boot menu.
- Next, enter “bootrec / nt60 sys” again and restart the computer.
TestDisk Utility
If you do not have a bootable USB flash drive or disk, you can restore the damaged record using a third-party program. To do this, you need to run another (working) OS. If your machine had only one Windows, you will have to connect the hard drive to another computer. Working with TestDisk is quite complicated, so it is recommended that you read the manuals specifically for this program.
Related entries: