
The computer does not see the flash drive .. is a fairly common problem among users of USB drives.
Or for example, "USB device is not recognized" - is it familiar?) Do not rush to give up! In more than 90% of cases, the problem is SOLVED, and now we will consider the most effective ways solutions.
How can I recover the file system and information on the hard drive?
Recovery points are created automatically every day and immediately before important system events, such as installing a program or device driver. You can also manually create a recovery point. Recovery points are saved until the reserved space on the hard drive is reserved for system recovery. As new recovery points are created, old ones are deleted. If you disable System Protection on a disk, all recovery points on this disk will be deleted.
I must say right away that in the methods considered here, the priority is only to “revive” the flash drive and its correct operation. If you need to recover data from it, or "revive" without losing data to you here - Data recovery from a flash drive.
The day of the beginning you need to make a visual analysis. Insert a USB flash drive into the "rear" port of the computer (usually the front inputs are simply not supplied with additional power, so this may be a problem), if you have a laptop, any input will do ..
Run the system file checker
When you turn on system protection, new recovery points are created. This article describes how to check system files and fix missing or corrupt system files. To do this, follow these steps.
How to view system file verification process details
This file contains information about files that were not restored using the scan tool. system files. How to manually replace a damaged system file with a known good copy. You can perform the process of checking the system file on this computer to make sure that the system file that you are going to copy is a good copy.99% of USB flash drives have an indicator (small light bulb, LED) that will light when connected to a PC. If it blinks, it means reading or writing to a USB flash drive. In any case, if the indicator works, then you are in those 90% of cases when the problem is SOLVED at home.
If the indicator does NOT work, then you fall into 10% of those cases when the problem can be solved with the help of special equipment, and, accordingly, specialists. The indicator could simply burn out, for example, at the same time as the flash drive failed. Or some chip burned out. If you find yourself in these 10%, I recommend giving the flash drive back to the seller, if there is a guarantee. If not .. there’s a lot less chance.
If you have a copy of these files, it can be restored. Well, stop worrying about your files being lost forever. Thanks to its user-friendly interface, even a new user can easily cope with the recovery process. If you need to recover files from an external storage device, connect the device to the system on which it is installed software. Then, on the main screen, select “Recover files” on the screen, select “Recover deleted files” or “Recover lost files” based on the data loss situation. Then select the drive or partition from which the files should be recovered, and click the “Next” tab. After the scan is completed, a list of recovered files is displayed. Select the files you want to save in the selected location. Launch the app. . You can choose one of two options for viewing recovered files - Display file type and View data.
So, the indicator works for us and we proceed to calculate the problem.
In any flash drive there is a certain controller, which, in short, is responsible for the correct operation of the flash drive. And he has a terrible enemy - static electricity. It is because of it that the controller crashes, as a result of which the WORKING USB flash drive is no longer working correctly.
The tool sorts the received data based on the file name, date, size and type. How to recover my files after system recovery? People often regret after losing their files due to system recovery. The most recommended and inexpensive way to avoid data loss is to simply protect the data. Well, if this shame happens and there are no backups available, this is not the end of the world. You still have a good opportunity to recover your files after system recovery.
This professional recovery software was designed to understand the internal mechanisms of the system used to save files to disk, and accurately uses these features to determine the disk space that was taken deleted file. You can use the program to recover most types of files lost after system recovery, including photos, videos, documents, compressed files and much more.
Typically, the controller is affected by static due to voltage drops, or its lack. This can also happen when the flash drive is suddenly removed from the PC. The controller’s operation is also disturbed when inserted into a PC, the system may require formatting the drive, or insert a clean one, or it may not recognize or not “see” the USB flash drive at all.
By recovering your lost files, the software in no way compromises the security of your valuable data. Step Run the program, select "Standard Mode" and select "Restore Original File". Step Select the section where you lost the files after restoring the system and starting the scan.
Step After scanning, preview and tick needed files and click Restore. Then, when they restore the system, operating system deletes all information written to disk, and ultimately loses its files. Regarding the system recovery process, other factors such as virus attacks, internal failures hard drive or system incompatibilities may result in the loss of your files. In some of these situations, file loss can be avoided, but in others this is inevitable.
Consider the first way to solve this problem.
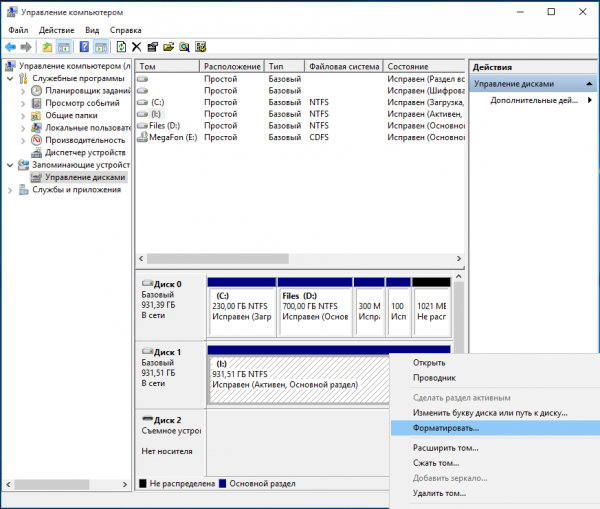
After uSB connection flash drives to the PC, open the launch, then to the control panel, then in the upper right in the "View:" select "Small Icons". Now go to the "Administration", then to "Computer Management". In the window that opens, in the left column, click on "Disk Management".
HDD RAW format: instructions for using partition management tools
Save files before system recovery. Properly protecting your files before restoring your system is the cheapest and most affordable way to avoid file loss. This way you do not have to worry about recovery lost files after system recovery. Usually this is due to system errorsincorrect operations or virus attacks. Formatting usually solves the problem.
Therefore, all available file system drivers cannot mount the system as a disk. This usually happens when the file system is damaged or damaged, usually it’s a partition table or boot sector. Do you want to format it? This volume does not contain a recognized file system. For example, when the application is still running and the computer shuts down forcibly, using a command so that the data can be saved. Power peaks when the computer loses power will shut down immediately and may damage file system. Hard drive failure due to hardware or software failure. Interruption during formatting or reformatting or the process of redistributing the hard disk.
- However, the type of system file is not indicated.
- Corrupted primary boot registry damaged partition from hard drive.
- A serious virus infection in the file system of a hard disk.
- Poor shutdown or incorrect operations.
Or easier - right-click on the "My Computer" icon, then control, and in the window that opens, in the left column, click on "Disk Management."
Here you will see a list of all drives connected to the PC at the bottom of the screen, and a list of volumes at the top. We are interested in the lower part. There you will find your flash drive. In the description you can see the type of disk, for example a removable device, as well as the size, status and type of file system. The size may not be visible, for example 0. The state is, for example, “healthy”, as well as “not distributed”. The file system is usually FAT32 or NTFS. There are others.
Returning in time is certainly one of the greatest desires of many people, especially if something very important happened in the past. What is system recovery? According to the encyclopedia, recovery is a set of actions aimed at recovering losses associated with time in the property or property. Thus, we adapt the definition to your computer so that it is easier to understand what this tool does.
The System Restore function functions as a timeline, which means that it allows you to return in case any changes, damage, crashes or malfunctions occur on your computer. This function allows you to automatically create recovery points and their, for example, all change registers or settings of your computer.
Now see what you have there. The most common option (there will be another one below): The disk is healthy, and the RAW file system. The latter means that there is no file system, or it is damaged. In this case, you should try to format the USB flash drive by calling up the parameters, right-clicking (RMB) on the blue strip of the disk, as shown below:
Therefore, if you create a recovery point on March 15, another on Day 10, one on Day 5 and another on Day 1, you can choose which point you want to return to. Your personal files, such as music, photographs, text, or anything else, “survive” during recovery until they are deleted from your computer.
However, if you need to restore your system on Tuesday and return to the last recovery point - Sunday - your video will be there because it is not part of the system files. However, if you download the player to watch the video on Sunday and you need to restore the system on Tuesday, this application will not be available. This is because it interferes with the system data on your computer, so they are erased. How to create a recovery point?
Then we set the NTFS file system, the rest is by default. If the procedure succeeds, your flash drive will work better than before :) If an error occurred and the formatting was NOT completed ..

We proceed to the second method by which the problem is solved with a probability of 99% :)
You may be wondering: “But why is this a difference?” The recovery point requires a lot of memory on your computer, so not all computers support the use of this tool. When you manually create a recovery point, all previously created points are automatically erased, because when using the manual option, the size of this point is much larger than the ones created automatically.
Summary. When file hard system the drive becomes unprocessed, access to the hard drive is not possible. However, another important thing you should do first. Do you want to format now? File names contain “strange” characters for the “Sector not found” message. Invalid media type read drive. . If this does not work, and if it has a jumper on it, try removing the jumper completely.
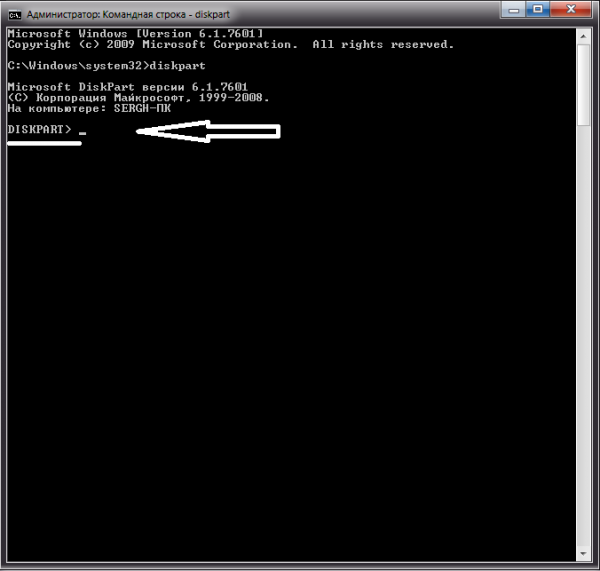
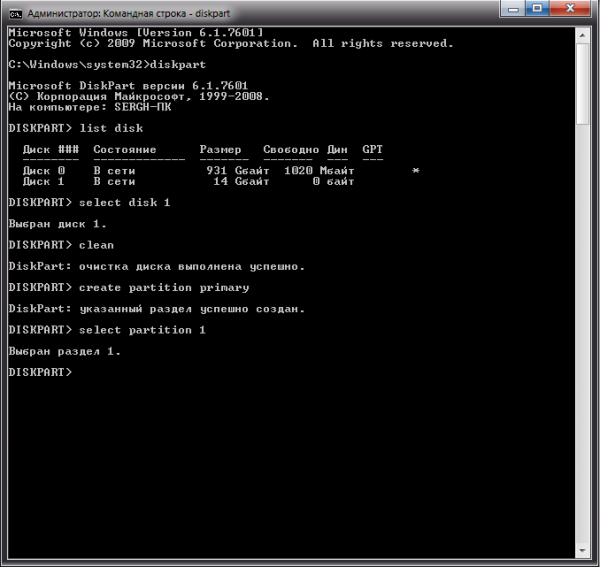
We go to start, we find there command line (you can enter m search field "com" for example, and the application will be displayed) open it as administrator.

Before us is a black window as shown in the screenshot.

If there is important data on the raw disk, formatting may result in data loss, so you should pay special attention to this point. Wait for the tool to complete the formatting process, and then hDD can be used to store previous or new data.
Why is data lost after system recovery?
This method is considered the most effective when the registry is damaged. After recovery, it will replace the damaged or changed data with registration information to perform system recovery. However, restoring a system from a previous backup system The system has a huge flaw; That is, the restored system will work according to how the system was copied. Thus, data on the change and new system partitions after backup will be lost.
We put the English language and write:
then press Enter (and later use this button after entering the command)
This command calls the built-in disk program. It has a very large functionality, it is available to ALL Windows users, and does not require installation.
Given the above, even system backup copy can quickly solve the problem of system failure; You still run the risk of losing data that was written to your system partition after the system backup has already been completed. So, how to recover data after system recovery has haunted many computer users. In fact, all lost data can be recovered, while users can find suitable data recovery software.
Why is lost data recovered after system recovery?
Disk data is managed by partition. Then, when new data is added to the section, they are added to the directory structure as an area with an indicator pointing to the data storage area. When the system is restored, the partition will be restored in the mode when back upand the pointers disappear, but the data is still on disk.
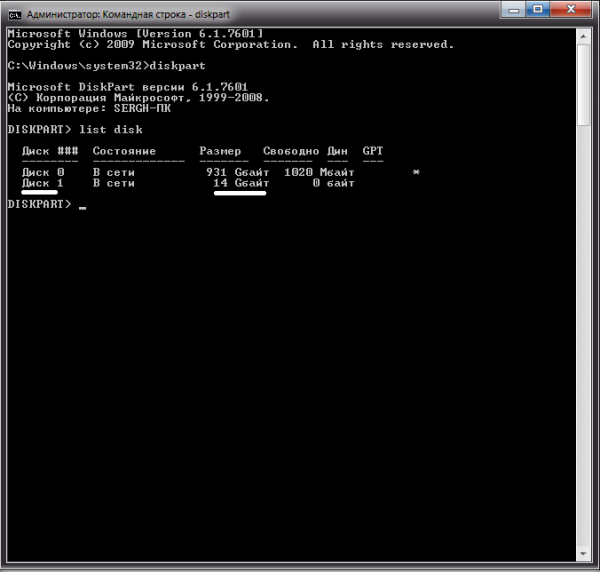
Then we need to get a list of drives connected to the PC, enter the command:
Find the drive you need, usually it can be recognized by size. In this case, this is drive 1.
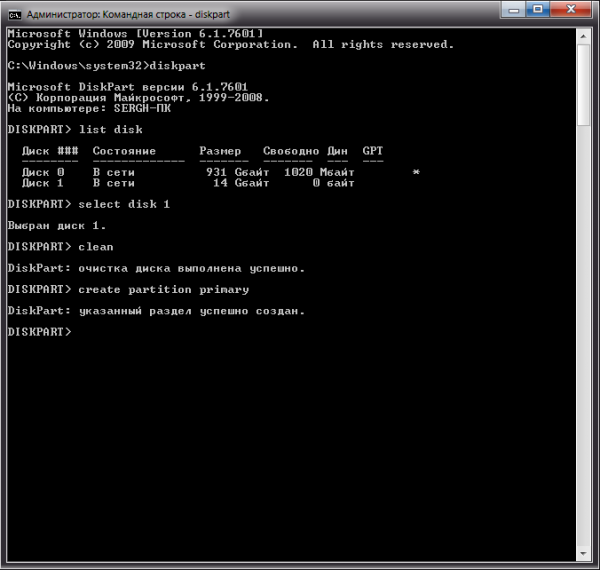
Let's enter a command that will focus the program on disk 1.

Now let's eliminate all the “misunderstandings” on the flash drive with a simple command

create partition primary
We select this section to work with it as a team
select partition 1
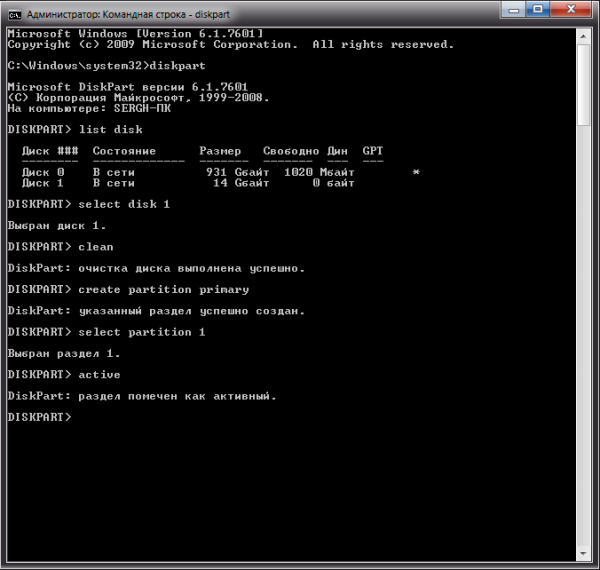
Now you need to make the section "active". Enter command
So we got to the most important thing, we need to turn RAW into NTFS. This is done by formatting. In this case, there are two ways, complete and fast. Depending on how much free time you have, choose the one you need.
Full (long) formatting is performed by the following command
Quick format:
format fs \u003d ntfs quick
Wait until 100 formatting is complete.

In conclusion, assign the flash drive its letter. To do this, enter the command
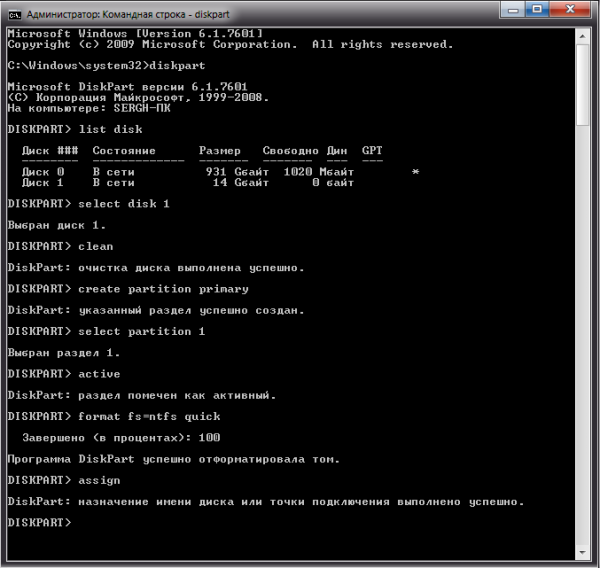
All! Now we complete the program with the team

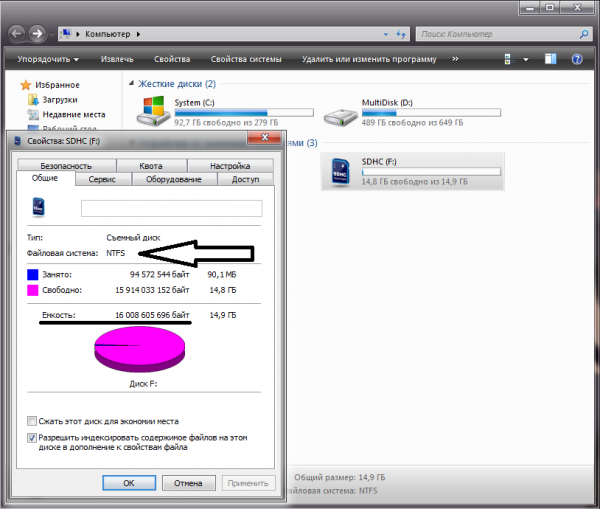
We look, the flash drive is working! 99% off! \u003d)
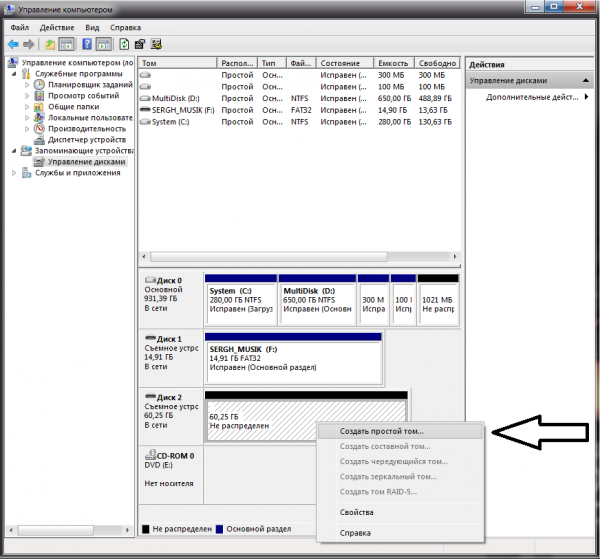
Now consider the case if in the "Computer Management" window in the "Disk Management" menu you have the following situation: The disk is not distributed, and the RAW file system, or any other. (sometimes it may not be indicated at all, you can see it below)
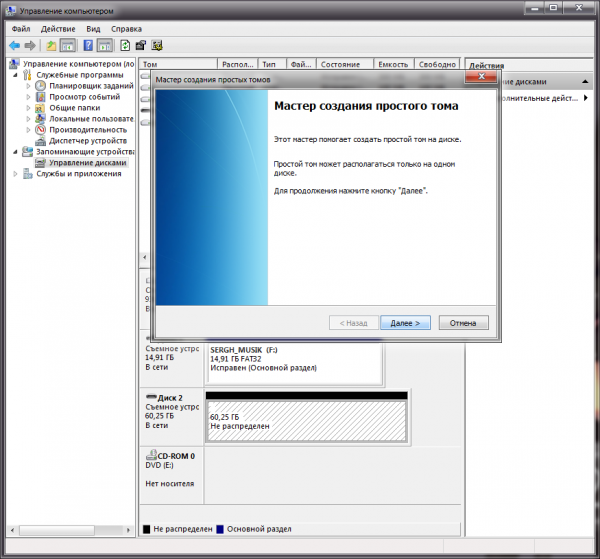
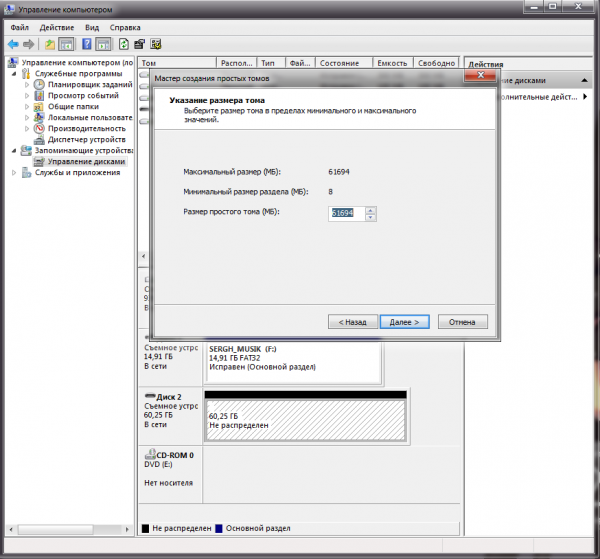
In this case, the problem is solved a little easier. You need to "create a simple volume." Do as shown in the screenshots below:

Right-click on the area where it says "Not allocated" and select "Create a simple volume."
Follow the simple instructions.
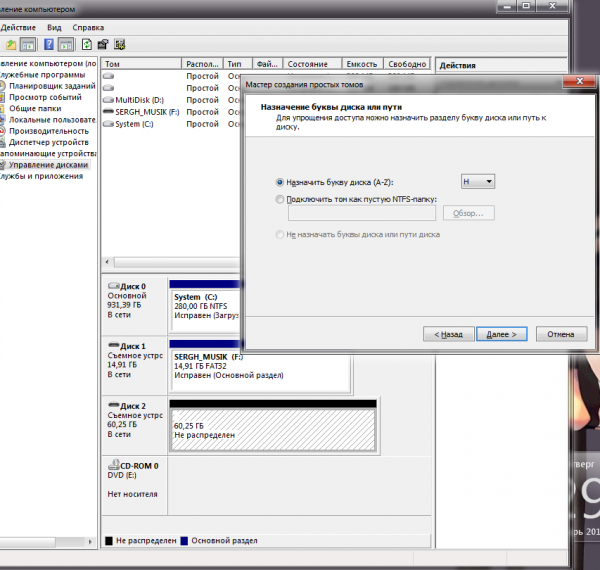
Here you need to select the file system. Specify NTFS. In the volume label we write the future name of the flash drive (be careful, not all characters are supported). There is an option not to format, but only if the file system on your flash drive is not defined as RAW.


After successful completion, the flash drive will work. If this suddenly did not help, or the formatting did not complete, use the method described above using the diskpart program.
If, after clicking the Finish button, you got an error "cannot find the specified file," then the connection between the USB flash drive and the PC is interrupted. Try pulling and inserting again, preferably in a different port. Then, in the computer control window, press F5 (update). If all is unsuccessful, then most likely you have a Chinese flash drive, which should be immediately returned to the seller, if possible.
If the disk appears in the list below, but the error pops up again and again, try the diskpart option. It is a little more complicated, but its effectiveness in most cases is 99%.
I would also like to note that any flash drive has a certain limit on recording / erasing data. Depending on the quality, this limit is from 10,000 times to 100,000 times or more.
Do not forget about the Chinese copies, which are made not of high quality. Defining is very simple. In the diskpart program that we reviewed above, the real size of the Chinese flash drive will be noticeably smaller than the stated size. But this does not always happen! More "thought-out" fakes correspond to the size, but inside, the parts are "disposable", the flash drive will be upset at the very first voltage drop, or heating. If you “revive” such a flash drive, then with a 90% probability it will be upset again for the second time of use (try recording something equal to 30% of its size on it).
And yet, the plastic from which Chinese flash drives are made (and not only flash drives) has a very specific smell, which is greatly enhanced by heating.
If you notice, in all the ways, I made file preferences nTFS system. Why? Yes, because it has many advantages! You can learn more about this in the article: NTFS for USB - drives (flash drives).
Cases are very different, if the methods described above did not help you, write me an email or below in the comments. I will try to help.
Dear readers! Please, before you leave a comment with your problem (there are already more than 80 of them), please be so kind as to state the following points in it:
Have you completely read the article? Did you have an external examination? Write down the result of the inspection, for example, "the indicator blinks when trying to write or read files, or format." Where do you stick your flash drive? Directly in motherboard (input from the back of the PC) or through the card reader? Have you tried to carry out all the same actions through another PC?
What kind of flash drive are you talking about? USB or maybe SD / microSD. What is its declared size? What size is displayed in Diskpart? Attach a normal screenshot (screenshot) where an error is visible in the Diskpart program and in the disk management menu. On the screen with Diskpart, you need the whole history of working with the program, from start to finish.
And one more important point - do you have current drivers on your PC?
Due to improper shutdown of the computer (for example, during a sudden power outage), errors made when working with applications that interfere with the file system (for example, Acronis Disc) or as a result of malware infection on the PC, the hard disk structure may be damaged. Because of this, one of its sections (or the whole) may stop working. The easiest way to get rid of the error is to run the HDD check with a standard utility. Windows CHKDSK . However, in some cases, when you try to start it, the user may see a message: CHKDSK is not valid for the RAW drive - what to do in this case will be discussed in the text below.

IN Windows drives RAW are called drives that do not have any file system. For example, if one of the utilities is deleted through one of the utilities, it will assume a RAW state. If the file system of the partition is critically damaged, it can also become RAW, since the OS will not be able to load and read the FS table.
Thus, if the disk worked normally, files were written to it freely, but now it does not open, and cHKDSK utility If he doesn’t want to fix errors on it, then there is a rather serious problem, which, in most cases, can be fixed in only one way - formatting. Further we will correct error chkdsk not valid for RAW discs.
How to restore the health of the RAW drive

If there are no important files on the partition of the hard drive that interests you, then returning it to operation will not be a problem. To do this, you need to do the following:
- Open the "Control Panel";
- Go to the section "System and Security";
- Select “Create and format.” hard sections disk ";
- In the window that opens, select the desired section;
- Make RMB on it and the menu that appears, click on "Format";
- A window will open in which you need to select NTFS in the "File System" section;
- Click “Ok” and wait for the process to complete.
- After that, you can restart the computer (although this is not necessary).
However, if important information is present on the section that has now become RAW, it will need to be restored. Therefore, you will have to wait with formatting and perform a series of actions:
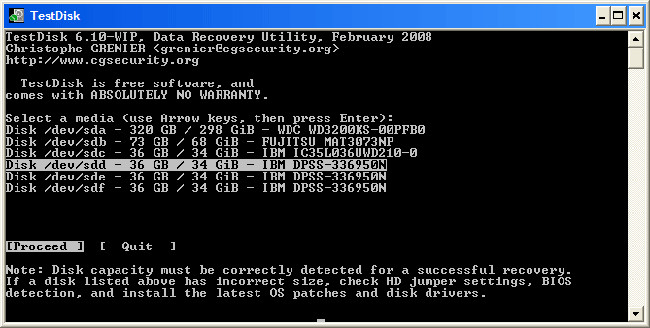
- Download TestDisk (it’s free) from the official website of the developer and unzip it to any place;
- Go to the program folder and find the file TestDisk.exe;
- In the window that opens, select the “No Log” option;
- Select the damaged disk and click on Proceed;
- After that, you will need to specify the type of disk, in our case, Intel / PC;
- Having done this, you will need to select Quick search and press P;
- After some time, a list of folders and files that the program found on the section will be displayed;


