Program Flash Tool allows each owner of a smartphone or tablet based on the MTK processor to reflash their device so that the device not only receives a new design, but also begins to work much faster.
For a complete flashing, you need
Compatible drivers for your device;
New firmware file;
Flash Tool Program.
Driver installation
In the Flash Tool, the firmware of the device is not possible without the correct installation of the driver. The Windows operating system does not always install drivers on devices with an MTK processor, the installation must be done manually. Need to download latest version drivers.
The driver can be installed by running the setup package, or you can install it manually by running the setup through Device Manager. With installation through the installer, everything is simple - you need to run it and follow the instructions.
When installing manually, through the control panel, you must perform the following steps:
Connect the device to the computer;
Find the icon in the control panel device Manager;
On an unknown device, press Update drivers.
Firmware file
The firmware must be designed for downloading through the FlashTool program.

Instruction
Install the driver for the firmware, if it has not already been installed. You can download the driver from home page site;
If the driver is installed correctly, the device should briefly appear without warning icons in the manager Windows devices when connected to a computer;
Turn off the device;
Charge the battery for Android device. The battery level must be over 50%;
Before further firmware operations, it is recommended to do data backup and firmware for your device;
You must click on running program button;
The file to be selected is located in the main folder with the firmware and ends with the extension _emmc.txt;
Select mode Download Only if you only want to flash images to the appropriate partitions, or Firmware Upgrade- full flashing with protection against loss of important data;
Many people try to figure out how to use the Flash Tool, and for most users, after the procedure, the device hangs on the logo and does not turn on;
To prevent this from happening, for the mode Download Only you need to uncheck the boxes PRELOADER and DSP_BL– for devices based on MTK processors: MT6575 and MT6577. For all other MTK-based devices in the specified mode, it is recommended to uncheck the checkbox PRELOADER;
In mode Firmware Upgrade paragraph PRELOADER must be active;
Click on the button Download;
To plug turned off android device to a computer using USB cable without the use of adapters, extension cords or hubs;
If the device is not detected, disconnect it from the computer, remove and reinsert the battery, then reconnect the device to the computer;
After the device is detected, the firmware process will begin. The process may take a long time, until the end of the firmware you can not disconnect the device from the computer;
It is necessary to expect the appearance of a green circle on the background of the program. When it appears, the device is successfully flashed;
Disconnect the device from the computer and turn it on.

Instructions for the Flash Tool will allow you to update the firmware or bring the device back to life, if before that it did not even turn on or boot beyond the logo.
Attention

You perform all actions at your own peril and risk.
In Android devices, various problems appear over time, which are fixed in the only way - by flashing the device. Doing this yourself is only a last resort, if there are no other options for solving the problem. During the firmware, complications may arise that will lead to even more damage to the device. But if you carefully read the instructions and consistently follow all the steps described, then the likelihood of new errors will be lower.
What you need to know before flashing a device
Before flashing a phone or tablet, you need to clearly understand what firmware is, in what cases it is really necessary and what risks there may be.
What does the firmware of the device give when it needs to be carried out
Device firmware is updating or rolling back the operating system of a phone or tablet to a specific version manually. When you buy a device, it already has all the necessary data for work, but sometimes it's worth intervening and changing the version or type of firmware yourself. This happens in the following cases:
- Some companies quickly forget about supporting devices, even relatively recent ones. Phones or tablets stop receiving system updates. You can check for available updates in the device settings by following the path: "About phone" - "System update". If there are no updates, read minimum requirements to the firmware you want to install, and make sure your device's internals can still support new versions of the operating system.
- Some companies install proprietary firmware on their devices or add their own innovations to the standard. The problem may arise that you do not like the zest from the manufacturer, or non-standard operating system will heavily overload the device. Most often the most common android versions work as stable and fast as possible.
- It is possible that there are folders, files and applications on your device that cannot be erased by simply pressing the "Delete" button, as they are protected by the system. One way to get rid of such items is to reflash the device, in which case all folders, files and applications will be irretrievably lost.
- You can install special versions of Android firmware from third-party developers who distribute their creations on the Internet for free. The advantage of these versions additional features and extensions. For example, the user is given the opportunity to fine-tune appearance system, access previously hidden folders.
- If you are afraid for the security of your data and do not trust companies that constantly sync their applications with your device, you can, for example, install the “Android without Google” firmware, which completely disables access to your information by applications from Google.
Possible consequences of device firmware
Installing manually new version operating system, some risks must be taken into account:
- During the firmware process, the phone or tablet may freeze or give some other errors, since each device has its own percentage of uniqueness, and it is because of it that you may experience a failure that did not occur to others. But don't be afraid, most possible errors can be corrected, this will be discussed towards the end of the article.
- If you upgrade your device to a higher firmware version, then its internals (processor, battery, etc.) may not be able to withstand the increased load. With each new version, the firmware is filled with more and more features and improvements, and the hardware of your device may not be designed for such loads. In this case, it starts to freeze or simply will not start.
- If you are installing unofficial firmware, then it may not support some processor models or conflict with them.
- Flashing the device manually will void the warranty. If after self update version of the system you will have problems, you will not be able to hand over your device to technical service under warranty.
Rules to follow when manually flashing a device
There are a few rules that you need to follow in order for the update process to be successful:
- Make sure your device battery is at least 60% charged. If the device sits down during the update, the firmware will break in the middle, and this will lead to breakdown and errors.
- Before you start flashing the device, carefully read the instructions below to make sure that all the steps are clear and understandable to you. Be sure to do this, otherwise there is a high probability that you will stall on one of the steps and will not be able to move forward.
- Follow all the preparation points that are described below.
Preparing for system firmware
Before starting the operation, you will need to prepare the following:
- Operating room computer Windows system or macOS.
- USB cable to connect computer and Android device.
- Application for firmware SP Flash Tool. Install the latest version to avoid problems. But be careful this program Only suitable for devices with MTK model chip.
- Drivers for the company that released your device.
- Suitable firmware. It should be downloaded and saved in a folder that can be easily and quickly found.
- Backup of all data stored on the device. This should be done just in case, so that if problems arise, you can roll back the process.
Backing up your data
For quick and easy creation backup data, you will need to root your device, as well as install a third-party Nandroid Backup program.
- Download the 360root application from the official website of the developer. It is necessary to obtain superuser rights.
- Launch the program on your device and press the big button in the center of the screen. Done, root-rights obtained.
- Go to Play Maket and install the Nandroid Backup app.
- The application will ask for root access, click the "Allow" button.
- Wait for the end of the backup process, it can last from two to ten minutes, depending on the amount of data.
- After the copying of information is completed, you will receive a notification that the operation was completed successfully and an indication of where the backup is stored. It must be moved to a computer or other device.
Flashing the device using the SP Flash Tool
- Launch the SP Flash Tool application. At this point, all drivers and firmware should be downloaded and unpacked.
- Specify the path to the file "MTK_txt number", which is located in the unpacked firmware folder or in the target_bin subfolder.
- We leave the program running, right-click on the "My Computer" icon and select the "Properties" section in the menu that opens.
- Go to the "Device Manager" section.
- We take the device that needs to be flashed and remove the battery from it. We insert it back, connect the device to the computer using a USB cable.
- We turn on the device. Until the moment when it is finally activated and goes into charging mode, you need to select the gadget on the computer and click the "Update Drivers" button. You will have 5-10 seconds from the moment when the computer notices the connected device, and until the moment when it starts charging it. If you do not have time to get into this gap, repeat steps 6-7 again.
- Specify the path to the file "MTK Preloader Number", which is located in the folder with the drivers, and then go through the installation process. If any warnings appear, ignore them.
- Now we return to the SP Flash Tool program and expand the Frimware menu, select the Upgrade item in it.
- We are waiting for the end of the firmware installation and we receive this message about the successfully completed process.
Video: how to flash a device using the SP Flash Tool
How to recover lost data
In the event that it is necessary to recover deleted data, we created a backup copy of the device data. To restore, perform the following steps:
- Download and install the Adb Run program. We connect the device to the computer via a USB cable.
- Run Adb Run and go to section 12.
- We select the second option - ADB Restore (specify the path to the created backup, if necessary).
- We take the device in hand and select the option "Restore data".
Possible problems with device firmware
If the device stops starting after flashing or freezes during the activation process, then it is worth flashing it again through the SP Flash Tool, while enabling the DA DL All With Check Sum function.
You may also encounter errors with the following unique numbers:
- 1003 S_COM_PORT_OPEN_FAIL - you must use another USB adapter or plug the device into another USB port;
- 1011 S_NOT_ENOUCH_STORAGE_SPACE - there is not enough memory on the device or the version of the SP Flash Tool is not up to date - update the application;
- 1013 S_COM_PORT_OPEN_FAIL - a problem with the USB cable or port, this error also appears with an outdated version of the program;
- 1022 S_UNSUPPORTED_VER_OF_DA - problems with SP Flash Tool version;
- 1040 S_UNSUPPORTED_OPERATION - wrong version of firmware or drivers;
- 3001 S_DA_EXT_RAM_ERROR - another USB cable must be used;
- 3012 NAND_FLASH_NOT_FOUND - you need to update the program or use another computer for flashing.
Also, if the SP Flash Tool does not see the device, you need to change the USB cable, update the program version, change the USB port or restart the computer.
Other ways to flash the device
There are several more ways in which you can change the firmware of your device:
- through the device settings - this method is not intended for installing a new firmware, it is needed to roll back the system to factory settings;
- through hard reset- this way you can also roll back the system, but you can choose the firmware option, you need a memory card;
- through others third party programs, if you have problems with the SP Flash Tool, there are a lot of free applications on the Internet to carry out this process.
If for some reason you want to change the model, version or type of firmware on your Android device, you can use free application SP Flash Tool after downloading the necessary firmware and drivers for your phone or tablet. Just in case, create a backup copy of the data stored in the device's memory, so as not to lose them in case of any mistake. If the SP Flash Tool does not work with your computer or device, you can use one of the other methods.
Many users of Android devices know that experiments with firmware, installation of various add-ons and fixes quite often lead to device inoperability, which can only be fixed by installing the system cleanly, and this process involves completely clearing the memory of all information. In the event that the user has taken care of creating a backup copy of important data in advance, or even better - a full backup of the system, restoring the device to the “as it was before ...” state will take a few minutes.
There are many ways to back up certain user information or a full system backup. What is the difference between these concepts, for which devices it is advisable to use one or another method, will be discussed below.
A backup copy of personal information means the preservation of data and content generated by the user during the operation of the Android device. Such information includes a list of installed applications, photos taken by the device's camera or received from other users, contacts, notes, music and video files, browser bookmarks, etc.
One of the most reliable, and most importantly simple ways save personal data contained in the Android device is to synchronize data from the device's memory with cloud storage.

Full system backup
The above methods and similar actions allow you to save the most valuable information. But when flashing devices, not only contacts, photos, etc. are often lost, because manipulations with device memory sections involve clearing them of absolutely all data. To reserve the opportunity to return to the previous state of the software and data, you only need a full backup of the system, i.e., a copy of all or certain sections of the device’s memory. In other words, a complete clone or cast of the software part is created into special files with the ability to restore the device to a previous state later. This will require certain tools and knowledge from the user, but it can guarantee the complete safety of absolutely all information.
Where to store the backup? When it comes to long-term storage, in the best possible way cloud storage will be used. When saving information using the methods described below, it is advisable to use the memory card installed in the machine. If it is not available, you can save the backup files to the internal memory of the device, but in this case, it is recommended that you immediately copy the backup files to a more reliable place, such as a PC drive, immediately after creation.
Method 1: TWRP Recovery
From the user's point of view, the easiest way to create a backup is to use a modified recovery environment for this purpose - custom recovery. The most functional among such solutions is.


Method 2: CWM Recovery + Android App ROM Manager
As in the previous method, when creating an Android firmware backup, a modified recovery environment will be used, only from another developer - the ClockworkMod team -. In general, the method is similar to using TWRP and provides no less functional results - i.e. firmware backup files. At the same time, CWM Recovery does not have the capabilities necessary for many users to manage the process of creating a backup, for example, it is impossible to select individual partitions for creating a backup. But the developers offer their users a good ROM Manager Android application, using the functions of which, you can start creating a backup directly from the operating system.


Method 3: Titanium Backup Android App
Program Titanium Backup is a very powerful yet fairly easy to use system backup tool. With the help of the tool, you can save all installed applications and their data, as well as user information, including contacts, call logs, sms, mms, dots WI-FI access and other.

The advantages include the possibility of a wide range of settings. For example, a choice of applications is available, which and whose data will be saved. To create a full backup of Titanium Backup, you must provide root rights, that is, for those devices on which Superuser rights have not been obtained, the method is not applicable.

It is highly desirable to take care of a reliable place to save the created backups in advance. Inner memory smartphone cannot be considered as such, it is recommended to use a PC disk for storing backups, cloud storage Or in extreme cases, the microSD card of the device.
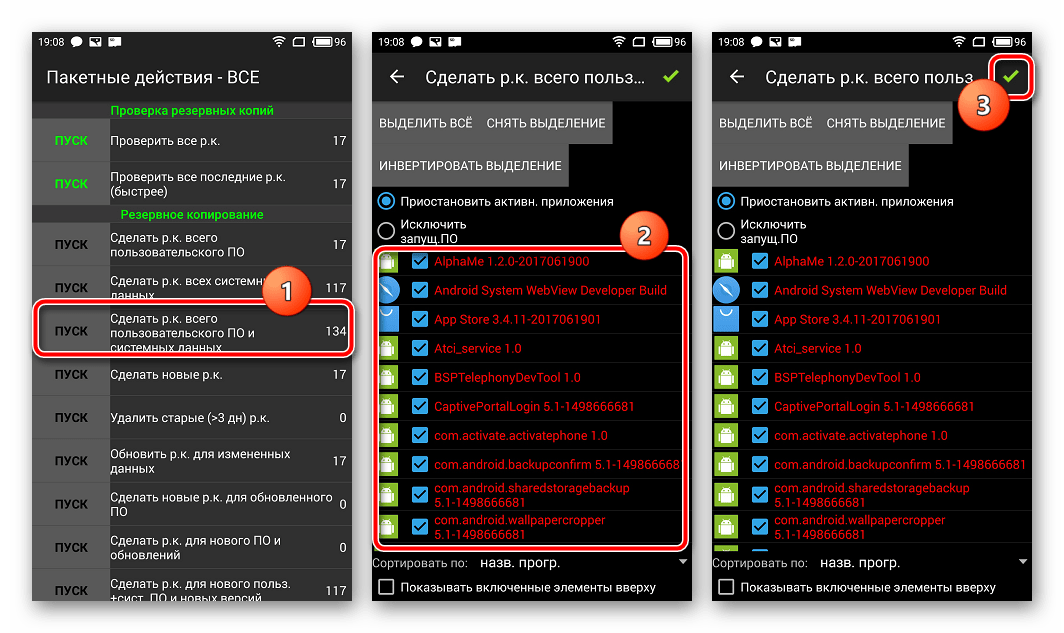
- Install and run Titanium Backup.
- At the top of the program there is a tab "Backups", let's go to it.
- After opening the tab "Backups", you need to call the menu "Batch Actions" by clicking on the button with the image of a document with a checkmark located in the upper corner of the application screen. Or press the touch button "Menu" under the device screen and select the appropriate item.
- Next, press the button "START" located next to the option “Make r.k. all user software and system data".A screen appears with a list of applications to be backed up. Since a full backup of the system is being created, nothing needs to be changed here, you need to confirm that you are ready to start the process by clicking on the green checkmark located in the upper right corner of the screen.
- The process of copying applications and data will begin, accompanied by the display of information about the current progress and the name of the software component, which is saved in this moment time. By the way, the application can be minimized and continue using the device in normal mode, but, in order to avoid failures, it is better not to do this and wait until the copy is created, the process is quite fast.
- At the end of the process, a tab opens. "Backups". You may notice that the icons to the right of the app names have changed. Now these are peculiar emoticons of different colors, and under each name of the software component there is an inscription indicating that a backup copy has been created with the date.
- Backup files are stored at the path specified in the program settings.

To avoid loss of information, for example, when formatting the memory before installing the system software, you should copy the backup folder to at least a memory card. This action can be done with any file manager for android. A good solution for carrying out operations with files stored in the memory of Android devices is.


Additionally
In addition to the usual copying of the backup folder created using Titanium Backup to a safe place, in order to reinsure against data loss, you can configure the tool so that copies are created immediately on the MicroSD card.


Method 4: SP FlashTool+MTK DroidTools
Using applications is one of the most functional ways that allows you to create a truly complete backup of all sections of the memory of an Android device. Another advantage of the method is the optional presence of root rights on the device. The method is applicable only for devices built on the Mediatek hardware platform, with the exception of 64-bit processors.
- To create a full copy of the firmware using SP FlashTools and MTK DroidTools, in addition to the applications themselves, you will need installed ADB drivers, drivers for the MediaTek boot mode, as well as an application (you can also use, but regular Notepad will not work). Download everything you need and unpack the archives into a separate folder on the C: drive.
- Turn on the device mode "USB Debugging" and connect it to the PC. For enabling debugging,
mode is activated first "For developers". To do this, we follow the path "Settings" — "About device"- and tap five times on the item "build number".
Then in the menu that opens "For developers" activate using the switch or checkmark the item "Allow USB Debugging", and when connecting the device to a PC, we confirm the permission to conduct operations with using ADB.

- Next, you need to run MTK DroidTools, wait for the device to be detected in the program and press the button "Map of Blocks".
- The previous manipulations are the steps that precede the creation of the scatter file. To do this, in the window that opens, click the button "Create scatter file".
- The next step is to determine the address that SP FlashTools will need to specify when determining the range of blocks in the reader's memory. Open the scatter file obtained in the previous step in Notepad++ and find the line partition_name: CACHE: , under which a line with the linear_start_addr parameter is located just below. The value of this parameter (highlighted in yellow in the screenshot) must be written or copied to the clipboard.
- Direct reading of data from the device's memory and saving them to a file is carried out using the SP FlashTools program. Launch the application and go to the tab Readback. The smartphone or tablet must be disconnected from the PC. We press the button Add.
- There is only one line in the window that opens. Double click on it to set the reading range. Select the path where the future memory dump file will be saved. The file name is best left unchanged.
- After specifying the save path, a small window will open, in the field Length: which you need to enter the value of the linear_start_addr parameter obtained in step 5 of this instruction. After entering the address, press the button "OK".

We press the button "Read Back" tab of the same name in SP FlashTools and connect the switched off (!) device to the USB port.
- In the event that the user took care of installing the drivers in advance, SP FlashTools will automatically detect the device and begin the reading process, as evidenced by the filling of the blue progress bar.
Upon completion of the procedure, a window is displayed "Readback OK" with a green circle, inside which is a confirmation checkmark.
- The result of the previous steps is the file ROM_0, which is a complete dump of the internal flash memory. In order to make it possible to carry out further manipulations with such data, in particular, upload firmware to the device, several more operations are needed using MTK DroidTools.
We turn on the device, boot into Android, check that "USB Debugging" turned on and connect the device to USB. Launch MTK DroidTools and go to the tab root, backup, recovery. Need a button here "Make a backup from the ROM_ flash drive", press it. Open the file obtained in step 9 ROM_0. - Immediately after pressing the button "Open" the process of splitting the dump file into separate partition images and other data needed for recovery will begin. Process progress data is displayed in the log area.

When the procedure for dividing a dump into separate files complete, the inscription will be displayed in the log field "mission completed". This completes the work, you can close the application window.
- The result of the program's operation is a folder with image files of the device's memory sections - this is our backup copy of the system.


And choose the way to save the scatter.


Method 5: System backup using ADB
If it is impossible to use other methods or for other reasons, to create a complete copy of the memory sections of almost any Android device, you can use the OS developers toolkit - the Android SDK component -. In general, ADB provides all the possibilities for carrying out the procedure, you only need root rights on the device.
It should be noted that the method under consideration is quite laborious, and also requires the user to have a fairly high level of knowledge of ADB console commands. To facilitate the process and automate the introduction of commands, you can turn to a wonderful shell application, this automates the process of entering commands and saves a lot of time.
- The preparatory procedures consist in obtaining root rights on the device, enabling USB debugging, connecting the device to the USB port, installing ADB drivers. Next, download, install and run the ADB Run application. After the above is done, you can proceed to the procedure for creating partition backups.
- We launch ADB Run and check that the device is detected by the system in the desired mode. Item 1 of the main menu - "Device attached?", in the drop-down list we produce similar actions, select item 1 again.

A positive answer to the question of whether the device is connected in ADB mode is the response of ADB Run to the previous commands in the form of a serial number.
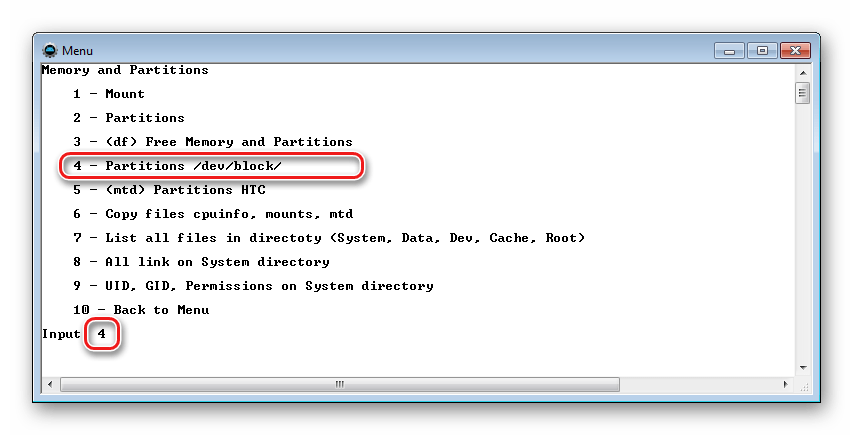
- For further manipulations, it is necessary to have a list of memory sections, as well as information about which “disks” - /dev/block/ partitions have been mounted. Using ADB Run, getting such a list is pretty easy. Go to the section "Memory and Partitions"(item 10 in the main menu of the application).
- In the menu that opens, select item 4 - "Partitions /dev/block/".
- A list is opened with a list of methods that will attempt to read the required data. Let's try each item in order.

If the method fails, the following message is displayed:

Execution will have to continue until the full list of partitions and /dev/block/ appears:

The received data must be saved in any way possible, automatic function Saving in ADB Run is not provided. The most convenient way to fix the displayed information is to create a screenshot of the window with a list of sections.


After we have downloaded everything you need, you can, for example, create an Android folder in the root and expand the unpacked contents of the archives into folders, i.e. drivers to the Drivers folder, Platform Tools to a separate folder, SP Flash Tool to a separate folder, MTK Droid Tools to a separate folder too.
Next, enable Developer Mode on your device and activate USB debugging. Those. first go to Settings -> About phone (About device) and click several times (5-7) on the inscription "Build number", until a message appears that Developer Mode is activated. Next, go to the menu Settings -> For developers and put a tick on "Debugging via USB":
After that, we connect the device to the PC and install the ADB drivers (that is, either by running AdbDriverInstaller.exe from the archive, or by opening the device manager and manually specifying the path to the drivers in the Android ADB driver x64 folder for an unknown device). The result should look like this (Device Manager):

The Android ADB Interface device in Device Manager confirms that we are all set for the next step.

We wait until the device is detected in it and press the "Map of blocks" button:

After that, click the "Create scatter file" button and save the resulting file (for me it was called MT6582_Android_scatter.txt) to disk. At this stage of preparation is completed and you can proceed directly to reading the data.
Open the resulting file in Notepad ++ or Word (note that a regular notepad will not work) and find the line partition_name: CACHE in it:

And remember what you have written in the linear_start_addr column, in this case it is 0x3E900000.
We disconnect the phone from the PC and turn it off, i.e. hold the power button and select "Power off" in the menu, you can also disconnect and insert the battery. Next, run the SP Flash Tool and go to the Readback tab in it. Next, click the Add button. As a result, one row will appear in the table:

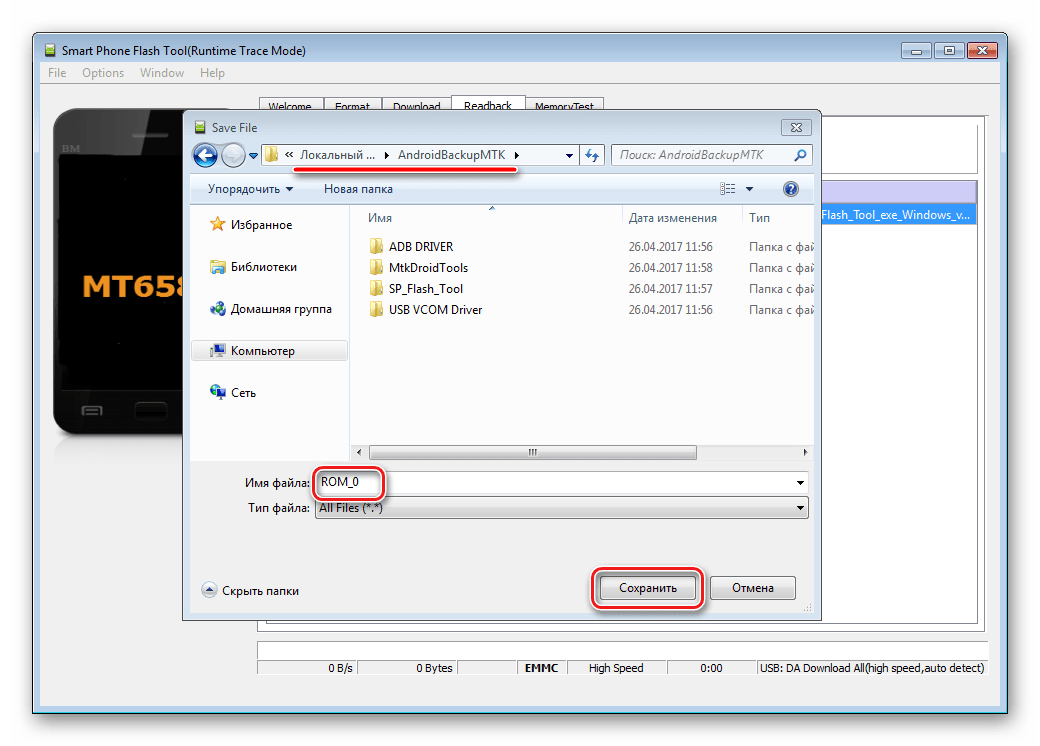
We click on it, we are prompted to select the location to save the ROM_0 file, select the folder where we want to save it and on the next screen in the Length field enter the number we remembered earlier (linear_start_addr):

The end result should be something like this:

Then we connect the switched off phone (!) To the PC. At this point, it is advisable to open Device Manager. So far, we do not press any buttons in the SP Flash Tool on this screen!
At the time of connection, you will determine unknown device MT65xx PreLoader and the OS will prompt you to install drivers for it. The picture below clearly shows this. It is better to open the device manager immediately before connecting the phone in order to “catch” the moment the MT65xx PreLoader appears. If the device appears, and the OS does not offer to automatically install the drivers, then this must be done manually by right-clicking on the MT65xx PreLoader device.

We select "Search for drivers on this computer" and specify the folder in which the unpacked contents of the mtk_xp_vista_7_8_x32_x64.zip archive are located (that is, by this time you should unpack the archive somewhere). After the drivers are successfully installed, the picture in the device manager should change to this:

If the drivers are installed, you can proceed to the next step. Please note that when you connect the phone, the Preloader USB VCOM Port may appear for only a few seconds - this is normal, our task at this stage is to install the phone drivers so that it is identified exactly as the Preloader USB VCOM Port, and not the unknown device MT65xx PreLoader. If you suddenly did not have time to install the drivers, and the phone turned on, we take out the battery, disconnect the phone, insert the battery, connect the phone and repeat the procedure.
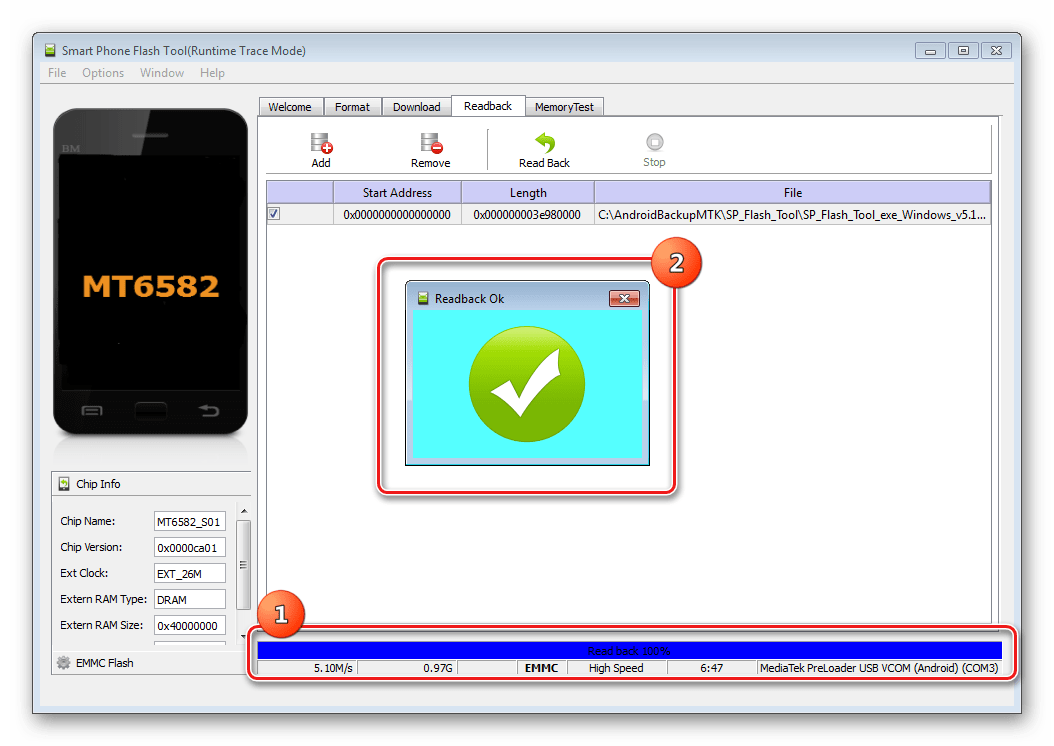
As soon as we are convinced that the drivers are installed, we disconnect the phone from the PC. We turn it off, in the open SP Flash Tool we press the Readback button and connect the switched off phone to the PC. After that, we will start the process of reading the firmware from the phone:

Many write about the difficulties that arise precisely at this step. I'll try to explain a little more. After you press the Readback button - SP Flash Tool goes into standby mode for connecting the phone, i.e. it is assumed that before that you managed to catch the moment when your turned off phone is defined as MT65xx PreLoader and install drivers on it so that you have Preloader USB VCOM Port in COM ports. If suddenly, for some reason, the SP Flash Tool wrote about an error, or the phone did not have time to connect, the following method can help (everything described is true only if you installed the drivers correctly and when you connect the phone you get exactly the Preloader USB VCOM Port): disconnect the phone from the PC, remove the battery, press the Readback button, connect the phone with the battery pulled out. A red bar (Download) will go to the SP Flash Tool, during this time we quickly insert the battery back, if we have time, then a blue Readback bar with percentages will go, as in the picture:

We wait until the process is completed. Creating a backup can take 10-15 minutes. We just look at the running interest and do not touch anything 😉 At the end of the reading procedure, you will see the inscription Readback Ok:

While we are doing Backup, it's time to explain what a scatter file is and what the ROM_0 file is, which we will get at the output. The phone's memory is a regular EMMC Flash, which is divided into certain sections. A scatter file is a section description file (for example, Scatter has sections PRELOADER, RECOVERY, LOGO, ANDROID, etc.). The purpose of partitions is different, for example, in Recovery - contains recovery image, in logo - the logo used when the system boots, in Android - the system image, etc. The ROM_0 file that we get as output is essentially a solid EMMC Flash dump in one file. But in order to use the received firmware backup, for example, to restore another similar device, we will still need to split it into sections. Here I will describe several ways how to do it. The first and most common is through MTK Droid Tools. Let's say we already have a ROM_0 file made with the SP Flash Tool.
We turn on the power of the device (phone) and let it boot, after which we restart MTK Droid Tools (the USB debugging mode on the phone, of course, must be enabled, and the ADB drivers are installed on the PC), go to the root, backup, recovery tab and click the "Create backup from ROM_ flash drive" button:

We select the ROM_0 we got at the previous step and in the log window we see something like the following:
- Save folder on the computer: E:\Android\MtkDroidTools\backups\KINGSING_S1_141117_ForFlashtoolFromReadBack_150512-005322\
— scatter is saved in the file:
E:\Work\Megaphone Login Plus\MtkDroidTools\backups\KINGSING_S1_141117_ForFlashtoolFromReadBack_150512-005322\MT6582_Android_scatter.txtCopy completed
- preloader.bin ... copied ... cut OK
- MBR ...copied
- EBR1 ...copied
- pro_info ...copied
- nvram.bin ...copied
- protect_f ...copied
- protect_s ...copied
- seccfg ...copied
- uboot.bin ...copied
- boot.img ... copied
…
Well, etc. Now in the save folder, I have this E:\Android\MtkDroidTools\backups\ we have a folder with a full backup of our firmware, divided into sections (i.e. each section in a separate file):

This completes the process of creating a backup of the firmware. If you just wanted to learn how to backup firmware using the SP Flash Tool and you succeeded, you can not read further.
For advanced
But what if MTK Droid Tools "does not see" the phone? Or is it impossible to create a scatter file or split the resulting ROM_0 file into sections? How to get a partition map and is it possible to "cut" the ROM_0 file manually? There is such a possibility. To get a partition map on MTK 65xx, you need to give a command in the ADB console - i.e. run adb shell in the console and type this command there:

If suddenly the phone for some reason is not seen through ADB (in this case, I advise you to read the ADB manual, there may be a problem in the VEN_ID of the device and you just need to register it in %USERPROFILE%\.android\adb_usb.ini, then the same command can be given in the phone itself by installing Terminal Emulator for Android from Google Play:

As you can see, the result is exactly the same and the linear_start_address of the cache section can be taken from here. Yes, by the way, in new devices, for example, based on MTK 6752, such as Beeline Pro, ZTE Q Lux, etc. The partition map can be obtained with cat /proc/partinfo. MTK Droid Tools does not work with these devices at all.
We now have a method for obtaining the start address of the cache partition, which is needed to obtain ROM_0 using the SP Flash Tool. We also know the addresses (offsets) and sizes of each of the partitions. Those. to "cut" ROM_0 into sections - we do not need to use MTK Droid Tools at all. This can be done "by hand" in any Hex editor that supports the function of selecting and saving a block to a file (I use the console HIEW). Well, as an example, let's "cut" the Recovery partition from the resulting ROM_0 file.
We know (from scatter or dumchar_info) its linear_start_addr: 0x4180000 and partition_size: 0x1000000. Open ROM_0 in HIEW and navigate to 0x4180000. Those. in the console we do hiew32 ROM_0, then press F5 and drive in the address of the beginning of the partition - 4180000:

As you can see, at 4180000 we have the ANDROID! signature, which tells us that we are on the right track 😉 The address of the end of the partition is calculated as linear_start_addr+partition_size-1 = 0x517FFFF in our case. Press in HIEW * (asterisk on the additional keyboard) to start highlighting the block (if you move the up / down / right / left arrows, we see how the block starts to be highlighted) and either go down to 0x517FFFF, or do it through F5:

And we finish the selection of the block, again through the “gray” * (on the additional keyboard). After that, press F2 - Put block (saving the block to a file):

AND recovery partition we have recorded. In the same way, you can cut any other partition from ROM_0. As you understand, we do not need the MTK Droid Tool at all.
To simplify the procedure, you can also write a script / program that will do this automatically for all sections, but to be honest, I don’t have enough time for this, and this task doesn’t arise so often, so HIEW is enough for me for these purposes.
p.s. That's all for now ... the post turned out to be a "draft version", because It was written in a hurry, maybe later I will supplement it if there are any incomprehensible moments. And of course, as always, I will be happy to hear your comments and questions...
p.p.s. As they managed to correct me a little, /proc/dumchar_info does not contain linear_start_addr from scatter, but physical_start_addr. Those. in the above example for the partition with recovery we have:
linear_start_addr: 0x4180000
physical_start_addr: 0x2D80000
partition_size: 0x1000000
And in /proc/dumchar_info we see exactly the physical_start_addr in the StartAddr column. But if we look at the size of the first section (preloader), it becomes clear how to translate physical_start_addr into linear_start_addr, if we add 0x1400000 to 0x2D80000 (this is just the size of the preloader), then it just turns out 0x4180000.
FlashTool is a powerful tool for flashing smartphones based on MediaTek chipset. With this application, you can either install a newer version of the operating system on your device, or completely replace it with a custom one (modified by third-party developers).
However, this whole process comes with a certain risk, and one wrong step can lead to the fact that your smartphone will turn into a useless "brick". To prevent this from happening, carefully read this article. From it you will learn how to flash through FlashTool correctly and not risk your phone in vain.
Determine the processor model
As mentioned earlier, FlashTool only works with MediaTek based devices. In view of this feature, it is important to make sure that your smartphone is equipped with the processor of this manufacturer, otherwise the firmware program may not interact with it correctly. This, in turn, is fraught with serious consequences.

To determine the processor model, you will need a special application - CPU-Z. It can be downloaded for free from Play market, so this process should not cause you any difficulties. After you download and install the program, do the following:
- Launch CPU-Z on your smartphone.
- Wait a few minutes while the program collects device information.
- Go to the SOC tab and pay attention to the very top line. This is where your processor model will be displayed.
If the above line says MediaTek, then your smartphone is suitable for working with the program. But still, before flashing through FlashTool, you need to do a few more important actions. They will be discussed below.
Preparation
It is important to know that flashing a smartphone will cause it to return to its factory settings. In other words, all information stored on the device will be deleted and it will be impossible to restore it. To prevent this from becoming a nuisance for you, do the following:
- Save all contacts from phone book. They can be transferred to a computer using special programs or sync with your Google account.
- Copy all important photos, documents and videos to your computer.
- Check if there is any left in the SMS important information(passwords from payment systems, bank codes, etc.). If there is one, then it is better to rewrite it.
- Check the calendar for significant dates.
- If you have left setup files some rare programs, you can copy them to your computer before flashing through FlashTool.
Do not neglect these simple tips, because they will help you save time and nerves. It is better to go through all the points several times, and only after that proceed with the firmware.
Operating system setup
Before flashing "Android" through FlashTool, you need to set some operating system settings. The fact is that Windows does not perceive smartphone drivers very adequately, so it is necessary to cancel the verification of digital signatures. This is done like this:
- Run command line(Administrator).
- Write command gpedit.msc for 32-bit OS or C:\Windows\SysWOW64\gpedit.msc for 64-bit OS. Press Enter.
- The Editor will open in front of you. group policy". Here you need to select "User Configuration", then "Administrative Templates", and then "System".
- Now click "Install Driver", and then select "Digital Signature".
- In the window that opens, select "Disable".
- Click "OK" and confirm the changes made.

Now the operating system will not "swear" at the smartphone driver, and the firmware program will be able to work normally.
Installing smartphone drivers
At this stage, you need to download and install the driver for your device, which will allow it to interact normally with your computer. You should look for it in these places:
- First of all, you need to look for the driver on the website of the manufacturer of your device. This way you will be sure that you do not catch a computer virus.
- Sometimes the driver can be found on the disk that comes with some phone models. If so, then you need to insert the CD into your computer drive and follow the prompts.
- In the event that the above two methods do not suit you, you can search for a driver on thematic forums. Keep in mind that in this way you risk the security of not only your phone, but also your computer. Therefore, be sure to check all downloaded files for viruses before installing them.
After you find the driver, you should download and install it. This is done by double clicking on the archive and should not cause any difficulties. But sometimes problems still arise, so such cases should be given special attention.
Problems installing drivers
It often happens that the driver does not want to be installed in any. In fact, there is nothing wrong with this, and the problem is solved quite simply. Namely:
- Disconnect the data cable from the computer and phone.
- Turn off your smartphone and remove the battery from it. You can leave the memory card and SIM card in place.
- Open Device Manager on your PC.
- Place the driver files anywhere you like.
- Without inserting the battery, connect your phone to your computer and get ready.
- Literally for a few seconds, a new device will appear in the manager. You need to have time to click on it with the right mouse button and select the line "Update driver".
- Now just specify the path to the driver files and wait for the installation process to finish.

If you did not manage to update the phone driver in time and the device disappeared from the manager, you need to repeat the whole procedure again, starting from step 5.
Firmware search
Now it's time to find and download the firmware that you will install on your smartphone. Here you have two options: use official software or custom. In the first case, just go to the website of the phone manufacturer and find Last update for your model. But if you decide to use custom firmware, then you should follow a few simple rules:
- Make sure that the selected firmware is suitable for your smartphone model. Failure to comply with this condition is fraught with serious problems, up to turning the phone into a "dead" piece of plastic.
- Download files only from reputable sites and forums. In this case, even if some problem arises, you can count on the help of software developers.
- Carefully study the reviews about the firmware left by other users. It’s better not to take risks if there are many negative ones among them.
- Make sure that the smartphone firmware you have installed is older than the one you are going to download.
Remember, following these simple rules, you will protect your phone from unnecessary damage.
Create a backup
Most users have no problems during flashing and the whole process runs smoothly. But still, it is better to prepare in advance for unforeseen situations, because no one is immune from them. To do this, you need to create a backup copy of the system files of the smartphone before flashing through FlashTool. For this:
- Connect your phone to your computer.
- Select a read speed.
- Specify the NOR read type.
- Go to the Read back tab and click Add. Create a backup file by giving it any name. After that click Save.
- A window will appear in front of you, in which you should specify the size of the data to be read in the Length field. First, try entering the value 0x01000000, and if it does not work, then 0x02000000.
- Disconnect your phone from the cable and turn it off. Remove the battery, put it back in, and then reconnect the smartphone to the data cable (not included).
- Press and immediately release the smartphone's power button.

If you did everything correctly, the backup process will begin. Be sure to wait for it to finish.
Device firmware
If you have thought everything over and prepared, then you have no choice but to flash through FlashTool. The instruction for this procedure, in fact, is not so complicated, and it looks like this:
- Launch FalshTool and click Scatter-loading.
- Specify the path to the MTxxxx_Android_scatter_emmc.txt file (instead of "xxxx" there will be numbers corresponding to the processor model of your device). Click "Open".
- Be sure to check the box DA DL All With Check Sum. Otherwise, you risk "killing" your smartphone.
- Press the Firmware-Upgrade button and connect the switched off phone.
- Multi-colored loading bars will appear at the bottom of the main menu of the program.
- As soon as the firmware process is completed, a green circle will appear on the screen, indicating a successful operation.
Now you can disconnect your smartphone from the data cable and use it. Keep in mind that turning on your phone for the first time can sometimes take a long time, so don't worry if you have this situation.

By the way, if you do not know through FlashTool, then you can use the same instructions. It is equally valid for all Android devices.
Firmware for Chinese phones
How to flash a Chinese phone using FlashTool? It is also possible to do this, but this procedure is somewhat different from the standard one, it will be considered separately. It is important to know the following here:
- Never press the Memory Test button in Flash Tool. For some reason Chinese phones respond inappropriately to this operation, and it may happen that the firmware is erased without the possibility of recovery.
- Carefully study the information about the firmware on the site from which you download it. It is possible that it contains bugs that can cause you serious problems.
- Do not try to install firmware from another device on your smartphone. So you risk ruining it, and it’s not a fact that you will be able to return the phone to working condition.
Also, if you are not confident in your abilities, it is better to contact the nearest service center. Chinese smartphones are very specific, so let the experts deal with them.
Actions after firmware
After the firmware of your phone is completed, you need to perform a few more simple steps:
- Don't forget to set the current time and date.
- Link your device to your Google account. This is especially useful if you have synced your phone book with it.
- It will be better if you format the memory card. They can stay on it system files from the previous firmware, which do nothing useful, but only take up free space.

That's basically it. Now you can enjoy new firmware which will surely make your smartphone work in a new way.


