How to recover damaged files in Windows XP:
There are times when you need to restore corrupted or deleted Windows XP system files. System files have every chance of being deleted, corrupted, or replaced by infected files as a result of, for example, exposure to viruses. Defect cases are frequent system files when the computer is turned off incorrectly (as an option, when the lights are turned off) due to errors in the file system.
Below you will get the answer to the question: How to recover damaged system files without reinstalling the Operating System.
The method is suitable for those cases when it is known which system files will need to be returned directly.
If the PC stops loading after an incorrect shutdown (power outage, shutdown with a button, pulling out the power cord from the outlet), first check hDD the presence of logical errors.
The recovery process is to copy from the installation windows drive XP required system files. The Windows distribution has all the system files. They are located in the I386 folder. All needed files on the installation disk are written in compressed form and have the extension of the form .dl_ .ex_, etc. .. That is the last character is replaced by an underscore.
We will need to unpack the files deleted from the system with installation disk Windows to the folder where they should be present. If you do not have a windows distribution, you can download archive with I386 folder for 32 bit windows versions XP.
To return system files, you must boot from a bootable CD, for example ERD Commander. . You can burn a disc image using free program ISO burner (you can download this link)
Let us consider how to unzip system files from the Windows installation disk using the example of recovering the file C: \\ Windows \\ System32 \\ userinit.exe, which is often replaced by banners blocking Windows. The process of recovering damaged system files from the installation disk is basically the same for other files. It is true to know the main thing in which folder a particular file must be located.
Boot from disk ERD Commander . Choose download ERD Commander 5.0 for Windows XP . In the window that appears at the end of the download, select the path to the installed Windows OS and click OK.
Open My Computer. We insert installation CD of Windows. From the I386 folder, copy the required system files with the extension dl_ or ex_ to the folder where they should be present in the installed system. For us, this is the USERINIT.EX_ file. Copy USERINIT.EX_ from the I386 folder to the C: \\ Windows \\ System32 \\ folder. To achieve the desired result, right-click on the USERINIT.EX_ file and select in the context menu Copy to.
In the window that appears, select the path C: \\ Windows \\ System32 and click OK.

After the file is copied to the system folder, you will need to unzip it. Unpacking system files with the extension dl_ or ex_ from the Windows installation disc is performed using the expand command.
Command syntax: expand [source file] [target file]
To execute the command, you will need to run the command line. In the Start menu, select Run. In the window that appears, enter the cmd command and press Enter.
In the command window, enter the command to unpack our file: expand c: \\ windows \\ system32 \\ userinit.ex_ c: \\ windows \\ system32 \\ userinit.exe and press Enter.
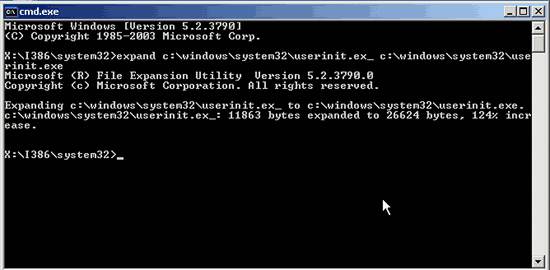
The unpacking will be carried out, as the text says: "c: \\ windows \\ system32 \\ userinit.ex_: 11863 bytes expanded to 26624 bytes". System file recovery was successful. Now you can restart the PC.
Any other Windows system file is restored in the same way.
How to repair corrupted Windows 7 system files without reinstalling the system.
Now consider how to restore system files in Windows 7.
We boot from the "ERD-Commander" disk (in the menu on the disk at boot, you must select the version for Windows 7) Disk image.
In the network settings window, select "Skip", and confirm the reassignment of disks. Next, select the path to windows system folder.
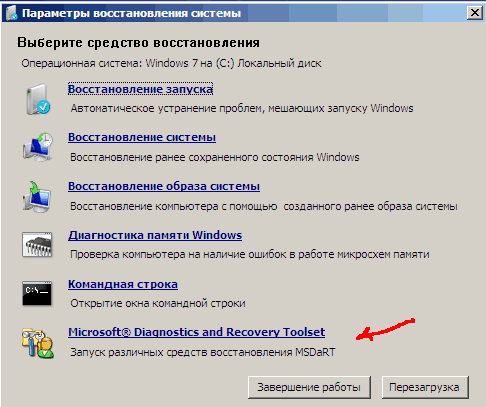
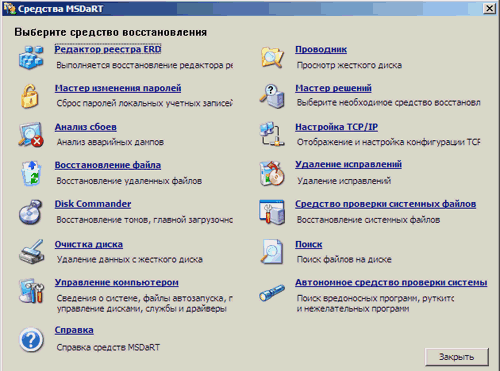
We launch "recovery tools" MSDaRT.
Choose in the menu "System File Checker"
Click "Dalee "

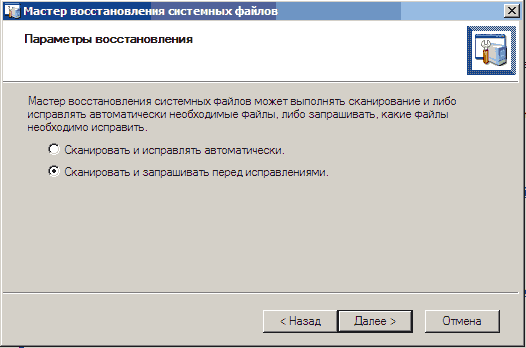
Select item "Scan and request before fixing" - click "Further"
As a result, it will start process of searching for damaged or remote system windows files 7 . It can last about 5 minutes. When the process is completed, a list of damaged or deleted windows files . Check off the files that we want to restore and click "Further".
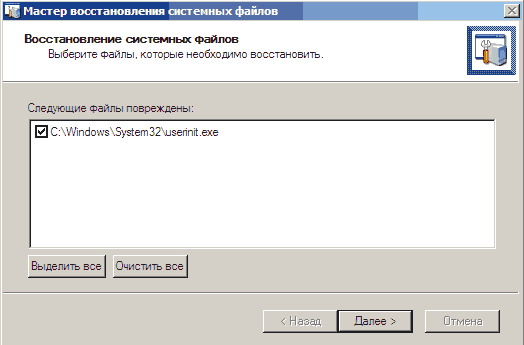
Will begin windows 7 system file recovery process, after which a window will appear recovery results. We click "Further" and in the next window - "Done".

Keep in mind!
You need to be careful when choosing files to restore. , especially when using the pirated version or build Windows
Perhaps certain system files will be changed in it so that Windows does not ask for activation. Recovery tool can consider these files to be corrupted and replace them with the original ones, because of which Windows during its download can display a message about an unlicensed version of your Operating system . In case of recovery of system files after banner removal, select files from the table below to restore.
Windows system files and folders in which they should be located:
Here are the specific Windows system files, as well as the folders in which they should be located. By the way, if you found a specific file, but in a different folder, most likely it is a virus! (excluding folder c: \\ windows \\ system32 \\ dllcache).
| File | Folder |
| explorer.exe | c: \\ windows |
| iexplorer.exe | c: \\ windows |
| regedit.exe | c: \\ windows |
| notepad.exe | c: \\ windows |
| userinit.exe | c: \\ windows \\ system32 |
| taskmgr.exe | c: \\ windows \\ system32 |
| taskman.exe | c: \\ windows \\ system32 |
| cmd.exe | c: \\ windows \\ system32 |
| logonui.exe | c: \\ windows \\ system32 |
| winlogon.exe | c: \\ windows \\ system32 |
Unstable problem work windows 7 is often associated with corruption or deletion of system files, for example, after reinstalling or installing an infected program. This is not the most difficult problem - there are many ways to recover data using standard OS tools or manually. The simplest and most effective options are discussed below.
Rollback to the last stable state
By default, protection is active in all Windows for system partitions. She is responsible for creating special checkpoints containing configuration information and system environment files before modifying it - installing applications, drivers, and updates. Moreover, recovery points are created without a similar reason by the system with a certain periodicity or by the user himself.
If problems began to appear relatively recently, and you remember the approximate date of their appearance, then the best solution is to roll back the OS to the moment when there were no failures while operating the OS.
In a working environment, this is very simple:
It only remains to reboot, after which the damaged system files will be replaced with previous working versions.
If Windows does not boot
Even if the damage to the system data is so serious that the OS cannot boot on its own, there is an opportunity to use recovery points:
The corresponding selection utility starts. control point, which you need to work with in the manner described previously.
If, when you press F8, the boot options window does not open, then you can get into the recovery environment only when using the boot / installation disk.
Using the standard SFC utility
This application checks and restores the main OS system files. It can also be run in command line from boot disk, from the boot options window after pressing F8 and from a running system. The last option is the simplest:
Upon completion of the operation, the SFC will notify you of the results - corrupted data must be detected and corrected.
Manually recovering data
Sometimes the methods described above cannot fix the problem. For example, when updating DirectX from distributions that come with various applications, DLLs are often lost. Therefore, always try to update DirectX from of. Microsoft site, and if trouble already happened, then if new version all DLLs will be updated automatically after installation from the site http://www.microsoft.com/en-us/download/confirmation.aspx?id\u003d35 of a fresh component package.
If there is no new version on the specified page, then any DLL from another source can be transferred to your system yourself. Libraries are stored in the following directories:
- for Windows 7 × 32 - in the folder C: \\ Windows \\ System32;
- for Windows 7 × 64, in the C: \\ Windows \\ SysWOW64 directory.
If a window appears when launching an application informing you that there is no DLL, and the installer from the Microsoft website reports about the presence of your system latest version libraries and does not update components, then you can simply use search engine. Search the Internet for DLLs and transfer them to the specified folders.
Not only DLLs, but also any damaged system files can be extracted from the installation windows distribution 7. To do this, you just need to know which files are damaged. Often, the OS itself informs the user about the absence of any DLL or application error, for example, Explorer.exe. You can get information yourself.
Find out what system information is faulty
To do this, you will again need the command line; we have already described how to open it. Write the following command here:
indstr / N: ""% windir% \\ Logs \\ CBS \\ CBS.log\u003e "% userprofile% \\ Desktop \\ sfcdetails.txt", where N is the drive letter.
Press Enter, after which sfcdetails.txt will be created on the desktop, which you need to open and carefully review. Its content will be approximately the same as in the image below.
Here we see that the Accessibility.dll library is damaged. It will be necessary to find it on the Web or independently extract it from the existing Windows 7 distribution kit for recovery.
We extract the components of the OS from the distribution
In addition to the installation disk, you will need a small free 7-zip application. With it, we will work with the install.wim image located in the sources directory. The order is as follows:

It remains only to copy them to the desired folder or flash drive. Replace them with damaged data using the installation / boot media or LiveCD.
Change damaged files to new ones
To boot the environment, we will use the same installation drive from which we took the data we needed:

These actions allow you to get into a fully functional explorer. Here you must first specify that the program displays all types of files. This is done at the bottom of the drop-down list. Next, it will remain to transfer the copied files to the damaged ones from a flash drive or from another folder and reboot. In this way, without reinstalling, you can fix the problems caused by damaged system data.
Restoring Windows 7 or Windows 8 / 8.1 system files is an interesting topic. Especially if operating system starts to fail, and we don’t have a recovery image and we forgot to turn on system protection to create recovery points. In this case, we will not be able to restore the system from the image, we will not be able to roll back Windows to the created recovery point and reinstall the system, we are too lazy, as it will take a whole day. And just here we have another chance to return Windows to its normal state - to try to restore system files. In this article I will try to fully disclose the topic so that it is possible to reanimate our computer in any situation.
1. Restoring system files in a loaded system
If our computer somehow turns on, then do the following. (if not included, see section 2 of this article)
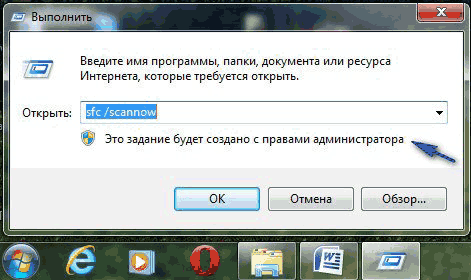
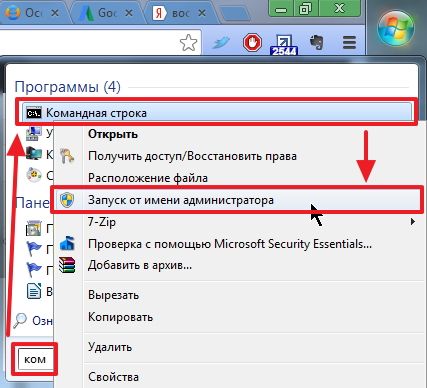
Open the Start menu. In the search field, write “Com”. On the element " Command line"Click with the right mouse button and select" Run as administrator»
In the command line that opens, write
sfc / scannow
Waiting a bit
If your system is OK, you will see the following image
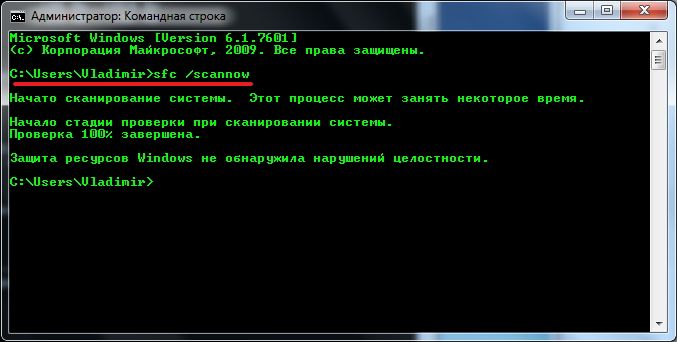
If your Windows was broken, you will see the following

System files restored successfully. We reboot and immediately turn on system protection to create recovery points so that the next time you just roll back the state of the computer a couple of days ago and that’s all.
It happens that when scanning the system, the sfc.exe utility found damaged files, but could not fix them. In this case, I would restore the system files in Safe Mode. If in safe mode read the last paragraph 4 of this article.
If your computer does not boot at all, then what was mentioned at the very beginning of the article, then read the next paragraph.
If our computer does not want to boot at all, then we use the recovery environment. You can boot into it:
- When you turn on the computer F8 repeatedly
- Booting from a boot (installation) disk or flash drive
The first option will work if we have boot partitionthat the system created when marking up the disk when we installed the system. Boot partition size:
- Windows 7 - 100 MB.
- Windows 8 - 350 MB.
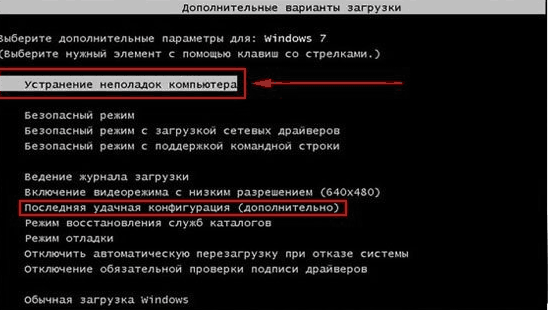
In any case, try to press F8 several times during boot. A window should open with additional download options. Choose Computer troubleshooting.
In the next window, select the keyboard input method. Choose the language in which you have set the administrator password (if there is no password, you can immediately click Next\u003e).
We select the user with administrative rights and enter the password if there is one. If there is no password, just click OK.
Select the command line.
If you can’t enter the recovery environment using the F8 key, you will need to boot from the installation (boot) flash drive or disk. In the same way, you can put the boot from disk. Only in this case, you need to put DVD-RW (drive for reading optical discs) put in the priority of loading in first place.
I like to boot from removable media using the boot menu. IN motherboard ASUS it is usually also called a key F8.
Booting from a flash drive or disk I saw the following picture. I choose Windows setup - Install Windows.
We are waiting for all the installed Windows to be found.
We choose the one that does not turn on for us. And here ATTENTIVELY! We remember the letter that the recovery environment assigned to your system (in the Folder column). I have it D.
Select Command Prompt.
Enter the command
sfc / scannow / offbootdir \u003d D: \\ / offwindir \u003d D: \\ windows
Instead of D, you substitute your letter. Press Enter and wait for the scan to complete
On the virtual machine, from where the screenshot above was taken, was blue screen, so I was not surprised that system files were found and restored.
3. How to find out the drive letter of the installed Windows
If you succeeded with the key F8 call the window “Advanced boot options” and select “Troubleshoot computer problems”, then we need to find out the drive letter where Windows is installed which the recovery environment assigned to. There are two ways to do this.
1. Call the notepad with the command
Expand menu in notepad File and choose Open…
Left click A computer and in front of you will be wheels with letters.
You can go to disk and see what and where.
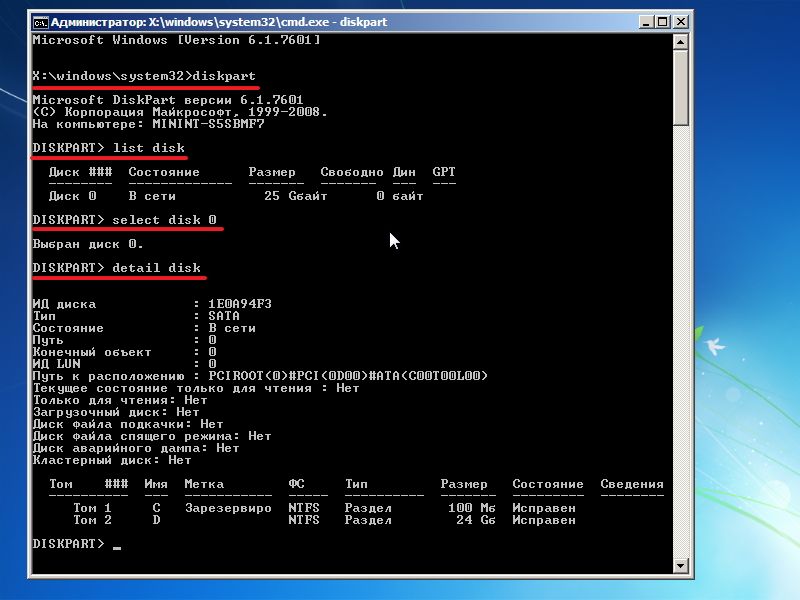
2. We use the utility DISKPART
At the command prompt, enter:
diskpart - we call the utility for work with disks.
list disk - view the list of drives.
select disk - I select the hard drive I need.
detail disk - I call information about this disk.
4. For Windows 8 / 8.1
If the sfc utility could not recover the damaged system files, then you should try to restore the storage of these system files. The place where copies of healthy system files should be located. As I understand it, it is located at C: \\ Windows \\ WinSxS. That is, we must first fix the file storage, and then restore the Windows system files after using the “SFC / Scannow” command.
4.1. Restore storage using Windows Update
1. Launch Windows PowerShell with administrator rights. To do this, open the Start menu or the initial screen and click on the "Search" icon. In the search box, write "PowerShell". Right-click on “Windows PowerShell” and select “Run as administrator” or “Run as administrator”.
2. In the window that opens, write
Dism / Online / Cleanup-Image / RestoreHealth
and wait. If the storage is intact or it was restored using Windows Update, you will see the following picture.

If Image Health State: Healthy - everything is fine. We reboot the computer and try SFC / SCANNOW again.
4.2. Restore storage using an image
If we have problems with Windows Update, then this method is suitable.
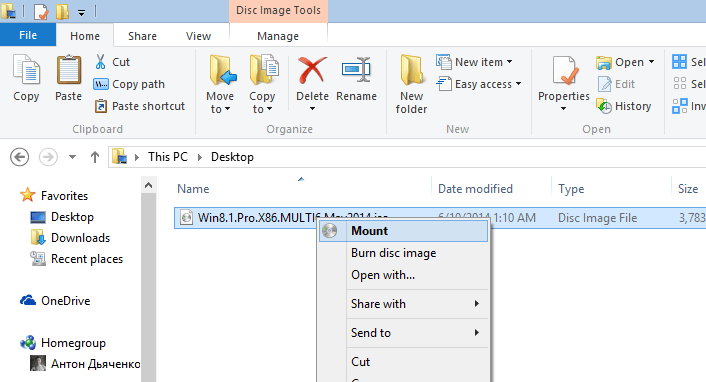
1. Download the original Windows 8 / 8.1 image of the same bit depth as your system. How to know the bit depth installed system - .
2. Connect or mount the downloaded image. Click on the image with the right mouse button and select "Connect" or "Mount".
3. On the command line with administrator rights, we look at what edition there are in the image with the command
Dism / Get-WimInfo /WimFile:F:\\sources\\install.wim
I have 2 editions in my image. Understanding what I need for these decals is hard. We use the first. If it doesn’t, the second.
4. Run Windows PowerShell with administrator rights and set the command
Repair-WindowsImage -Online -RestoreHealth -Source F: \\ sources \\ install.wim: 1
where, F is the drive letter to which we connected the image, 1 is the Windows revision number in the image.
5. Manual system file recovery
If using sfc utility it was not possible to recover the beaten files, you should try to do it manually. In this case, you need to run the command
findstr / c: ""% windir% \\ Logs \\ CBS \\ CBS.log\u003e "% userprofile% \\ Desktop \\ sfcdetails.txt"
Findstr / s: ""% Windir% \\ Logs \\ CBS \\ cbs.log\u003e sfcdetails.txt
and carefully examine the file sfcdetails.txt on the desktop or in % windir% \\ Logs \\ CBS \\.
There should be something similar as in the picture below.
After the name damaged file known (Accessibility.dll), we are looking for it on another computer with the same system as yours. If this is not an option, then I would download the original Windows image and install it on a virtual machine. I found the file I needed and copied it to the boot or installation flash drive. Then, from this installation flash drive booted into the recovery environment, would launch a command prompt. From the command line I would open notepad. Opened the menu File\u003e Open - and now I have almost a full explorer. Copy the replacement file from the USB flash drive, reboot and everything should work.
If the option of installing a virtual machine does not suit you, then you can connect the install.wim file to the folder. Then go to this folder and copy the necessary files.
1. Create a folder. For example, “Win8.1Pro” in the root of drive D.
2. Copy the install.wim file to the root of drive D.
3. Mount the install.wim file to the created folder.
Dism / Mount-Wim / Index: 1 /WimFile:D:\\install.wim /MountDir:D:\\Win8.1Pro
We go into the created folder and copy the necessary files.

Disable Image
Dism / Unmount-Wim /MountDir:D:\\Win8.1Pro / Discard
Hello readers of the blog of the ComService company (Naberezhnye Chelny)!
Restoring Windows 7 or Windows 8 / 8.1 system files is an interesting topic. Especially if the operating system starts to fail, and we don’t have a recovery image and we forgot to turn on system protection to create it. In this case, we will not be able, we will not be able to roll back Windows to the created recovery point and we are too lazy, as it will take a whole day. And just here we have another chance to return Windows to its normal state - to try. In this article I will try to fully disclose the topic so that we can reanimate ours in any situation.
Article structure
1. Restoring system files in a loaded system
press Enter and wait for the scan to complete

On the virtual machine, from where I was taken above, I was, so I was not surprised that system files were found and restored.
3. How to find out the drive letter of the installed Windows
If you succeeded with the key F8 call the window “Advanced boot options” and select “Troubleshoot computer problems”, then we need to find out the drive letter where Windows is installed which the recovery environment assigned to. There are two ways to do this.
1. Call the notepad with the command
Expand menu in notepad File and choose Open…
Left click A computer and you will see wheels with letters

You can go to disk and see what and where.
2. We use the utility DISKPART
At the command prompt, enter
diskpart - call the utility for working with disks
list disk - view the list of drives
select disk - I choose the one I need
detail disk - I call information about this disk
4. Manual system file recovery
If using sfc utility it was not possible to recover the beaten files, you should try to do it manually. In this case, you need to run the command
findstr / c: ""% windir% \\ Logs \\ CBS \\ CBS.log\u003e "% userprofile% \\ Desktop \\ sfcdetails.txt"
and carefully examine the file sfcdetails.txt on the desktop.
There should be something like the image below.
After the name of the damaged file is known (Accessibility.dll), I would look for the same in the distribution and replace it. In this case, you will naturally need to receive. And before you boot into Windows and get file permissions, you can try to copy the files you need using a notepad launched from the recovery environment (how to do this was written above).
Conclusion
Friends! Everything written above about restoring system files in Windows 7 is true for. And, I would also apply such a command to Windows 8

I have not tried this command myself, but if the system does not boot, then it definitely won’t be worse.


