1. Connect to the Internet. Without it, updating Windows will not work.
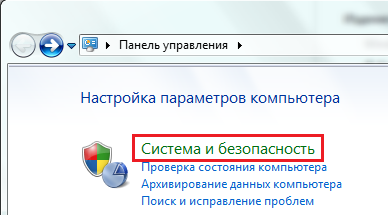
2. Start - Control Panel - System and Security.
4. In the window that opens, click Search for updates. Windows will automatically connect to Microsoft servers and look for available updates.
5. Found updates may be importantand optional.
- Important ones relate to the operating system and security.
- Optional languages, some drivers, etc.
Important: in the beginning, check only importantupdates, then restart your PC and run Windows Update again to install optional updates.
Select from the list of important all updates, and from the list of minor ones, selectively those that you consider necessary and install them.
The installation process will take some time, so do not turn off the computer and do not run powerful programs that load the processor and RAM.
Note: we recommend that you constantly search for fresh updates for Windows, since developers often release patches to fix errors and add new features to the system, especially since you can update Windows for free and unlimited times!
We recommend repeating the procedure at least once a month!
The topic of today's post is updating windows 7 to the maximum. When buying a laptop or desktop computer preloaded with Windows 7, the user may encounter some problems. The thing is that the Windows 7 Starter included in the kit is only suitable for demonstrating the capabilities of the operating system, but is in no way suitable for any convenient communication with a home computer.
Having at its disposal a computer with Windows 7 Starter and trying to trivially change the picture on the desktop, the user will be very upset, because there is simply no such possibility in this version of the system. The desire of developers to make a simple distribution for everyday home tasks that do not require software technologies used in enterprise solutions is understandable. But in order to exclude such an important trifle from the system for a simple user ..?!
Such "trial" versions of the system are justified only to draw attention to the product and force the purchase of the full version of the operating system - confirmation of these words lies in the impossibility of updating Windows 7 Starter or Home to Windows 7 Ultimate. This fact negates all attempts to simply upgrade Windows 7 to the maximum, so it’s easier to install the operating system from scratch.
However, if you are not afraid of difficulties, then you can upgrade by doing the following steps: First, check for the “Service Pack” in your windows versions 7. Click Start - Computer - Properties (right-click) and evaluate its availability. If you have Service Pack 1 installed, the picture will look like this ... and you can proceed to the next upgrade item.
If this inscription is missing on your computer, you need to install this package! To do this, go to the "Windows Update" click "Search for updates" and update your computer to the maximum!

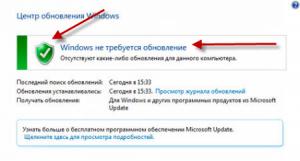
After installing Service Pack 1, you will see a window that says that windows does not require updating.

In the window that appears, select the key entry point for upgrading the system;
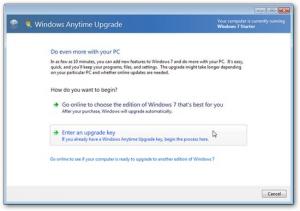
If you have a system interface in Russian, then you need to select the next tab.
I will not tell you about that. where to get the keys to enter in the field that appears, as I am a supporter of licensed software, and I believe that licensed products are the best solution for any application! But for those who still want to test the process of transition to more full version os windows 7 without a license key, I can advise google search, which displays a bunch of links to the key generator for the upgrade already in the top ten of the output.
Download the one you like best and generate the key for the version that you need! I use the license key from Microsoft to upgrade to Windows 7 Ultimate.
Further, following the instructions, a Windows update window will appear with an indicator of the process of completing the task. Upon completion, the computer will automatically restart. You must repeat the above operations only when requesting an update key.
These manipulations will allow you to get Windows 7 Ultimate, as the main OS. If you have chosen Professional as your version, I can assure you that you will not notice any differences in visual and technical terms between Ultimate and Professional.
Since the release of Windows 7, only one comprehensive service pack has been released for it - Service Pack 1 (Service Pack1 or SP1). This package includes over 800 different fixes that enhance OS security, performance, and stability. A number of updates to the first service pack fix bugs that cause crashes and crash systems and programs, but the main part - closes vulnerabilities, that is, prevents the introduction and execution of malicious code hidden from the user. SP1, like other service packs for Windows, is distributed free of charge, but it is not always included in official distributions. To install, you need to download it from the official Microsoft website or simply enable the automatic update function in Windows 7. If there is a problem with Internet access or the inability to download large amounts of traffic - SP1 can also be bought on a DVD-ROM.
Checking for Service Pack 1
To find out whether fresh version the system is installed on your PC, open its properties by selecting the item of the same name in the context menu of the Computer folder.  At the top of the properties window, in the "Windows Edition" section, there is information about the installed service pack.
 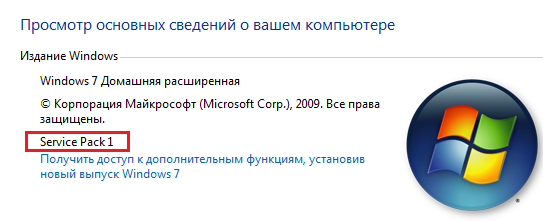 If Service Pack 1 is mentioned here, then you have the latest version of Windows 7. If not, you must install the service pack separately.
Install Service Pack 1 through Windows 7 Update
Preliminary preparation
- Before downloading SP1, it is important to make sure that it has enough hard disk space for it. free space. If you have a 32-bit version of Windows 7, you will need 4100 MB disk spaceif 64-bit is 7400 MB.
- Next, in case of failure, you need to do backups all important data. Best suited for this external storage or unsystematic hard section drive.
- If you are installing the service pack on a laptop, charge a fully rechargeable battery and plug in the machine.
- Some antivirus programs can block the installation of the service pack, so to avoid possible problems, after downloading the package, temporarily unload the antivirus and disconnect it from the Internet in order not to leave your computer without protection from threats from the network.
If Windows reports that this version of the service pack has already been installed or errors will occur during the installation, your system may have some parts of this package or its preliminary releases. In this case, the old release of the package needs to be removed. For this:
- launch the applet of the control panel “Programs and components”, click “View installed updates”;
- select from the list KB 976932 (Service Pack Microsoft Windows) and click "Delete";

- after restarting the computer, you can install a new package.
If the computer has unlimited Internet access, it will be most convenient to use the auto-update system: the service pack will be downloaded and installed automatically.
- Expand the "System and Security" section in the control panel.
- Near the item "Windows Update" click "Check for updates."

- After checking, click on the link "Important updates: # available"
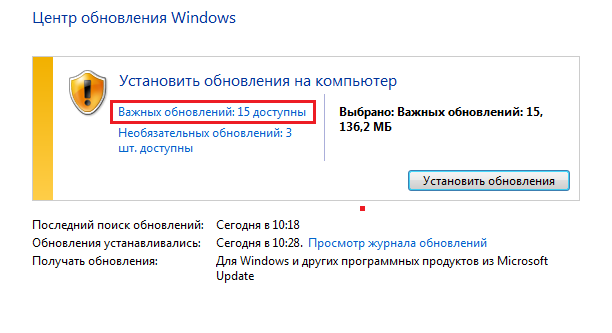
- Select from the list KB 976932 (Package microsoft updates Windows), check and click OK.

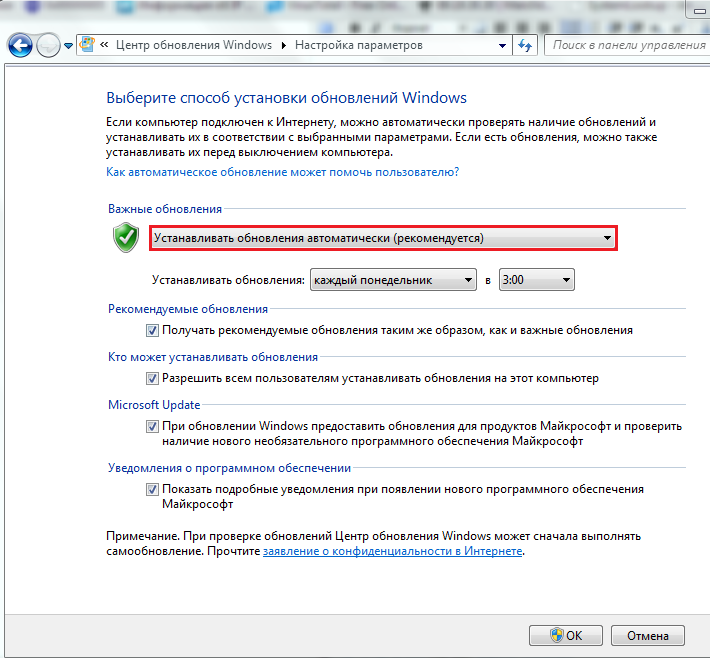
- Then again return to the "System and Security" section, near the "Windows Update" item, click on "Enable or disable automatic updates."

- From the Important Updates drop-down list, select Install Automatically. Below, under this list, configure a convenient schedule for checking and installing them.
 After completing these steps, the operating system on your PC will be constantly kept up to date.
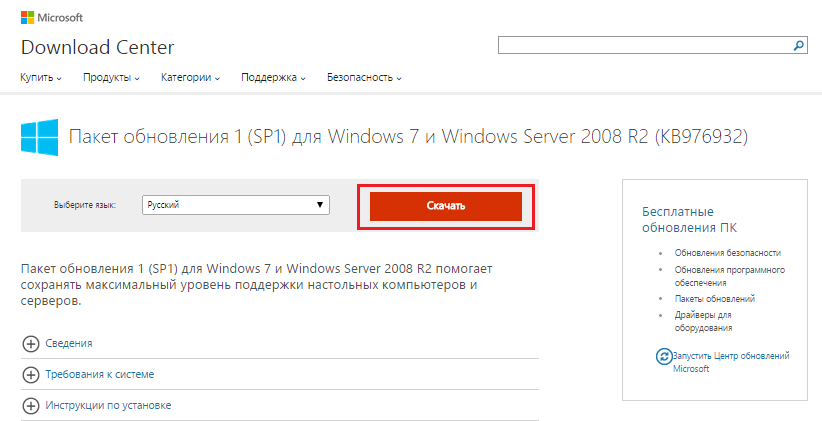
Install Service Pack 1 from the Microsoft Download Center
- Open the Service Pack 1 download web page for Windows 7 in the Microsoft Download Center. Select the language you need and click "Download."
- Mark the package that matches the bit depth of your system and click “Next”.
![]() After downloading, run the installation file and follow the instructions on the screen. At the end of the installation process, the system will restart. After it loads again, do not forget to turn on the antivirus.
After downloading, run the installation file and follow the instructions on the screen. At the end of the installation process, the system will restart. After it loads again, do not forget to turn on the antivirus.
Install Service Pack 1 from a DVD
This method is convenient when the computer on which you are going to install SP1 is not connected to the Internet. If it is not possible to burn a disc yourself, you can order it on the Microsoft website. However, this is not free: shipping costs $ 10.50. Having selected the update package of the desired language, enter the recipient's data in the appropriate forms on the site, using bank card pay for the order and wait for it in the mail. To install SP 1, put the DVD in the drive and follow the instructions of the installer. Anyone will cope, since this whole procedure is no different from installing ordinary programs from disk. You will learn about the success of the operation after a system reboot, when a notification appears on the screen that Service Pack 1 is now on your computer. And this is the last one, updated version Windows 7
Hello! This article was born due to the fact that I learned how to easily, quickly and simply change your operating system. More precisely, update younger windows versions 7 to the desired, in order to obtain new system capabilities.
I have 2 laptops in use (one backup, you never know what!), I install the OS myself. At work, I have Windows 7 Ultimate, and on a handy one, for some reason, I set my Homework. Well, I got tired and tired. After all, I can always reinstall the OS, for me this is not a problem (I thought). But it turns out that the system can do everything by itself and this material will be useful to those who usually resort to third-party services in order to update the software.
Read, watch and repeat - you will be satisfied with the result!
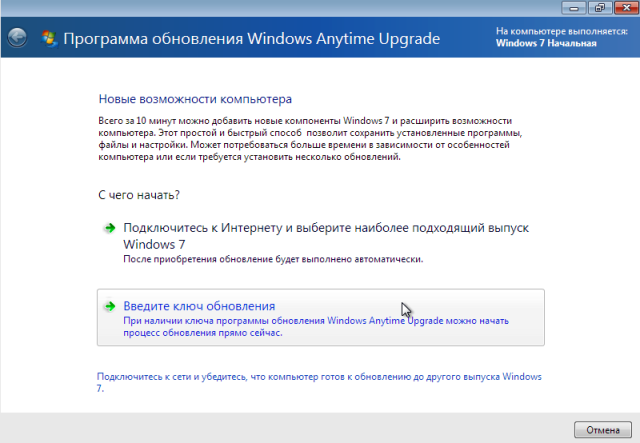
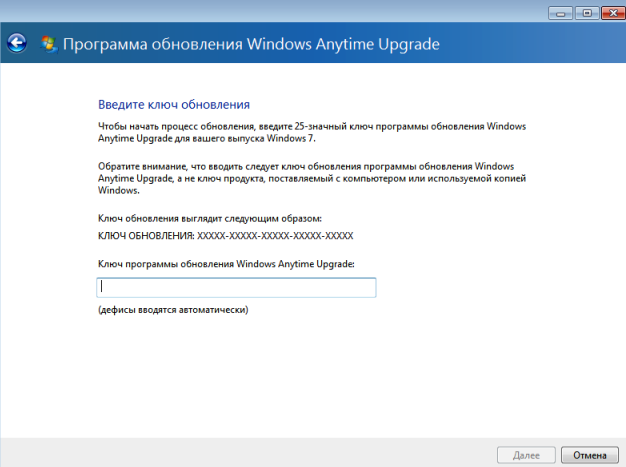
1. Go to the Start menu - All Programs - run Windows Anytime Upgrade (WAU). All pictures are clickable.

2. The Wizard of Updates window will appear in front of you, select “Enter update key” and enter the activation key to switch to the desired version.
From the keys below, select the one you need. I laid out a lot of keys.
Home Premium / Home Premium:
6RBBT-F8VPQ-QCPVQ-KHRB8-RMV82
Professional / Professional
6RQ9V-6GCG4-8WV2H-966GF-DQ4DW
32KD2-K9CTF-M3DJT-4J3WC-733WD
Maximum / Ultimate
FJGCP-4DFJD-GJY49-VJBQ7-HYRR2
342DG-6YJR8-X92GV-V7DCV-P4K27
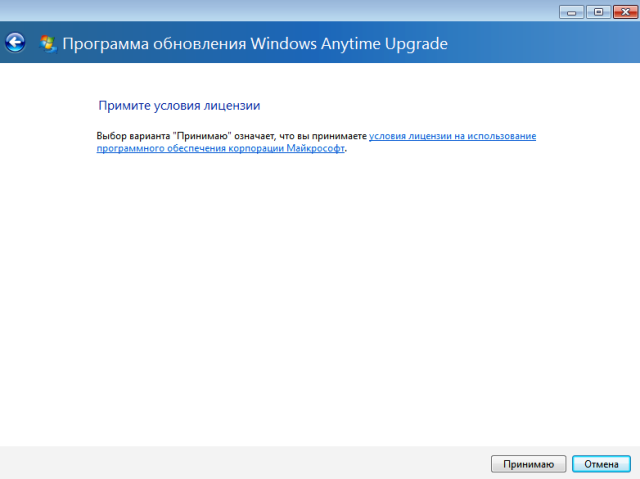
3. After you enter the key, wait for it to be verified. If he approached, the system will begin updating to the required version.

The process is not long, lasts 10-15 minutes, or even less, depends on the speed of the Internet connection, which must be connected.
During the update, the computer may restart.


Bottom line - you got the coveted Windows 7 Maximum, with which I congratulate you!
Errors may occur during the upgrade. Do not despair! On the Microsoft support site you can find lists of error codes, their description and solutions.
To prevent possible problems, before and after the update, it is recommended to remove updates KB971033 and KB2859537, and prohibit their installation through the "Update Center". I did not do this (I honestly admit) and so far everything is working fine for me. There will be a problem - I will solve it and share my results with you.
Finally, I share the activation keys that I found on the Internet, use it!
Windows 7 Ultimate OEM: SLP Keys (OEM-8992662)
22TKD-F8XX6-YG69F-9M66D-PMJBM - Lenovo
4HMYB-6YHYT-TW2J6-FQBC3-6GBFW - ALIENWARE
342DG-6YJR8-X92GV-V7DCV-P4K27 - Dell
FJGCP-4DFJD-GJY49-VJBQ7-HYRR2 - Acer
2XQ63-J3P67-9G3JC-FHQ68-8Q2F3 - TOSHIBA
49PB6-6BJ6Y-KHGCQ-7DDY6-TF7CD - Samsung
6K2KY-BFH24-PJW6W-9GK29-TMPWP - Lenovo
76MTG-QMQJQ-46DQR-CHRBB-7K3HD - OEGSTONE
2Y4WT-DHTBF-Q6MMK-KYK6X-VKM6G - Asus
VQ3PY-VRX6D-CBG4J-8C6R2-TCVBD - Alienware
MHFPT-8C8M2-V9488-FGM44-2C9T3 - HP
6RVBB-93T7R-GKQKQ-YWCJR-2TKPJ - HEDI
4BRY2-6W9VH-9CM6R-GPKRY-HHVCY - TAROX
YJJYR-666KV-8T4YH-KM9TB-4PY2W - Sony
2WX6M-X2HKM-86X8X-2QD44-F3FGJ - Asus
9CW99-79BBF-D4M3X-9BK9M-4RPH9 - FUJITSU
78FPJ-C8Q77-QV7B8-9MH3V-XXBTK -?
2WX6M-X2HKM-86X8X-2QD44-F3FGJ -?
9D4JH-GPGMP-CTQYB-XM74F-2CTYY -?
Windows 7 Ultimate OEM: NONSLP Keys (OEM-8992662)
7YWX9-W3C2V-D46GW-P722P-9CP4D
Windows 7 Ultimate E (OEM-8992662)
278MV-DKMGJ-F3P9F-TD7Y3-W6G3M - HP / COMPAQ
Windows 7 Professional OEM: SLP Keys (OEM-8992671)
YKHFT-KW986-GK4PY-FDWYH-7TP9F - ACER / GATEWAY / PACKARD
4CFBX-7HQ6R-3JYWF-72GXP-4MV6W - ALIENWARE
MPC38-VC8FK-TWPXH-TR3XV-T2Y4K - ALIENWARE
87MQK-W9Y79-J7M7B-92RTM-MXFJG - Aquarius
32KD2-K9CTF-M3DJT-4J3WC-733WD - Dell
6BJ27-DVBFF-VKQC8-7JPQP-TJKYY - DEALIN
32327-2GRQK-M6H8D-2XV93-YYCCF - ByteSpeed \u200b\u200bComputers, LLC
74T2M-DKDBC-788W3-H689G-6P6GT - HP-Compaq
4872B-B4R7J-QWCFR-YH962-RGDRW - BGH eNova
D8VYT-828P6-7V77D-P8VV7-CHC4M - CCE INFO
BDX3F-M3WPY-FTKYK-QBVD7-9DXH8 - DakTech Computers Professional
26QH2-B4V28-CWVMD-38GXQ-WHFYH - GENUINE C&C
BPM2T-G28MM-DYPRD-CDFQB-JG89V - INSYS
4FXT2-THHQK-B7293-VYHKX-3DRPD - OEGSTONE
CR3MG-TDDHT-T44X2-K722W-J936F - M&A Technology
84TBR-V3TCM-DC73Q-TDRQ7-WHPJ4 - MAXDATA / QUANMAX / CHILIGREEN
2XGJT-GV4QG-QBHPB-D6DBW-DTW9Q - MITAC
2RGBP-GKB4B-BGF4Y-8H6XF-WWPJD - PANASONIC
4CMG7-XWKFW-FJQVW-6XBCB-DD9CV - POSITIVO
7K3CD-PXHTK-GDBRW-KH842-F9P3D - SHUTTLE
CVKKG-87DDK-HK8G2-BYQ72-43KFW - Tangent Inc
72X79-RQPFF-YGK82-7FF8M-PX4XB - TAROX
4HRQP-KTBTJ-4R9CX-4DWJ6-QFPFT - Twinhead International Corp
84KJC-W886T-XQ496-YTB7W-46DTY - Wipro
6JKVQ-WJTWW-JVPRB-77TGD-2DV7M - WORTMANN
H8KMB-DPB9M-P3RYK-7JCGW-X97C3 - XPLORE
6V27R-JRHC9-9W42J-37TFX-9T8Q7 - ZOOSTORM
32HPJ-4XRDR-424C8-DYQM9-GM768 - KRAFTWAY
GMJQF-JC7VC-76HMH-M4RKY-V4HX6 - Samsung
H9M26-6BXJP-XXFCY-7BR4V-24X8J - Sony
2QTV2-3CMPP-FQBYK-GRD62-D7XMW - HCL
2WCJK-R8B4Y-CWRF2-TRJKB-PV9HW - Asus
237XB-GDJ7B-MV8MH-98QJM-24367 - Lenovo
2QGXM-V9W9W-6Q7MR-64C4X-R26CV - LG
2WGY7-J3JQT-78CF9-J6DHQ-DJTQW - MECER
862R9-99CD6-DD6WM-GHDG2-Y8M37 - Fujitsu-Siemens
PT9YK-BC2J9-WWYF9-R9DCR-QB9CK - Fujitsu-Siemens
2V8P2-QKJWM-4THM3-74PDB-4P2KH - Toshiba
7RQGM-4BJBD-GM2YY-R2KTT-43HG8 - STEG
W2PMW-T7DBH-YHKRM-DXXF6-KP4KT - TOSHIBA
6FWJ7-TDRCV-BYTP3-JWB98-9J64J -?
7QY32-TQCBJ-G7MC8-Y4PGF-7TGB8 -?
36KXM-JVMP6-88WMK-YCCGV-YFDVX -?
CRYGF-JG347-QPJKH-BR82M-3MQP3 -?
7MB39-TFBVT-9KJKK-6G7H4-66Y7W -?
2W3CX-YD4YJ-DF9B2-V27M6-77GMF - MSI
BV4Y4-DVXDT-3FC64-X2QR7-DW82M -?
Windows 7 Professional OEM: NONSLP Keys (OEM-8992671)
VTDC3-WM7HP-XMPMX-K4YQ2-WYGJ8
CX7PR-8RJ4T-4RD3X-R7YQB-QBWMG
Windows 7 Professional E (OEM-8992671)
P42PH-HYD6B-Y3DHY-B79JH-CT8YK - HP / COMPAQ
Windows 7 HomePremium OEM: SLP Keys (OEM-8992687)
VQB3X-Q3KP8-WJ2H8-R6B6D-7QJB7 - Packard Bell
6RBBT-F8VPQ-QCPVQ-KHRB8-RMV82 - Dell
7JQWQ-K6KWQ-BJD6C-K3YVH-DVQJG - Asus
CQBVJ-9J697-PWB9R-4K7W4-2BT4J - Samsung
4FG99-BC3HD-73CQT-WMF7J-3Q6C9 - HP
H4JWX-WHKWT-VGV87-C7XPK-CGKHQ - Sony
6B88K-KCCWY-4F8HK-M4P73-W8DQG - Toshiba
2QDBX-9T8HR-2QWT6-HCQXJ-9YQTR - Asus
6GF36-P4HWR-BFF84-6GFC2-BWX77 - Toshiba
38JTJ-VBPFW-XFQDR-PJ794-8447M - Advent
27GBM-Y4QQC-JKHXW-D9W83-FJQKD - Lenovo
C6MHH-TRRPT-74TDC-FHRMV-XB88W - Fujitsu-Siemens
2P2P9-CM3F8-FTV6P-PC7CX-8TFF7 -?
V3Y2W-CMF9W-PGT9C-777KD-32W74 - ALIENWARE
8YDX9-B7MMG-82XD9-V88G9-MR92T - DEALIN
83K3W-QH8JT-T7KBY-9FQB6-V9R8H - DELL
3743C-T6892-B4PHM-JHFKY-4BB7W - GIGABYTE
C3V4C-6Y6WM-DGRM9-QJG82-8K3FP - SHUTTLE
C23T3-9F2T2-FPWBM-XYMW2-272J9 - VIEWSONIC
GFDW7-7T4B9-VB8W7-TTHRM-JG2KB -?
CPF7K-XP3YV-JVHHF-YMMRD-Y4Y9K -?
7K377-DVP2Q-YGWJG-3M3G7-RBCDP -?
BVQFP-FKQGV-J82F3-2JTVV-733D2 -?
76QPJ-99DMC-MW43P-8JKHY-6YMRQ -?
38GRR-KMG3D-BTP99-TC9G4-BBDJJ - LG
HWDFB-YVFG4-3TJ7F-Q3WMT-7B6PH - Siragon
4G3GR-J6JDJ-D96PV-T9B9D-M8X2Q - MSI
2XPWB-Q64BJ-W8CT3-WJTWT-4DQ99 -?
39QDH-D7MHH-WDMTD-TM2R9-KM7DB - HCL
TTJQ7-4PFJC-6JFJ8-B22VD-VXW88 -?
Windows 7 HomePremium OEM: NONSLP Keys (OEM-8992687)
V2HHT-47JXK-3YMXJ-9MCH3-RYQGW
Windows 7 HomePremium OEM: COA Keys (OEM-8992687)
4JC62-DQC38-4M7P6-CYMWT-GQM77 - Asus
C3F32-CQX4C-YFR7Q-B2892-FDHFD - Asus
Windows 7 HomePremium E (OEM-8992687)
TD77M-HH38J-FBCB8-8QX7Y-P2QH3 - HP / COMPAQ
Windows 7 HomeBasic OEM: SLP Keys (OEM-8992752)
MB4HF-2Q8V3-W88WR-K7287-2H4CP - Acer
89G97-VYHYT-Y6G8H-PJXV6-77GQM - Asus
22MFQ-HDH7V-RBV79-QMVK9-PTMXQ - Lenovo
DX8R9-BVCGB-PPKRR-8J7T4-TJHTH - HP
36T88-RT7C6-R38TQ-RV8M9-WWTCY - Dell
2P6PB-G7YVY-W46VJ-BXJ36-PGGTG - Samsung
9DBMT-GXRWM-6Q9Y3-WMYM8-FJCBW - Tongfang
2TY7W-H4DD4-MB62F-BD9C3-88TM6 -?
6M78P-JJRQP-9C4RX-RPK7G-3VTH3 - DEALIN
7WGMV-QFYXX-64DCG-HQFWM-DWGKY - FOUNDER
8W3JQ-BP2HY-F47QX-6CQ94-2BKQB - FUJITSU
2Q4QP-8P4MD-47YBP-7TXX9-FKDRM - HCL
82P6X-KGH24-FCPXC-XQKC9-74KC8 - KSystems
YV7QQ-RCXQ9-KTBHC-YX3FG-FKRW8 - Sony
9H4FH-VD69Y-TGBD2-4PM4K-DRMMH - Toshiba
Windows 7 HomeBasic OEM: NOSLP Keys (OEM-8992752)
BMDHM-HCRHH-JFBC8-9R8DT-YQB23
Windows 7 HomeBasic OEM: COA Keys (OEM-8992752)
VK92Q-BQP3W-43TFR-M3834-3Q7C4
Windows 7 Starter OEM: SLP Keys (OEM-8992707)
RDJXR-3M32B-FJT32-QMPGB-GCFF6 - Gateway
RH98C-M9PW4-6DHR7-X99PJ-3FGDB - HP
TGBKB-9KBGJ-3Y3J6-K8M2F-J2HJQ - Toshiba
36Q3Y-BBT84-MGJ3H-FT7VD-FG72J - Dell
6K6WB-X73TD-KG794-FJYHG-YCJVG - Asus
2XGHP-9TQK2-8CF28-BM2P2-8FRX8 - Nokia
273P4-GQ8V6-97YYM-9YTHF-DC2VP - Lenovo
32J2V-TGQCY-9QJXP-Q3FVT-X8BQ7 - Sony
6PB94-MC2C6-4F37H-KTJ32-PF2PT - CASPERERA
BB2KM-PDWW3-99H7J-F7B9R-FXKF6 - COMPAQ / HP
BHP4B-MXP9G-RG7KQ-T8R84-CW3D3 - ECS
4FRH4-WQDGJ-M9HRY-K73D8-RGT3C - EXPER
BRFCY-XMXRV-28JHQ-F6D9B-BV73C - HANNSPREE
PMXH9-M23P9-QJJMB-2FWRC-7CDKP - FUJITSU
2K8WH-JVQDM-C9HVC-YR2XC-8M76G - MEDION
344HQ-3YHDT-C7VCT-BDPBV-4KTR3 - OLIDATA
6TQ9G-QB2WK-FM2TB-CKBDP-9D6HM - VIEWSONIC
6CYKC-TDDYQ-K4B6G-HQD89-CWDP3 -?
4HGWK-KHT8C-J2KCF-F3PVF-44PD4 -?
32TF3-PT6YV-V6GCK-RR8GM-VM4QG -?
6HKDD-HMKWQ-74YC4-2B8C3-MPG6R -?
PV9BD-YBRX6-CTMG6-CCMJY-X8XG7 - Samsung
22P26-HD8YH-RD96C-28R8J-DCT28 - Lenovo
2W4DJ-JFFJV-DMCPP-2C3X8-883DP -?
7W842-2HCPJ-BC3MJ-B79K6-TD2HQ - Viliv
2YKPV-BFXFW-X8GJQ-9KQFF-KCXGD - MSI
Windows 7 Starter E (OEM-8993706)
C3HY9-34XKR-6Y9Y9-RB7TR-84KWG - HP / COMPAQ
KEY DESCRIPTION:
OEM: SLP - the slick must be stitched for a specific model (model name after the key)
OEM: NONSLP - no firmware needed, this is a key with offline activation
OEM: COA - activation via phone or internet
- without pre-installed internet browser Explorer
Who has what happened - write in the comments.
HOW TO UPDATE WINDOWS 7 TO THE NEED VERSION
Many users very often encounter update problems in Windows 7. The system constantly displays a message that they are searching for updates, but find nothing.
There is one solution to this problem. It is enough to manually download and install just one package from Microsoft, which will fix this error. Consider why windows 7 update cannot find the update.
For quite some time, Windows 7 Update has been creating serious problems for its users. Unfortunately, I myself belong to the group that is experiencing problems in its own skin with the center at the G7. On one of my computers, in any attempt, the search ends with the endless message “Searching for update ...”. At first, he suggested that the system was looking for updates for a long time, but when he left the computer on for the night, it did not bring the desired result. What to do if Windows 7 Update does not work properly?
It turned out that this problem can be quite easily solved. Of course, I do not guarantee that the proposed method will solve the problems of absolutely all users, but for me it was instantly solved manually - by installing the KB3172605 package and performing several other simple steps. Here's what you need to do to fix the problem.
Step 1: Download the update for your system (but not install)
First of all, you need to download the KB3172605 package directly from the Microsoft website using a web browser. You will find direct links below for versions of 32- and 64-bit systems.
You need to download the package, but do not install it yet - we will do this in step 4. First, you need to perform two simple steps.
Important! If in the fourth step you encounter the problem of installing the above package (for example, a message about system incompatibility is displayed on the screen), then instead of the above, you need to download the KB3020369 package at the links below. But do this only when the above updates do not work.
Step 2: Disable Internet Access
Downloaded files should be installed with the Internet turned off. If you use Wi-Fi, then click on the icon wireless network in the notification area (lower right corner of the screen) and disconnect the connection. If you are connected to the Internet using a network cable, you can disconnect it from the computer.
As an alternative, right-click on the network icon, select "Network and Sharing Center," then go to the "Change adapter settings" tab and disconnect the network card with which you connect to the Internet.
Step 3: Stop the Windows Update Service
After disconnecting from the Internet, we need to stop the service center windows Updates. To do this, click combination windows keys + R, enter the following command in the “Run” window that appears and confirm its execution by pressing Enter:
services.msc
The system services window opens. Locate the Windows Update service in the list, and then right-click on it and select Stop. Make sure the service is stopped and then close this window.
Step 4: Install the KB3172605 package (or KB3020369)
Only now can you start installing the previously downloaded KB3172605 file for your system. Run the file with the installer and confirm the installation.
If an error appears that the update is not compatible with your operating system, make sure that you have downloaded the correct version for your system (32-bit or 64-bit). If the error returns again, use the alternative package from the first step.
After installation, you will be prompted to restart the computer. Confirm and wait for the update to install and the operating system to load.
After loading the system, connect to the Internet and turn on the Windows Update service (right-click on it and select "Run").
Now go to the windows update window (e.g. using search bar in the Start menu) and then click on the update search button.
After about 5-10 minutes, a list of updates available for installation will open. In my case, the search lasted several minutes and, thus, finally solved the problem with the endless search in Windows Update.
Update Windows 7 without Windows Update
Sometimes Windows 7 Update does not download updates, especially when there are a lot of them. This most often happens after reinstalling the system - we installed a fresh operating system and suddenly the center gives a message that several hundred updates are available for installation. Downloading them one at a time takes a lot of time, not to mention installing them. This is often problematic and ends with a message about restoring previous computer settings, since so many updates cannot be installed (the solution is to install them in small batches).
Fortunately, Microsoft after several years decided to do something with this problem, due to the fact that many users do not properly upgrade the “seven” to latest version. The company decided to put cumulative packages for download on the Microsoft Catalog website. Packages are constantly updated and are currently available for 32-bit and 64-bit versions of Windows 7 and 64-bit Windows server 2008 R2.
The huge advantage of such packaging is that we do not need to download hundreds of individual packages through the Windows Update center.
In order to install them, the "seven" should include:
- installed Service Pack 1 (SP1)
- kB3020369 since April 2015
When these conditions are met, we can download the rollup package, which will refresh our system to the latest version in one click. To do this, go to the following link using a browser Internet explorer (unfortunately, the following page works only under IE):
Download update rollup for Windows 7 / Server 2008
Upon entering the site, a list of found updates will be displayed. Three will be available for download:
- for Windows 7 (32-bit only)
- for win computers 7 based on x64 processors (only for 64-bit version);
- for Windows Server 2008 R2 x64 (64-bit only).
Download the package that corresponds to the bit depth of your Windows and install it as a standard by running installation file. A rollup package requires a minimum of 4 GB of free disk space.


