Imagine a situation where you have system unit or a laptop from your hands and after starting the system you find that the disks are named with some phrases. In other words, the volume label of the partition has been changed, and anything can be written there. Here is a screenshot as an example.
How to change the volume label on a partition?
I will not describe the meaning of this concept, because everything is clear anyway. In Windows 10, I will show you how to change the volume label of any partition. Moreover, having administrator rights, everything can be done in a few seconds.
So, open the "Computer" folder and click on any section that you need to rename. Click on it with the right mouse button and click on the item "Rename".


A message will appear that you need to have administrator rights, but since we have them, click "Continue".

That's all.
How to change the volume label in Disk Management
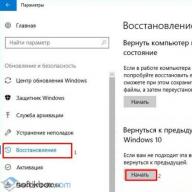
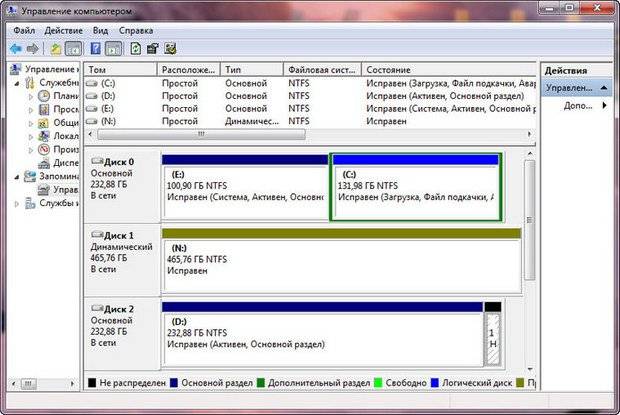
You can change the volume label in another way. To do this, right-click on the Start menu and click on the item "Disk Management".

Select the desired experimental section, right-click on it, and then on "Properties".

At the top there will be an input field where you can enter whatever you want. Don't forget to just click "Apply".

In fact, you can go to the properties of the disk from the "Computer" folder.
In some cases, you may need to rename the drive in Windows 7. This is usually done for more comfortable PC management, for example, you can set a label indicating that the drive is intended for archival copies of important data.
Important! In Windows 7, you can also change the letter of non-system partitions, but you should be aware of the risks before doing these steps.
Change volume label
Users treat their PCs differently. Some are quite satisfied with the parameters offered by the system by default, others prefer to "sharpen" the system for themselves, having achieved the most comfortable conditions for using the computer.
After installation, all partitions on the hard drive are often named " local disk”, but it is much more convenient to designate the place reserved for movies, photos or backup more clearly. This is especially true if the PC is used by several users.
The volume label is a descriptive name of the partition on the hard drive, it is necessary only for the convenience of the user and does not affect the operation of the OS.
Consider the main ways to change the volume label:
- usage GUI;
- label command.

Most users are not accustomed to working with a command line. For them, changing the volume label using the graphical interface is much more suitable.
Here is the procedure for changing the volume label:
- open "My Computer";
- right-click to open the menu on the desired disk;
- select "Rename";
- enter a new name;
- press Enter.

Before changing the volume label, you need to know the basic requirements for it, because otherwise the correct operation may be broken, consider them:
- maximum label length - 11 characters for FAT or 32 for NTFS;
- spaces are allowed;
- it is forbidden to use a tab character in the label;
- The label of a FAT-formatted drive cannot contain the following characters: * ? / | . , ; : += ".
Hard disks usually formatted for many years in NTFS, other drives may still be marked in the older FAT file system.
For experienced users, it is more convenient to change the volume label using the command line and the label command.
Consider how to change the label from the command line:
- open a command prompt with administrator rights;
- enter the command label drive letter;
- press Enter;
- specify a new label and confirm the entry with the Enter key.
It is worth noting that the old label will be overwritten without displaying an additional warning.

If you just need to remove the volume label, then you must perform the following steps:
- run a command prompt with administrator rights;
- type the command label drive letter and press Enter;
- when prompted, leave the input field empty and press Enter;
- confirm deletion of the label by pressing Y.
Possible problems
Sometimes Windows users 7 cannot change the name of the disc. This is due to the big changes that have occurred in this version of the OS. Often, on computers with Vista and XP, an autorun.inf file was created in the root of the disk to prevent infection by certain viruses. On Windows 7, creating it does not make sense, but this file may be hidden.

Consider how to enable the display of hidden files:
- open the "Control Panel";
- go to the "Folder Options" section;
- On the "View" tab, check the box next to "Show hidden files and folders";
- press Ok.
Now you can delete the autorun.inf file and restart the computer, and then change the volume label.
Video: How to change the drive letter
Drive letter change
The drive letter is a pointer directly to the logical hard section disk, it also has removable drives, CD / DVD drives and virtual disks. Sometimes it may be necessary to change it for greater convenience or the correct transfer of programs to the installed new drive.
Important! Never try to change the letter of a drive that is a system drive. In most cases, this operation will fail, and in some cases there will be problems starting the OS.
Consider how to change the drive letter:
- go to the "Control Panel";
- select "Computer Management" and go to the "Disk Management" section;
- on the section that needs to change the letter, right-click;
- in the menu that opens, select "Change drive letter or drive path";
- in the window that appears, click on the "Change" button;
- choose the appropriate letter;
- press Ok;
- confirm changes.
Important! Changing the drive letter can have an unpredictable effect on installed applications. It is also not recommended to change the letter for the optical drive, as Nero and some other programs may not work correctly after that.
Change label hard drive you can do it an unlimited number of times, as it is only for the convenience of users and does not affect running applications. Changing the drive letter is recommended only for experienced PC owners, as these actions can harm the system.
>volume label displayed in Windows Explorer. If you open "My Computer", then if there is a volume label, it will be displayed next to the drive letter (for example, Label (C:)), and if it is absent, "Local Disk" will be written next to the drive letter. To change the volume label, you need to select the disk in "My Computer" with the mouse and press F2 on the keyboard, then enter a new volume label and press the Enter key.
Also, the volume label can be set on the disk when it is . To change the volume label from the console, there is a console command label, for which you can read the help on MSDN .
The maximum length of a volume label for a file NTFS systems is 32 characters. For the FAT file system, the volume label can be up to 11 characters long. The volume label can contain spaces, but cannot contain tabs.
On FAT, the volume label cannot contain the following characters (this restriction does not apply to NTFS):
* ? / \ | . , ; : + = < > "On FAT, the volume label is stored as letters in upper case. In NTFS, the label is stored as entered by the user.
Question from user
Hello.
I want to completely delete all the contents on the disk, and then reinstall the system. I have two drives ("C:" and "D:") - I was able to format one, but there is a problem with the "C:" drive. Do not tell me how you can format the system HDD(on which Windows 8 is installed)?
Good day to all!
In general, on today's modern system, starting disk formatting is not a complicated operation, I would even say simple (not what it was 20 years ago). Perhaps, questions arise only in cases where Windows does not see the disk, errors appear during formatting, or when trying to format system disk(as in your case).
In the article below I will analyze several formatting methods - depending on your tasks and the specific problem, select the one you need. So...
Important: after formatting the drive, all information on it will be deleted! Make a copy in advance desired files from disk to third-party media.
From under Windows
Via my computer
Probably the classic and easiest way to format a disk is to go to "My Computer" (or "This Computer", depending on your OS version), find the desired disk partition in it. Then select this section, right-click on it - and in context menu select the required (i.e. formatting, see screenshot below).
Note: if there is no "My Computer" icon on the desktop, and you do not know how to open it, press the button combination WIN+E- Explorer will open: on the left in the menu, select the link to "My Computer / This Computer".

Format drive // This PC // Windows 10
- file system: FAT 32, NTFS, exFAT, etc. In most cases, the best option for a hard drive is to use NTFS;
- allocation unit size: 4096 bytes (optimal);
- volume label: disk name, you can enter any (I recommend using the Latin alphabet, because some programs do not read the Russian font correctly).

In general, the default settings will usually suit most users - you can immediately click the "Start" button. In a few minutes you will have a "blank" disk...
Through Disk Management
In those cases when you went to "My Computer" - and your connected disk is simply not visible in it (this often happens with new disks that have not been formatted) - then you must use either special utilities, or use the Disk Management tool built into Windows.
To open Disk Management, you need:
- press a combination of buttons WIN+R to open the Run window;
- enter command diskmgmt.msc and press Enter. The Disk Management application should open.
Next, you will see not only all connected drives, flash drives, memory cards, etc., but also what partitions were created on them - i.e. the whole structure. Select the desired section, and right-click on it - in the context menu, click on the item "Format..." (see red arrows on the screen below).


Through the command line
In cases where the explorer freezes (for example), also in case of various kinds of errors, you can try to format the disk via the command line.
First you need to open it as an administrator. For this:

format G: /FS:NTFS /q
G: - letter of the disk being formatted (specify carefully!);
/FS:NTFS - select file system;
/q - quick format.
Basically, the drive must be formatted.
In Windows 10, by the way, a small "error" may appear - the system will ask you to specify the volume label for the disk, and then it will write that "Invalid disk label is specified" (although you seem to have indicated everything correctly, see the example below).

In this case, do the following...
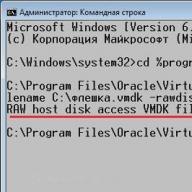
First open in command line the disk you want to format, for example, a disk G: (see screenshot below).

Team VOL- look at the volume label
Next, enter the format command again, and in the disk label field - the label that we learned in the previous step (in my case, Windows 8). Next, you will be warned that all data will be destroyed during formatting (agree by entering y and pressing Enter ).
In the next step, you will be prompted to enter a volume label - now you can specify any name (32 characters). You can simply leave the field blank by pressing Enter. Actually, that's it - the disk will be formatted (screen below).
With the help of special utilities
The best programs and utilities for working with a hard drive:
Now hundreds various programs and utilities for working with hard drives. Operations such as formatting, splitting, defragmenting, and so on can be done in more convenient programs than those built into Windows. The link to the article with the best of them is given above.
In my opinion, one of those that deserves attention is AOMEI Partition Assistant.
AOMEI Partition Assistant
It allows you to quickly, safely, and easily carry out the most necessary operations with disk drives:
- resize their partitions (including without formatting);
- move sections;
- merge sections;
- format drives;
- change labels and much more!
What else captivates is that the program has many different step-by-step wizards - they will help solve the problem even for those users who have only recently met with a PC. Well, for example, you can convert file system FAT 32 to NTFS without losing data, move Windows from a hard drive to a newfangled SSD, and more.
Via BIOS
(for formatting system partitions, for example, on which Windows is installed)
If you want to format the partition on which Windows is installed, then it just won't work. The bottom line is that you need to boot from another medium - for example, from another hard drive (on which Windows is installed) or from a bootable USB flash drive, and then format your drive.
Naturally, you need to prepare such media in advance (for example, an installation USB flash drive with Windows) - since after formatting the system partition of the drive, Windows will no longer boot from it (don't install it again yet. Chaotically explained, but in general terms, I think it's clear ☻).
Using a Windows installation flash drive
The easiest way to format the system partition of a disk is to use a Windows installation flash drive. You can learn how to create and prepare it (if you don’t have it) from my previous articles (I provide links below).
Utilities for creating bootable USB flash drives with Windows -
Create a bootable Windows 10 USB flash drive -
Creating a bootable USB flash drive for installing Windows XP, 7, 8, 10 (UEFI and Legacy) -
The easiest way to boot from a flash drive is to use a special boot menu - BOOT MENU, which can be called immediately after turning on the computer / laptop (or by changing the boot priority in the BIOS). In order not to repeat myself here, I will give a couple of links to detailed articles about this.
Hotkeys for entering the BIOS menu, Boot Menu, recovery from a hidden partition -
How to configure the BIOS to boot from a USB flash drive or disk (CD / DVD / USB) -
Next, booting from the installation flash drive, you need to get to the selection of the partition for installing Windows. In this step, you can format both the entire disk (delete all partitions and create them again as well), and its individual partitions.

If there are difficulties and you do not know how to get to this step when Windows installation I recommend reading this article:
With the help of special programs
Take the same AOMEI Partition Assistant that I recommended using when working from under Windows, a little higher in the article. She has an excellent tool in her arsenal for creating a special emergency flash drive from which you can boot when your system has crashed (or it is not installed on the disk at all).
About programs for working with hard drives, I have an article on my blog:(including the AOMEI Partition Assistant).
To create such a flash drive, you need to run on a working PC in the program "Wizard/Make Bootable CD Master".


To boot from such a flash drive, use also boot menu, links to instructions were given above in the article, in the previous step. When you boot from the emergency flash drive, the menu and the program will be similar to the one that works under Windows. Also click on desired disk and perform the necessary operation (screenshot below).

AOMEI Partition Assistant - partition formatting
That's all, for additions a separate merci.