The article addresses the question of how to check if a bootable USB flash drive is working in VirtualBox. I will pre-install and check the performance of several flash drives with different operating systems at once: Android, Kali Linux and Windows. After that, let's check how the bootable USB flash drive in VirtualBox is operable.
I won’t get inflamed for a long time about how convenient a mobile operating flash drive is, always carried with you. Fortunately, in order for any of the OS to always be with you, you need only one device - a USB drive. And a computer on which we will be allowed to run a flash drive. The rest is details.
But immediately after creating a flash drive with a wearable OS, it must be tested. The VirtualBox virtual machine is quite suitable for this. However, for some, it is the process of creating a bootable USB flash drive in VB that makes it a little difficult. No wonder - the function has not yet been brought to the graphical interface by the developers, although it has long been completely functional.
What will we need?
- flash drive with installed OS
- VirtualBox virtual platform
We will work from the master's Windows.
ATTENTION. All open VirtualBox windows CLOSE
Flash drive - to the port. diskmgmt.msc from string Run We get into the Disk Management console in Windows. We look where your flash drive is in the list of disks. It will be easy to detect it: the corresponding size and a different serial number (Windows numbers physical disks, let me remind you, starting with 0 ). I have one HDD Disk 0) and flash drive ( Disc 1):
Actually, we only need a number, the serial number of the disk. 1 - remember it; it will appear a little later at the end of the command to create a VMDK virtual machine disk file for the flash drive being checked.
We launch. In it, go to the directory with the installed virtual platform:
cd %programfiles%\Oracle\VirtualBox
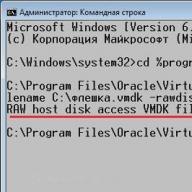
and give the command to create a disk file of the VMDK virtual machine for our flash drive in the root of drive C (the file name and location path can be anything):
VBoxManage internalcommands createrawvmdk -filename C:\flash drive.vmdk-rawdisk \\.\PhysicalDrive 1

Let's use Windows Explorer and see if the file is in place:

where does he go...
It's time for the virtual machine. Let's run it as admin. And create a new machine like this, pointing to the created file flash drive.vmdk:

We launch. A bootable USB flash drive in VirtualBox with Android on board works:

I immediately draw your attention to the fact that in the settings of the virtual machine in the section carriers The first boot device must be the VMDK virtual machine disk file you created. This is a prerequisite if you want to not only test the flash drive as a LiveCD media, but also want to install the system on a virtual machine for a full performance check as an installation flash drive. But for this, no matter what OS you try to install, you you need a virtual hard disk for it. It is easy to create it in the same menu carriers by clicking on the icon Add hard drive. And during the installation of the OS on the virtual HDD in VirtualBox, point to it. For Android, I chose this:

What to pay attention to?
- If you have any questions about installing Android on a computer, refer to the link of the same name in the paragraph above.
- The dimensions of the virtual disk during the installation of the OS are different, but we are testing the flash drive, which means we take minimal requirements. But I advise you not to skimp on the performance characteristics (take more video and RAM volumes) in order to avoid problems during installation and not sin on the performance of your bootable flash drive.
- After installing the OS on a virtual disk in VirtualBox from a USB flash drive, the file flash drive.vmdk must be REMOVED FROM the LIST of virtual media (otherwise, booting from a USB flash drive will follow you in a circle).
Everyone is good for testing operating systems and software, but for some reason none of these hypervisor programs provides the option to boot from a USB flash drive in a normal usable format. Having the ability to boot from bootable CD/DVD images may solve the problem of viewing the contents of the latter, but this will in no way satisfy the need to test a finished bootable flash drive. Check the performance of the bootable flash drive on a virtual machine, test the software contained in the resuscitation Live-disk in conjunction with the virtual hardware, take screenshots of this action, install an operating system whose distribution kit is available only in the recording on a flash drive - but you never know for what needs you need to be able to boot from USB.
How to set up booting from a USB flash drive on VirtualBox and VMware Workstation virtual machines - we will understand this below. And for these purposes we will use the loader Plop Boot Manager.
1. Prepare the Plop Boot Manager Disk Image
The purpose of the free Plop Boot Manager downloader was discussed in detail in the site article. Designed to solve the problem of the lack of an option to boot from USB devices in the BIOS of old computers, Plop Boot Manager will also help in solving the problem of booting from a USB flash drive on virtual machines. Download the distribution of the latter from the official website of the developer.
After unpacking the Plop Boot Manager archive, we can delete the contents of the folder, leaving only the desired ISO disk image - the file "plpbt.iso".

It is better to move this file immediately to a secluded place, say, to a folder with the same virtual machines, since in the process of using this ISO image, its location path will be specified in the hypervisor settings. The latter, in fact, we will carry out further - we will configure the “plpbt” ISO image as a boot source for VirtualBox and VMware Workstation virtual machines.
2. Booting from a flash drive in VirtualBox
The VirtualBox virtual machine must be turned off when it is configured to boot from a USB flash drive. We press the settings button. In the window that appears, first look at the section " System” to ensure that the boot order is for the original drive. The checkbox must be placed on the item " CD/DVD».

Now let's go to the section carriers". Click " Controller: IDE' and select the button labeled ' empty” (if no other disk image is attached to the virtual machine). Next, we need the parameter " Attributes". At the end of the column Drive unit"Press the button in the form of a disk, then - the browse button with the inscription" Select optical disc image».

In the explorer window, open the same file " plpbt.iso».

That's it: the Plop Boot Manager disk image will now be mounted into the VirtualBox virtual drive. Click " OK».

Insert the USB flash drive into the computer's USB port. We start the virtual machine. The latter will boot from the Plop Boot Manager disk image and in its window we will see a minimalistic boot menu, among the options of which are USB devices. But first you need to connect the USB flash drive to the virtual machine. We click at the bottom of the window a small button with the image of a USB input and put a checkmark on the desired USB device. In our case, the flash drive is the only one of those.


We will see the Plop Boot Manager interface again and now we can already select the boot option - USB. To interact with the bootloader interface, you need to enter the virtual machine with mouse capture - that is, double-click inside its window. Recall that by default, the release of the mouse pointer from being captured by the virtual machine in the VirtualBox program is carried out by pressing the right Ctrl key. To navigate through the boot options in the Plop Boot Manager menu, use the navigation keys "" "↓", the very choice of the boot device is confirmed with the Enter key.

In order for the VirtualBox virtual machine to boot from the hard disk again, you can either set the boot order from the last one in the settings section " System” - which we actually checked above, or extract the disk image from the virtual machine drive. This is easiest done by clicking the disk-shaped button at the bottom of the virtual machine window. One of the available functions would be " Remove disc from drive».

However, if bootable flash drives are often tested, you can simply select the boot option from the desired disk partition in the Plop Boot Manager bootloader window.
3. Booting from a flash drive to VMware Workstation
Okay, still free VirtualBox, but for the paid VMware Workstation program, the lack of a simple and understandable option to be able to boot a virtual machine from a USB flash drive is an unacceptable thing. Nevertheless, even having paid, we will solve this problem with our own efforts.
As with VirtualBox, the VMware Workstation virtual machine must also be shut down. In the details window, click the option to change settings.

Let's get into the parameters of the virtual machine, here we need the tab " Equipment". Move to the tab " CD/DVD", set the active option" ISO image file", then use the browse button to specify the path to the file" plpbt.iso". Click " OK».

Returning to the virtual machine details window, click the drop-down list of its states and select " Enable with firmware". In our case, we are dealing with the latest version of VMware Workstation 11. But in earlier versions of the program or in different editions of the VMware Workstation translation, this option may be called differently, for example, “ Enable in BIOS”, the English version is “ Power On to BIOS».

Unlike VirtualBox, VMware Workstation does not provide for setting the boot order of a virtual machine in its settings. Everything happens like on a real computer: the priority of boot devices is assigned in the virtual BIOS - an analogue of a real basic input / output data system.
After starting the virtual machine in BIOS mode, we enter it (by double-clicking inside the window or by pressing the ctrl+g). For reference: by default, the release of the mouse pointer in the VMware Workstation program is carried out with the Ctrl + Alt keys. Using the navigation keys "→" we move to the section " Boot”, then using the “↓” key we go down to the parameter “ CD-ROM drive". Use the "+" key to push it to the top of the list and press " F10».

We confirm the decision by pressing Enter in the box with a preset answer option " Yes» when prompted to save the configuration.

The virtual machine will restart and we will see the Plop Boot Manager interface. Also, as in the case of VirtualBox, at the bottom of the virtual machine window, click the USB devices button and connect the USB flash drive.

We restart the virtual machine.

Now we can go inside it and select the option to boot from USB devices in the Plop Boot Manager menu.

Returning the VMware Workstation virtual machine to boot from the hard disk is the reverse process. You need to enter the BIOS and set the boot priority with " hard drive' just as it was before. You can do otherwise and remove the Plop Boot Manager disk image itself. At the bottom of the virtual machine window there is a button in the form of a disk, it provides quick access to the drive settings. Click " Options».

In the virtual machine drive settings window, we can either uncheck the device status " To plug”, or make the option to detect a physical CD/DVD drive active.

Did this article help you?
I connected usb to VirtualBox as shown in the screenshot.
But it is not possible to boot from a USB drive even when connected (link).
So I would like to know if there are any other options to boot from a USB stick?
VirtualBox itself does not support booting from a USB device. Booting from a USB device requires a different bootloader. The following steps provide one possible way to achieve this:
If all goes well, the machine should now boot from the USB device.
Since VirtualBox does not boot to USB drives, you can create a .vmdk file that points to your USB drive to boot to.
NOTE. You MUST add your user account to vboxusers for VirtualBox to see your USB. You MUST add your account to the disk group as well, otherwise you won't be able to add the .vmdk file to your VM. IN EDIT instructions added.
First, you need to create your USB drive on your system and define what a physical drive is. We're assuming your disk is mounted as /dev/sdb1 . So the physical drive will be /dev/sdb .
Then type the following from a terminal window: create a .vmdk file pointing to the USB drive:
Vboxmanage internalcommands createrawvmdk -filename ~/usb.vmdk -rawdisk /dev/sdb
VBoxManage internalcommands createrawvmdk -filename ~/usb.vmdk -rawdisk /dev/sdb
Then you should see something similar to this:
RAW host disk access VMDK file /home/ravan/usb.vmdk created successfully.
Then all you have to do is add the .vmdk file to the VirtualBox VM and make sure you can load it.
EDIT:
To add a user to vboxusers , run the following command:
sudo usermod -a -G vboxusers username
To add a user to the disk group, run the following command:
Note. Adding a user to a disk group can be dangerous and a security risk. This is just as dangerous as sudo access to write to a raw disk.
sudo usermod -a -G disk username
Then you MUST PAY your system for the changes to take effect.
Before reboot:
After reboot:
Hope this helps!
I came to this post just a few days ago. I don't want to use Plop Boot Manager because my USB drive is already bootable.
So I tried pointing the USB drive to the VMDK drive (as in Terrence's answer) by creating vboxmanage internalcommands createrawvmdk -filename ~/usb.vmdk -rawdisk /dev/sdb
Unfortunately this refused to work... I chmod and chown the usb.vmdk drive and so I was able to mount it to the VM, but it just didn't work.
Finally I tried another solution and it works flawlessly. Here it is (thanks Jean Santos for research):
- Insert a USB stick and identify it (mine is /dev/sdb , works on Sabayon Linux);
Create disk.vmdk , converting a raw device (like a USB stick) to a VirtualBox disk
sudo VBoxManage convertfromraw /dev/sdb ./usb.vmdk --format vmdk
You now have a usb.vmdk disk created from your bootable USB drive. I also tried .vmdk usb drive to image file and create .vmdk drive from image file. It works and also the .vdi drives created the former path (or from an image file)
Now give permissions to the created drive so that VirtualBox can access the file. It simply means changing the owner of a file to a user in the vboxusers group. If your VirtualBox installation is running fine than this owner, you might:
Sudo chown `whoami`:`whoami` ./usb.vmdk
Now you just need to attach the usb.vmdk disk to the virtual machine. But he must be attached to the IDE controller. I have tried SATA without success.
At this stage everything is fine.
Just boot up a new virtual machine, press F12 and select your boot disk.
Enjoy!
The easiest solution is to copy the contents of the USB key into an iso file (well, next time I'll just download the iso to the right machine, no USB key needed anyway)
Dd if=/dev/sdc of=myusbkey.iso
And then add this .iso as an optical drive in VirtualBox settings, under Storage, Controller: IDE (or SATA I think).
There is no need to create a .vmdk file, VirtualBox supports .iso files.
I didn't want to run Virtualbox as root. I didn't want my user to be from a drive group, having full permissions on all drives.
So here's what I got to work:
Learn what an SD card is. In the following instructions, this is sdc .
- Launch virtualbox
Disable Memory Stick
Su chmod 666 /dev/sdc1 chmod 666 /dev/sdc VBoxManage internalcommands createrawvmdk -filename usb.vmdk -rawdisk /dev/sdc chmod 777 usb.vmdk chmod 666 /dev/sdc
Attach virtual machine usb.vmdk
Chmod 666 /dev/sdc
When done, reset sdc1 permission for security:
Chmod 660 /dev/sdc1
In the above, you can see that I had to reset the permissions for the drive several times because it would revert to root each time.
I'm using Mandriva Linux but on Ubuntu it should be about the same
May 19, 2015 at 12:33 pmInstalling AirSlax on a virtual machine. Work with WiFi
- System administration
Somehow I ran BackTrack r5 on VirtualBox, but I couldn’t do anything, because it needs a Wi-Fi Adapter, and it saw the adapter built into my laptop as Ethernet, so you can’t work through it. You will not turn on the monitoring mode on it.
I've searched a lot of sites on the internet and haven't found anything. Decided to start digging myself. And I did it. I must say right away that I did not install AirSlax in order to hack other people's WiFi networks. I needed to find out who is connected to my network, but this is not about that now.
I will describe the whole process, namely:
1. Installing AirSlax on VirtualBox
2. Preparing the flash drive
3. Setting up the virtual machine
4 Working with usb WiFi adapter
Those who know how to install AirSlax on VirtualBox can skip this and start reading about setting up a USB WiFi adapter.
Let's start.
Step 1: Prepare the virtual machine in VirtualBox
By the way, why VirtualBox and not VMWare?There are several reasons:
1. I didn't fully understand VMWare, but I have experience with VirtualBox.
2. I couldn't run AirSlax on VMWare
Let's get started.
1.1 Enter a name for the virtual machine
1.2 Type Linux (Required Linux)
1.3 Version, up to you, but I chose Linux 2.6 / 3.x 64bit (if you have a 32 bit operating system, then select 32 bit)
Now we will specify the amount of allocated memory for the virtual machine

Specify such an amount that you have a couple of GB left for the main operating system, optimally like this:
- with 4 GB of RAM ~ 2 GB per virtual machine;
- with 8 GB of RAM ~ 4 GB per virtual machine;
- with 16 GB of RAM ~ 8 GB per virtual machine;
- with 32 GB or more, 8 is possible. It will be enough for her.
Because AirSlax includes the Porteus bootloader, installation on a real hard drive is not recommended. This bootloader will break your Windows bootloader.
Now, if you have not created a flash drive with AirSlax yet, then I described it here, and if the flash drive has already been created, then proceed to step 3
2. Preparing the flash drive
2.1 Downloading the original image
You can download the image from here. The link leads to Yandex disk.If you don't believe me, then go to www.airslax.ru and download from there yourself.

2.2 Copying the downloaded image to a flash drive
Copy the boot and porteus folders to a flash drive. After copying the files, go to the boot folder and open the porteus-installer-windows file:
When this window appears, press any key to install the porteus bootloader on the media. Make sure you don't install a bootloader on your hard drive:

Now press any key again to exit the installer. That's all, the flash drive is ready and AirSlax is already on the flash drive.
Now I’ll explain why a flash drive is needed, as mentioned above, Porteus bootloader can ruin your system loader, respectively, putting all the files in iso, you can’t run airslax without installing porteus bootloader.
Oh, by the way, on account of the hard disk for the virtual machine, select "Do not connect a virtual hard disk". We will do this a little later.
Somewhere on the Internet, I found an article on how to boot from a USB flash drive into virtualbox, maybe even read it on this site, I don’t remember exactly.
3. Setting up a virtual machine and setting up boot from a USB flash drive for VirtualBox
In order for VirtualBox to work with a flash drive, you need to write down the path to the device, all the information in the vmdk file, how to do this.To create we need:
1. VBoxManager (vboxmanage.exe - located in the VirtualBOX folder)
2. DiskPart (system utility for working with disks, disk partitions)
I managed to create a regular bat file in the folder with VirtualBox, but I didn’t have enough rights to create a vmdk file, the program required administrator rights, I had to do it through the command line (cmd).
I will describe how to do it through the command line, but if you want to make a bat file, then just copy the lines and edit them a little with your own.
3.1 Configuring VirtualBox to boot from a flash drive
Open cmd (as administrator).Enter the following: cd the path to VirtualBox (mine is: "C:\Program Files\Oracle\VirtualBox"). After
VboxManage.exe internalcommands createrawvmdk -filename c:\vbox\usb.vmdk -rawdisk \\.\PhysicalDrive1
I'll write the commands:
VboxManage.exe internalcommands createrawvmdk (this must be rewritten);
- filename (path to save the vmdk file);
- rawdisk (physical disk, flash drive) - how to find out what number, for this we need DiskPart.
Let's get started with DiskPart.
Open another cmd, this utility does not require administrator rights.
Enter diskpart, if entered correctly, you will see this window:

Enter list disk and find the flash drive in the list. Please note, since I have Disk 0 is a hard drive, and Disk 1 is a flash drive. Since Disk 1 is a flash drive, the command in VboxManager will be:
Switch back to cmd with the command you entered.
VboxManage.exe internalcommands createrawvmdk -filename path for vmdk -rawdisk \\.\PhysicalDrive1 (in my case 1 is a flash drive).
Don't forget to create a folder where you will save the vmdk file. If everything goes well, you will see the inscription
RAW host disk access VMDK file filename.vmdk created successfully.
Now let's move on to setting up the virtual machine itself.
3.2 Connecting an external flash drive to a virtual machine
Right click on the virtual machine -> Settings
Select Media from the list on the left. Then click on the button highlighted in red in the picture.

Click on the "Select an existing disk" button and select your created vmdk file.
Now let's move on to connecting USB WiFi to AirSlax in VirtualBox:

Go to the USB menu and click on the button with a green plus and select your adapter, then click "OK" and run.
If everything is set up correctly, you will see a blue menu, select Graphic Mode and wait.
As soon as the desktop appears, you can work.
Here is a screenshot of AirSlax in VirtualBox:

I hope I didn't waste so much time. Good luck!
This article was created for informational purposes. The author of the article is not responsible for the damage caused by this program.
Being engaged in system administration, I often have to use virtual machines like Oracle WM VirtualBox And WMWare Workstation. VirtualBox\"I use it more often because it is simpler and easier for single launches. It became necessary to boot the virtual machine from a real USB flash drive, in this case, to check a freshly assembled bootable flash drive. But there is one nuisance - through the main interface of the VirtualBox program you cannot boot a virtual machine from a physical USB drive, however, there is a way to solve this problem.This method will be discussed in the article.
To boot the VirtualBox virtual machine from an external USB drive, you need to create USB disk clone as *.vmdk file, through which the VirtualBox host will communicate with a physical external USB drive. Such a file will take several kilobytes, because. contains only data for communication with the USB drive.
1. Create a file that serves as a bridge between VirtualBox and a USB drive.
To create a *.vmdk file, there is the vboxmanage.exe utility, which is included in the standard VirtualBox package, so you do not need to download it separately.
So, to create such a file, you need to run the following command in a command prompt window, replacing the path to the VirtualBox directory with your own:
"C:\\Program Files\\Oracle\\VirtualBox\\VBoxManage.exe" internalcommands createrawvmdk -filename c:\\temp\\usb.vmdk -rawdisk \\\\.\\PhysicalDrive2 -register
Here you should pay attention to two parameters:
To find out the number of the external USB drive to which the file should be associated (usually an external USB HDD with the number 1 , if only one hard drive is installed), you can peep it in "Control Panel → Administrative Tools → Computer Management → Disk Management".

Now all that's left is to configure the VirtualBox host to boot from the newly created virtual disk.
2. Installation in VirtualBox *.vmdk file as a boot disk.
First you need to add the created usb.vmdk to the list of hard drives in the VirtualBox virtual media manager.

Next, go to the "Properties" of the virtual machine (which must be booted from a USB external drive) and in the "Media" section, install the added virtual hard disk usb.vmdk in Slot"Primary IDE Master" as in the screenshot.

Done, now you can boot the virtual machine from an external USB drive.