In well-structured style sheets, there is no need to assign classes to each element. It is enough to describe the styles of elements in more detail, using the ability to nest selectors within other selectors. By the way, such selectors are called nested and represent a three-dimensional structure.
Example 2.2.1
Below is the so-called "verbose CSS", which presents a model for nesting some selectors within other selectors.
.global-header ( background-color : #f5f5f5 ; color : #443d3d ; border-bottom : 1px solid #ddd ; ) .global-header h1 ( margin-top : 0 ; margin-bottom : 0 ; font-size : 4rem ; ) .global-header h1 small ( font-size : 2rem ; ) .global-header .header-actions ( background-color : #fff ; padding-top : 10px ; padding-bottom : 10px ; text-align : center; )Problem solving
All this is good, but only as long as the class names are short, the nesting depth is not great, and your eyes are able to follow this structure. Personally, until I started using CSS preprocessors, I wrote code in this way, along the way dividing the CSS file into logical blocks and trying to keep it clean. This is convenient and practical, but I quickly got bored with sorting code by nesting, and my style sheet sometimes looked like a hodgepodge of letters and numbers. Of course, before the final assembly of the project, all this was corrected, but this is not the case that you want to spend time on.
Imagine a table of contents for a simple book, like this:
1. Chapter 1. This is my first chapter of book 1.1. This is my first story about what I did 1.1.1. A little more detail on what I did 1.2. This is my second story about what I did 1.X. ...
Here it is quite easy to understand that point 1.1 is a consequence of the first point. However, if you rewrite it in a more readable format, you can save time processing numbers in your head. Abstractly, one can represent the following format:
This is my first chapter of the book This is my first story about what I did A little more about what I did This is my second story about what I did
It is this nesting model that is present in Less, when one selector, in the truest sense of the word, is nested in another selector. This results in a structure that is easy to maintain, readable, and pleasing to the eye. If you try to project such a model onto the CSS code, then it will look like this:
.class-1 ( property : value; .class-2 ( property : value; ) .class-3 ( property : value; ) )For more clarity, I propose to refer to a specific example in which I will try to compare classic CSS and Less code.
Example 2.2.2
Here I rewrote the code from example 2.2.1, replacing the classic syntax with a preprocessor one.
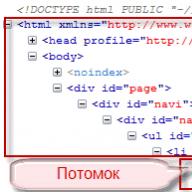
.global-header ( background-color : #f5f5f5 ; color : #443d3d ; border-bottom : 1px solid #ddd ; h1 ( margin-top : 0 ; margin-bottom : 0 ; font-size : 4rem ; small ( font- size : 2rem ; ) ) .header-actions ( background-color : #fff ; padding-top : 10px ; padding-bottom : 10px ; text-align : center; ) )The image below shows the nesting model described in this example. For clarity and understanding of the essence of what is happening, the screen is divided into two parts, where the code is written on the left in the preprocessor language, and on the right in "pure" CSS.
Agree, now your code becomes intuitive and easy to read. In such a structure, it is difficult to get confused and lost among the selectors, because here their nesting is clearly visible and there is no need to remember the name of the parent selector - the compiler does this for us.
Warning!
Try to remember once and for all that you can nest selectors in each other indefinitely, but do it strictly Not recommended! Many developers advise to ensure that the structure, in general, does not exceed three investments. There is no need to nest selectors starting from the parent to that depth. The maximum allowable level, in extreme cases, five attachments. Try to avoid edge cases unless you really need to.
Hello, dear readers of the blog site. Today I propose to continue the conversation about, which we started in the above article. Earlier, we got to know what cascading style sheets are, what they mean, and much more.
All the material on cascading style sheets that have already been published on this blog can be found in . Today we will first talk about how you can combine and group selectors, and then take a closer look at the rules that apply to the same element in the Html code (Important, selector counting and writing rules in the style attribute).
Combinations and grouping of selectors in CSS
So, in previous articles, we managed to consider 7 types:
Of these seven possible types in the CSS language, combinations can be made. All combinations that we will make are directly related to (ancestors - descendants, parents - children, brothers - sisters).
The first type of combination is called context selector. It takes into account the relationship of Html code elements according to the principle "Ancestor - Descendant":

Separate selectors in a combination are written with a space and should be read from right to left. That. the CSS rules will only apply to the last one of that combination (the rightmost one), and anything before it just allows us to fine-tune the application (targeting) of our rules (accent).
The first example says that all B elements (bold) that have Div elements in their ancestors will be colored green.

In the above code, only the underlined fragment will be colored green, because there is a Div among its ancestors, and the second code fragment, highlighted with B tags, will remain in the color that is selected for it by default, because the Div container is no longer among its ancestors (only P and Body):

Such combinations work in any browsers.
The next type of combination would be child selector, which is based on the principles of the relationship of code elements according to the "Parent-Child" type:

They are written with a separator greater than sign (>):

This entry will be interpreted by the browser as follows: for the "parent" (nearest ancestor) of which is the container Div, red highlighting will be used.

In the above example, only the paragraphs that are outlined will be colored red because they are wrapped directly in the Div container that is their parent (nearest ancestor). If you modify the above example of a child selector to this:
Body > p (color:red)
Then only the last paragraph will be highlighted in red, because its parent is the Body tag, and the first two paragraphs will remain in their default color (Body is their ancestor, but not the parent, which is the Div). Child selectors do not work in Ie 6 browser.
How and why group selectors in CSS code
The last combination is called adjacent selectors and meets the principles of relations between the elements of the Html code of the type "Sisters - Brothers". They can use either "+" or "~" as a separator:

This entry means that the content of the I element (italicization) will be colored red only if its nearest left (top code) neighbor is the B element (bold). For example, the given condition will be met in this example:

If you write an adjacent selector in Css code like this:
H1~p (color:red)
This will mean that all paragraphs (P), which have a neighboring element H1 (heading) above in the code, will be colored red. It is the neighboring elements that are meant (relations of the type "Sisters - Brothers"). In the example below, the given selector will match the circled paragraphs:
Combinations of adjacent selectors in the browser Ie 6 are also, unfortunately, not supported. In Ie 6, only the first type of combination is supported, while in Ie 7 and above, all others are supported. Other browsers shouldn't have any problems.
Selectors in CSS can also be grouped. For example, if some of them use one or more of the same rules, then they can be combined into a group to reduce the amount of Css code.

In the example shown in the screenshot, it is repeated for each header selector (h1-3), which can cause difficulties (multiple work) if you want to change the value of this property. Therefore, the second version of the grouped record looks a little more preferable.
Please note that when grouping selectors are separated by commas. If there are more identical rules, then the code savings will be more tangible. And those rules that were unique still need to be written down individually.
Css Property Priorities (with and without important)
Now let's think about what styling will the browser use if no styles are set for this Html code element? And for this there is a corresponding specification, where all this is described.

As you can see, now there is already a final separation of Html and Css. Those. even for pure HTML code, the browser will still use the default style sheet properties. So here are the default properties have the lowest priority.
The properties assigned by the user in their browser settings have a higher priority. These styles will be applied to any documents he views in that browser.
True, not all browsers have such an opportunity, but at least Ie and Opera have it. Those. if desired, the user can include his own CSS file as a source of style markup.
For example, in Ie, for this you need to select from the top right menu "Tools" - "Internet Options", and then on the first tab "General" click on the bottom button "Design". In the window that opens, you need to check the box "Design using custom style", and using the "Browse" button, find on your computer the CSS markup file you need:

Those. the user has the ability to make any site opened in the browser look in accordance with his requirements, described in the CSS file. It is called "custom styles" and they take precedence over the styles that are defined in the default specification. But the so-called author's styles will have even greater priority.
That is, if I (the site developer) wanted to use styles other than the default styles in the design of any Html code element (remember, they are described in the specification), then the user will not be able to interrupt my design with his own Css file.
Will the user be forced to accept? No. He has the opportunity boost your CSS properties by adding Important at the end of each. This word is written through a space character and an exclamation mark is placed in front of it:
P (color:red !important;)
If the user in his own style file, which he connected to the browser, will have the same property with Important, then he will see all paragraphs in red. But after all, the author (developer) of the site could use Important for this property. Who then will win and whose priority will be higher?
We decided that custom styles with Important will have in any way a higher priority than the author's styles, both with Important and without it.
Let's summarize in the form of a list all the above information about the priorities of style properties. The priority will decrease from top to bottom:
- Custom with Important
- Copyright with Important
- Copyright
- Custom
- Styles adopted for Html elements in the default specification (when neither the author nor the user has specified anything else)
Those. without Important, author styles are more important, and with them, user styles are the most important and priority. Well, now let's deal with the author's tables, because what the user does is unknown to us and is covered in darkness.
How to increase the priorities of Css properties in author styles
Right now we are moving on to the question cascading css style sheets. Let's look at this with an example to make it clearer. Let's say we have a code snippet with the following Html elements (a paragraph inside a Div container):
Container content
Let's write these properties first:
P(color:red) .sbox(background:#f0f0f0)
As a result, both the first of them will be applied to the paragraph (because it is formed by the P tag), and the property that sets the gray background for the element with the “sbox” class, which again this paragraph has:
And now let's add another property to the second (class) selector that will conflict with the first line (both of them are set, but the values are used different):
P(color:red) .sbox(background:#f0f0f0;color:blue)
As a result, the text color of the paragraph will turn blue instead of red.
Why? Because this is how the conflict is resolved when the same Html code element receives several identical rules at once, but with different values and from different places in the Css code. To determine which rule has higher precedence, you need to count its selectors.
In addition, themselves selectors are graded by priority. ID has the highest priority. In this example, the text color will be blue precisely because the Id (#out) priority will be higher than the tag (p) selector:
P (color:red) #out (color:blue)
Further down the priority ladder are the class, pseudo-class, and attribute selectors. In the following example, the (p) tag will play again and the color of the paragraph text will be blue, because it competes with a higher priority (class) selector:
P(color:red) .sbox(color:blue)
Well, the lowest priority (apart from the universal *, which has the lowest weight and does not make any changes to such butts) is tag and pseudo-element selectors.
Div p (color:red) p (color:blue)
What color will the resulting paragraph text be? That's right, it's red, because. this property has more tag selectors (two vs. one). Oh how. Those. Ids are considered first. If there is no winner, then classes, pseudo-classes and attributes are considered. Well, and if nothing was decided there either or no such was found, then selectors of tags and pseudo-elements are considered.
But it is quite possible that the winner will not be revealed and the selectors of competing classes will be of equal priority in the sum. For example, for our long-suffering paragraph enclosed in a Div container:
Container content
It will be quite possible to write such a piece of Css code:
Div.box #out(color:red) #in p.sbox(color:blue)
And what color should the paragraph text be? Both combinations describe exactly our paragraph. The first should, as usual, be read from right to left: apply these properties (color: red) to the element with Id #out, which is somewhere inside (have it among the "ancestors") of the Div container with the class.box (div.box ). Completely fits our paragraph.
Second combination: apply these properties (color:blue) to a paragraph element with class sbox (p.sbox) that is inside any element with Id #in. Again, it fully describes our paragraph. Let's count selectors.
With ID in both combinations they occur once, the same can be said about classes. It remains only to count the tag selectors, but they are also used in both combinations the same number of times (one). Ambush.
turned out equal priorities for the same property with different values (text color red or blue). How will the browser solve this dilemma?
Here the rule will apply - who is last, he is right. Therefore, in my example, the text color of the paragraph will be blue, because this property (color: blue) is located lower in the code. If these rules are reversed:
#in p.sbox(color:blue) div.box #out(color:red)
This will change the text color of the paragraph to red. Q.E.D. You can add, for example, another tag selector to any combination and we will tip the scales in its favor, even if it is not lower in the code:
Body #in p.sbox(color:blue) div.box #out(color:red)
In this case, the color of the paragraph will change to blue. The universal selector "*" has no effect on the priority calculation at all. By the way, just above we considered a way to increase the priority of Css rules by adding Important. In our example, it might look like this:
P (color:green !important) #in p.sbox(color:blue) div.box #out(color:red)
What color will the paragraph text be in this case? Green, of course. And you don't even need to count anything, because adding Important to the style property solves this controversial issue unambiguously, no matter where it is in the code and how many selectors it has.
But Important is not the only way to unconditionally raise the priority of a property. The second way to boost might be to use stylesheets. properties in the Style attribute the Html element you need.
Those. write the Style attribute inside the same long-suffering P tag with the assignment of any color:
Container content
Well, that's all. Now, regardless of what properties are written for this element in an external style sheet file or inside the Style Html tags of the code, the text color of the paragraph will be yellow.
But he will not be able to kill properties with Important. Those. in the last example where we added the "p (color:green !important)" rule, the text color will still be green even though style="color:yellow" is set.
In fact, the priority of the two rules (with Important in the external stylesheet file and in the style attribute) is equal, which means you need to move on to counting selectors. Can they be inside the style attribute?
Yes, there cannot be any, which means that a rule written in the style attribute will always lose to a rule with Important only due to a smaller number of selectors (zero will be less than any number).
Well, what then will give the highest priority to the Css property? That's right, it will be written in the style attribute, and even with Important:
Container content
In this case, the text color of the paragraph will be yellow and it will be impossible to interrupt it with anything in the author's styles. We have found an absolute way to set styles. It can only be overridden by a user with their own stylesheet and the Important property set for it.
So let's try to compose list of factors affecting priority properties in author styles in descending order:
- Setting the property in the style attribute of the desired tag along with Important
- Adding Important to a property in an external style sheet file or in the style tag directly in the Html code
- Simply writing this property in the style attribute of the element needs
- Using a larger number of Ids for a given property
- Using more class selectors, pseudo-classes, or attributes
- Using more tag selectors and pseudo-elements
- Lower position of the property in the Css code, all other things being equal
In fact, the rules in the style attribute are rarely used (imagine how difficult it would be in this case to make changes to the entire code of the site, and not in a separate CSS file).
This attribute is mostly used when you just need to test something quickly. Well, it's also convenient if you insert your code into other people's Html pages, which have their own style design and which can be inherited () for your inserted elements.
Why and how to insert your code on other people's pages? We may not need to, but Yandex and Google do it when or on other sites (our sites with you).
By adding the style attribute to all elements of the ad block code, with properties written in it and Important added, you can no longer worry that the ad code will be changed in any way (although Yandex ads can still be changed due to CSS and Important, apparently they did not use this method).
Good luck to you! See you soon on the blog pages site
You may be interested
 Tag, class, Id, and universal selectors, as well as attribute selectors in modern CSS
  Selectors of pseudo-classes and pseudo-elements in CSS (hover, first-child, first-line and others), relationships between Html code tags
  List style (type, image, position) - Css rules for customizing the appearance of lists in Html code
  What is CSS for, how to connect cascading style sheets to an Html document and the basics of the syntax of this language
  CSS - what is it, how cascading style sheets are connected to Html code using Style and Link
  Size Units (Pixels, Em and Ex) and Rule Inheritance in CSS
  Background in CSS (color, position, image, repeat, attachment) - all for setting the background color or background image of Html elements
  How to find and remove unused style strings (extra selectors) in your site's CSS file Different styling for internal and external links via CSS
The article is not entirely relevant.
In 10.2 and higher, added the ability to rename the page with the rules of the site directly in the admin panel of the engine, while directly editing the text of the rules. However, the site rules page remains. It exists and is located on any DLE site at http://my_site/rules.html
How to squeeze all the juice out of this address - read on
Page with site rules in CMS DLE
The page with site rules in is a system static page. It is processed by the engine and generated in the same way as a regular stat page. Only it is impossible to remove it - it is not provided by the engine developer. Even if the site rules themselves are turned off for display during registration, then the site rules page is always available at http://my_site/rules.html The first search engine that finds it there will start to puke and spit on the text and name. It is not smart. After all, on all sites DLE - the same thing.
When a page with site rules gets into the site map, it is regarded by the search engine as "garbage" and is not taken into the search index, since the site rules are the same almost everywhere. Therefore, the page with site rules in DLE, by default, is prohibited (closed) from search indexing in the file ( Disallow line: /rules.html).
The uniqueness of the "Site Rules"
Personally, my opinion about the page with the rules of the site and about its uniqueness is an atavism that distracts the user's attention during registration. The rules of the site are a rudimentary offshoot, the uselessness of which was successfully proved by the organizers of social networks.
No, well, did someone see on facebook or twitter any formidable or special rules when registering? Or maybe they are on Vkontakte and Odnoklassniki? That's it!
And some website, with a attendance of 1000 uniques -
begins to write its own unique rules for users.
As for me, the best rules on the site are their complete absence.
If the user is normal and adequate, he understands everything.
No page - no problem
It's no secret that blocking pages and directories from search indexing is not a panacea. One way or another, any page of the site will sooner or later be “chewed” by the search engine. For example, take the same Yandex. His search robots will pump out absolutely everything they find from the site, and only then they will start sorting and thinking whether to issue pages to the search or not. This is quite obvious, despite the touching assurances of Yandex that he and his robots do not download extra material from the site. Like, if a web page is closed from indexing, then Yandex saves only its address marked , or(who will close it).
Rather than digging and blocking a “garbage” page with site rules from search indexing, it’s much better to remake it for some other useful thing and open access to it for search engines - let them calm down. Or, at least just write your behavior on the site and, again, allow search engines to the page.
Open site rules for search engines
We take a bold step and open access to the page with the rules of the site for search engines. To do this, in our file we find the line Disallow: /rules.html and delete its nafik. It is done! Now, any search robot will be able to officially get into the open "Site Rules" and, of course, say "Fe-e!" and "Be-e!". To prevent this from happening, we remake the "Site Rules" page - insert your own unique text on any topic, pictures and change the name (title) of the page.
Editing the "Rules on the site" page
Editing the page with site rules is available in the DLE engine admin panel, in the "List of all sections" - "Rules on the site" section. Editing the page "Rules on the site" is performed, as for any other static page - in the normal mode of the visual text editor. Here, problems can only be with writing a unique text and selecting unique pictures. A little higher, there is a special window for entering a title (title) for the updated page. But, such an innovation appeared in, starting with version 10.2.
To rename the site rules page
in older engine models -
You will need to delve into its system files.
Renaming the page "Rules on the site"
(for CMS DLE 10.1 and below)
Directly renaming the "Rules on the Site" page itself is done in the adminpanel.lng file, which is located in the language/Russian/adminpanel.lng folder. The adminpanel.lng file is a DLE engine system file. To edit it, go to your server (otherwise - no way).
Open the adminpanel.lng file.
We are looking for a line
"rules_edit" => "General site rules"
We change the words “General rules on the site” to our new name. We close. We save. (You can only change the Cyrillic alphabet, which is between the quotes. Otherwise, it will stop working altogether.)
Clear engine and browser cache. After editing and saving the adminlogs.lng file, it is necessary to clear the engine cache and the browser cache in order to force the engine to re-generate the page with a new name, and the browser to download it. If this does not help and the old name continues to be displayed, you need to go to the admin panel of the engine, edit and re-save the "Rules on the site" page with some insignificant sign. For example - put a period in the text (then you can fix everything back). Such bullying and atrocities will definitely clear the brains of the engine and the server and force them to generate and display a new name.
Thinking out loud. It feels like respected celsoft reading this blog. A little later, after this publication, in the admin panel of the CMS DLE 10.2 version of the engine, it became possible to rename the page with the site rules in a normal civilized way, without tedious picking in the script system files. Many thanks to the developers of CMS DLE for their work and attention to the problems of ordinary people.
Rules are part of our world and constantly guide our daily actions. In almost every area of our lives there are rules - rules of behavior (rules of behavior), rules of etiquette (etiquette), rules of crossing the street (rules of crossing the street) - the list is endless.
What are rules? It is a set of instructions that must be followed or obeyed. There are many English words that imply rules, or refer to rules:
- Cautions - warning
- Commandments - prescription, directive
- Directions - instruction
- Forewarnings - warning
- Guides - guides
- Guidelines - guidelines
- Instructions - instructions
- Laws - laws
- Policies - settings
- Procedures - procedures
- regulations
- Warnings - warnings
Google shortcode
Rules affect us every day and are hard to avoid even in the simplest places, even when we are just walking down the street it is impossible to miss all the signs (miss all the signs) posted around us, warning (giving warnings) and indicating on the rules to follow. The most common way to explain a rule is to write it down in a book or put up signs that everyone can see. Here are some of the rules posted in the form of signs that we often see on the streets and in public places, known as warning signs.
- no cycling - you can not ride bicycles
- no entry - entry denied
- no skating allowed - you cannot roller skate
- beware of oncoming bicycles - beware of oncoming bicycles
- Keep clear = do not block this area - do not occupy this area
- you can't fill your gas cans here - you can not fill gas cylinders
- poison = do not eat it - poison = you can not eat
- no smoking allowed - do not smoke
- beware of people crossing the road - carefully, pedestrians
- no parking allowed – parking is prohibited
- do not drop litter - do not throw garbage
- no children allowed - children are not allowed
- no photography allowed - photography is prohibited
- please clean up after your dog - clean up after your dog
- danger of death - danger, high voltage electricity nearby - dangerous! – dangerous, high voltage
- no spitting allowed - you can't spit
As you can see, there are a lot of rules around us (rules are all around us), and we must follow them, although, it must be said that sometimes people do not follow the rules, they break them (they break the rules), or go against the rules (go against the rules), sometimes they are “caught” (they are caught) and punished (they are punished). If you break the rule, you may be forced to pay money, i.e. a fine (a fine/penalty), or worse, may be forced to go to the police station.
Have you ever broken the rules? People who always follow the rules are called “law abiding”, and people who break the rules are called “law breakers”.
Finally, we want to wish you “be good!” , "follow the rules!", "stay out of trouble!"
Sharing is caring!
Attribute of what does| Name | food |
|---|---|
| Starflower | stir fied tofu |
| Miko | vegetable rice soup |
| Andy | hummus |
| Ping | french toast |
The ALL Value for the RULES Attribute
RULES=ALL indicates that all the internal borders should be visible. RULES=ALL is usually used in conjunction with FRAME=VOID so that there are outer borders but no inner borders.
| Name | food |
|---|---|
| Starflower | stir fied tofu |
| Miko | vegetable rice soup |
| Andy | hummus |
| Ping | french toast |
The COLS Value for the RULES Attribute
COLS indicates that there should be borders between the columns but not between rows.
| Name | food |
|---|---|
| Starflower | stir fied tofu |
| Miko | vegetable rice soup |
| Andy | hummus |
| Ping | french toast |
The ROWS Value for the RULES Attribute
RULES=ROWS indicates that there should be borders between rows but not between columns.
| Name | food |
|---|---|
| Starflower | stir fied tofu |
| Miko | vegetable rice soup |
| Andy | hummus |
| Ping | french toast |
The GROUPS Value for the RULES Attribute
RULES=GROUPS allows you to put borders between groups of table cells. There are two ways cells can be grouped: by row and by column. Let's go over each of them. Note that currently Netscape does not recognize RULES .
Grouping By Row
To group by row use the ,
, tags. indicates the header rows of the table, indicates the main body of the table, and indicates the bottom rows. So, for example, this code creates a table with three groups. Borders appear just between groups:
| Name | food | price |
|---|---|---|
| Starflower | stir fied tofu | 5.95 |
| Miko | vegetable rice soup | 4.95 |
| Andy | hummus | 3.95 |
| Ping | french toast | 5.95 |
| Total | 20.80 | |
Here's how that table renders:
| Name | food | price |
|---|---|---|
| Starflower | stir fied tofu | 5.95 |
| Miko | vegetable rice soup | 4.95 |
| Andy | hummus | 3.95 |
| Ping | french toast | 5.95 |
| Total | 20.80 | |
Grouping By Column
To group by column use the