Windows 10 has many new and useful features, including a new search tool and a search assistant called cortana. Here's how it works and how files can be found relatively easily.
Search for files in the traditional way: explorer
In Windows 10, a lot like in previous versions support for search operations, with the help of which you can easily find any file:
1. Open the file in Windows Explorer ( windows key + E)
2. At the top, enter the file name in the search bar, then one of the following search parameters:
date - file creation date
datetaken:
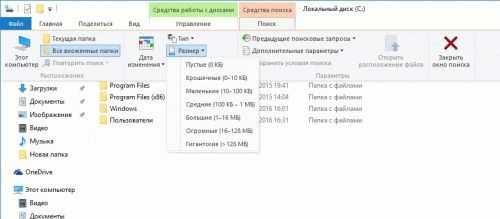
size: file size
keywords: - keywords
datemodified:
kind: - view
filename: - file name
There are a bunch of other operators to search for the desired file, and you can even combine several search operators using this
photoname date: last month AND keywords: great
You will have the opportunity to play around with these operators for a while to get desired file. Unfortunately, you will not be able to search the search results.
Search for files using special tools
Some of my favorite Locate32 and SearchEverywhere search tools.
Locate32 will index the whole hDD (C) and you can run a search query in seconds. It helps a lot if you are dealing with a million files or more.
Microsoft Account Login: Using Cortana
Cortana is a new speech recognition search assistant, you need to install it for this.
How to install Cortana Voice Assistant on Windows 10
One of the main features of Windows 10 is called the cortana voice assistant, your virtual assistant that will do the things you make it work with, using the built-in text-to-speech converter that is able to tell you about the latest stock quotes and complete a search query - that's it it is only from your voice.
Click on the Cortana search bar
4. Click in the search box on the taskbar
5. You will be prompted to log into your Microsoft account.
6. If you are using a local account, use the buttons and follow the on-screen instructions. You will be prompted to switch your local account to a Microsoft account. All your files will remain where they are, but you must now log in to your account microsoft entrybefore you can access your computer.
Optionally: Switching from a local account to account Microsoft
7. Log in to:
8. If you already have a Microsoft live account, you can now log in, if you do not have an account, create one of the first ones:
9. In order to protect your account, you can provide your address email from which you are registered:
10. The final step is to confirm the switch. Please note that all files will remain where they are, but from now on you will need to log into your PC using the Live.com password. You should also be aware that Microsoft can track how you use cortana (anonymously) to improve the service. For example, Cortana now has trouble identifying certain words; in order to improve the functions of converting speech into text, for this they will need more samples for processing.
Tell Cortana Your Name
Don't be rude, tell cortana your name and what you would like to call:
Start talking with cortana
I wanted to see that the function of converting speech to text works and, frankly, Amazon did the best work with partners for remote control (since this makes it easy to search for videos while talking from the remote control) to understand me 9/10 times.
But the cortana voice assistant still does not manage to understand even simple commands like “open browser”, which can sometimes be converted to “open frozen”, which are not even close to what I said. Something in Cortana came up with a very funny thing.
But after several attempts you will get what you need. True, I am a foreigner and cortana may have some problems with my accent. You must speak very clearly and clearly, and this helps to speak only from keywordsfor example, “Microsoft stock price”:
Then Cortana converts your speech into text and you will see that Cortana does this very well. It will either be a search through Bing or will directly open stock quotes or related applications.
I’m sure that the Microsoft developers worked hard to improve the function of converting speech to text. I really hope that they do not load it, as it is right now, because it can entail a lot of negative reviews. Apple and Amazon has already made speech recognition much better, but it's still a technical preview and they will hopefully deal with RTM quickly.
Each of us faced a situation where it was necessary to find the file, but the trouble is, it is not clear where it lies, in which folder it is saved. Well, if we know the file name. Then the search becomes an easy task. And if not? Then you have to look for indirect signs, whether it is the creation time, size, time of the last change, etc. With each new version Windows Microsoft is trying to increase the functionality of all applications in the system. The search function was no exception. The search itself in Windows 7 has been significantly redesigned and improved compared to WindowsXP. Windows 8 and 10 were no exception. The most noticeable difference, which immediately catches your eye, is the different ways of starting a search. In Windows 7, for this it was necessary to press the start button and enter the desired request in it already. On Windows 8 and 10, the search bar is already available in the start screen.
In Windows 7, the desired programs and settings were always sorted in order of priority. In windows 8 and 10, the search results simultaneously display files, settings, applications, etc.
The search menu in the Explorer ribbon allows you to filter your search queries by:
- Change date
- Type
- Size
- The name
- The path to the folder
- Tegam
![]()
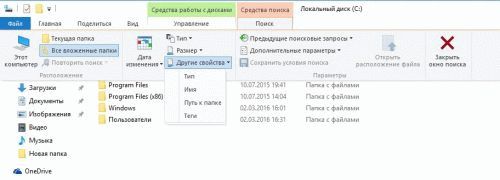
You can also use complex query syntax:
- View (search by document type properties)
- Date / change (search files by date / change)
- Type (search for files by type)
- Name (search files by name)
Let’s take a look at a specific example. Suppose we want to find a specific file, but do not know the exact date of its creation. But we can roughly indicate the date range. Windows 8 and 10 let you search for files by date range.
There are two ways to search for files: using the mouse or using the keyboard. We will show in detail how files are searched by date range in each of the ways we marked.
How to search for files by date range using the keyboard
The method is simple, the main thing is to know the syntax of the request. Open an explorer window and enter the following query in the search field:
date of change: 03/01/2016 .. 01/08/2016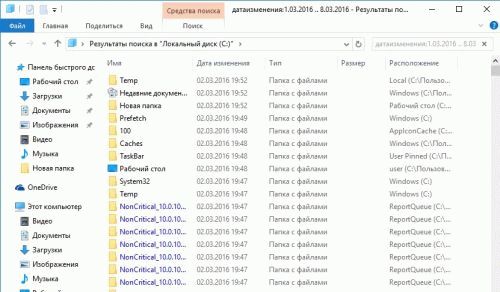
In principle, it’s possible not to type such a long query using the keyboard, just type “date change:”. A calendar will automatically open, in which, highlighting the necessary dates, we select the range we need with the mouse.
You can also search for files by typing in the search bar the query "create date:". Explorer will automatically offer you search options.
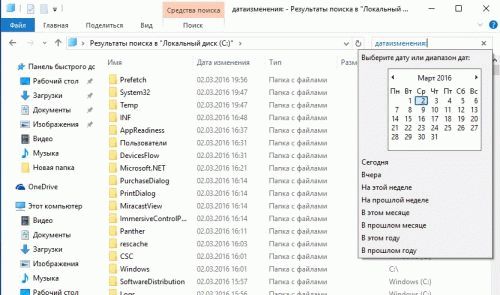
How to search for files by range with the mouse
In the explorer ribbon, open the Search tab and click Change Date. A list of preliminary search options opens: today, yesterday, this week, last week, etc. We select any of the proposed options and see that the condition we selected is displayed in the search field. You can specify a specific date. To do this, left-click anywhere in the search bar after the colon, the calendar will open. Select a specific date to search for files.
Now let's try to search by date range. There are several ways to search.
Try it, experiment. Combine queries, add different search parameters. If you often search for files by the same criteria, save the search parameters. To do this, on the Search tab, click Save Search Terms.
Alas, since the publication of the article about, a useful utility for instant search files in Windows, passed 3.5 years, and " things are still there"- the full-time search service still does not please users. The long-awaited release of the Top Ten with a personal assistant who learned to search for information not only locally on the hard drive, but also on the Internet, did not change the situation. this review I’m not boring, briefly and in the "pictures" will talk about the principles of work and self-tuning quick search by adding the requested directories to the indexed database (index).
How search works in Windows 10

As in previous versions of the OS, the "top ten" uses a similar search engine. Index Is a set necessary information about files on the hard disk as a group of files stored in a folder C: \\ ProgramData \\ Microsoft. Various properties of files (path, name, size, etc.) fall into the index, and indexing occurs during any of your manipulations - adding, changing or deleting controlled objects. By windows default indexes a limited number of folders (directories, locations), this list does not include system files, program folders, network drives. Unfortunately, if you do not save downloaded movies or books in directories specially designated for this, then they are also “deleted from the list”. Thus, all non-systemic ones are “deleted” from the index logical driveson which personal files are commonly stored: video, audio, photos, software distributions, documents, etc. For this reason, a regular search service is so slow, because the system first searches in its own list of indexed (index) files. Moreover, by default, searching outside the index is performed only by file names, ignoring archives (ZIP, RAR, CAB).
How to speed up your search in Windows 10
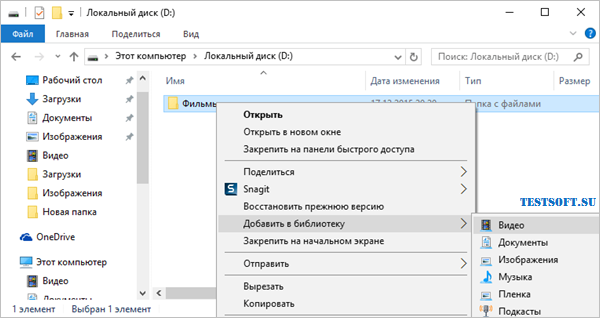
I think you have already guessed what to do in order to significantly speed up the search in the system: index daily use folders. The easiest way to implement this - add them to libraries, by right-clicking → in the pop-up menu, click on the item of the same name → select the desired library or create a new one (screenshot). In one library ("Video", "Documents", "Images", etc.), you can combine folders from various locations and then view and organize files, as in a directory. When a folder is integrated into a library, its contents will be automatically indexed.
However, there is a method to add location to the index without using libraries. But first let’s make it visible hidden folders and files that come in handy to us in the future.
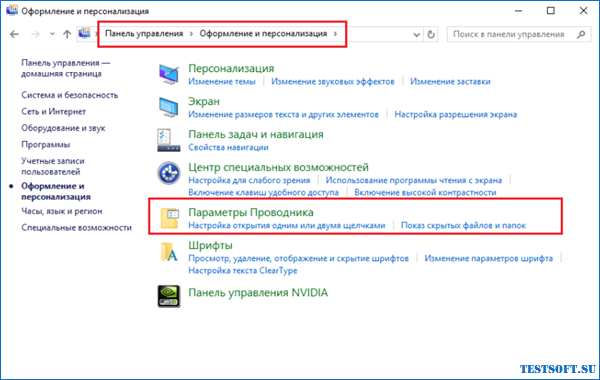
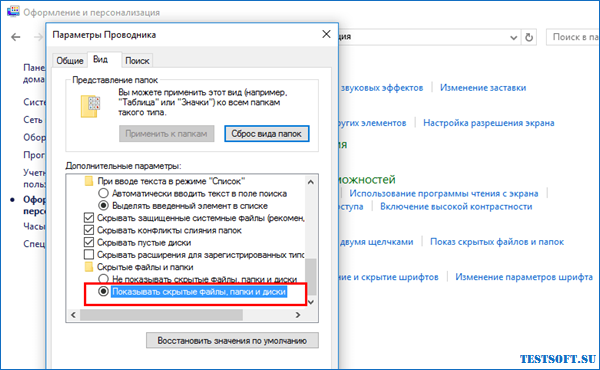
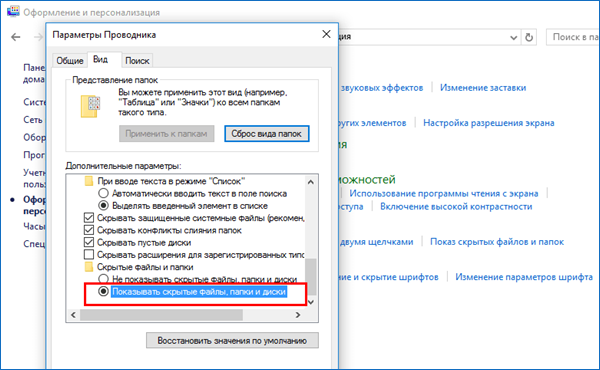
So, open the Control Panel and find the applet (section) " Design and personalization"→ by clicking on the subsection" Explorer Options"(screenshot), switch to the tab" in the window that opens View"and activate the option" Show hidden filesfolders and drives"(screenshot below).
Finished with minute optimization, move on to the second method indexing and service settings Windows search "for yourself."
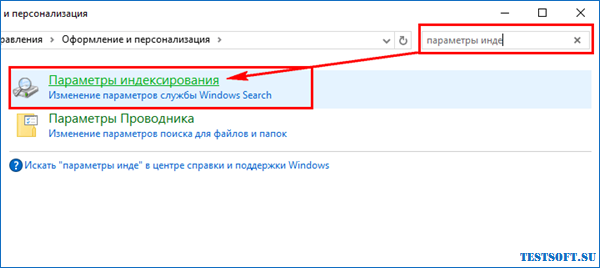
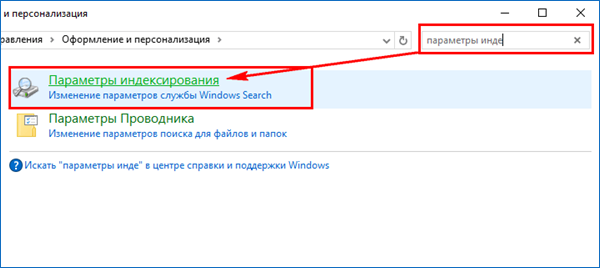
- Using the search in the Control Panel, we’ll find and open the subsection " Indexing Options" (screenshot).
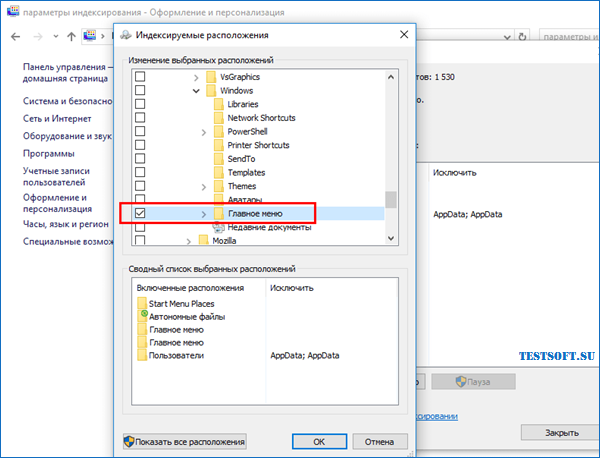
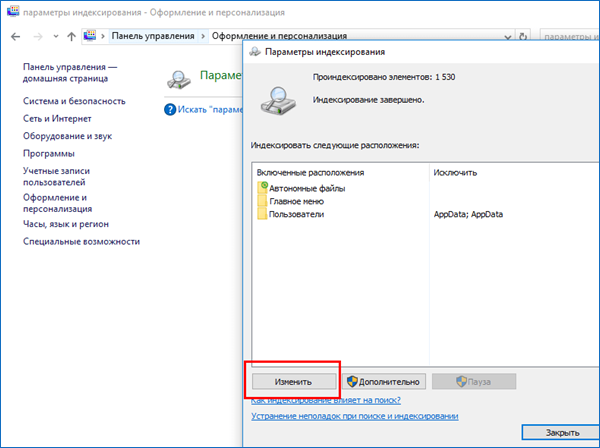
- All indexed locations will appear in a new window. Click on the " Edit"(screenshot) and check the boxes in the drop-down list with the areas in which you most often have to search. If the computer is powerful, and the vast majority of folders on a non-system drive D: \\ demanded, it is easier to add the entire disk to the index.

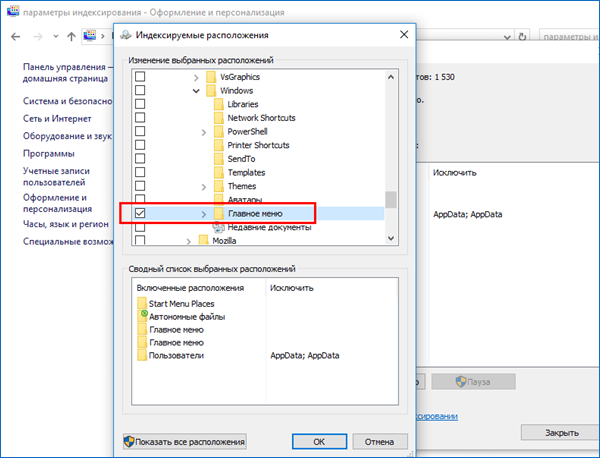
- Also make sure that hidden directories are included in the list of indexed directories. C: \\ ProgramData \\ Microsoft \\ Windows \\ Main Menu and C: \\ Users \\ [Your_Account_Name] \\ AppData \\ Roaming \\ Microsoft \\ Windows \\ Main Menu (screenshot).
Confirming all changes with the " OK", we will give" Windows "time to index new areas. Now you can be sure that it is integrated into the service Cortana will work very, very fast.
Who liked and helped the voiced solution to the issue and who voted for it on social networks (which is not necessary, but desirable) - read the review on how to replace the search field with a compact icon and how to turn off the search ( Cortana) in . By the way, disabling personal assistant (web search) will further accelerate the search process.
Note 1: In the case of C.-L. problems with the service Windows search(search in Windows 10), such as slowing down or displaying incomplete results, in the "Indexing Options" window, use the appropriate link to run the troubleshooting tool for diagnostics (the penultimate screenshot).
Note 2: An attentive and experienced computer user must have noticed that the irrelevant Internet Explorer Log has disappeared from the locations included in the indexing.
Dmitriy dmitry_spb Evdokimov
Everything also does not please users. The long-awaited release of "tens" with a personal assistant has not changed the situation. Cortana , who learned to search for information not only locally, on the hard drive, but also on the Internet. In this review, it will be boring, brief and in “pictures” about the principles of work and self-tuning of quick search by adding the required directories to the indexed database (index).
How does search inWindows 10
As in previous versions of the OS, the "top ten" uses a similar search engine. Index - a set of necessary information about files on a hard disk, as a group of files stored in a folder C: \\ ProgramData \\ Microsoft. Various properties of files (path, name, size, etc.) fall into the index, and indexing occurs during any manipulations - adding, changing or deleting controlled objects. By default, Windows indexes a limited number of folders (directories, locations), this list does not include system files, program folders, network drives.
Unfortunately, if you do not save downloaded movies or books in the directories specially designated for this, then they are also “deleted from the list”. Thus, all non-logical logical disks on which personal files are commonly stored are deleted from the index: video, audio, photos, software distributions, documents, etc. For this reason, a regular search service is so slow, because the system first searches in its own list of indexed (index) files. Moreover, by default, searching outside the index is performed only by file names, ignoring archives (ZIP, RAR, CAB).
How to speed up your search in Windows 10
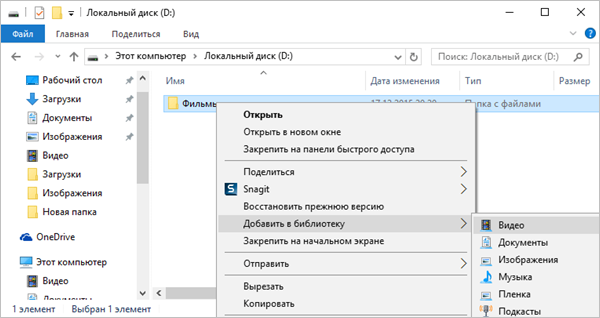
I think you have already guessed what to do in order to significantly speed up the search in the system: index daily use folders. The easiest way to implement this is to add them in a pop-up fashion. libraries, by right-clicking → in the pop-up menu, click on the item of the same name → select the desired library or create a new one (screenshot). In one library ("Video", "Documents", "Images", etc.), you can combine folders from various locations and then view and organize files, as in a directory. When a folder is integrated into a library, its contents will be automatically indexed.
However, there is a method to add location to the index without using libraries. But first, make hidden folders and files visible, which will come in handy to us in the future.
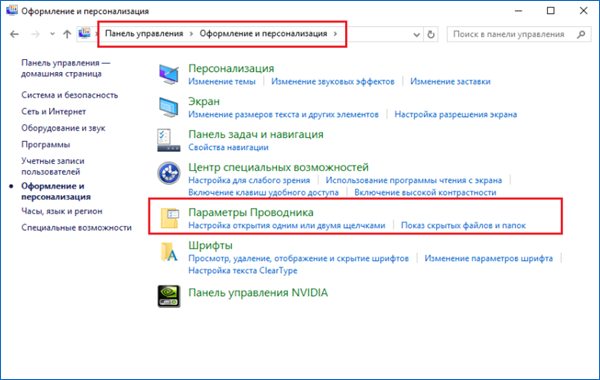
So, open the Control Panel and find the applet (section) " Design and personalization"→ by clicking on the subsection" Explorer Options"(screenshot), switch to the tab" in the window that opens View"and activate the option" Show hidden files, folders and drives"(screenshot below).
Having finished with the minute optimization, let's move on to the second method of setting indexing and service parameters Windows search "for yourself."
- Using the search in the Control Panel, we’ll find and open the subsection " Indexing Options" (screenshot).
- All indexed locations will appear in a new window. Click on the " Edit"(screenshot) and check the boxes in the drop-down list with the areas in which you most often have to search. If the computer is powerful, and the vast majority of folders on a non-system drive D: \\ demanded, it is easier to add the entire disk to the index.
- Also make sure that hidden directories are included in the list of indexed directories. C: \\ ProgramData \\ Microsoft \\ Windows \\ Main Menu and C: \\ Users \\ [Your_Account_Name] \\ AppData \\ Roaming \\ Microsoft \\ Windows \\ Main Menu (screenshot).
Confirming all changes with the " OK", we will give" Windows "time to index new areas. Now you can be sure that it is integrated into the service Cortana will work very, very fast.
Who liked and helped the voiced solution to the issue and who voted for it on social networks (which is not necessary, but desirable) - read the final part review on how replace search box on the compact icon and how to turn off the search ( Cortana) in Windows 10 . By the way, disabling personal assistant (web search) will further accelerate the search process.
Note 1: In the case of C.-L. problems with the service Windows search(search in Windows 10 ), such as slowing down or displaying incomplete results, in the "Indexing Options" window, use the appropriate link to run the troubleshooting tool for diagnostics (the penultimate screenshot).
Note 2: An attentive and experienced computer user must have noticed that the irrelevant Internet Explorer Log has disappeared from the locations included in the indexing.


