For shopping in stores iTunes StoreiBooks Store and App store, and also to use Apple devices, a special account called Apple ID is used. Today we’ll take a closer look at how registration at Aityuns takes place.
Apple ID is an important part of the Apple ecosystem that stores all the information about your account: purchases, subscriptions, backups Apple devices, etc. If you have not yet registered an iTunes account, then this instruction will help you complete this task.
In order to start registering Apple ID, you need iTunes installed on your computer.
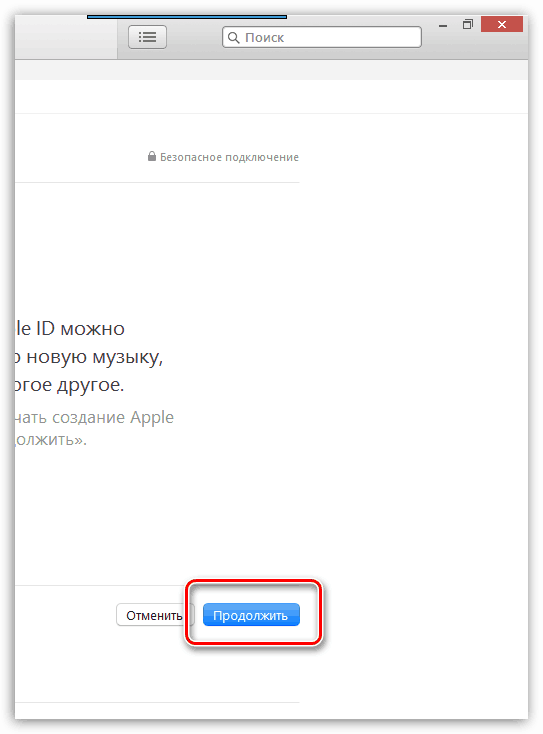
Launch iTunes, click on the tab. "Account" and open the item "To come in" .

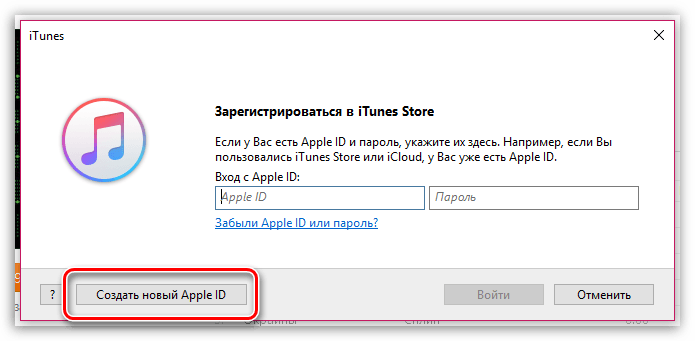
In a new window, click on the button "Proceed" .
![]()
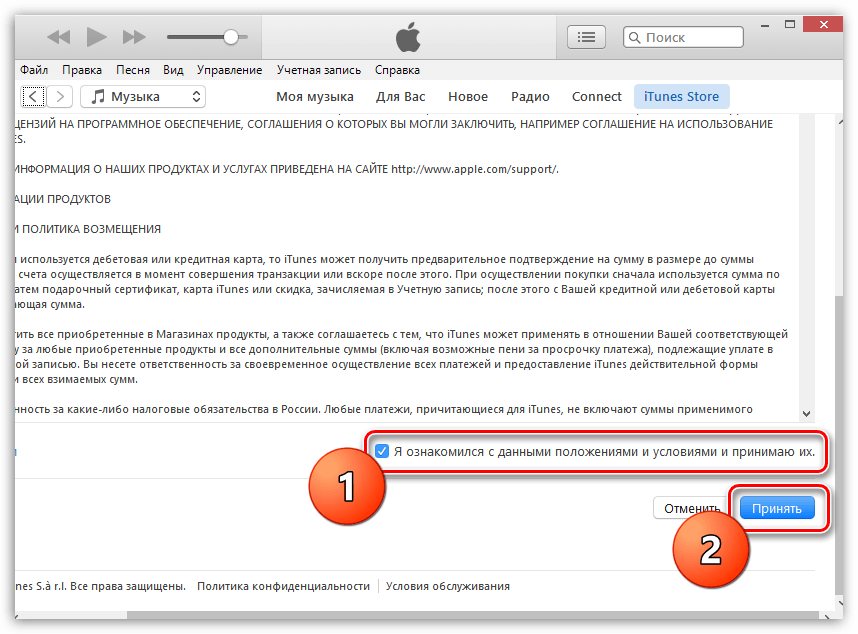
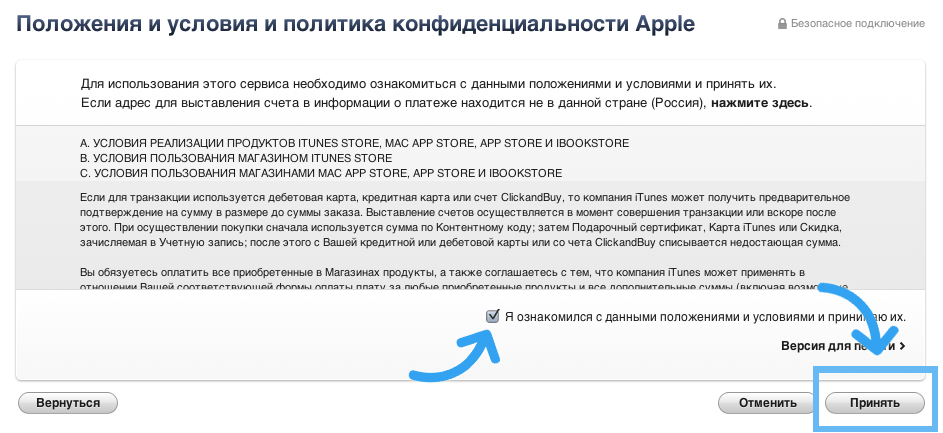
You will need to agree to the terms that Apple sets for you. To do this, check the box next to “I have read and accept these terms and conditions.” and then click on the button "To accept" .
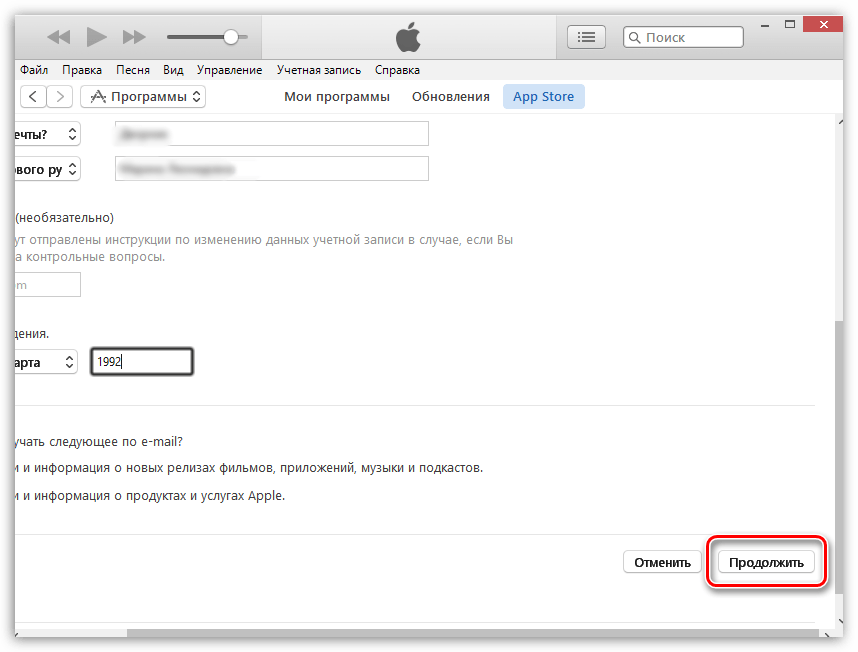
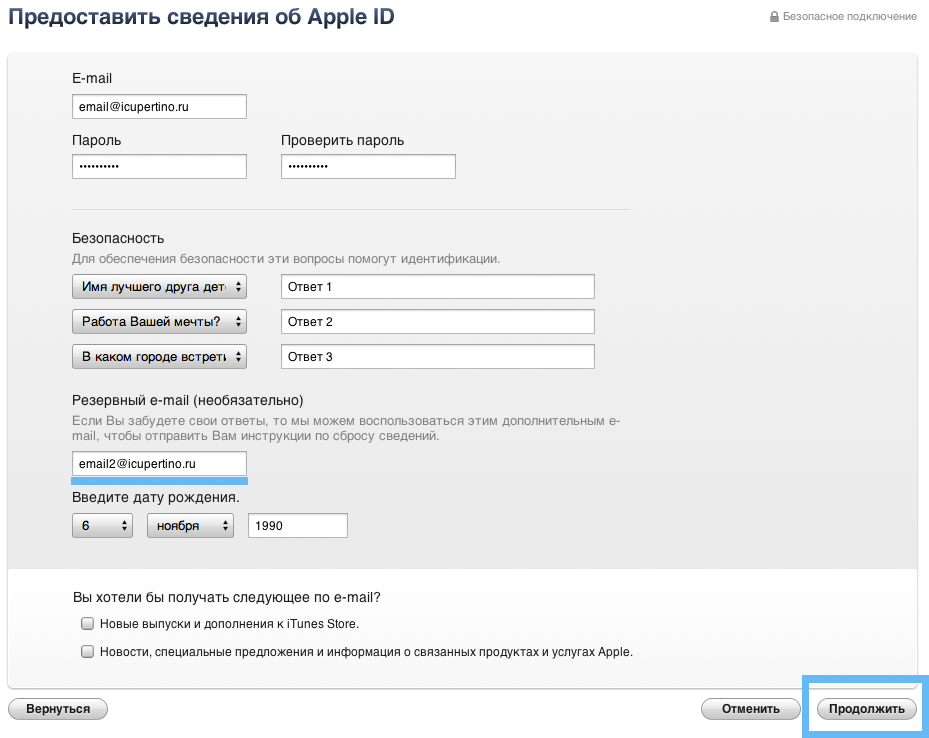
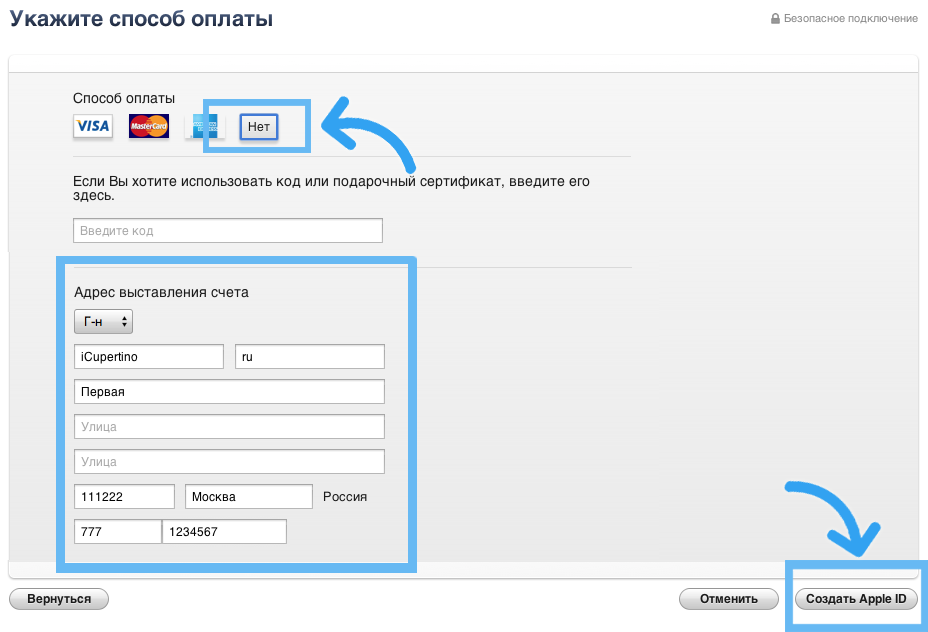
A registration window will appear on the screen in which you will need to fill in all the fields. We hope that in this window you will have no problems with filling. As soon as all necessary fields are registered, click on the button in the lower right corner "Proceed" .

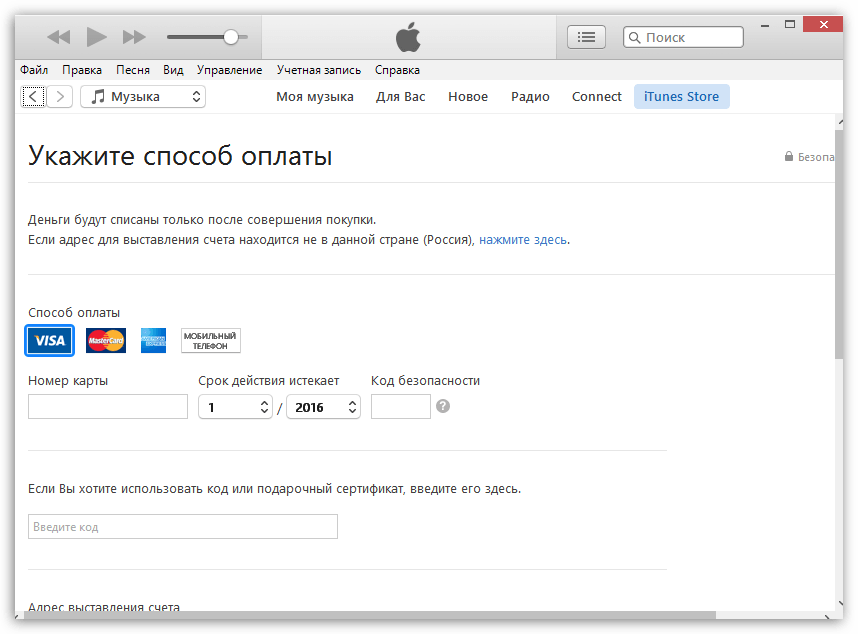
The most crucial stage of registration has come - filling in the information about the bank card, which you will pay. More recently, an additional item has appeared here. "Mobile phone" which allows instead bank card assign a phone number so that when making purchases in Apple online stores, you will be debited from the balance.
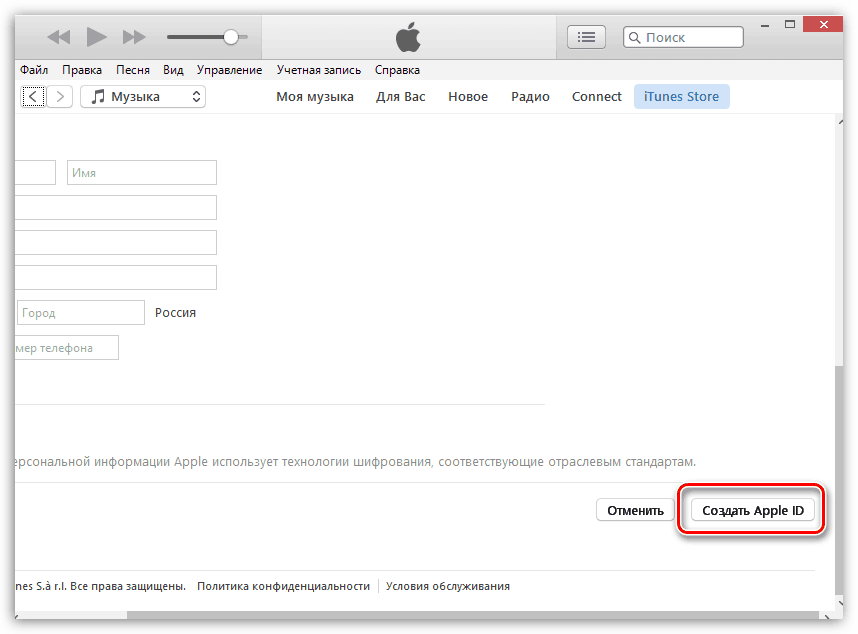
When all the data has been successfully entered, complete the registration form by clicking on the button. Create Apple ID .
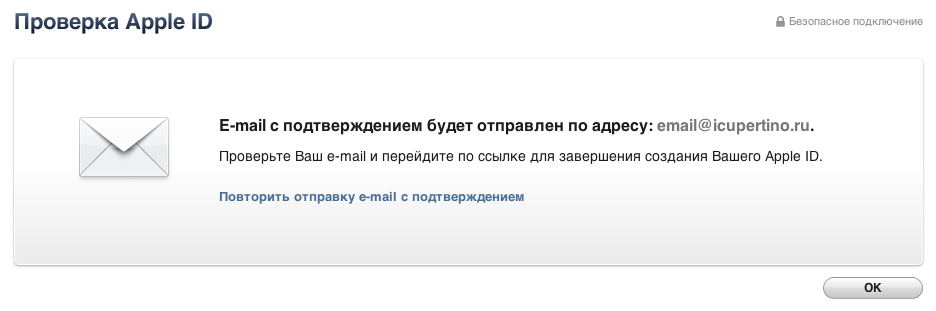
To complete the registration, you will need to visit your email address to which you registered your Apple ID. An email from Apple will arrive in your mail, in which you will need to click on the link to confirm the creation of the account. After that your apple account ID will be registered.
How to register an Apple ID without a bank card or phone number?
As you may have noticed above, the process of registering an Apple ID requires binding a credit card or mobile phone to make a payment, it doesn’t matter if you are going to buy something in Apple stores or not.
However, Apple left the opportunity to register an account without reference to a bank card or mobile account, but registration will be carried out in a slightly different way.
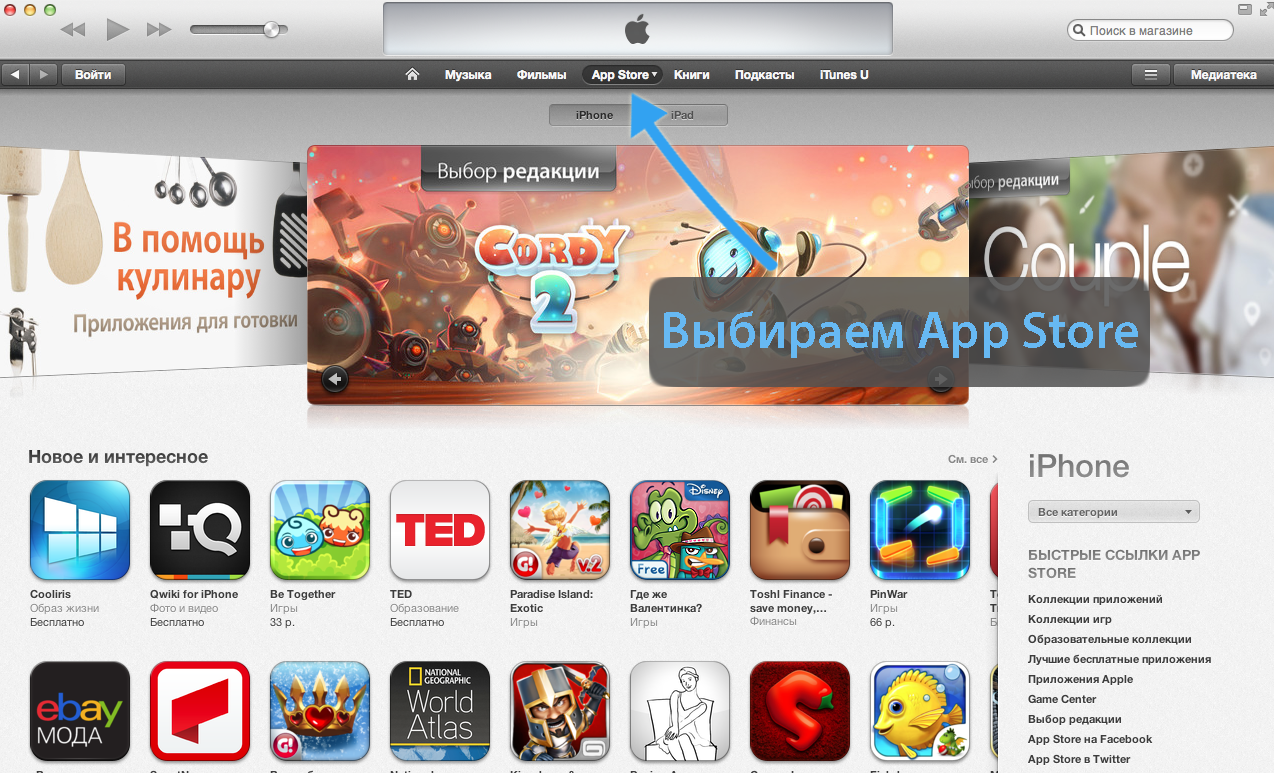
1. Click the tab in the upper pane of the iTunes window. “ITunes Store” . In the right area of \u200b\u200bthe window, you may have a section open "Music" . You need to click on it, and then in the additional menu that appears, go to the section "App Store" .
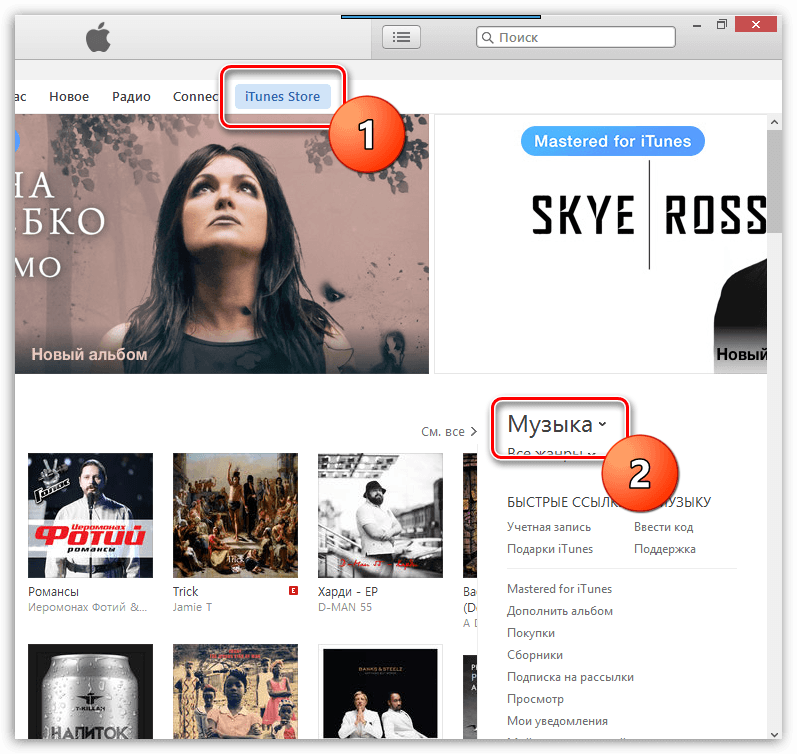
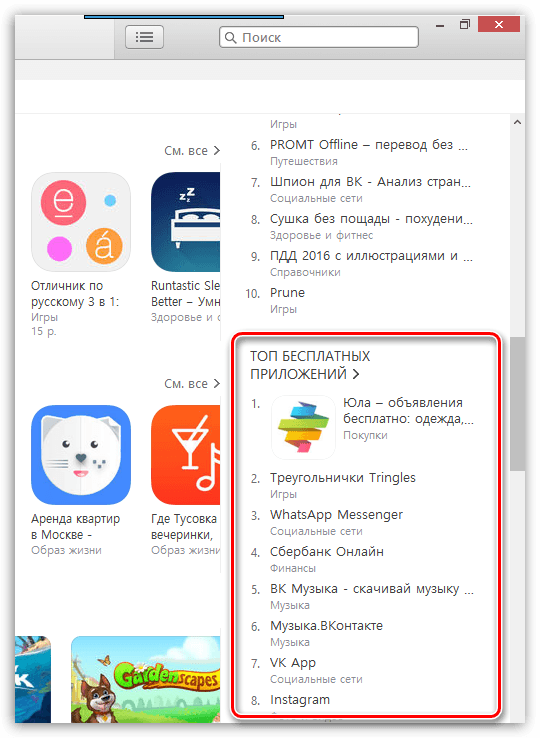
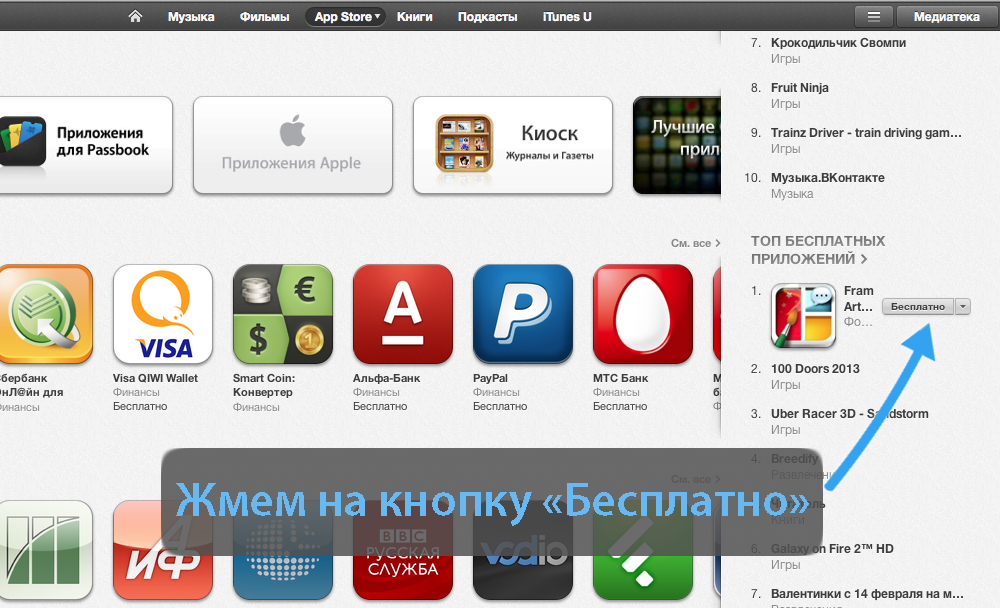
2. The application store is displayed on the screen. In the same right pane, go down a bit and find the section “Top free apps” .
3. Open any free application. In the left area of \u200b\u200bthe window, immediately below the application icon, click on the button "Download" .
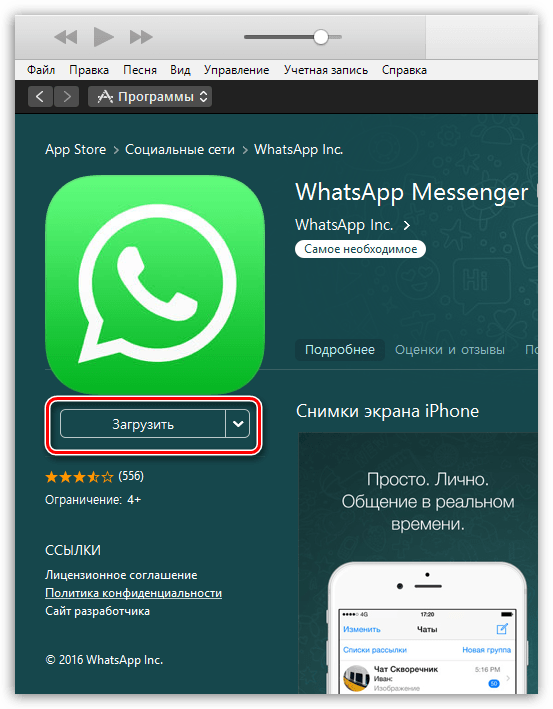
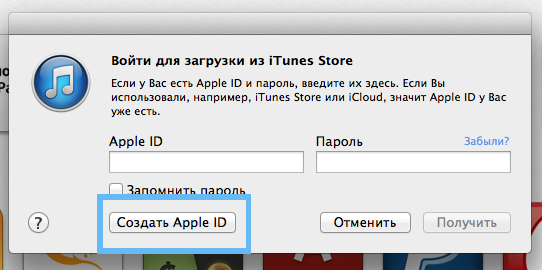
4. You will be prompted to enter these Apple ID accounts. And since this account we do not, select the button Create New Apple ID .
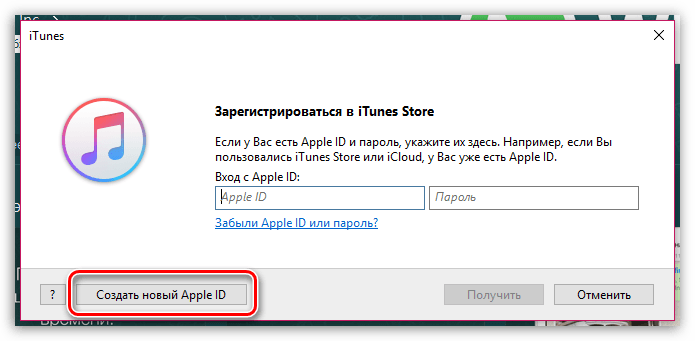
5. In the lower right area of \u200b\u200bthe window that opens, click on the button "Proceed" .
6. Accept the license by checking the box and then click on the button "To accept" .

7. Fill in the standard registration data: address emailpassword test questions and date of birth. After filling in the data, click on the button "Proceed" .
8. And now we finally got to the payment method. Please note that the “No” button appeared here, which relieves us of the responsibility to indicate a bank card or phone number.
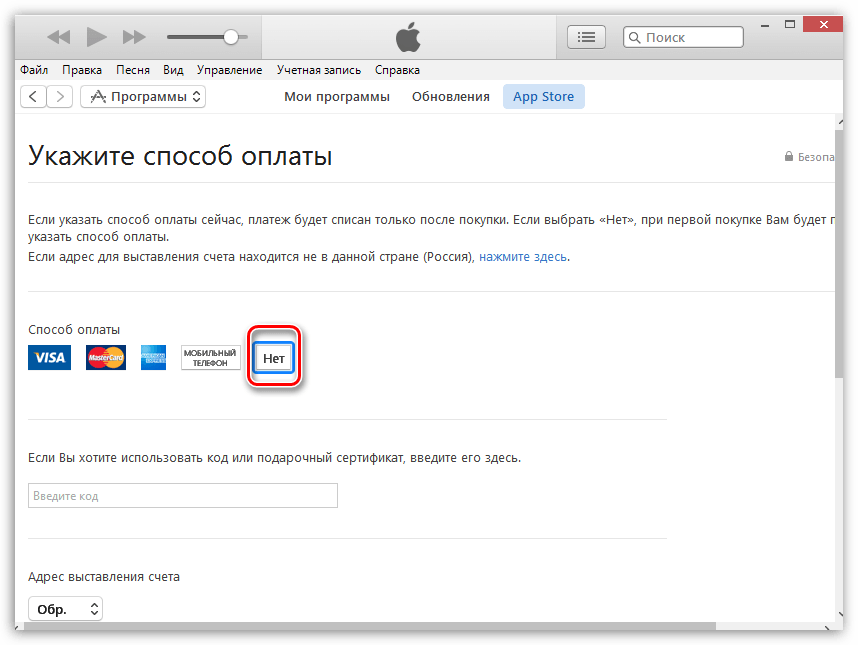
Selecting this item, you just have to complete the registration, and then go to your email to confirm the registration of Apple ID.
We hope this article helped you answer the question of how to register on iTunes.
If you own an Apple appliance, then you definitely need an Apple ID. Creating it with a credit card is probably not going to be a problem, but creating an Apple ID without a card is a little more difficult. First of all, Apple wants its customers to be solvent and able to purchase paid content, so when registering, it requires data entry credit card. As a result, registering an Apple ID without a card is impossible without knowing a hidden loophole. In this article, I will describe in detail how to register such an Apple ID.
Step 1. The first thing we need to create an Apple ID without a card is iTunes. For example, I will use iTunes 11. Run the program and go to the App Store section. Next, we need to make sure that we register an Apple ID for the Russian store. This is necessary so that in the future, if necessary, you can connect a credit card to a Russian bank. You can change the country at the very bottom of the window.
Step 2 Now find any free application and press the button "Free"
Attention! This step is required; if you skip it, you cannot create an Apple ID without a card.
Step 3 After which a window appears asking us to enter the username and password from Apple ID, do not pay attention to it and click on the button "Create Apple ID".
Step 4 Next, we are presented with a page on which we must confirm our desire to create an Apple ID by clicking on the “Continue” button. In the next window, we need to accept the conditions and privacy policy of Apple, ticking the corresponding item, and click the "Accept" button.

Step 5 Having reached the window that is shown below, fill in the data. Do not make a mistake when entering your email, as it will send you the registration data for Apple ID. For improved protection, be sure to specify a backup email, in case of an account hack, a message will be sent to it with instructions for data recovery.
Step 6 In the next window you will be prompted to choose a payment method, for which we mark “No”. You can specify any billing address; this does not affect anything. Click Create Apple ID.
At this stage, we are completing the creation of the Apple ID, it remains only to confirm your email address specified during registration, and you can start using your account.
Congratulations on your successful registration! You are now a full-fledged user of Apple products!

If you have any difficulties, I suggest watching a video instruction on creating an Apple ID without a credit card, just go to.
Having trouble? Write about it in the comments, and I will try to help you solve the problem.
Join us at
Posted on Tue, 12/18/2012 - 23:24 by adminRegister Apple ID it is possible both from a computer and directly from mobile device Apple - iPhone, iPad, iPod touch.
Registration from a computer is done via the Internet either directly on apple.com or through iTunes - the top menu, the "Store" item, and the "Create Apple ID" sub-item.
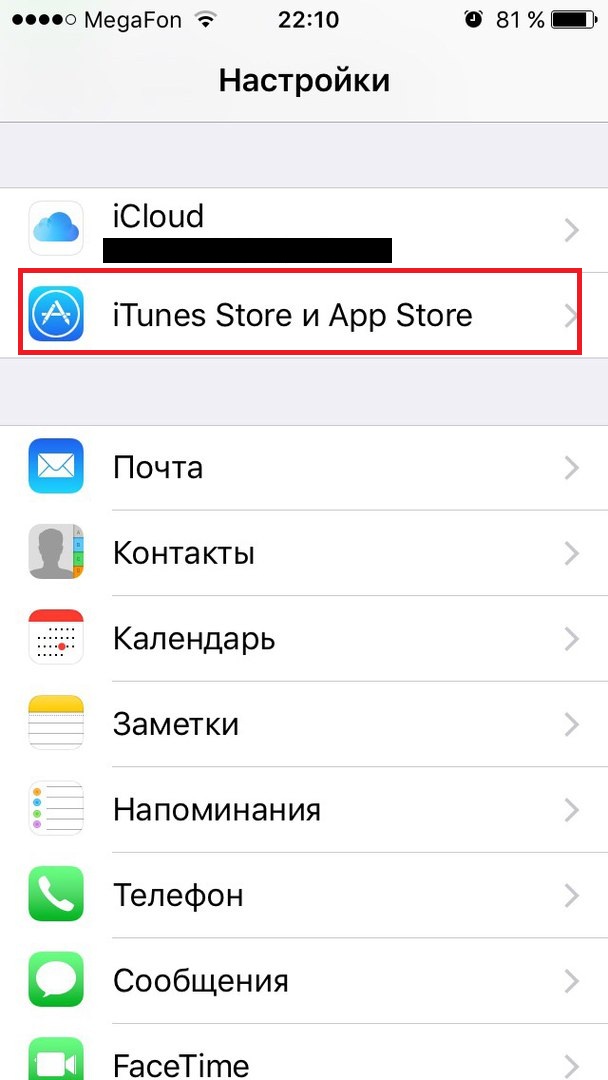
Registration from a mobile device - iPhone, iPad, iPod touch, begins through "Settings", the item "iTunes- and App Store, the button" Create a new Apple ID ".
Attempting to download a program from the App Store will also take you to the starting point of the Apple ID registration process.
In any case, the registration procedure consists in filling out the questionnaire, answering questions, indicating how to contact you and setting a password with the choice of secret questions for its recovery in case of loss. After reaching the beginning of the registration process, it remains only to follow the prompts on the screen. Despite the simple formula for creating a new Apple ID, many questions arise during the registration process itself, and few people manage to go through the procedure the first time on an intuitive understanding of what is required to register. Below we will complete the registration step by step through all the points and giving comments and advice on filling out the registration form.
When filling out the registration form, you will be asked to indicate the details of the means of payment - bank card. This item is especially worrying for those who, due to age or belief, do not have a bank card. In this case, it is possible to register an Apple ID without specifying payment details. The functionality of such an ID will be incomplete - a user with an Apple ID without a credit card attached to it is not able to buy paid applications. However, this is the only restriction in rights, and all other services, including the ability to download free applications, will work in the same way as in the case of a full Apple ID.
Register Apple ID c iPhone.
At register iPhone should be connected to the Internet, preferably via Wi-Fi - this is faster, but in principle the way to communicate with the Apple server does not matter, so if necessary, you can register and connect via 3G over the networks of mobile operators.
We are going to the beginning of the Apple ID registration process.
1. Go to "Settings" - gray gear icon on iPhone home screen.
2. Select item iTunes and App Store - so it is called in iOS 6, in earlier versions the designation "Shop" and "App Store" were found. If you are registering an Apple ID from a device running more than old versionthan the current one - don’t be embarrassed, there may be some differences in terms, but essentially the same thing. Hereinafter - “choose” means find and touch.
3. Push the button Create New Apple ID - if the device has already logged into the store under some other Apple ID, then for the "Create a new Apple ID" button to become available, you must first exit the current session. To do this, touch the button with the Apple ID designation under which you are logged in and select the "Exit" option from the proposed options - then the "Create a New Apple ID" button will become available.
4. We get to the entry point into the registration process - at the top of the screen is written "New account", and in the center of the screen there is a single button with the inscription "Shop Russia". It is possible to change the country of residence of the App Store, for this you need to click on this button and select a different country - the App Store assortment of different countries differs from each other, the richest assortment in the US App Store, but for correct registration you will need to indicate plausible American addresses and phone numbers - the system has protection against a fool and it will not be possible to register in the American App Store by indicating the Russian address and credit card of a Russian bank. If you agree with the regional registration in the App Store of Russia - click on the button "Further" in the lower right corner of the screen.
5. We get to the first page of warnings, familiarization with the terms of use of the App Store and other protective spells of Apple, designed to prevent a situation when you want to sue Apple and you will be in your own right. You can read the proposed 60 pages of the text of the "Terms of Service", receive this text by e-mail or click the button “I accept”, confirm your conscious desire to accept the proposed terms of service by pressing the button again “I accept” in the pop-up window, and finally go to filling out the registration form.
6. On the first page of the registration form you will be asked to indicate your e-mail address, which will continue to be your identifier in the Apple system. You must specify a valid address from which you can actually remove mail immediately after completing the registration form - to complete the registration and activate the new Apple ID, you must follow the link from the letter sent to you at this address from Apple.
7. Password - be careful when choosing a password - below the password field are the requirements for the password format: at least 8 characters, at least one uppercase letter, at least one digit and no more than three identical characters in a row. We enter the password twice so that by accidentally making a mistake you won’t get into an awkward situation, when your valid email address will be spent, and you won’t even be able to log into your account.
8. Block "Security" contains three points with secret questions and answers, in each point you have the opportunity to select a question and give your own answer to it. You need to fill in all the points, an attempt to skip any of them will lead to the fact that the registration procedure will return you back until you spit and give up :) This is done in case - believe me, this is not uncommon if you forget your password and request the option to recover the lost password. The system will ask you secret questionsand you, answering them, will be able to prove that you are what you are, and not some intruder.
9. An emergency e-mail serves the same purpose of recovering a lost password. You can receive this emergency e-mail address that you specified when registering your Apple ID. new password to his account, even if you forget the answers to your security questions. It is not necessary to register a new email address; just enter the address of a loved one.
10. The information block of the registration form regarding data on the date of birth usually does not cause difficulties; how to fill in the fields is intuitive - just press the buttons and select the necessary numbers.
11. At the end of the page you are offered to subscribe to news about iTunes content and new Apple products - you can turn on the proposed switches and then you will receive newsletters from Apple, you can leave it as it is, i.e. off, then you will be left alone.
On this the first page of the registration form is completed, you can press the button "Further" - bottom right, and proceed to filling out the second page.
Each user of the iOS device just needs to have a personal apple ID ID (Apple Idy), because without it it is impossible to access the mass of branded services of the "apple" giant and, accordingly, the functionality of the device is seriously limited.
Unfortunately, for many, the requirement of registering a personal account to provide credit card information becomes a serious obstacle to creating an Apple ID. Someone is purely psychologically not ready to share this kind of information, fearing that it will leak into the wrong hands, and someone simply does not have a bank card - in Russia, at least, there are still quite a few such people.
Well, we have great news - Apple ID registration is possible without a credit card, and in this material we will introduce you to how to perform this procedure
How to create an Apple ID without a credit card on an iPhone and other mobile iOS device?
First of all, it is worth noting that you can create an Apple ID using a card and without, in two ways - directly from the device itself or through a PC with the iTunes utility installed on it.
Both methods are very similar, you will have to perform almost the same steps, so the choice in this case is determined only by which gadget is closer to you at the moment - as a rule, of course, it is easier to register an Apple ID directly from the "apple" without involving any, let’s say , intermediate links, therefore we will begin with this method of creating an identifier.
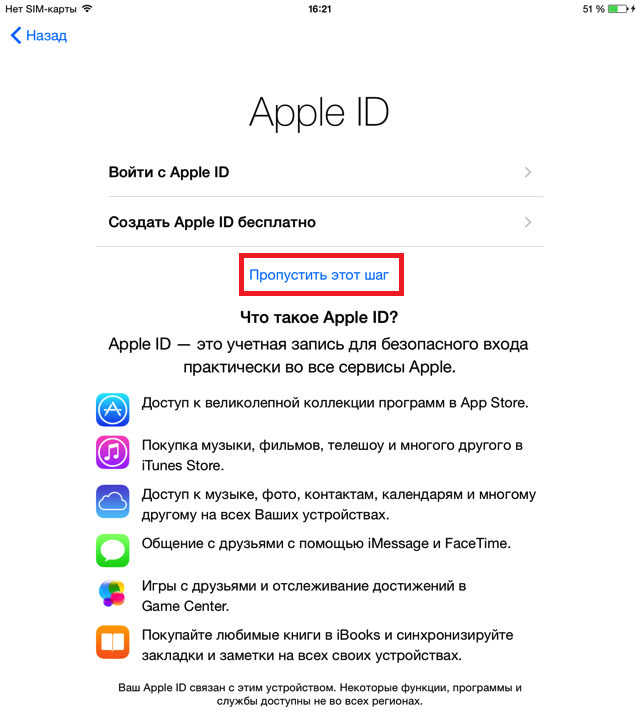
So, you just purchased, say an iPhone (or other Apple mobile gadget) and turned it on. What awaits you? Not an instant loading of the interface, but the initial setup, during which the SIM will be activated, and a number of important parameters for the system will be set. Also, at the initial setup stage, you will be asked to indicate your Apple ID, but you can skip this step, and we will do so by tapping on “Skip this step”.
After completing the initial setup, we get an activated clean device, which only waits for it to have its own ID. So let's get started creating it:
Well, congratulations! You have created a personal Apple ID and you can start using all its “benefits." By the way, if you suddenly decide that you are ripe for shopping, for example, in the App Store, then you can always easily specify payment information. To do this, tap "Download" on the paid application that you want to have, and the system will automatically transfer you to the page for indicating payment information.
Creating an Apple ID without a credit card on a computer?
Well, now let's look at a way to register an identifier using a PC. Here, too, everything will be quite simple, the only condition is the availability iTunes. If you don’t have it, we highly recommend downloading the utility from the official Apple website, because it is the main link between the iOS device and the PC, in particular, it allows you to reset music and other content, set ringtones, etc. In short, it will certainly come in handy.
So, if you have iTunes, let's start creating an account:
Done! You see, as we promised, the registration methods are identical.
How to untie the card from Apple ID?
You need to understand that there is absolutely nothing wrong with tying an ID card to Apple, with only one condition - if you use an iOS device, you are a conscious person. For example, these situations are very common. A parent buys a device for his child and does not know that you can get an Apple ID without a card, but he knows that you can create an electronic card with a balance of 0 rubles. So the parent makes such a card and indicates it when registering the identifier.
Unfortunately, there is one very subtle point - the system, while accepting card data, does not take into account its balance, and payments may be debited with a delay. That is, your little daughter can freely download paid programs or content, and after a couple of days you will find that the account is blocked, because there are no funds on the specified card, and until you put money on the card and payment does not pass, Apple ID use will be impossible.
You probably have a question - what can be done in such a situation, how can I untie the card from Apple ID? Is this even possible? Of course! And it is very simple:
That's all! The child will still be able to download free applications and content without problems, but he won’t be able to get paid ones, and you won’t get any unexpected bills.
To summarize
Well, now you know how to create an Apple ID without entering payment information through the device itself and the PC, as well as how to untie the card if it is already tied to your ID. We hope our article has helped you!
Having an Apple ID account gives you access to cloud storage data, to the app store, and to many other features. But for this it is necessary to have a credit card with which payment is made for installing paid applications. How to register in iTunes with a credit card and without it? Read our instructions and get at your disposal an account with the parameters you need.
Applications, music, films, interesting and relevant books - this is what you can download to your smartphone from using iTunes. In order to download paid content, you need to attach a credit card to your Apple ID. With it, you can purchase programs, albums of fresh music tracks, films and much more. Using a credit card as a means of payment is associated with certain amenities. But sometimes these amenities create problems for us.
For example, you bought an iPhone for your child and attached a credit card to your Apple ID. The child, not yet fully understanding where the funds come from on the card, can acquire a huge amount of clearly unnecessary content, introducing his parents into expenses. In this case, we recommend registering in iTunes without a credit card - this way you will save yourself from unnecessary expenses. If you need paid content, you can add a map in the future.
First way
Let's find out how to sign up for iTunes with a credit card. Method One:
- We go to the Apple website, in the section "Managing your Apple ID";
- Click on the link "Create Apple ID";
- In the registration form indicate the email address and other data;
- We answer control questions;
- If necessary, check the boxes for receiving announcements and special offers.
After creating your Apple ID, you can enter your account information into your devices and start using them. Each device will have access to the AppStore, iTunes Store, iCloud and many other services from Apple. To bind a credit card, log in to your account from a PC and pay attention to the "Payment and Delivery" section. By clicking on the “Add a card” link and specifying the details of your credit card, you will attach the payment instrument to your account and be able to purchase paid content.
Pay attention to the control questions, to which the answers are indicated - in order to register, you must answer all the questions, and not one of them.
Second way
In order to register in the AppStore and get the opportunity to buy software and content, you must install on iTunes computer and try to download some paid application. At some point, iTunes will prompt you to enter your Apple ID in order to access your purchases. If you already managed to create an account and attach your credit card to it, enter your Apple ID and password, after which you can make a purchase.
If you have not registered Apple ID in the above way, then at the stage when iTunes prompts you to enter your account information, click on the "Create Apple ID" button and go through the registration process. Specify your credit card type as a payment method - it can be VISA, MasterCard or American Express. Next, we confirm the registration using the control code received by mail, after which we receive at our disposal Apple iD with a credit card attached to it.
Third way
How to register in Apple ID without a computer? Indeed, some users may not have a stationary PC or laptop at hand. What to do? The answer is simple - we can register an Apple ID with using iPhone, iPad or iPod touch. To do this, go to the AppStore store and try to download any paid application - since we have not provided your Apple ID here, the registration procedure will be launched.
Registration takes place in much the same way as on a computer - we follow the instructions on the smartphone screen. At a certain stage, we select the type of card to be attached, we confirm the creation of an Apple ID using the control code and we have at our disposal a full account with a card attached to it. Now everything is ready to pay for applications, interesting books, music albums and other content.
Pay attention to the term “credit card” - it means all types of banking products, whether credit or debit cards of various categories and world payment systems.
We have already said that using an attached card can lead to serious monetary losses. Also, many people do not like to indicate the data of their cards, for fear of theft of money. Their fears are quite true, since fraudsters do not doze off, regularly inventing new ways to rid honest citizens of surplus funds in their electronic accounts.
How to register in iTunes without a credit card and is this operation possible? Some users are sure that a credit card is required here, but this is far from the case. We really can register in Aityuns without a credit card, using the functionality provided to us. By analogy with the above methods, we can register both on a computer and using the smartphone itself. We will not repeat twice and tell you how to register in iTunes without a credit card using a computer.
In order to register, install iTunes on your computer and try to download some free application. ITunes will request an Apple ID, but since we don’t have one, instead of entering a username and password, we click on the Create Apple ID button. Next, we indicate the email address, last name and first name, password, answer security questions, and select “No” as the payment method. At the final stage, we confirm using the control code and complete the registration - an account without a tied credit card is ready.
Did you create an Apple ID account without a credit card, and later find out that you need access to paid content? You do not need to create another account - you can add payment data at any time, having received a tool for buying applications, music, videos and e-books.


