Appearance HP Pavilion DV5

Attention! As experience has shown, independent disassembly can lead to serious breakdowns, so if you have doubts about reading the instructions, please contact specialists.
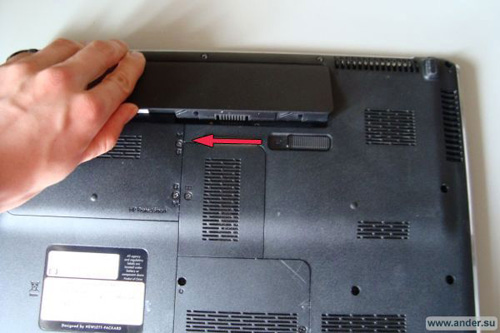
First of all, remove the battery in order to dealers the laptop and avoid the risk of possible closures during disassembly. The battery is removed easily, the latch must be moved as shown in the figure and simultaneously remove the battery.

Below is shown:
- 1) Hard disk
2) RAM

Replacement, removal of hard disk
Remove or replace hDDIs simple enough, it is enough to remove it from the recess, take a hard disk with one hand, the other - connecting the contact and disconnect.

Replacement, Removing RAM
Running memory is also removed simply, first you need to disconnect the fasteners on the sides and at the same time slightly raising rAM. If you only needed a replacement of RAM, then the steps below can be skipped.

Replacement, Removing DVD Drive
Replacement or removal DVD drive Most laptops are performed as follows: unscrew one or more screws that fasten the DVD, then carefully pull out the drive.

In order to clean the laptop from dust inside or further disassemble the HP Pavilion DV5 laptop, you must unscrew the specified screws. It will come across the screws of different sizes and diameter, so when unscrewed it is best to record bolts from where the bolts and add a box signed earlier, otherwise the incorrectly jumped bolt can damage the laptop. After you disconnect the Wi-Fi sensor, for this disconnect the wires from Wi-Fi, we sign out where the wire was, disconnect the Wi-Fi sensor.

I turn over the laptop, we draw the panel near the monitor, something flat and gently unfold plastic latches. This procedure Requires some experience in order not to damage the plastic latches that are attached to the panel. The most important thing is not to do sharp movement and because The panel itself is still connected to the laptop with wires.

Raising the panel turning 4 screws fixing the keyboard. Under the keyboard there are contacts from the panel, so until it is removed.

In order to disconnect the keyboard - turn the mount, pushing a flat screwdriver (approximately as shown in the image). You can make it with your fingers.

Disconnect the panel in two places - in the middle and the same way on the left. In some cases, before removing the contact, you must push 2 tips along the edges (shown by arrows) if they are present.


After removing the panel, proceed to the disconnection of the other contacts and unscrew the screws shown in the figure. When everything is done by removing the panel on which speakers are located. Through the holes for the columns, dust and garbage on the speakers usually falls, so the cleaning of the speakers from dust does not hurt, while it is better to use a dry cloth.

The next step will be disconnecting the display. Before removing the screen, you need to disconnect 2 contacts on the left and remove the wires from the groove that is suitable on the right. Now we unscrew on 2 screws on the right and left, we note from where the screws were and we can remove the screen. Even if only cleaning the laptop from dust inside and replacing the thermal paste on the HP Pavilion DV5 processor - it will not work without removing the screen.

After removing the screen, we disassemble further - pass around the perimeter and disconnecting all the latches, remove the cover under the keyboard, for these purposes it is convenient to use a small knife, this procedure is not desirable to perform a screwdriver. There is a risk of scratching the case.

We disconnect 2 contacts on the board (shown in the picture), and turn out several cogs (not shown in the figure) that are attached to the bottom.

Cleaning a laptop HP Pavilion DV5 from dust inside
Removal motherboard - turn it over and turn off the laptop cooler power wire as shown in the image. You can use small pliers.

To replace the thermal paste and cleaning the laptop from dust inside, we unscrew 6 bolts, fixing the plate and cooler. Sometimes it may be necessary to further unscrew a few more bolts near the cooler. Disconnect the HP Pavilion DV5 Cooling System from the board. It happens that it is necessary to make small efforts, because The thermalcase as it glues the cooling plates to the processor.

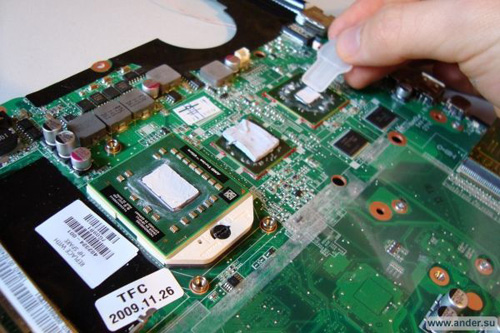
We remove the old thermal layer on the processor and another chip completely, even at the edges, with a cotton stick with a moistened with solvent or alcohol (can be replaced with vodka). The thermal block is desirable to replace if the crack appeared on it, if it is preserved in good condition - you can leave on the spot and nothing to do with it. After you can clean the laptop boards from dust with a cloth with a dry or moistened with alcohol, do not forget to clean the HP Pavilion DV5 case inside.

This procedure is performed before replacing the thermal paste and on the cooling system. Sometimes the thermalcase dries greatly, in this case, you can use a flat screwdriver to remove residues - all this concerns only the cooling system. On the processor or chip should not be used when removing the paste iron tip screwdriver or similar.

In order to clean the dust inside the cooler, turn the screws. On some models of laptops, the cooler may not understand, in this case it can be limited to the fact that it is possible to brush with cotton wands where possible.

The cooler is convenient to clean with a cotton walker with a moistened with alcohol, because Alcohol dries quickly and the cooler immediately after cleaning can be assembled, and not wait until it dries. The piece of iron (cooling system) can be purged, but it is better to rinse under water. If we decided to rinse with water, then you need to prepare for what you need to wait enough time until the water dry out or use the usual hairdryer.

Replacing the thermal staste
The final barcode is the replacement of the thermal paste in the HP Pavilion DV5 laptop to the new on the processor and chip. For these purposes, we applied the paste, smoothing something flat - the sim card is suitable from the phone, plastic card or similar. Thermal thermal layer on the processor - about 0.5 mm, the layer on the chip is better to apply more, because There will most likely be a gap more.
After applying, it is necessary to make sure that the layer thickness will be enough. For layer testing, we perform the following steps:
- 1) applying thermal paste (described above)
2) Cooling system assembly (tighten all the screws that fasten the iron plate to the board)
3) Remove the cooling system
4) We look, - is there an imprint of the paste on the cooling system. If the imprint remained, then we remove the thermal plane from the iron plate and re-make steps 1 and 2. If the imprint is not, or it is not fully printed, then you need to increase the layer. As a rule, on the processor there is a sufficient minimum layer, and a layer is required on the video card or chip.
This article described how to disassemble the HP Pavilion DV5 laptop and replace the thermal chaser on the processor. If you have difficulty - you can always use the service cleaning laptops from dust inside .
Your questions and comments
05.07.2017 Sergey
- Question:
- HP DV6 2150ER. Periodically, the coolers will stop the cooler, it will start spinning again, when the slope is heard as it hits with blades at small revs. Today, when you turn on the Cooling Fan 902 error, although it is heard that the cooler is slightly scrolled, but stops and stopped and stops again and stops. Question: Could you tell me - what labeling from the cooler and from what other laptops will suit it to change or analogue or may articulate to buy and change. Sarati
- Hello, look for the exact name of the model, for example, a "cooler for DV6 2150ER". Be sure to specify the exact model, because The line of DV6 has many different modifications with different fans.
Comfortable in all respects portable device - laptop - still has a number of flaws. A peculiar achilles fifth compact computers is considered to be far from perfection the cooling system, the efficiency of which over time limits another unfavorable factor - the impact of the external environment. In particular, lattices and filters of laptop air intakes are inevitably clogged with dust particles, which, in turn, adversely affects the favorable heat sink. The replacement of the thermal paste in a laptop is the inevitability due to only the temporary framework and the quality of the substance used. However, let's consider such an important and responsible service process in more detail, as well as understand the main issues of operational nature.
ART to anticipate, or when is the replacement of the thermal paste in a laptop?
Yes, it is in time the noticeable deviation from the norm (meaning the total use of laptop) and immediately undertaken steps towards resolving the problem situation will help you avoid different kind of computer troubles. In order to understand that the laptop needs prevention, it is not necessary to be a specialist. However, the main signs of the malfunction should be known, so to speak, "in the face".
Diagnostics and monitoring: Your assistants
Even those users who know how to change the thermal colon in the laptop will not be a rush with disassembly without a thorough analysis. Unfortunately, operating windows system All of its editors have no integrated tools for conducting high-quality monitoring of the temperature indicators of the system. The only solution can be considered the viewing of current degrees generated by some components of the system through bios.
- The CPU temperature is considered normal if in idle state the indicator varies in the range of 30-45 ° C. Work when loading - 50-65 ° C.
- Graphic processor in passive mode - 50-55 ° C, in active condition - up to 85 ° C.
Install free program PC Wizard, and you can always control the temperature indicators of the hot components of the system.
Alarm list
So, to your attention the price list of unpleasant surprises with which most users often faced and which rarely be corrected. It is likely that something like you have already met in practice. Nevertheless, for a beginner, it is invaluable information, familiarization with which it is possible to open it to the question of how to replace the thermal poll in a laptop.

- The accumulation of dust in the vents of the device prevents air passing in both directions.
- An explicit noise of the cooling fan, as well as a continuous intensive rotation cycle with any laptop operation mode.
- Some body parts of the device are very heated even with its short-term use.
- Spontaneous shutdown.
Of course, this list can be significantly adding. However, the last of the danger signals requires immediate participation on your part.
How to change the thermal poll in a laptop: direct process
Before proceeding with practical actions, you need to prepare a simple tool: thin cross-coded and flat screwdrivers, an unnecessary bank card, a conventional painting brush, alcohol and a small piece of fabric. Of course, get the thermal paste. Yes, and remember: do not save on quality.
Planned retreat

It does not matter exactly what kind of modification is your laptop. The only thing to pay attention to the dismantling process is the structural features of the product. In other words, in the disassembly process, be careful, since the fastening screws and various clamps can be somewhat different from the models that will be considered below. In order for the replacement of the thermal paste in a laptop without negative consequences, it is worth studying the question of the features of your device in more detail.
Step number 1. Remove the battery
As a rule, the battery in the laptops is fastened with the help of special latches, which are opened with a slight effort to a locking element: pressing or offset to the side. Usually there are two locks.
Step number 2. Dismantling of cabinet segments
To get to the laptop cooling system, it is often necessary to disassemble almost all the device, which is called to the last screw. However, the replacement of the thermal paste in lenovo laptop It can be done in a completely different scenario of actions. It is enough to unscrew just one protective cover, and access to the radiator is open. It is worth noting that most modifications laptop computers The cooling system is hidden enough in its case departures, so the universal action plan will look like this:
- The rear of the laptop has several compartments that are closed with plastic or metal casing.
- Unscrew the screws need carefully, since there is a risk of threading.
- In some cases, the drive for optical disks can be unorded, reloading only one bolt. By the way, the replacement of the thermal paste in mSI laptop It is made without removing the DVD / CD recorder.
- Ultimately, you need to remove all attachment components of the system: RAM, hard disk, wireless communication modules.
- The final action is unscrewing all screws. Be careful, since the missed bolt can fix the removable component of the laptop, which will be discussed in the next paragraph.
Step number 3: Disconnecting the keyboard

At this stage should be more than attentive, since the pushbutton module is connected to the laptop system board with a loop. The risk of damageing this connecting element is incredibly great, if not taken care.
Typically, the keyboard unit is attached using latches located around the perimeter of the module. However, the location of the locks in each modification is individually. Carefully "inhibiting" a screwdriver in the area of \u200b\u200bthe upper edge of the keyboard, while simultaneously use it until the output is out.
Step number 4. Disable internal device connector
When the thermal paste is needed in laptop Acer.It is required to make a complete disassembly of the laptop. Therefore, after dismantling the keyboard on the opening section, all contact loops should be separated and unscrew the locking screws.
Step number 5. Disconnection of the main parts of the housing

When all bolts are unscrewed, you need careful movements (like a credit card) to separate the upper part of the plastic rim from the bottom. Next, you need to dismantle the motherboard to perform follow-up.
Step number 6. Dismantling of the cooler and radiator with motherboard
Replacing the thermal paste in the HP laptop is carried out only if the cooling unit is completely removed from the motherboard. However, this condition is relevant for the absolute majority of modifications of laptops.
- To remove the radiator and heat sink tubes from the motherboard, it is usually necessary to unscrew the four screws in the Central Processor area and two in the field of graphic chip. Depending on the manufacturer and model of the laptop, the fixation scheme can be completely different.
- At the same time, there is a certain mandatory screwing algorithm and twisting the bolts, with which the cooling system is recorded. The manufacturer lakes the removable part of the numbers that indicate the sequence and revealing order.
Step number 7. Fan cleaning and lubrication
With the help of a tassel, free the item from dust layers. A drop of machine oil into the inner part of the rotating element will soften the course of the fan blades and will relieve you from foreign horses further.
Step number 8. Blowing the radiator and removing residual traces Thermal paste

Remove the ribbon from the side ribs of the cooling segment and clean the internal compartments "Refrigerator" using a vacuum cleaner. The spikes in the contact of the radiator with the CPU and GPU must be thoroughly wipe first with alcohol, then a dry cloth. Replacement Thermal Pasta B. notebook Samsung Maybe then to be considered high-quality when the flint surface of the component reflects the mirror clean.
Step number 9. Right layer and radiator installation in place
No need to think that the more you put the "binder" substance on the details, the better. This is a delusion, moreover, dangerous (in the sense of implementation)! On the plane of the purified part, squeeze a bit of thermal paste and with a credit card stretch it with a thin layer over the entire surface.
Secure the cooling system segments on the motherboard according to the marked script. Do not neglect this recommendation, since when there is a blockage (fixing two bolts on one side, and after another) the risk of damaging the flint surface of the processor is great. Yes, and the paste will fall unevenly. As a result - inevitable overheating.
Step number 10. Reverse Process - Installation

Replacement Thermal Pasta B. laptop asus Performed in the same way - according to the foregoing instructions. Nevertheless, this laptop brand is incredibly demanding by the time of assembly. Therefore, before disassembling a portable device, do not be lazy to sketch the schematic drawing of your laptop (screws as disassembly are laid on the displayed graphically appropriate place). It is necessary so that the reverse assembly process does not cause any difficulties, since often when installing the screws do not match the place of screwing. By the way, some manufacturers are applied to the location of the label, identifying the type of fastener.
As you can see, the replacement of the thermal paste in a laptop - in a generally not a difficult process of service, the nevertheless incredibly responsible and requires considerable attention from the user.
As far as all simplified, if the owners of portable computing equipment, comply with several simple rules:
- Do not use a laptop indoors with high humidity.
- Cold medium or hot weather also destructively affect the laptop, especially under the condition of long exposure.
- During the work of the compact device, make sure that the outlet of the air intakes are not closed with third-party items.
- In a timely manner, conduct preventive maintenance of the laptop.
Depending on the intensity of the use of the laptop, it is possible to replace the thermalcolos one after a year. However, now you know when it is necessary to resort to such a radical service method. All the best!
The thermalcaste is a substance used to control the temperature between the parts of the electrical appliance, which is actively separating heat (in laptops and computers, are the processor and video card). The thermalcaste is an important "binder" element, since it provides dense contact of the elements among themselves, without which the normal heat exchange is practically impossible. It is for this reason that the replacement of the thermal paste on a laptop or stationary PC is one most important stages of the maintenance of your device. Therefore, it is necessary to approach this lesson with maximum accuracy and proper level of training.
Features of the process
Do not forget that each model of the laptop may have distinctive nuances in terms of construction, not taken into account when creating a manual. In order not to have any unpleasant moments when replacing the thermal paste, it is worth carefully learning the features of your technology.
Laptops need to be replaced by the thermal paste once 1-2 years, because without it the technique is strongly overheated, which negatively affects the work of such parts as a video card and processor. After the problem appear, they can fail within a few weeks if nothing to do.

Thermalcaste - This is a thick mixture of a pale gray or - most often - gray-white, its main characteristic is high thermal conductivity.
Elements that are constantly undergoing heating (central processor and video card chip), when applied, the thermal paste is better given heat, which allows them to protect them from excess temperatures.
Since after a certain time, the use of the thermalcase dries out, which leads to overheating of individual parts of the laptop, you should always be on the main.
If the temperature of the processor of your laptop or computer has risen above the permissible norm, it is usually 75-80 degrees, and the thermalcase has not changed for many years, it is necessary to urgently take measures to replace.

Replacing the thermal paste can be performed in service centerBut you can implement it at home and significantly save.
Preparatory stage
To replace the thermal paste on a laptop at home we will need:
- Thermal Cap itself, which can be purchased at any store specializing in computer equipment.
The question of which pasta is preferable to use, is quite controversial: even in the environment specializing in this person it is impossible to find a unambiguous answer, which paste is preferable, but most often among the recommended brands are called Zalman, Noctua and Arctic. The syringe in which four grams of thermal paste is located (this is enough for several replacements), you can buy within 300-400 rubles. You can also use a more popular and cheap option - KPT-8, but feedback about this paste is contradictory. In addition, for a short time (for example, there is no possibility to purchase a suitable product) The thermalcolone can be replaced by lead dust, silicone, a thermoclate, thick silicone lubricant containing silver oxide (the required component), or a alloy of Wood;
- A vacuum cleaner or a small brush (to clean the parts from the accumulated dust);
- Paper napkins (in no case are not wet, because they contain substances that can damage the details of the laptop), toilet paper and cotton wands for wiping hands, as well as removal of residues of the old thermal paste and excess new;
- Alcohol (helping to separate the thermal paste from the details of the laptop in the case when it is not possible to do it);
- Knife (preferable to use the stationery);
- Screwdriver (in order to disassemble the laptop);
- Tassel, plastic card or any other suitable object, not leaving scratches that can be applied to the details of a new thermal path.

The process of replacement Thermal paste is a procedure requiring care, accuracy and full compliance with technology.
It is worth remembering that the wrong disassembly and cleaning can damage the laptop, so it is not necessary to risk once again if you are not sure about one hundred percent.
In addition, you do not need to forget that independent opening of a laptop or system Block Will the loss of warranty on it. Have it in mind when opening the device.
Disassembling a laptop
Before disassembling, disconnect the laptop, then with a screwdriver, carefully unscrew the screws and remove rear cover, cooler and clean it from dust using a vacuum cleaner, which will reduce the total temperature of the system.
It is necessary to perform this action as much as possible so that the vacuum cleaner does not touch the inner details of the laptop and did not damage them.

After that, it is necessary in the strict sequence specified on the radiator, unscrew the bolts that are fixed, and disconnect the cooling system from the motherboard.
Most often for this, it is necessary to unscrew the four screws that attach the radiator to the central processor, and two that are located next to the graphic chip.
Having understood with bolts, you will see a metal fee on which the remains of the old thermal paste are located, the processor, next to it, you can also see the chip of the built-in video card.
Sometimes it happens that in some models, the laptop housing does not allow separating the radiator from the motherboard.
In this case, it is necessary first of all to pull out the motherboard and only after that disconnect the cooling system from it.

If a separate video card is also present in your laptop, having your own cooling system, pull it out, and then remove the radiator from it.
Under it, you will find a video chip - a small plate on which the remains of the old thermal paste can also be detected.
Note that all connectors must be disconnected as gently in order not to damage them.
Pull out all the details of the laptop (processor, video card and cooling system) also needed with due accuracy. The processor can be taken only for the sides and to put on any plane without excessive pressure so as not to drive the legs, although they look strong enough.
Removal of old thermal stas
Gently, without excessive pressure, with dry paper napkins or toilet paper, it is necessary to remove the remains of the old thermal span with the cooling system, processor and the laptop video card.
If the paste is bad, you can use cotton chopsticks, mixing them with pharmacy alcohol.

The replacement of the thermal paste is considered successful only in the case when the surface of the processor is pre-cleaned to almost the mirror gloss. To avoid the noise of the fan blades in the future, you can also use a drop of machine oil for lubrication.
Applying new thermal staste
First of all, it is necessary to squeeze the thermal panel from the syringe to the processor, after which it is possible to start it with its distribution on the surfaces.
To do this, use a special tassel (sometimes it can be bought with a thermal storage), a plastic card or any other suitable object that will not leave the scratch on the lid of the chipset.

The thermalcolus is necessary to distribute the surface of the built-in or external video card, and the processor, as well as - at will - on the cooling system (but it is not required: the paste on other parts is enough for the laptop again to function efficiently).

If your laptop has a video card with its own cooling system, a radiator contact pad with a graphics chip is also worth covering the thermal storage.
Excess substances should be wiped with a paper napkin. It is not necessary to think that the more the thermal paste you use, the better your laptop will work: this is the situation where quality does not depend on the quantity.
Laptop assembly
Perform the action specified in the first paragraph by observing the reverse sequence. First we return the processor to the place (its angle marked with a golden arrow must match the same marked arrow of the connector angle), then we lower the foot of the retainer.
We establish the cooling system, twisting the bolts in accordance with the numbering indicated on the radiator.
It is necessary to make sure that all bolts are fixed properly so that there are no problems with the further work of the laptop.
Making sure that all the parts are on the spot, close the housing cover. Turning on the laptop, check the temperature of the processor and the video card under load. If its indicators fall compared to last time, the replacement of the thermal paste went to the laptop for the benefit. The reason for failure can be other reasons for the exhaust technology.
Output
The replacement of the thermal paste is not so complicated, but a very important process, if you certainly do not want your laptop to be out of order. In any case, if you enjoy the instruction, the process of replacing the thermal paste will not be a problem for you.
The laptop began to warm much, it turns off it myself? Most likely, if the computer is not new, he clogged with dust. We will tell you what to do in this case, and with the help of our instructions you can find out how to disassemble a laptop yourselfClean the cooling system from dust and produce replace the thermal paste on the processor, Lappotop video card. This procedure will help reduce the operating temperature of the processor by 15-20%.
Modern laptops contain many powerful generating heat components that can often lead to overheating, especially if it is intensively used and scored dust. If your laptop is always warm in certain places, and sometimes it turns off randomly, there are all reasons to believe that the device overheating is.
How to clean the laptop from dust at home
And if your computer is no longer covered with a warranty, do not worry. We have described all stages step by step necessary workAnd we will show you exactly how to deal with overheating problems yourself. You will be able to do the whole necessary procedure for cleaning and replacing Laptop thermal paste.
Cleaning the cooling system and replace the thermal paste in the laptop
The first method: analysis of the laptop and blowing the cooling system with compressed air
This method is designed for those who are not familiar with the internal device of the computer. Even if you have never dealt with computer equipment before, following these instructions, you simply and quite effectively, will be able to repair a laptop overheating.
Required tools:

- Small-sized cross screwdriver
- Compressed air canister
Step One: Disassembly. Removing the bottom cover of the laptop

For this model, it is necessary to remove only two screws (converted red).
Before you start, make sure that the laptop is completely turned off, is not in sleep mode or hibernation mode. Also make sure you have turned off charger, remove the battery battery. If you use an anti-static bracelet, now it's time to ground it.
The rear panel removal process varies from the model to the model, but most will have a set of screws at the bottom of the laptop. Some models may have a pair of screws on the sides or back of the device. In addition, keep in mind that it is not necessary to all screws on the bottom of the laptop serve to mount the rear panel. Try to follow the contour to determine which screws must be removed.
After all the necessary screws are removed, you can remove the back cover. Most models will have a small edge for which it can be hired. Carefully, without strong pressure, disconnect the panel. If you feel that it is not served, check if there are no screws that you may have missed. In rare cases, some screws can be hidden under stickers.
* Note: Be sure to read the information in guarantees and check if it is not canceled if you remove these stickers. Some companies do not allow you to open the system. If your laptop is still under warranty obligation The manufacturer and the seller will better use the warranty service.
Step second: detection and cleaning of the fan and cooling radiator

Most modern laptops will have a cooling system similar to the photo above using copper thermal tubes connecting the processor and GPU with a copper radiator near the fan. You need to carefully remove dust from the cooler impeller and in radiator grilles. In most cases, dust is assembled between the fan and the radiator. The easiest way, remove large lumps of dust with fingers or tweezers, and then bley everything else with a sphailed air can. Act care, so as not to lock the tubes or thin radiator grilles.
Pull the fan with compressed air, use short pressing on the spray valve to the fan blades do not rotate too quickly. In addition, watch the impeller not interfere with nothing bother, otherwise you can damage it and break.
Some laptop models can have several coolers and radiators. If so, then simply repeat the same procedure with each.
* Note: Always, use a compressed air cylinder in the correct position vertically. If you keep it on your side or inverted, then compressed air will be released in a liquid form, which can damage the electronic components.
Step Three: Additional cleaning and reverse laptop assembly
After you have finished this cleaning, pass throughout the system, checking all the holes, corners and slots for the presence of dust, which can prevent ventilation.
Now you can make a laptop assembly in reverse order. Insert rechargeable battery, Connect your charger, and enjoy the quiet work of the laptop without overheating.
Method Second: Capital Cleaning Cooling System with Full Disassembly and Replacement Thermal Past
This method is intended for more experienced computer users, it includes the removal of the radiator and apply a new thermal paste on the processor and the video card. If you have disassembly experience personal computersYou can easily fulfill these instructions.
Required tools:

- Cross screwdriver (to remove rear panel and radiator)
- Compressed air in the canister.
- Thermalcaste (you can use standard - kPT-8)
- Cleaning fabric
- Pure isopropyl or denatured alcohol *
- Any solid plastic card
- Antistatic strap (optional, but recommended)
* Note: Isopropyl alcohol must be 100% clean, that is, without adding water, minerals, or oil.
Step One: Remove Rear Panel
This step is identical to the first way. See above.
Step Two: Radiator Removing


Most modern laptop models will use a combined GPU / CPU radiator, thermal tubes, while coming from the GPU block to the processor unit and are connected to the ribs of the radiator near the fan. As a rule, there will be several screws surrounding both processors and video chip, and sometimes, screws fastening the radiator to the fan.
Delete all these screws and carefully lift the radiator. You can slightly move it from the side to the side in order to free. For models with multiple radiators, simply use the same procedure for each of them.
The remains of the old thermal paste is sometimes difficult to clean with radiator and chips, especially when they are cooled. A good idea will be, open a laptop shortly after it was used when the components are still warm. This will make the removal of the old thermal paste easier and the rapid process.
Step Three: Cleaning the radiator


Use compressed air to clean the lattices and the cooler from dust. With the help of the edge of the plastic card, consider an old thermal chaser from the radiator. Remove as much as possible. Do not use any metal to do it. Radiators have tiny micro grooves to optimize cooling, so even a small scratch may threaten the efficiency of the heat sink.
After the main part of the thermal paste was removed, use the fabric without a pile, moistened in isopropyl or denatured alcohol to finally clean the radiator. It is necessary to make it as clean as possible.
After you cleared the radiator, do not touch the contact surface by anything - even the slightest pollution, like fingerprints, can prevent cooling efficiency.
Step Four: Cleaning Central and Graphic Processors

Cleaning from the old thermal path of the crystals of central and graphics processors will be the same process, although you have to act much softer. It is better to use only cloth for cleaning. Make sure the fabric is not too moistened with isopropyl, avoid dropping a drop of alcohol around your processor or GPU. Just like with a radiator, avoid contact with the surface of the processor or GPU after you removed the old paste.
Step Fifth: Applying a new thermal paste


There are generally accepted methods of applying the thermal paste when it is replaced. For the components of the mobile PC, the most common method is the use of a small drop of paste in the middle of the chip, and, using a clean plastic edge, uniformly smeared the paste along the top of the crystal. Use the photo above as an example. The new thermal layer should be thick as a sheet of paper.
It can be tempting to use large quantity Paste, but in fact you need to use as little as possible, drops enough to cover the chip crystal and filling out all micro grooves. Most high-grade thermal pastes contain silver particles for better heat transfer. When the paste layer is just a few microns between the radiator and the computer chip, these particles are uniformly distributed and provide optimized heat transmission.
Step Six: Reverse Radiator Fastening

When everything is ready, very carefully attach a radiator to the chip and slightly pressing, move it from side to the side, one or twice. This will help the thermal paste fill the micro grooves.
After that, insert the screws. Slightly nag them and then tighten the finally diagonally. Make sure to check each screw twice.
Step seventh: reverse laptop assembly
Just repeat all the steps when disassembling in the reverse order, do not forget to verify that all the plumes and connectors are connected, use compressed air to clean any dust components, and close the rear panel. If you had cooling problems earlier, you will probably see a significant difference.
Additional Laptop Protection Tips from overheating
Many cooling laptops pull the air through special openings from below. And using your laptop on the knees, on the sofa or other soft surface can significantly reduce air flow. In addition, the fabric is an additional source of dust and smallpox. To avoid it, try using your laptop on flat, smooth surfaces, like tables or a small board under the size of a portable computer.
Pets also significantly contribute to the clogging of the device. If you have pets, try to keep them away from your computer, especially in the summer when they are driving, and wool in significant quantities falls inside the housing. Try not to iron your favorite next to your mobile PC when it is enabled.
In this article, we described in detail how to clean the laptop from dust and independently replace the thermal colon on it. And another advice, try to turn off your laptop when you do not use it. While the fan is turned on, it pulls the air, and with it, dust comes. This measure is enough to reduce the amount of pollution by as much as 30%. Light breathing your laptop!