In Photoshop, the grid is used to solve various tasks. The main assignment of the grid in the correct location of the objects. The grid is simply necessary when compliance with high accuracy is required in the location of various elements on the canvas.
In this small lesson, we will consider the principles of calling and editing the grid in Photoshop.
Call the grid is quite easy. To do this, click on the main menu to "View", then in the list that opens, to bring the "Show" parameter to the "Show" parameter and from the proposed list, select the item you need - "Grid".
As a result, the canvas will acquire an appropriate appearance and will be rapidly at squares.

Also to call the grid, you can apply the key combination - Ctrl + '. The effect will be the same as in the first version.
The resulting grid can be configured under the parameters you need. To do this, go to the Edit section, select "Installations" there and then click on the "Guide, Mesh and Fragments" item. - This method is suitable for photoshop version CS5, CS6.
We use this lesson using Photoshop CC 2018, so our actions will be slightly different. We need to go to the "Photoshop CC" menu, choose "Settings" and then "guides, grid and fragments".

As a result, a window will open with the settings where you can change the grid parameters. For example, change the color of the lines and their style display (dotted, solid lines or points). And also configure the required cell size and distance between the lines.
05.02.2017 28.01.2018
Hello all site visitors site
The Photoshop program has an excellent tool that helps with an accuracy of the pixel to arrange objects, draw objects of the specified size, and the like. This is called this grid tool. It is often used by web designers, but this tool is so useful that everyone needs to know about him. If you still did not know what Grid in photoshop how to enable it and how to use - This lesson will be quite by the way.
It should be noted that the grid is not visible when the image is saved in JPG, PNG, GIF formats. Also the grid "Invisible" when printing. The grid is visible only in the program itself Photoshop or if you save the image in PSD or TIFF format. If you save the image in PSD or TIFF format and transfer the file to another person, he, opening the file on your computer, can see the grid you created.
How to enable / disable the grid (grid)
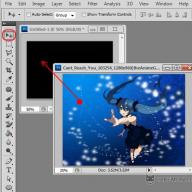
For a start, as always, create a new document in Photoshop (Ctrl + N) with an arbitrary size, I have 800x600 pixels:
By default, the tab with a new document will look like this:

In order to turn on the grid, you need to go to the menu View - Show - Mesh (View - Show - Grid) or press the key combination Ctrl + "("E" in the Russian keyboard layout):

The grid appeared:

By the way, in order to turn off the grid, you need to do the same actions - go to the View menu and remove the checkbox from the "Grid" or re-clamp Ctrl + ".
How to set up a grid
By default, the grid is divided by bold lines, the distance between which 2 cm, in turn these blocks are separated by dotted lines to 4 parts.
Change these settings to your needs perhaps by clicking on the menu Editing - Settings - Guides, grid and fragments ( Edit - Preferences - Guides, Grid & Slices) either by pressing the key combination Ctrl + K. and Ctrl + 8..

The following window will open in which you can change the color settings, units of measurement of the grid, etc.

How to use the grid
Suppose we need to cut a rectangle on the layer to make a frame, leaving 50 pixels across the edges.
Change centimeters on pixels and set a step in 50 pixels:

Activate the tool Rectangular selection (RECTANGULAR MARQUEE.), Hot Tool Call Key - M..

A small tip for the use of the grid in Photoshop:
When working with a grid, as well as with guides and layers, it is desirable to enable the function Binding. When this feature is active, the objects created as it would be "sticking" to the grid lines (in our case). To make sure the function is enabled, go to the menu View - show (View - Show.). If the checkbox does not enable, click on this item to deliver it.


If they have a different view, activate the item you need to click on it or click on the item "All", in the second case, the binding will turn on immediately by all available items:

Return to the lesson
Create a selection using the tool Rectangular selection, retreating on 50 pixels from the edges of the image. The parties of the created rectangle "stick" to the grid lines and do not allow us to climb over the borders.
There is a tool with which to edit graphics will be much easier. This is a grid. It helps when creating images and folding collages. It can be estimated by the size and distance, estimate how objects will be located relative to each other, make markup. Navigate where to place one or another picture. This is a useful tool if you can use them. Learn how to enable the grid in Photoshop, how to configure its attributes and how to remove it.
The grid helps you more accurately and symmetrically arrange elements in the composition
In essence, these are guide lines. Smooth table. It is superimposed on top of the image, but does not overlap it. It is easier to calculate the proportions with it, see the symmetry, correctly put individual elements.
As an analogy, we give the school notebook into the cage. It was built graphics and painted geometric shapes. On such a sheet, it was possible to draw a straight cut without a ruler, set an angle of 45 or 90 degrees without using the transport. It was determined on it, which length of the side of the rectangle, and how many cells make up its area. In Photoshop, the table is about the same functions.
It can only be seen in the program. It will not be displayed when printing. In the digital version of the drawing of the cells will not be either. This is not part of the image, but an editing tool.
Do not confuse it and pixel grid. The latter is to split the picture on the point. It is useful for detailed editing. It can also be enabled and configured.
Even if you do not need these options, it will still be useful to know about them. For example, to remove the table if it is accidentally activated.

How to turn it on?
- Open any graphic file or create a new one.
- In the menu bar, click on the "View" button ("View"). It is usually located between "3D" and "Window".
- Mouse over to "Show" ("Show").
- In the drop-down menu, click on the "Grid" ("Grid"). It will appear on the layer.
- You can also press the Ctrl + 'keys (in the Russian formation Ctrl + E).
How to setup?
You can make another cell size (for example, so that they visually designate a segment of 1 centimeter long), select the type or color of the lines.
- Open the Editing menu on the top panel.
- Hover the mouse to the Installation Point. He is at the bottom of the list.
- Click on "Guides, Mesh and Fragments".
- In the window that opens, set the desired cell size. This can be done in the "line through every ..." field. Different units of measurements are available: inches, millimeters, items, and so on.
- In the "Style" section, specify how the mesh should be displayed: a solid strip, dotted or dots. This is not so important, since the markup will be visible only when editing the pattern.
- In the "Color" paragraph, select Pouring. The setting can be used when the table merges with the background.
How to remove?
You can get rid of the cells in the same menu through which they were added. Here is how to remove the grid in Photoshop:
- Go to View - show.
- Remove the checkbox from the corresponding item.
- Or use the Ctrl + e key combination.
Pixel grid
Pixel grid is noticeable only near. To see it, you need to enlarge the picture and change the scale. But when working with graphics, it can interfere. Here's how to insert it or remove it:
- Open the View menu - show.
- Click on the "pixel grid".
Rulers
Another measurement method in photoshop - ruler. They are outside the drawing. With this tool, you can estimate the length and width of objects and the image as a whole. You can activate the line in the View menu. To select their parameters, go to edit - Settings - Units of measurement and ruler.

The table is useful when drawing schemes. Or for any other work in which accuracy is required. But this tool will come in handy and outside the professional sphere. After all, during drawing a lot of "pretending to the eye." If you turn on the markup, it will be possible to navigate it. And in the end, it turns out the verified, worked and beautiful drawing.
Instruction
The grid can provide substantial assistance in the reconstruction of the image after some operations were performed, and it turned out to be distorted. Open the Reconstruct tool, it will allow you to cancel the changes, restore the initial image of the image or on the contrary to apply distortion to other objects. In addition, to distort the object can section Liquify. The grid will allow you to track changes and distortions in any created object, and you can also save the grid at any time with the form of the converted object so that you can subsequently apply it to it. Similarly, you can save the grid for a normal undischarged object to restore its parameters after unsuccessful actions.
If you allowed an error, you can always use the "History" function.
Sources:
- How to make a calendar in photoshop
There are many techniques of art photographing, allowing to get unusual visual effects. One of them - "Fish eye" It is achieved by using a wide-angle lens with short focal lengths. Therefore, it cannot be reproduced on amateur chambers. However, to make the effect of "fish eye»You can in Adobe Photoshop editor from the usual photo.
All lines will disappear, but if you need to display them again, then return the check mark back, and then all the guides will turn out again in our places and you can continue working with them.
Marking Marking in Photoshop
Remember what a notebook looks like in a cell. The same grid can be placed on top of the document in Photoshop. To do this, execute the command:
View - Show - Mesh

Setting up the grid is carried out in the photoshop installations: Editing - Settings - Guides, Mesh and Fragments.
You can specify which widths will be the main (large) cells and from which amount of additional internal divisions they will consist. For example, I have basic cells of 2 centimeters and are divided extra on 4 smaller. Thus, each small cell is 0.5 centimeters.
This grid is convenient when you need to align many different elements, such as text.
Noticed the error in the text - select it and press Ctrl + Enter. Thank you!
In Photoshop, a grid is built for convenience, which helps to conduct a more accurate drawing of the elements taking into account this grid. Also, the functionality offers the user and the ability to change the grid itself.
Working with a grid in Photoshop is very simple. Let us consider how it can be turned on.
How to turn on the grid in Adobe Photoshop
Before you start, you will need to create a new document in the program or run already existing. The inclusion of the standard grid of the program occurs according to the following instructions:

However, if for some reason you are not satisfied with the standard mesh type, you can configure it a little to your needs. This is done as follows:

You can also make an arbitrary grid from the guides. In this case, the canvas will only be distinguished by you, and not the program itself. This feature is often more convenient. Creating a grid in Photoshop from guides occurs according to the following instructions:

A more detailed setting of guides occurs by analogy with a conventional grid, which was considered in one of the instructions above. The only difference is that you will need to work in the "Guide" and "fast guides" blocks. Here you can choose the color of the guide lines, as well as their style.
As you can see, installing and setting up a grid in Photoshop is a very simple matter. Use this information to get the most accurate location of objects on your images.