"Scanning" of documents and photos on the phone is a useful feature. Fortunately, there are very simple ways to scan documents.
Of course, a special scanner will still be better if you often need to scan a large number of documents, but the use of your phone as a scanner is also suitable if you need to scan only a few documents. That's what we recommend for Android.
The best way to scan documents on Android: Google Disk
If you are using an Android device, the best way to scan documents is a Google Disk application that is installed almost every Android device.
You can scan documents directly from Google Drive by clicking the "+" button in the lower right corner of the main screen.
In the pop-up menu, select "Scan".

It can request permission to access the phone chamber. Click "Allow".

When you are ready to scan the document, place the document so that it occupies the entire screen to as much as possible and press the blue button. You can also use the flash by pressing the flash icon next to the capture button, if the flash is installed on your device. If there is no flash on your device, this parameter will not appear.

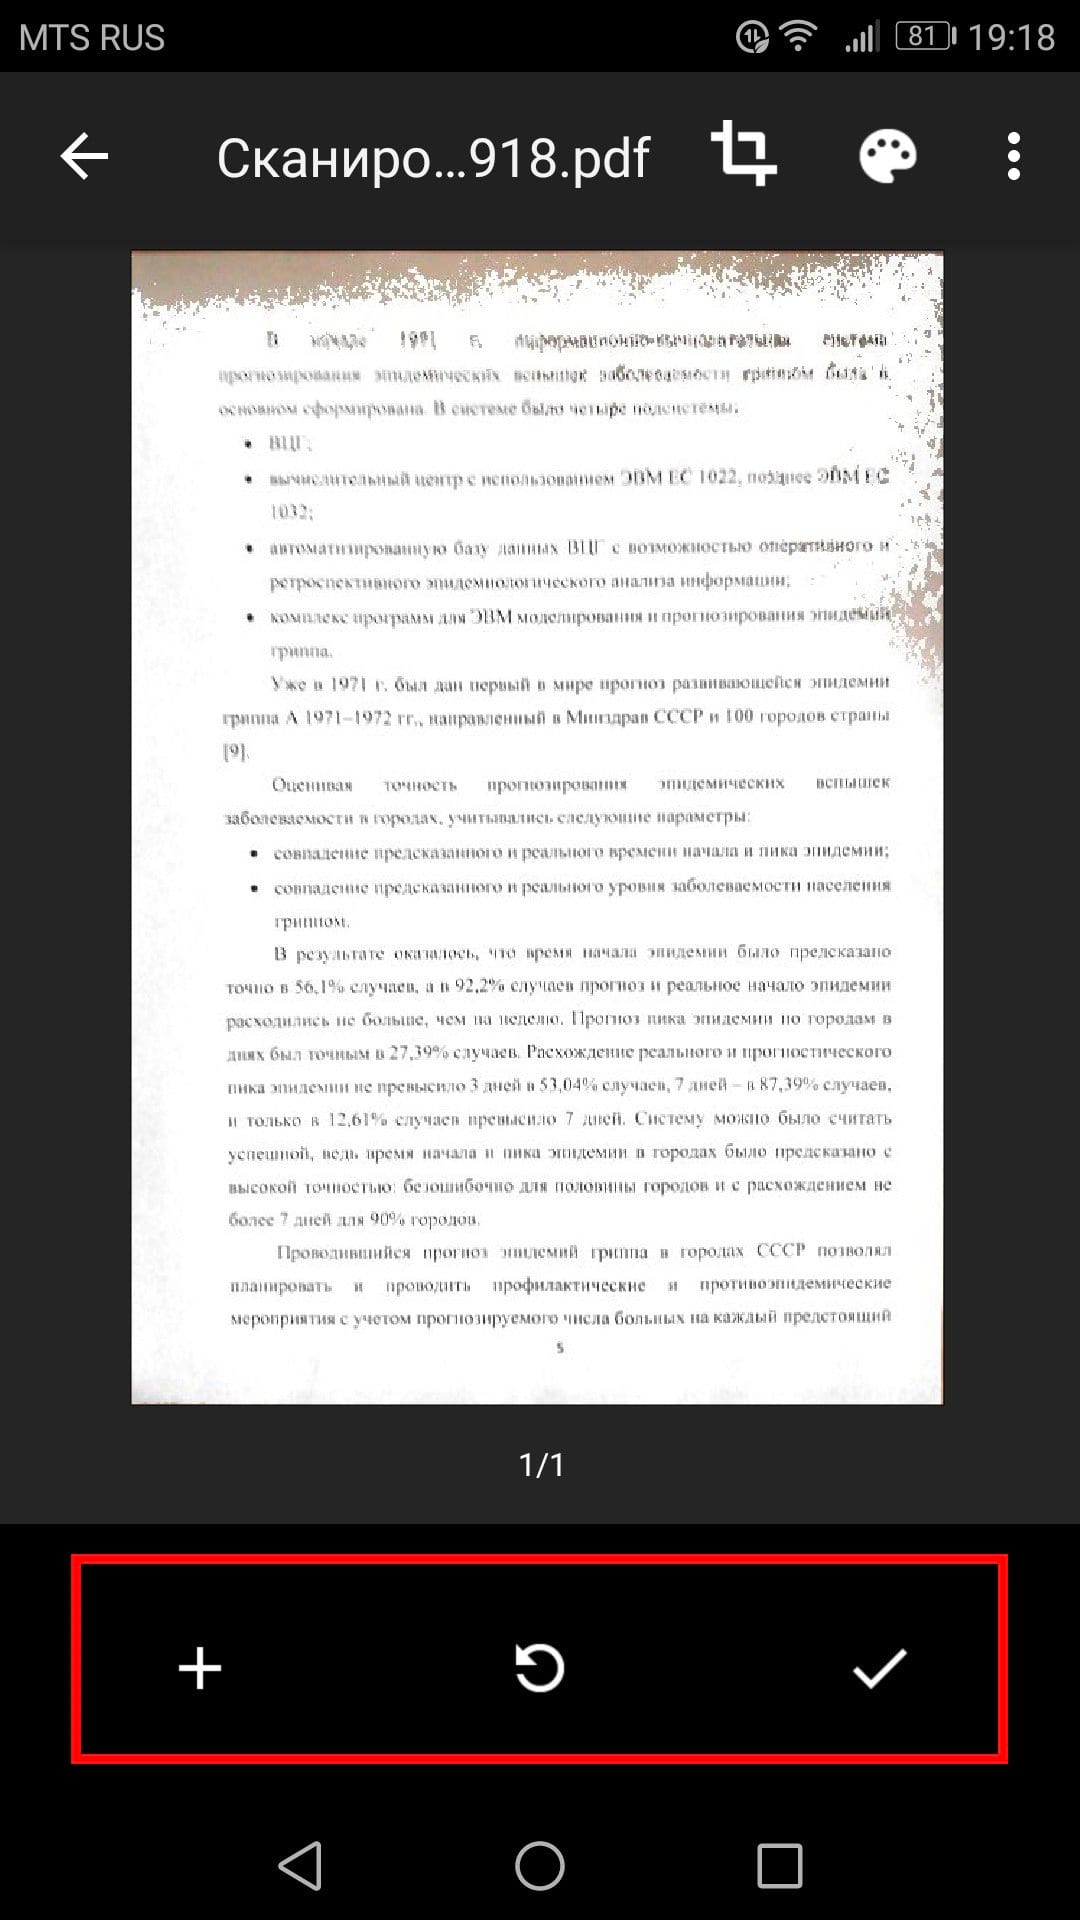
After scanning the document, a preview will immediately appear. Do not worry if when viewing most of the document will be cut. Click on the appropriate icon to select the area you want to save.

Touch, hold and drag the points to change the area that is scanned.

When finished, click on the tick in the lower right corner of the screen.

You have three options immediately after scanning:
- Click the "Plus" icon to add more pages to the document.
- To repeat the scanning, tap the circular arrows in the middle.
- Click the Talk icon to complete and download the document on Google Disc.
You can also make minor adjustments after scanning. For example, pressing the palette in the upper right corner will allow you to change the selection of the color of the scan and bring it to a specific type of document. By default, the scanner automatically chooses the one that, in his opinion, is the best.

Finally, three points in the upper right corner will allow you to delete, rename and turn the scanned document if necessary.

Scanned documents are added to Google disk in PDF format, and the names are added along with the word "scanned" followed by the date and time. You can move, rename or delete any of the scanned documents by clicking three points next to the file name.


Then you convert this scanned PDF to a document, which can then be edited or exported to Microsoft Word.
Today there are many ways to create a copy of a paper document, translate from paper format to electronic, etc. If only xerox is required to create copies of paper documents, then not only special equipment, but also software will be required to translate a paper document to its electronic format.
How to create an electronic version of the document?
In order to create an electronic copy of the document, the user will need a scanner or MFP (multifunction device). Of course, if there is no need for MFP, it is not worth buying it, it is easier to do with the scanner. First, it will cost much cheaper, and secondly, it will perform exactly the function that the user needs, namely scan the document and translate it into an electronic format.
For the work of the scanner, special software is required - driver. Usually it comes in a set with the device, but if it is not, it can always be found on the Internet. You can use the universal ABBY FineReader program, which is directly scanning and text recognition.
The entire procedure for transferring a paper document into an electronic format is reduced to these two procedures (scanning and deforming text). For Wow to make an electronic copy of the document, you must: go to the Start menu, and in the list of all programs, find either the driver from the scanner or MFP, or the ABBY FineReader program and run it. After starting the program and the scanner, you can open the cover and put the paper document on it with text down. The document should be placed on the scanner surface as soon as possible with respect to the edges of the working surface of the device. Next, it is necessary to use the cover as close as possible so that the lighting does not fall onto the working surface. Otherwise, the electronic document will be illuminated, that is, a part of the text that the light came to, will not be visible.
Next, in the settings, select the optimal scan parameters, such as color, output size, output resolution, etc. When everything is ready, you can click on the Scan button. When the procedure is completed, you should click on "recognition", with which the text will be converted to an electronic format, for example.doc, and the document can be opened in a text editor to make changes.
The scanner is called a mechanical device that allows you to convert various objects (text, image, photo, documents) into digital format (more precisely, in the picture), followed by their saving in the computer device.
What kind of scanner, we will talk, adhering to the following plan:
The word "scanner" came to us from the English language: Scanner - from SCAN, which can be translated as "intently look at, view."
Scanner
Different levels of reflection allow the scanner to generate a digital copy of the scanned object. There are scanners that can scan not only the image on paper, but even volumetric items.
Scanners are several types. However, devices that allow working with textual and graphics documents were the greatest popularity.
Most budget inexpensive models belong to tablet type devices. Here, scanning (or photocopy) occurs as follows.
The sheet of paper from the information available on it is placed on a special transparent window (glass) of the scanner and on top pressed with a dense lid. Then the flow of light beams is sent to the sheet, which are reflected from the scanned image and is captured, recognized and converted into a digital copy.
The main element of the scanner is a matrix that catches and recognizes the image. It happens two types:
- CCD I.
First type CCD - Charge Coupled Device - Scanning an image using sensitive elements called CCD sensors (charging device).
The model of the first type has a matrix with a carriage with a built-in backlight lamp. The system of focusing systems (lenses) collects reflected light. To get a color image, it is divided into the color spectrum components and is captured by photocells.
This allows you to get saturated and bright images at the output. Moreover, the tight clamp of the paper sheet with the scanned image to the scanner window is not required. Since the light stream has sufficient intensity to overcome small distances. And this circumstance is very important for simple devices, for widespread use.
Information in such scanners is processed with quite high speed. The shortcomings can be considered a short lamp life and the need to apply an external power supply.
Second Type CIS - Capital letters from Contact Image Sensor - translated as "image contact sensor".
A carriage with photocells and LEDs is built into the CIS matrix. In the process of scanning, it slowly moves along the copy of the object, including the LEDs of various colors (red, blue, green), which allows you to form a color picture.
Such models are characterized by high reliability. In addition, their cost is relatively low. The main disadvantages of the device include the need for a dense clamping paper to the scanner window and the low scan speed.
The main characteristic of these devices is the so-called color girth depth (24, 32, 42 bits) and resolving the ability or simply resolution. The more bits in the resolution of the device, the better the quality of the image received. The resolution is denoted in the form of XXX (permission at points): yyy (carriage steps), for example, 600: 300 dpi (bit per inch).
On the first video you can see how you need to prepare the scanner and document for the subsequent scan.
Video 1. "How to prepare a scanner and document on the MFP HP Laser Jet M1005"
On the second video, it is shown how to perform scan operations and subsequent processing of the received scanned file, again on the example of the HP Laser Jet M1005 MFP multifunction device.
Video 2. "Scan and scanning scanner on HP LaserJet M1005"
On the first part of the second video below the text description is given.
Starting scanning
Before you start working with a scanner, you need
- scanner connect to 220V,
- and also connect the scanner to the computer, as a rule, through the port.
- It is also important to press the power button on the scanner if it is.
Then you need to properly put a document for scanning (down text or picture on the window, pressing to the corner, which is shown in the diagram applied directly near the scanner window).
So, "Iron" collected, connected, go to its software control on the computer. To do this, click the Start button. In the Start menu, click on "Devices and Printers". The window opens, as in Fig. one:

Fig. 1. Where in Windows 7 find MFP (printer, xerox, scanner in one bottle), if connected to a PC
In fig. 1 Numbers 1 marked printer (+ scanner, + xerox), which is connected and ready to work. Green tick in fig. 1 shows us the printer status (+ scanner) that this particular printer is a "default printer".
On the printer (+ scanner) by clicking PCM (right mouse button). A context menu appears, as in Fig. 2:

Fig. 2. How to start scanning?
In this menu, we find the "Start scanning" option (digit 1 in Fig. 2). The New Scan window opens (Fig. 3):

Fig. 3. Window "New Scan" in Windows 7
Five scan settings
1) Before starting scanning, if necessary, you can make settings. Let's start with the parameter " Color format"(Number 1 in Fig. 3). Clicking on a small triangle (figure 1 in Fig. 3), you can choose one of the formats:
- Color
- Shades of gray
- Black and white
I chose the "Color" format, as it was prepared to scan a color postcard.
2) the following parameter - " File type"(Figure 2 in Fig. 3). This refers to the type of file that we get as a result of scanning. If you wish, you can choose formats:
- BMP (point drawing)
- JPG (Figure JPEG)
- PNG (PNG drawing)
- TIF (drawing TIFF)
My type "JPG (JPEG Figure)" is selected, since this type allows you to store a file in a more compressed form, and saves the hard disk space.
3) parameter " Resolution (DPI)»Denitated 3 in Fig. 3.
The smaller the resolution is chosen, the worse the quality of the scan. Minimum resolution - 75. Maximum for this device - 1200.
The higher the resolution, the better the quality of the resulting scan. But the scanning will last longer and the resulting file (SCAN) will have a larger volume, that is, take more space on the hard disk.
4) parameter " Brightness»Allocated in Figure 4 in Fig. 3. You can adjust the scan brightness using the slider. I have a brightness - 25, a little to the middle of the scale.
5) scanning parameter " Contrast»Figured 5 in Fig. 3, regulated by the slider. In my case, there is a contrast of 0, that is, exactly in the middle of the scale. Brightness and contrast are selected by an experimental way. Here it is impossible to give accurate recommendations.
Press the "Start Scan" button (digit 6 in Fig. 3). After the scan is completed, the preview of the scan (reduced copy of the scan for a compact representation to the user) and together with it the field in which the resulting scan is given to give a name.
In my example (Windows 7, the HP LaserJet M1005 scanner) thus obtained by the scan is on the computer in the image folder.
If you need to process the resulting scan, you can delete too much, add inscriptions and more. In the video 2, it is described in more detail, for example, how to cut extra white fields on the resulting scan.
On other devices, the preparation of the scanner, preparation of documents for scanning, scanning itself and the subsequent processing of scanned images is made in a similar way.
Buttons on the HP Laser Jet M1005

Fig. 4. Buttons on the HP LaserJet M1005 device
The top number of the buttons is designed to choose from the menu of those options that are required when configuring the printer or scanner.
1 in fig. 4 - The entrance to the menu appears after clicking on the "OK" button.
2 and 3 in fig. 4 - Moving by different options in the menu is carried out using the left / right arrow, which are located on both sides of the "OK" button. The same button is completed from the menu.
4 in fig. 4 - If the user has changed his mind to use the menu (standard settings are satisfied), then you need to click on the pink "Cancel" button.
5 - "Number of Copies" - Sets the number of copies.
6 - "lighter / darker" - adjusts the color to the brightest or darker.
7 - "Advanced Copy Settings" - You can specify, for example, scale.
8 - "Start copying" - Run a xerox (copy) of a document pre-laid in the device.
Answers to 12 "simple" questions about the scanner
1) What is a copier printer xerox?
This is a MFP - a multifunctional device, "three in one". In other words, a printer, a scanner, a photocopier in the "one bottle", which is called MFP.
2) What makes the scanner in the printer?
The scanner is needed in the printer in order to text, image, paper with paper to translate into a digital view, in the picture, i.e. In the file that you can send, for example, by e-mail or submit as evidence that one or another document you have "on your hands" in paper.
For example, sometimes in the Internet Bank, in accounting, when preparing negotiations, to carry out any actions, you need to send a scan of a document (scan of a signed contract with printing, scan of the birth certificate, etc.).
3) What is better than MFP or printer and scanner? Equipment with scanner What is it?
MFP (Multifunctional device) is a printer, scanner and xerox.
Therefore, MFP is better than the printer and the scanner for the reason that three in one (3 in 1) is better than two in one (2 in 1).
With the exception of breakdown. If the device is one, and it broke, the user deprives all the capabilities (printer, scanner, xerox) at the same time.
Equipment with a scanner means that in addition to the printer, the scanner also includes the device.
4) What is better printer or scanner?
The printer and the scanner have different functions, so the question is: "What is better" not correct. The printer prints on paper documents, images and other files that are on the computer.
The printer prints files from a computer on paper. The scanner makes the opposite: translates to the file (i.e., in the picture, in a digital form), the information that is "on the hands" in paper.
Together, the printer and the scanner complement each other: the translation from the "Figures" on paper, and translation from paper in the "digit".
5) What is the scanner driver?
Scanner Driver - This software (software), i.e. These are those programs with which the Iron scanner turns into a controlled device.
If the scanner driver is missing on the computer, it may be one of the reasons why the scanner does not work.
As a rule, the presence of the scanner driver is checked when the scanner is first connected to the computer. Recently, the drivers are automatically downloaded from the Internet (if the Internet is connected) in the first to connect the scanner to the computer.
If this does not happen, then it is necessary to remember, maybe when selling to the scanner, a disk with drivers was attached. Then the scanner drivers are installed on the computer from this disk.
An integrated option is also found. First, the drivers and programs for the scanner are installed from the disk attached to the scanner, and then these drivers and programs are also updated from the Internet.
6) What is the scanner resolution? What is the scanner resolution?
This parameter is indicating how the digital image of the scanned original will be obtained (see figure 3 in Fig. 3).
The higher the resolution, the more accurately there will be a digital copy (scan), it will be more like the original. But at the same time the scanning will take place longer, and the amount of file received will also be great.
With a smaller resolution, the scan is performed faster, the amount of file received is less, and worse quality.
PC user resolution Selects itself depending on the scan goal. As a rule, it is recommended to install not too high permission, for example, 300 dpi.
7) Type of scanner tablet, what is it? Scanner type long, what is it?
IN Tablet The original scanner is placed on the scan window and closes with a lid. The original lies motionless under the lid, and moves inside the scanner. Thus, scanning is carried out.
Tablet scanners are like independent devices, and can be included in the multifunctional devices: printer, xerox, scanner.
IN Stretch The scanner is exhausted from one end to the other end of the scanner. The scanner itself is still motionless. In this case, it is more likely that the original can get stuck, break, damage.
But the mechanism of the lengthy scanner is easier than that of the tablet, it works longer. In the broach scanners, as a rule, you can lay documents, which is called a bundle. And they will be automatically served for scanning one by one. This is its convenience compared to the tablet scanner.
True, there are already multifunctional devices with a tablet type scanners, which can also be supplied to the originals with a bundle. So manufacturers continue their endless competition for consumer preferences.
8) The scanner does not scan what to do? Computer (laptop) does not see the scanner, what to do?
Check the following points:
- Connect the scanner to 220V.
- Whether the scanner is enabled (the scanner may have its own power button).
- Connecting a scanner to a computer (usually via a USB port).
- Check the readiness of the scanner driver to start work as follows:
- we bring the mouse to the image of the scanner in the "Devices and Printers" window,
- we make a small pause,
- a small window appears with inscriptions, testifying to the status of the device, which must be connected and ready to work.
- If the scanner connects to the computer for the first time, then you need to make sure the scanner driver is available.
9) What if the scanner gives an error? What is the scanner error?
To begin with, it is better to restart the computer, close unnecessary windows, disable all unnecessary programs and devices. And again try scanning a document or picture.
If it does not help, then the simplest in such a situation is "google", i.e. Search response online:
- Select error code (or "paint in blue"), which gives the scanner.
- Copy the selected error code, for example, using hot keys Ctrl + C.
- In the search (for example, Google, Yandex), insert error code, for example, using hot keys Ctrl + V.
- View error information and apply it in practice.
10) Scanner badly scans what to do? Scanner pale scans what to do? The scanner writes that the parameter is defined incorrectly.
Change the scanner settings (Fig. 3): Color format, resolution, brightness, contrast. The optimal settings select a PC user experimental.
I adjusted my scanner for several hours, trying to different settings, until I stopped on the parameters:
- color format
- file format.jpg,
- resolution 300 dpi,
- brightness 25,
- contrast 0.
11) Scanner writes that busy
If the scanner is in general access from several computers, then they can be used in the queue. While the previous user does not finish scanning, this access cannot be obtained.
If the scanner is individually access, on a personal PC, then you need to check if you have an accidental access to it through the Internet. On the jargon of the sysadminov, this is called "shaking the scanner", that is, "split the scanner" from the English word Share - share.
You can check it with a click right-click on the image of the scanner in the "Devices and Printers" window, then select the "Scanner Properties" or "Printer Properties" menu (for multifunctional devices).
In the "Properties: Type of Scanner or Printer" window that opens, on the Access tab, there should be no ticks opposite the inscription "Sharing this scanner (printer)"
12) Anti-virus scanner - what is it?
Anti-virus scanner - this is no longer a device, it is a program that does not have anything to do everything that is written above!
The antivirus scanner checks and treats the infected operating system of the computer. It does not conflict with the anti-virus program installed on the computer.
There are different antivirus scanners, for example, Dr.Web Cureit! Or Kaspersky Security SCAN, more. The anti-virus scanner is also called the attending utility.
P.S. Other computer literacy articles:
Get current computer literacy articles directly to your mailbox..
Already more 3.000 subscribers
In modern conditions, scan a document or a picture from the printer, that is, to create its electronic copy, can be different methods. One of them is the use of a printer with built-in scanner functions.
Choice of equipment for scanning
Before scanning, you need to make sure that the printer connected to the computer has the properties of a multifunctional device (MFP). From an ordinary printing device, create a copy will not work. So, scanning from the printer to the computer begins with the correct MFP connection to the computer via the USB port with the further installation of the hardware drivers, which is performed automatically from the disk or wizard of the operating system drivers. Driver disk comes with a device.
After the installation is properly installed in the lower right corner of the desktop, alert appears that the device is ready to use (in Windows). 
Standard method: Built-in scan wizard
To scan the document to a computer from the printer, you need to stick to the next algorithm (the method works in Windows 7/8/10):

This procedure can be done in another sequence (it happens that the wizard when you press the button on the printer does not start automatically). Then you can run it from the Start menu, called " faxes and scanning«. 
Then continue working with the application.
Scanning through the Paint App
Most Windows users are familiar to the simplest Paint graphics application (installed automatically at the time of installing the operating system). This editor can not only process images, but also scan a photo on a computer.
There is an option in its menu. getting Pictures "From the scanner or camera." 
Taking advantage of it, get a window with selecting parameters Procedures (Scan you can in a black and white variant, color, configure the quality of the scanned document). 
In general, quickly, conveniently and everything else, you can continue to edit the image immediately in Paint, saving it in a convenient format. 
Third-party applications
It happens that the functions of standard scanning programs are not enough. For example, you need to recognize scanned text, save the image in another format or use the specific quality settings of the resulting image, process it. In this case, you can resort to specially developed scanning programs with advanced features.
- ABBYY FineReader - can recognize text and digital images in high quality. Paid but with test period;
- Scanlite is used when you need to scan a large number of documents;
- OCR CUNEIFORM - another program for recognition of scanned text Files in many languages. Distributed free of charge;
- Paperscan - free Convenient program for transferring pictures on a computer and processing the resulting image.
- WinScan2PDF - a free Windows program, saves scans in PDF format;
Summing up, we conclude: use one or another scanning program on the basis of the goals and the result obtained. The usual user will fit the standard methods, and additional utilities will need narrow specialists and professionals. Good luck in choosing!
Recently, the cost of peripheral computer devices is reduced with each new generation. For example, quite recently, a person with an average of income to buy a laser printer for a home computer could only dream, and now you have to choose between a good inkjet model and a budget laser. The price reduction process did not bypass and such seemingly office devices like scanners. Allow yourself to buy a model with a CIS matrix.
Finally, after a long search, the scanner was bought, brought home and removed from colorful packaging. The very first question that arises from the owner: "How to scan the document?". First of all, we note that scanning is completely safe for both the user and the process itself, therefore it can be repeated any time, there will be no loss (unlike printers).
Before you need to prepare a device for operation. To do this, you need to successively perform a number of actions: Connect the power of the scanner, connect it to the computer, install the driver. The control driver is on the disk that is attached to the device. If it is absent, then you need to find a sticker on the body with the name of the model and download the program from the developer's site.
Usually after preparation, each user has a desire to figure out, it is a photo (picture) and only then - the document. Open the top cover of the scanner (relevant for popular tablet varieties) and place a snapshot on a transparent glass image down. Usually in the upper right corner (there is a key label). By the way, who is looking for how to scan the text, not the pictures, must remember the rule: any documents are placed in the scanner down symbols. Scanning mechanism passes under glass! After placing a sheet (books, photos), close the lid. The smaller the external light falls on the glass when working, the higher the quality of the digitization. Sometimes the question is not to scan the document from the A4 sheet, but how to digitize information from the bulk book. In this case, we place the sheets of turns on the glass scanner alternately, and the resulting open areas are closed with tight paper.
Next, run the program. It can be a user interface of the driver or third-party FineReader from ABBYY. For whom it is more important to figure out how to scan the document, it is recommended to choose exactly the FineReader, as this application has great capabilities. However, it must be downloaded and installed on the computer. Starting Standine: Open the Start button menu, follow the "ABBYY - FineReader" or if it is decided to work directly through the driver, then, for example, "Canon-ScanGear" (depends on the scanner).
In FineReader, click "Scan" and perform a preview. As a result, a black and white image will appear. Using the mouse, drag and drag dotted lines, choosing the desired area - it will speed up the digitization process. Further, in the same window, click "Settings" ("Settings") and set the desired parameters: permission to DPI, brightness, color mode. The greater the resolution value, the higher the quality. For a simple text, 150-300 dpi is enough, but for photos it is advisable to choose more. True, this setting directly affects the scan speed, so do not forget to set it according to the source type. Do not forget about the "Save" button.
Now click "Scan". After passing the scanner's carriage, the desired image will appear on the screen. If we are talking about a photo, now in the menu select "Save as an image", specify the target folder, type the file name. If the text was scanned, you must click the "Recognize" button. After that, recognized text appears on the right side of the screen, which can be saved as a file or send to Word.