As a rule, newcomers are made to the eye, which is not necessarily. Select the Move tool and pay attention to its parameter panel. There are a number of settings that are responsible for this task (see screenshot):
The first three buttons are responsible for alignment vertically (from left to right): at the top edge, in the center, at the bottom edge.
The following three buttons are responsible for horizontal alignment (from left to right): on the left edge, in the center, on the right edge.
Thus, to place the object exactly in the center, you need to select centering vertically and horizontally.
The most important level of alignment is: first of all, you must specify photoshop area relative to which the program should look for edges or middle. While you do not do this, the alignment buttons will not be active, that is, you can not click.
This also lies the secret of how to make an object in the middle of the entire image or its separate fragment.
So, the sequence of actions is as follows:
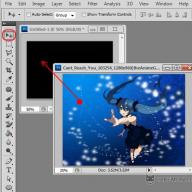
Suppose you need to place this picture in the center:

Option 1 - relative to all canvas.
STEP 1
We specify the photoshop area with respect to which the program should align the image. This is done by creating a dedicated area.
On the layer palette, we allocate the background layer and click on the keyboard, the Ctrl + A key combination (allocate all). As a result, you should see the allocation frame from "marching ants" around the background layer. (As a rule, the background layer - coincides in size with canvas).

You can highlight the background layer in another way - clamp the key Ctrl And right-click on the background layer. The method works when this layer is unlocked (the lock icon signals this).
Step 2.
Now you need to choose a tool Move. When we have a selection frame, the alignment buttons will become active, and therefore they can be used.
Select a layer with a picture you want to align, and now click on the buttons according to wherever you want to place this picture. For example, let's post exactly in the center. Then we need to press these buttons:

Another example. Suppose you need to place a picture in the center, but from the left edge. Then select such buttons on the parameters panel:

Option 2. - in a separate image fragment
Suppose, there is a fragment on the image, inside which you need to place any ideally accurately. In my example, I added a glass square. Let the other picture be inside it (by the way, in this article you can learn how to make such a glass square).
STEP 1
First of all, by analogy with the first option, it is necessary to highlight this fragment. How to do this?
If this fragment is on a separate layer (as I have a square, which I put it separately), then you need to press Ctrl and click on the layer miniature if it is not blocked).
If this fragment is in the image itself, you need to select rectangular and oval area selection tools and draw a smooth dedicated area around the fragment. How to use these tools.

Step 2.
Select a layer with a picture and select the buttons how would you like to place this picture. For example, in the center:

Council. In some cases, it is necessary to manually correct the location of the picture. Select tool in and by pressing the SHIFT key, press the directions on the direction on the keyboard. The picture will move in increments of 10 pixels.
If you do not clamp this key, but simply use the keyboard arrows, then the picture will move in increments of 1 pixel.
So how can I rebuild blocks inside the document and arrange them geometrically relative to each other and the whole document?
Of course, I could try to arrange them manually using the "Move Tool), but it will take a decent time, and I doubt that I would be able to place them accurately using the" on the eye "method. Better, and it is much easier to align and streamline blocks using special alignment options (Align and Distribute Options).
To access these options, we must select a tool (Move Tool):
With the selected "move", the alignment options are displayed as a row of icons in the parameter panel at the top of the screen. At the moment, the icons are displayed in gray and unavailable, because In the layer panel, I've selected only one layer, and it's simplicated to align it with anything:
Let's see what happens if you choose a few layers. Pressing the Ctrl key, I will choose three layers, "Top Left", "Top Right" and "Top Center":

Options are now active. Let us now consider each of them.
Alignment options
These are the first six icons in the options group. I list the purpose of the icons from left to right: - Alignment on the upper edges
- vertical layers centers
- at the bottom edge
- on the left edge
- horizontal centers
- on the right edge
These options can be applied to the contents of two or more layers and will be repelled from edges or from content centers:
Distribution options
I list them from left to right:
- Distribution over the upper edges of the content
- on the centers of the vertical layers
- at the bottom edges
- at the left edges
- on the centers horizontally
- on the right edges
Attention! Please note that the option has become available, you need to have three or more layers selected!
And now let's see how in practice, apply these options to streamline blocks in my document. As you remember, I chose three layers - Top Left, top center, and top right (top left, top central, top right). I am going to temporarily disable other blocks in the document by clicking on the visibility icon. I disabled visibility only for clarity, this does not affect the operation of alignment options:

Now in the document window, only three blocks remained:

To begin with, I align these three blocks horizontally at the top edge of the blocks. To do this, click on the "Align Top Edges" option in the parameter panel:
At the same time Photoshop defines the position of these three blocks, finds out which one is closer to the top of the document, and then moves two other blocks to the level of the upper edge of the highest, in this case, is a block with a yellow letter "O", and this action is performed. instantly. For a better understanding of this moment, hover the mouse to the picture, while the image with the position of blocks will appear before Movement:

Hello everyone, in this lesson we will deal with how to align text or shape in a certain space. For example, take a clean document and insert some shape or text there. In our case, it will be a blue avatar.
With an active layer with avatar, press Ctrl + A.To highlight the entire document. Selection will play the role of the frame, within which the text will be aligned.

Then choose the instrument Move.
The following buttons will be active on the settings panel of this tool:
1) Alignment at the top edge.

2) Alignment of vertical centers.

3) Alignment at the bottom edge.

4) Alignment on the left edge.

If you click on the alignment of the centers vertically, and then on the left edge, it will turn out like this:

5) Align the centers horizontally.

6) Alignment on the right edge.

And now click first alignment at the top edge, then on the right edge. Our avatar will move into the angle:

Everything is fine, only an avatar is completely stuck to the edges, you need to make a little indent. Click Ctrl-D.To remove the selection. Then SHIFT + Arrow Left and Shift + down arrow. Pressing the shift and arrows on the keyboard, you can move the object at once on 10 pixels in the desired side.

Use these knowledge to move objects on your work document. It is very convenient. Using keys Shift + arrows You will have smooth gaps between the elements. And your designer work will look more organized and balanced.
See you in the next lesson!
1. Enlarge history.
By default, the photoshop costs 20 returns, it is very uncomfortable, because sometimes we need to return to a larger number of steps back. Therefore, press Ctrl + K and change 20 to as much as you need, for example, 100
2. How to find a center of any document
Suppose you need to find the center of the random size. To do this, first turn on the display of the Linek (Ctrl + R or the View menu -\u003e rules) and guides (Ctrl + H or View menu -\u003e Auxiliary elements). Then you need to create a new layer and pour it in any color (this is optional, but it helps to visually determine the middle). Set the approximation so that the entire document is placed in the workspace. Then Mouse over the vertical ruler, hold down the left mouse button and drag the guide to the document center. When approaching the center, the guide will be automatically tied to the central point horizontally. The same should be repeated for the upper ruler.

3. To spend a straight line, click at point A, then press SHIFT and click at the point B.

4. How to find the unique layer of a large number of layers.
Often, when performing collages in the PSD file there are a lot of layers. And even if they are all signed and well grouped together to find the uniquely desired layer is pretty tinned - you need to select some element, and on what a layer is unknown.
a) You give V (Move tool). Click Ctrl and click on the desired object. So we will fall on the layer we need.
B) put a tick at the top, on the settings panel, in the auto-layer parameter - layer
Now it is enough just to click on the object, and the layer will choose the photoshop itself.
5. If you put a check mark here
Tick \u200b\u200bin the "Show control elements" parameter
That will automatically turn on the mode of free transformation.

6. How to change the background around the document.
In photoshop around the image is always gray background. It can be replaced by any other! To do this, select the desired color in the Main Footage window, activate the fill tool, hold the SHIFT and click on the gray background.

7. How to get color from another document or program
Photoshop allows you to obtain the desired color from the desktop or from other programs using a standard pipette (i), such as a browser.
To do this, it is necessary to reduce the photoshop window to the minimum size so that the desired color is visible on the screen. Then call the pipette (i) tool, click on the document in the workspace Photoshop, and, without releasing the left mouse, bring the pipette to any desired area of \u200b\u200bthe screen, outside the editor

8. When working with a brush tool for quickly changing brushes and access to the brush selection palette, right-click in the image window, and the palette will be displayed directly under the cursor.
Very often novice users make eye alignment operation, which takes a lot of time and effort. In this lesson, we will analyze the techniques that allow without unnecessary manipulations to accurately align images in Photoshop.
Photoshop includes a tool "Movement"Thanks to which you can accurately align the layers you need and image objects as you need. It is done quite simple and easy. In order to simplify this task, you need to activate the tool "Movement" And pay attention to its settings panel. The first buttons on the third allow you to choose vertical alignment. The buttons with the fourth on the sixth allow you to align the object horizontally.

So, in order for the object to be located in the center, it is necessary to activate the centering in two parameters. The main condition for alignment is the need to indicate photoshop area on which it must find the edge or center. While this condition is not executed, the buttons for alignment will not be active. This is the secret of setting the object in the middle of the picture or in one of the specified areas.
Option 1: Alignment relative to the entire image

Option 2: Centering for the specified fragment of the canvas
The following example. You need to arrange a picture in the center vertical, but on the right side. Then you need to center the vertical location and set the alignment on the right edge horizontally. Suppose in the picture there is a fragment, inside which you need to smoothly position any picture. To begin with, the first embodiment should be highlighted this fragment. Let's try to figure out how it is done:

After that, you need to select a layer with an image and by analogy with the previous point to position it in the location you need.

Result:

Sometimes you have to spend a small manual image correction, it can be useful in some cases when you only need to fix the existing location of the object. To do this, you can select the Move function, keep the key Shift. And you need to push the directions on your keyboard. With this method, the picture correction will be shifted by 10 pixels for one press. If you do not keep a key Shift.And decide to simply use the arrows on the keyboard, the dedicated element will move to 1 pixel at a time.
Thus, you can align the image in the photoshop program.