In this article, we will learn how to change system windows sounds. Just in case, it is recommended to do backup registry before you run our program, which makes changes to the registry.
You may know that in Windows you can set your accompaniment sounds for various events, such as Windows Logon, Connection Establishment, Mail Notification, and so on. We can customize our sounds on the victim’s computer to make fun of a colleague. There are many resources where you can find a good collection of sounds, for example, http://www.reelwavs.com/ and http://www.funwavs.com/.
Setting system sounds
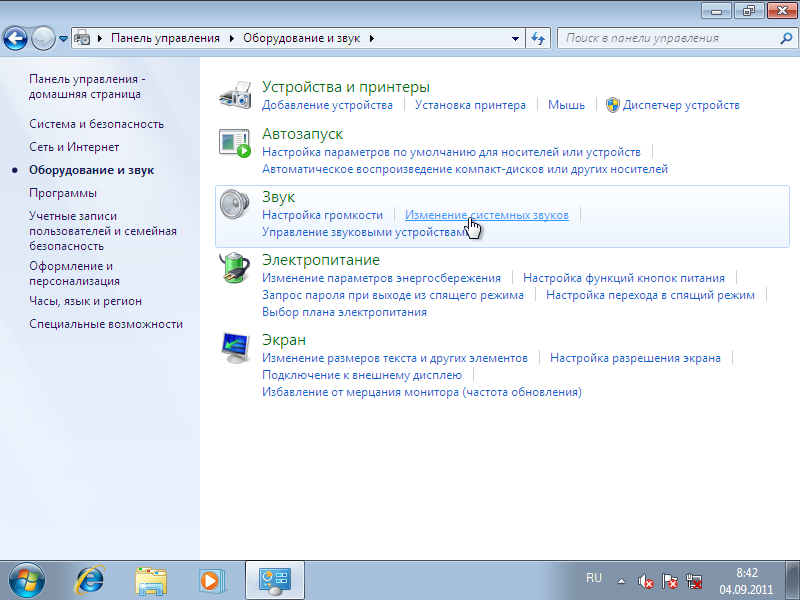
If you have access to the victim’s computer, you can change the system sounds in the Control Panel by opening the Sound category (Control Panel | Hardware and Sound | Sound | Change system sounds). You can go through all the events and assign your sounds by specifying file paths.
Programming System Sounds
We can programmatically change system sounds using our utility. In addition, the utility will save and restore sound settings and play sounds.
But first, we need to find out where the information about system sound files is stored. Like so much more, such information is stored in the registry. You can find this information in a specific place:
Each folder in the Schemes / Apps / .Default section corresponds to a specific event. For example, if you disconnected the USB device, you should have heard the system sound associated with the event DeviceDisconnect. A given event, like DeviceDisconnect, has several folders: .current, .Default, and a folder for additional sound schemes.
The system event has the following structure:
- .current - contains an empty key with a value containing the path to the sound file used in this configuration. For DeviceDisconnect on Windows XP, the current file is "C: \\ WINDOWS \\ media \\ Windows XP Hardware Remove.wav".
- .Default - Contains an empty value containing the default sound file. If you did not change the sound file, then this value matches the .current key.
- Other folders - You may have other folders in which sound schemes (user settings) are stored.
Reading and writing audio files for events
Knowing where the necessary settings are stored, you can create a DataSet that will contain system events and the file path for these events. Run the new Windows Forms project and select "Add New Item ..." from the Solution Explorer window, then select the DataSet template. Add a DataColumn Soundname and Soundfileas below:
Reading system event data from the registry
Declare two variables in the RegistryWrapper class for storing paths.
// these represent the location in the registry with the user sounds string hivePrefix \u003d @ "AppEvents \\ Schemes \\ Apps \\ .Default \\"; string hiveSuffix \u003d @ "\\. current";
Next, add the method GetSystemSound ()which returns RegSoundDataTablecontaining the values \u200b\u200bof SoundName and SoundFile. The first thing we do is get a list of all the subkeys for the path that we set when the GetSubKeyNames method is called. The method will return us a list of all system sounds for events. Then, we go through each event, creating a new series for the DataTable until the settings for SoundName for the current event and SoundFile in the registry key contain the path to the file. Please note that when we call the GetValue method to get the sound file, we must pass the empty string "" in the key name. We will also add a helper function to join the two variables declared earlier.
Public RegSound.RegSoundDataTable GetSystemSound () (// Get the subkey key string values \u200b\u200b\u003d Registry.CurrentUser.OpenSubKey (hivePrefix) .GetSubKeyNames (); RegSound.RegSoundDataTable tb \u003d new RegSound.RegSoundDataTable (); foreach // Loop through rows RegSound.RegSoundRow newRow \u003d tb.NewRegSoundRow (); newRow.SoundName \u003d s; newRow.SoundFile \u003d (string) Registry.CurrentUser.OpenSubKey (getRegKeyPath (s)). GetValue (""); tb.Rows; .Add (newRow);) return tb;) // adds the full registry key including prefix and suffix private string getRegKeyPath (string s) (return hivePrefix + s + hiveSuffix;)
Register entry
To set all the sound events, we will create another method that takes the RegSound DataTable and the sound files that we change. We loop through each row in the DataTable and set the registry key value for sound using the SetValue method. Calling the SetValue method, we need to know the name of the key (in our case, this is the empty string ""), the key value (the path to the sound file), and RegistryKind, which describes the type of value (we use the type string).
Public void SetSystemSound (RegSound.RegSoundDataTable sounds, string soundPath) (// loop through all sounds foreach (RegSound.RegSoundRow row in sounds) (// Set key and value RegistryKey key \u003d Registry.CurrentUser.OpenSubKey (getRegKeyPath (row.SoundName) , true); key.SetValue ("", soundPath, RegistryValueKind.String);))
Backup current sound settings
Changing the victim’s sound patterns, we must consider the possibility of restoring the previous settings. To do this, add the SaveSystemSound method, which uses the DataTable to save and file paths. We can use the WriteXml method in the DataTable to save the DataTable as an XML file.
Public void SaveSystemSound (RegSound.RegSoundDataTable sounds, string savePath) (// Save Sound DataSet sounds.WriteXml (savePath);)
Restore saved settings
Now let's add a method to restore the settings from the previous step. We need to know where the DataTable was saved and call the ReadXml method to read the data. Now we have the opportunity to loop through each sound event and call the setValue method to set a new value.
Public void RestoreSystemSound (string savePath) (// Restore Sound DataSet RegSound.RegSoundDataTable sounds \u003d new RegSound.RegSoundDataTable (); sounds.ReadXml (savePath); foreach (RegSound.RegSoundRow row in sounds) (// Set Key RegistryKey key \u003d Registry .CurrentUser.OpenSubKey (getRegKeyPath (row.SoundName), true); key.SetValue ("", row.SoundFile, RegistryValueKind.String);))
Playback sound event
Finally, we will add the ability to play sounds. Sound files are located in the system media folder windows folders, we need to quickly check if there is a backslash ("\\") in the file path to find out if the file contains the path and the file name itself. If not, then we attach the path to the file name and play it.
Public void PlayRegistrySound (string soundFile) (// play sound if there is an associated file if (soundFile! \u003d "") (SoundPlayer sp \u003d new SoundPlayer (); // add default path if there isn "t one int a \u003d soundFile .IndexOf ("\\\\"); if (a! \u003d 0) (soundFile \u003d "% SystemRoot% \\\\ media \\\\" + soundFile;) sp.SoundLocation \u003d soundFile; sp.Play ();))
User Interface Creation
Creature user interface we will start by adding controls to the form:
- ToolStrip element for the Backup, Restore, Select, and Apply changes buttons.
- DataGridView, which we can drag by clicking "Data\u003e Show Data Sources," and dragging the RegSound DataGridView.
- There are two OpenFileDialog elements, one for choosing where to restore settings from, and the second for choosing audio files to replace.
- SaveFileDialog element for choosing where to backup the current system sounds.
Data loading
So, we have almost everything ready for the application. Add two more variables. One for introducing RegistryWrapper, which we described earlier, and another for storing RegSoundDataTable data. To populate the DataTable, we will call the GetRegistrySounds method, which in turn will call the GetSystemSound method that we created earlier. We call the GetRegistrySounds method during form loading and while restoring sounds, or when we apply the changes, filling in the current sound settings of the DataGridView.
Private void frmMainMenu_Load (object sender, EventArgs e) (GetRegistrySounds ();) private void GetRegistrySounds () (// Call the RegistryWrapper Class sounds \u003d myReg.GetSystemSound (); regSoundDataGridView.DataSource \u003d sounds;)
Setting DataGridView
Let's deal with the presentation of data in the DataGridView element, changing some properties, for example, setting the property AlternatingRowsDefaultCellStyle in different colors, changing the DefaultCellStyle font in Arial 10, and turning off the ability to add, edit and delete data. We will also add a “play” image to listen to the current associated sound. To do this, right-click on the DataGridView and select "Edit Columns" to open the Edit Column dialog box. Here we will add a new column "Play," set the type DataGridViewImageColumn, assign the property Image our image of music and set the property Imagelayout in “Zoom” so that the image fills the entire cell of the column.
Add a code to play the sound when we click on the picture. To do this, use the DataGridView CellContentClick event. The sound will play if we click on the third column (the reporting index is from 0, so we use # 2 for the third column). For playback, we need to know the path to the file that we will receive by creating DataGridViewTextBoxCell for the SoundFile column and reading its value.
Private void regSoundDataGridView_CellContentClick (object sender, DataGridViewCellEventArgs e) (// Represents col # 3 the "Play" column if (e.ColumnIndex \u003d\u003d 2) (DataGridViewTextBoxCell cell \u003d (DataGridViewTextBoxCell) regSoundDataGridView.Rows.Rows.Rows.Rows.Rows.Rows.Rows.Rows.Rows.Rows. PlayRegistrySound (cell.Value.ToString ());))
Conclusion
Translation: Vasily Kotov
But at the same time, you play any sound files, i.e. speakers disconnect impossible, find the speaker icon in the toolbar near the clock in the tray. By clicking on it once, a row will appear. column with the image of a common slider sound volume coming out of speakers . Under it you will see the link “Mixer”. Click on it to open the volume mixer window of your sound card. In the window that appears in the "Applications" section, you will see several columns with sliders for adjusting the volume level. Among them will be the column "System sounds»- lower the slider to the minimum or click on the icon in the form of a blue speaker under the slider so that a red appears under the speaker image crossed out a circle. System soundsthus be eliminated.
If you work in Windows XP, Windows NT, Windows Millennium or lower (before 2003), go to the “Control Panel”, which is located in the “Start” menu or in the “My Computer” system folder. Select small display in the control panel icons and find the “Sound” label. Left-click on it to open the sound card properties panel. In the window that appears, select the Sounds tab and in the Sound menu drop-down list scheme "Click on the line" Without sound ", Then click the" Apply "and" OK "buttons.
Disable just a few sounds also easy in any edition of Windows. Repeat step No. 2 and in the sound properties window in the “Sound scheme” tab, you will see the “Program events” field. On the contrary to some events, a speaker icon is installed - this means that this event is accompanied by a sound effect. To mute a sound, click on the event and select “(NO)” in the “Sounds” drop-down list, then click “Apply” and “OK” to save the sound scheme.
Not all sounds that come from the speaker in the system unit can please the user of the PC platform. In most cases, they simply annoy the person. The solution to this problem is to completely disable it through the registry through software or manually.
You will need
- A computer.
Instruction manual
Try disabling the system speaker through your registry operating system (Windows). Open Registry Editor. To do this, call the context menu of the desktop item "My Computer" and select the item of the same name. The context menu is called by clicking the right mouse button. You can also call the registry editor using the Run applet. Press Win + R, type regedit, and then press Enter.
In the open window of the Regedit program, go to the left panel and select the HKEY_CURRENT_USER branch. In this thread, navigate to the Control Panel folder, and then Sound. In the right part of the window, all parameters of the Sound folder will be displayed. Find the Beep parameter. If it does not exist, create a new parameter.
To do this, right-click on free space right panel and select the "Create" section. In the menu that opens, click on the item "String parameter" and enter the name Beep. Double-click on the new parameter and enter the value No to turn off the notification sounds of the system dynamics.
To disable the built-in dynamics using the software method, you must run the "Device Manager" applet. Click the Start menu and select Control Panel. In the window that opens, double-click the "System" icon.
In the window that appears, click on the “Hardware” tab and click on the “Device Manager” button. In the running applet, open the "View" menu and click on the "Show hidden devices" option. Now in the list of devices you need to find and open the "System Devices" section. Double-click on the “Internal speaker” line and select “Disabled” in the properties.
The most radical way is to disconnect the signal cables from the internal dynamics. It will be enough for you to remove only one side wall of the system unit and disconnect the cables dynamics from connectors to motherboard. The speaker itself is located near the Power and Reset buttons.
Sources:
- how to disable the system speaker in 2017
Than longer person uses a computer, the more he learns about it. New tasks appear, and to accomplish them you have to do something that you did not have to think about before. One of these actions is turning off, full or partial, sound mixer Windows This must be done because during installation additional programs or equipment conflicts may occur.

You will need
- Computer, sound card, mixer, basic computer skills.
Instruction manual
An example of such a situation is the appearance of a constant echo during installation.
Almost every important action in Windows 7 has its own sound effect. You may already be tired of original sounds and you want to change them using sound files downloaded from the network, creating your own sound scheme. After reading this guide, you can do it.
1. Go to the "Control Panel" by clicking on the "Start" button.
![]()
2. Find the “Hardware and Sound” menu.

3. Click on the “Change system sounds” item.
4. Here you can immediately turn off the Windows startup ringtone.

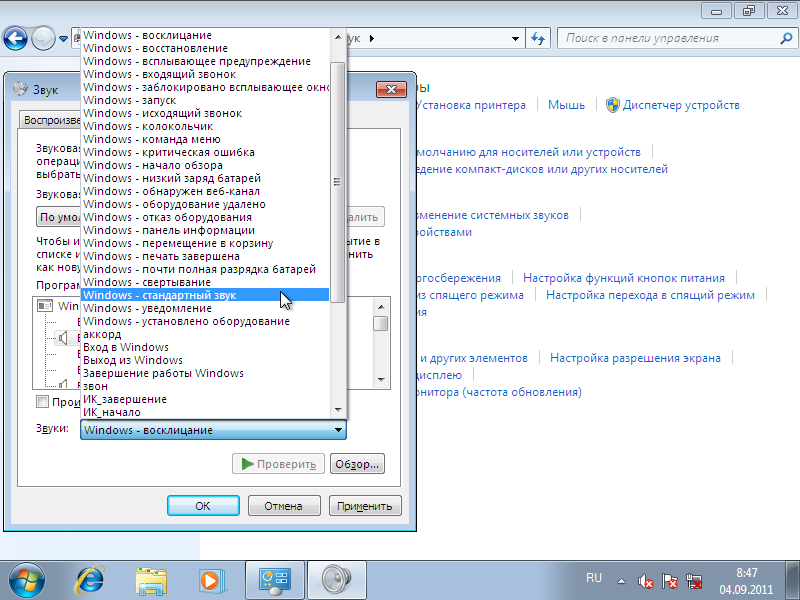
5. Click on the event for which you want to change the sound, then click the "Browse" button, and select the sound file in the WAV format, click "Open". This way you can even use your own sound files.

6. Or you can select a sound from the drop-down menu.
7. After you have selected the sound, click the “Apply” and “Check” buttons to check the sound.
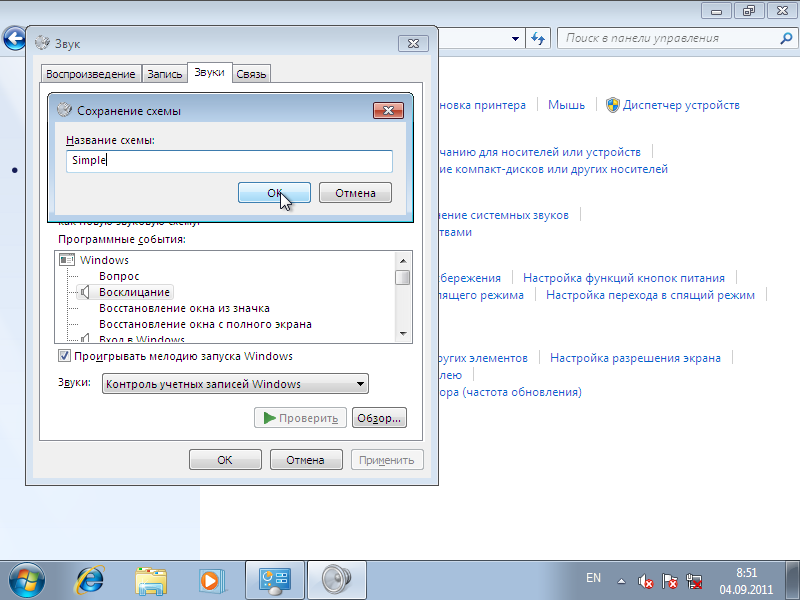
8. If you want to switch to another scheme, click on the “Sound scheme” arrow and select the desired scheme from the drop-down menu by clicking on it.

10. You can also delete the schema. Select the desired one from the drop-down list and click "Delete", confirming the removal.
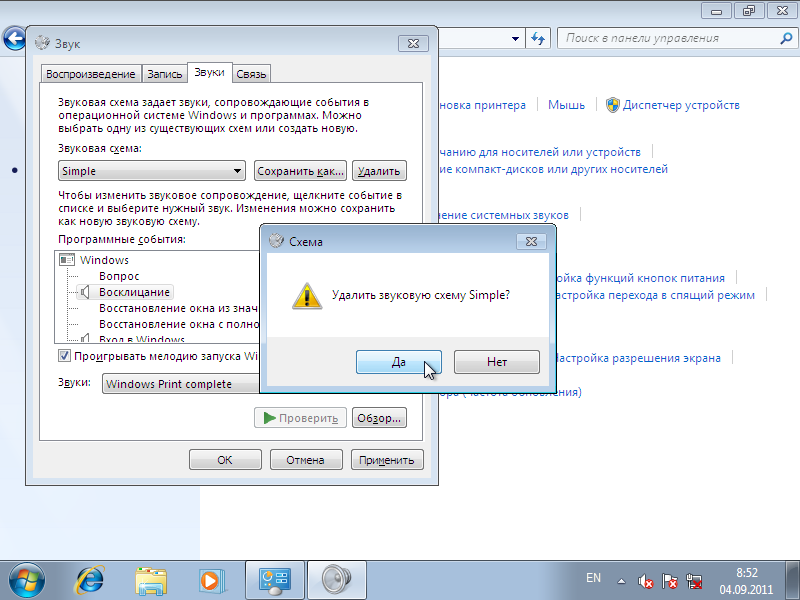
Do not forget about the “Apply” button to save the changes.
Almost every important action in Windows 7 has its own sound effect. You may already be tired of the original sounds and want to change them using the downloaded sound files from the network, creating your own sound scheme. After reading this guide, you can do it.
1. Go to the "Control Panel" by clicking on the "Start" button.
![]()
2. Find the “Hardware and Sound” menu.

3. Click on the “Change system sounds” item.

4. Here you can immediately turn off the Windows startup ringtone.

5. Click on the event for which you want to change the sound, then click the "Browse" button, and select the sound file in the WAV format, click "Open". This way you can even use your own sound files.
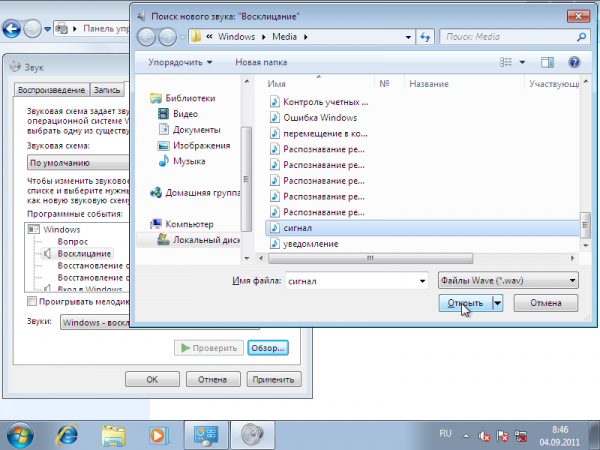
6. Or you can select a sound from the drop-down menu.

7. After you have selected the sound, click the “Apply” and “Check” buttons to check the sound.
8. If you want to switch to another scheme, click on the “Sound scheme” arrow and select the desired scheme from the drop-down menu by clicking on it.
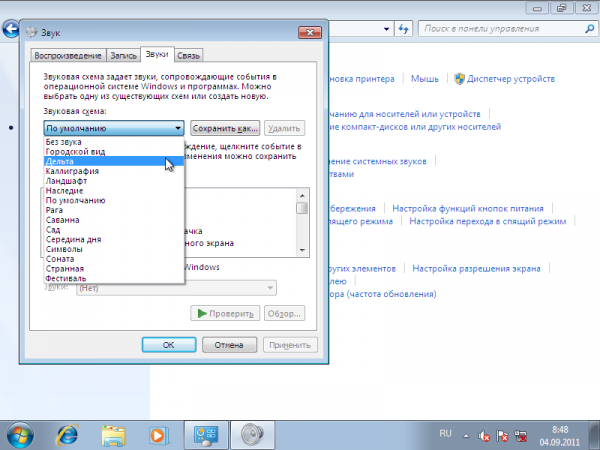

10. You can also delete the schema. Select the desired one from the drop-down list and click "Delete", confirming the removal.


