An irreplaceable symbol of the New Year is a Christmas tree. But not everyone puts a living tree at home. Then crafts come to replace, for example, a Christmas tree from cotton pads.
This is an original way to create a New Year mood in a room, in a kindergarten or in a school. Such a craft can be made even by a child. Therefore, one of the options is to create a snow-white beauty with the whole family.
To make a beautiful fluffy tree with your own hands, you need to prepare some materials. For such crafts, you do not need to spend a lot of money, because the most important material is cotton pads.
To make the tree medium-sized, you will need about 4 packs, which contain 100 disks. Next, you need glue (glue stick or “Moment”).
In addition to discs and glue, you need to take a white sheet of cardboard, a stapler and scissors.
To decorate the crafts, you can use the following:
- beads;
- colored ribbons;
- sparkles;
- packing tape and more.
These decorative elements can transform a white Christmas tree.
Christmas tree is made from a large number of discs. They symbolize the twigs of a tree. To give them the right look, it takes a certain amount of time and patience. Therefore, before you assemble the New Year tree, you need to prepare the branches themselves. To do this, you will have to work with each disk.
First of all, it is bent in half, and then again in half. So you get small triangles. The bend of the cotton circle can be fixed with a stapler. If you don’t have such a tool at home, you can simply use glue. This bending procedure needs to be done with each cotton pad. Once they are all ready, you can proceed to the next steps.
Assembly of a snow-white fir-tree
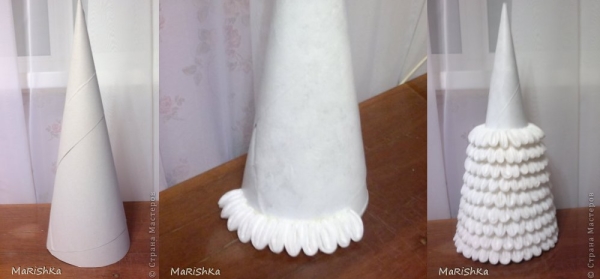
 When you glue all the available petals in the form of disks, you will need to start collecting the whole tree. To begin with, a large cone must be made of white cardboard, the sides of which can be fixed with either a stapler or glue.
This will be the trunk of the New Year’s beauty. Then you need to take one cotton pad and stick it on the bottom of the trunk. Moreover, the place glued or fixed with a stapler should touch the trunk, and the edges of the cotton pad should look up.
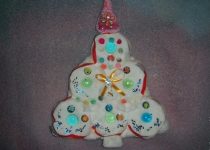
But you can’t leave her without jewelry. What Christmas tree stands without a star on New Year's holidays? This item can be made from another cardboard or wrapping paper. To make the miracle look more impressive, beads can be glued to the branches. Any manifestation of imagination is welcome. A Christmas tree made of cotton pads can be decorated with tinsel or colored ribbons. You can make various home-made garlands and cut toys. It all depends on your ideas and desires.
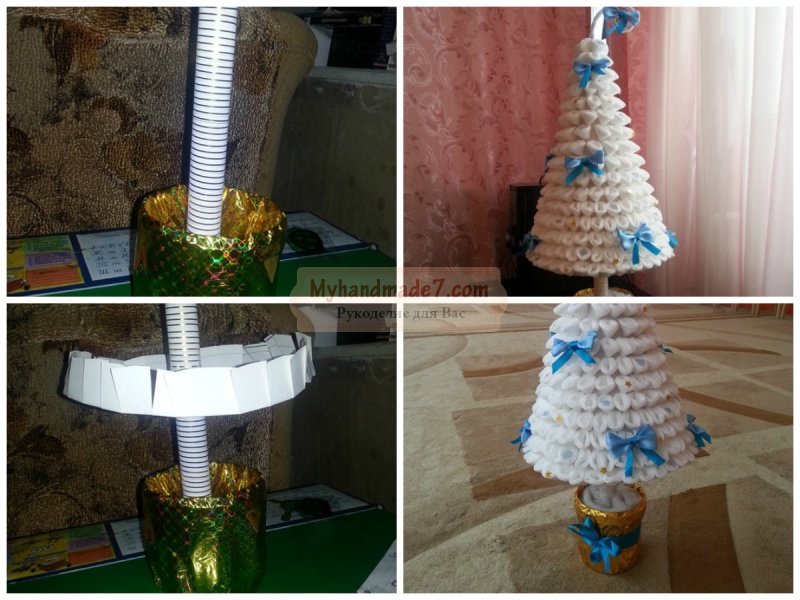
In addition, the Christmas tree can be placed in a bucket. To do this, take a plastic cup or bucket of mayonnaise and decorate it. The size of the vessel depends on the size of the resulting Christmas tree. This bucket should be wrapped with packaging film so that it looks like a beautiful addition to the main craft.
At the bottom of it you need to put clay, and in the middle stick a stick (you can take the tube from the rolled foil). After that, the tree can be mounted on a support in a bucket. If you do not want the open bottom of the tree to be visible, cover it with cardboard. You can put a synthetic winterizer in the bucket, and homemade gifts on top of it.
Such a craft will surely appeal to young children. She is very beautiful and easy to manufacture. Moreover, the surface of the discs can be painted green (or any other). The Christmas tree made of cotton circles has an advantage: even if you drop it, it will not deteriorate.
The most important thing during assembly is to glue each petal tightly. In this case, you will get a very strong and stable tree that will delight the eye for long days.
Cotton pads can be bought in almost any supermarket or pharmacy, they are in the cosmetic bag of almost every woman. Have you ever wondered how else, besides their direct purpose, they can be used? We thought about it, and prepared for you a small master class on the decorative functions of this inexpensive and affordable material.
The basic set of tools that you will need in any case:
- Several packs of cotton pads
- Scissors
- Stapler
- Decorative elements (ribbons, beads, sequins, pendants, etc.)

In addition to this, stock up with thick cardboard, polystyrene foam, large beads, white thread, sewing pins, toothpicks and paints. All this will be useful to you at certain stages of work on different projects.
Autumn is in full swing, the New Year is just around the corner, and therefore our workshop will be devoted to the most festive elements of the decor - the New Year tree and decorations. Let's start with the Christmas tree.
Step by step instructions with photos
So, first of all, you need to acquire blanks (you will need a lot of them). It’s very easy to make them - just fold each cotton pad four times as shown:
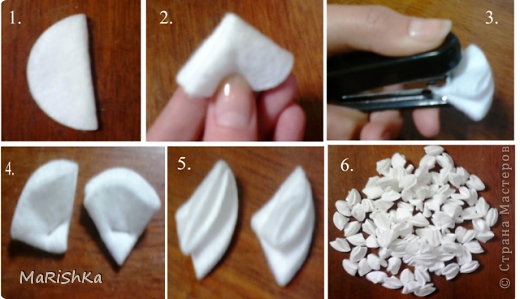
Corners can be fastened with a stapler or thread, as you prefer.
Next, using dense cardboard, scissors and glue, we make a cone-shaped base. Colored cardboard is best painted with white paint. The height of the cone can be any, at your discretion. The base must be very stable, so the bottom edge is best reinforced with a braid or strip of cardboard glued around the inner circumference.
When the “trunk” dries properly, you need to glue “needles” to it. Starting from the bottom:
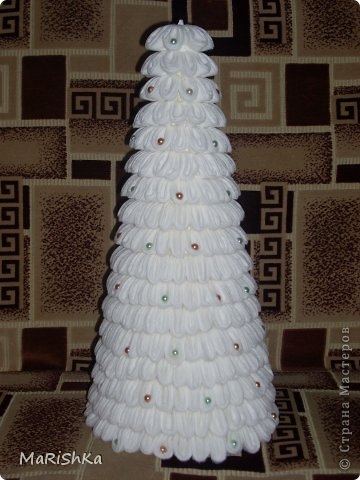
The finished Christmas tree can be dressed up with shine, beads and ribbons. At the top we placed a bright star made of cardboard:
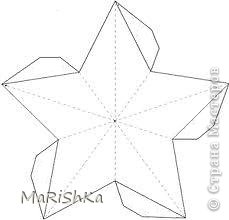
A star can do so. We cut the workpiece according to the template and then proceed in steps:
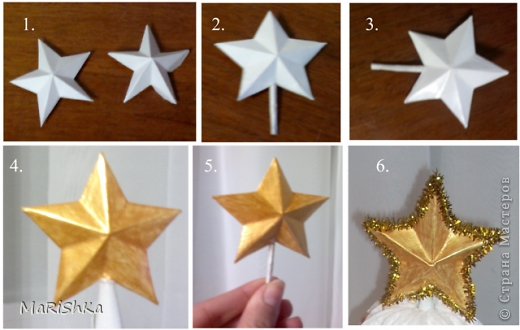
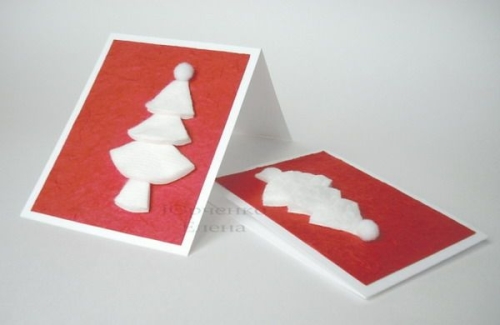
And here is our final version:

By the way, by arranging the blanks at different angles, you can get such a Christmas tree:
![]()
Now that you already have a Christmas tree, maybe you want to decorate your apartment or office with a few more original holiday accessories? We will be happy to show you several ways to diversify the usual set of snowflakes and toys with something special.
Master class on creating crafts from cotton pads
Take the New Year (Christmas) wreath as a basis:

To do something similar, first of all, you need a foam circle (you can also take a round synthetic insulation). You can search for the finished one in stores, or you can cut it out of a regular rectangular piece of polystyrene and polish it so that there are no corners left.
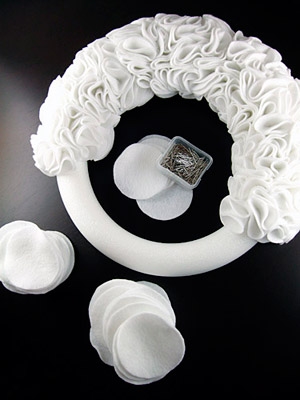
On a foam base with the help of sewing pins, we attach folded four-wad disks. You can glue only one side if the wreath hangs on the wall, or cover the entire foam in a circular manner, if you plan to hang it, say, on a chandelier:

Do not forget about the ribbon, which will serve as a loop for hanging the finished product:

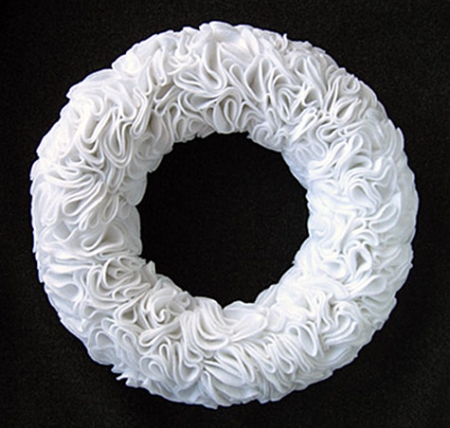
When the base is ready, simply pin or gently glue the appropriate jewelry on top of the discs.
By the way, to support the topic, some of them can also be made of cotton wool. Let in our case it will be an angel - a symbol of Christmas.
Do it yourself angel
To make such an angel, divide the cotton pad into two thinner ones:

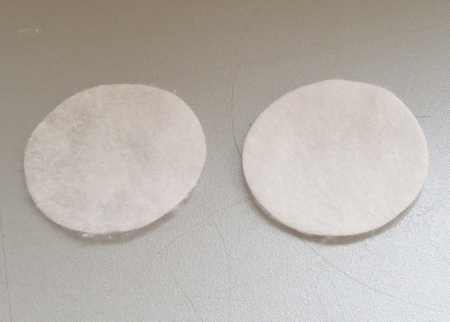
For the sake of beauty, the edges can be trimmed in waves to resemble a flower.
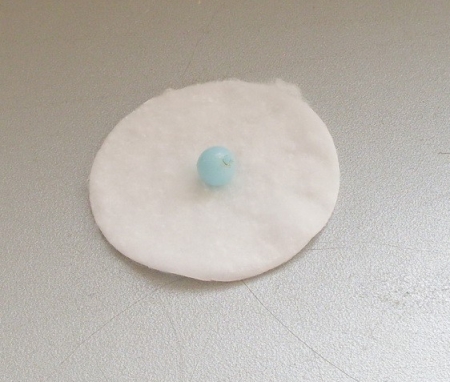
In the center of one of the resulting disks we put a round bead, wrap it with thread and straighten the figure so that we get a head and wings:
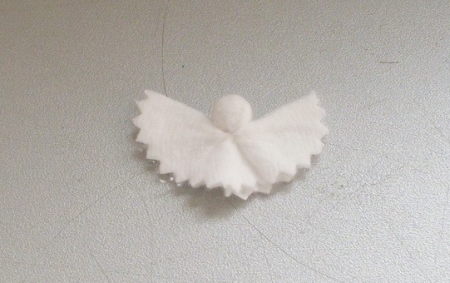
Now we need a slightly denser body on which all this will be held. We add the second disk as follows:

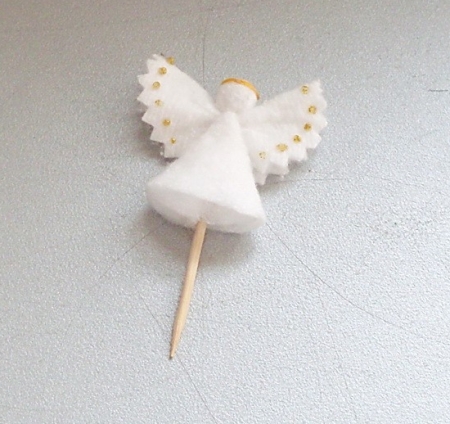
In the center of the body you need to place the “leg” of a regular toothpick and fix it with a drop of glue. To make a hanging figure, simply attach a thread loop to her head (a toothpick is not needed in this case). Then we glue both parts, and decorate the wings with a felt-tip pen:
![]()
Such an angel can be stuck in the foam base of the wreath or used as a decoration for festive pastries.
DIY photos
Other crafts from cotton pads and sticks, inspired!

Brooch
Flowers

Tree

Applique
DIY Christmas tree made of disks - An interesting type of creativity for children and adults. Old CDs that have been gathering dust on a shelf for a long time will now find a new life, becoming a bright decoration of your house before the New Year holidays. They can be used to create original Christmas tree decorations, balls, snowflakes and garlands, using the latest techniques and sophisticated materials. It will be interesting for children to create using cotton pads, because before they already worked with them in kindergarten when they made winter applications.
For several years, CDs have not been popular media, because movies and music can be found on the Internet and recorded on a USB flash drive, but take your time to throw them away, because they can be excellent material for home creativity. If you are preparing for the New Year's party, where there will be loud music and fun, then collect all the old CDs at home, as well as borrow from friends, and put a big triangle on one of the walls of the room - a fantastic Christmas tree. It will sparkle with party lights and set a special mood for the whole holiday.
DIY Christmas tree made of disks
This is a present for your friend as a programmer, such a decoration can be put on the office desk. The musician will also be pleased with this gift, the main thing is not to spoil the disks with his favorite music.
Today, old and unnecessary CDs are in every house, if 5-6 years ago they were in demand, now heaps of CDs with films, music and programs that we have not used for a long time are stored at home. Increasingly, unnecessary DMs find themselves in a landfill, but creative people do not throw out unnecessary materials, but look for suitable ideas for creativity in order to breathe new life into them.
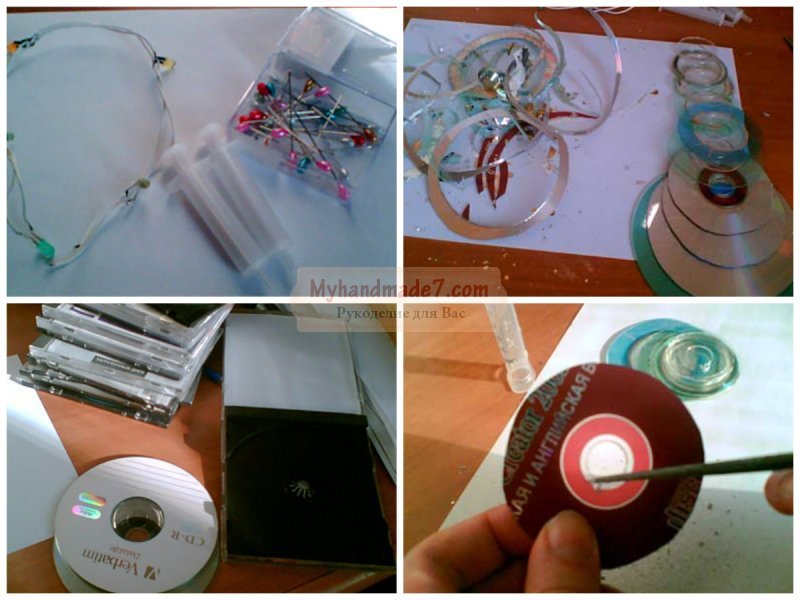
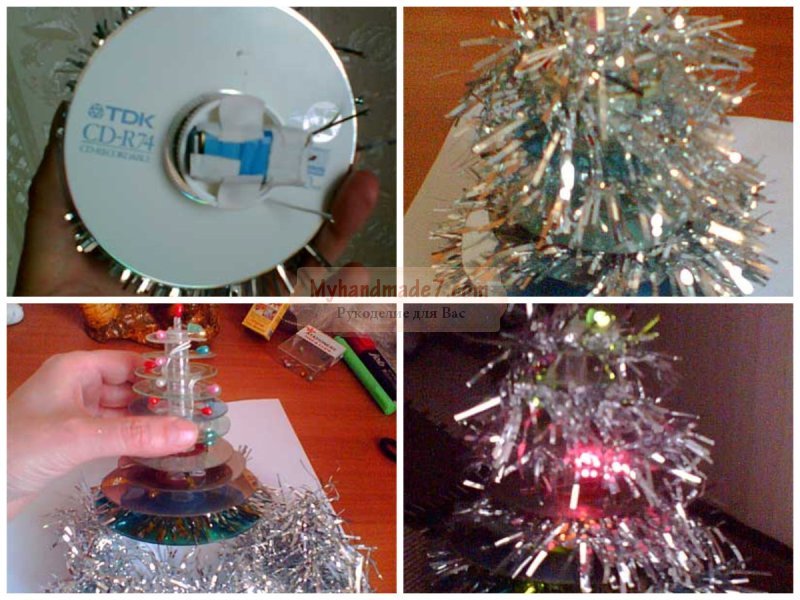
A CD with a shiny surface is an ideal option for creating and crafts, they themselves are bright and immediately striking, therefore they do not require special decoration and decoration. But in this case we will make a real New Year's souvenir and decorate it with an LED garland, for it we will need five LEDs that will be connected in parallel, and for their power - batteries. We recommend using a square 4.5 V battery or replacing it with two 1.5 V finger-type batteries connected in series. You may need the help of one of the men who are versed in electricity.
We will use two 5 ml syringes as the basis. For a Christmas tree-like pyramid, we take 10 LEDs, since the Christmas tree should consist of ten circles with a successively decreasing radius. Each following circle should be one centimeter smaller than the previous one. To crop an even circle, it is advisable to pre-draw a contour with a pencil on the side where the drawing is applied to the SD, although even if your circle did not turn out perfect, in the final version of the craft this will not be noticeable.
Since we will also thread the wire for the garland, in each LED we need to cut out a groove in which two wires would fit.

The easiest option to create a foundation is to use plastic syringes. The piston can be removed immediately, for this they will not be needed. We put the first largest circle on the syringe base, and pass the garland through the central hole and fix it into the groove. Now under the lower LED we should have two wiring from the garland. To fix the position of the lower disk, you need to fix it with a clerical needle. Almost flush with the CD, you need to pierce the plastic case of the syringe. Thus, we will fix each next layer do-it-yourself Christmas trees from disks, photo The process will help you in doing the crafts.

DIY Christmas tree made from discs
We continue to consider a step-by-step master class, how to make a Christmas tree from disks do it yourself: we will fasten the subsequent LEDs, now fixing them on both sides (bottom and top), while piercing should be in opposite directions so that the heads of the pins are randomly located on the base, because they will also serve as a kind of decoration.
For the next SD, you first need to prepare a place: pierce the base with a pin, stepping back from the previous one about one centimeter. Then put the disc on the base and secure it with a pin on top. When fixing the next layer, do not forget about the garland, which must be passed into the groove.
When the base of the first syringe is over, put on the second one on top and continue to string the CD on it. And the tip of the upper syringe must also insert a pin, this will be our peak.
Now you need to arrange a stand where you can put the batteries. You can use the lid of a shampoo or medicine bottle as a stand.
You can decorate the Christmas tree with tinsel, which will fill the space between the layers. It is advisable to choose not too fluffy tinsel, if necessary, long hairs can be cut with scissors. After decoration, the Christmas tree should not lose its conical shape.
In the end, it remains only to connect the ends of the wires of the garland with the poles of our battery, and you will see how ours do-it-yourself tree from disks, master class helped to fulfill it, light up and become a bright decoration of the office desk. You can connect the poles incorrectly, therefore, if the Christmas tree did not light up the first time, the poles should be changed.
DIY Christmas tree toys
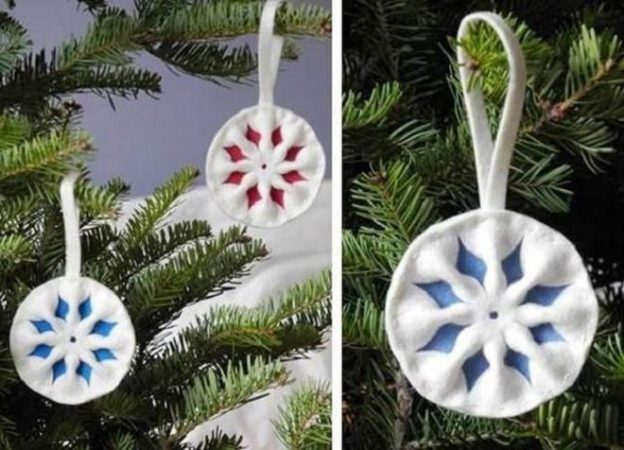
You can execute dIY Christmas tree toys in the technique of sinking. This technique allows you to create various patterns on the surface (in this case, we will use the circular surface of the disk as the basis). To create a pattern, you can use silk threads, woolen, floss or ordinary sewing threads.
In addition to the old CD, we will also need scissors, a needle, a ruler and a pair of compasses. The drawing must first be drawn on paper: circle the circular base of the disk. Dots must be applied to the drawing, which will then be used to create the pattern. Our template must be cut and transferred to the surface of the disk.
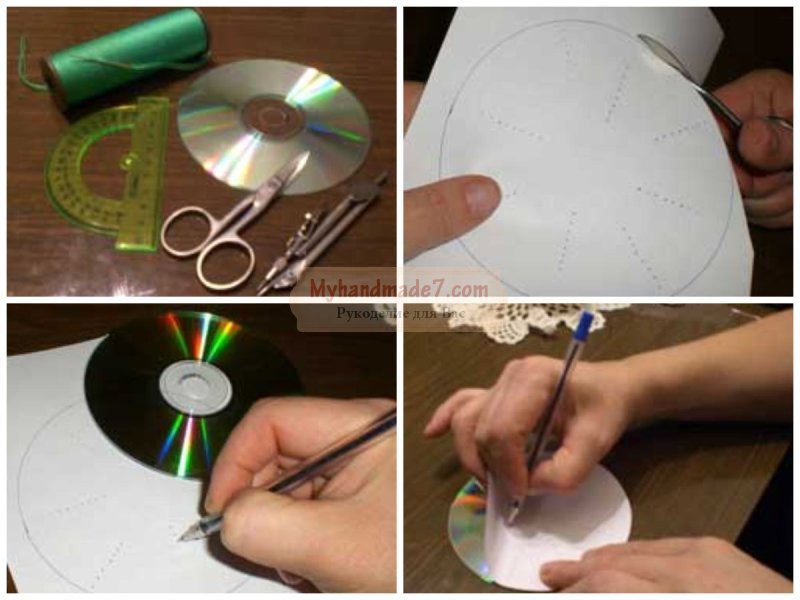
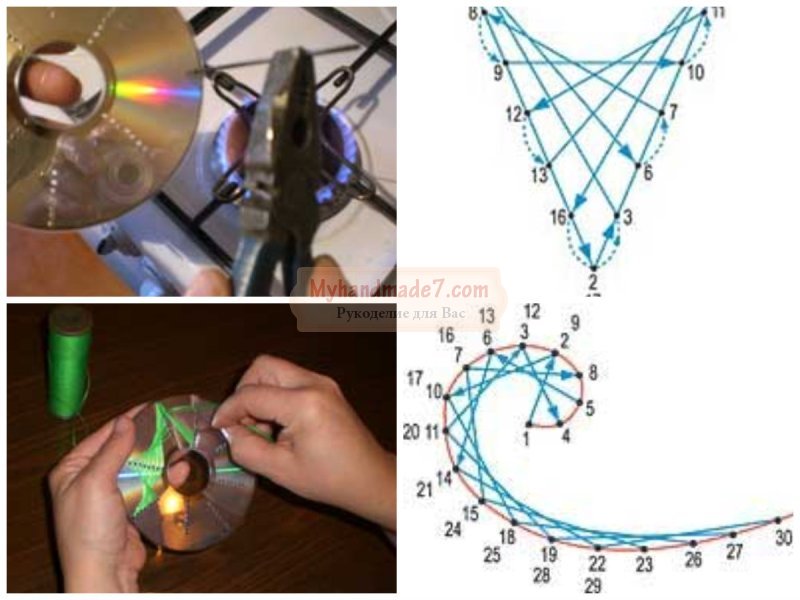
Holes should be made in the CD according to the pattern. To do this, we need a thick needle, which we will heat up on fire and make holes with them. Since when heated, the needle will become completely hot, you can hold it with pliers.
Next, you need to insert a thread into the needle, and proceed to create the original pattern, and some schemes you can find in our master class. Experienced craftswomen who have long been working in the technique of sinking can come up with various patterns on their own. In the isoniac technique, you can combine various shapes: circles, triangles, ovals and rhombuses, different colors of threads, overlapping each other, create fancy ornaments.
Using this principle, you can make a snowflake on an SD basis, but first you need to divide the circle into 5-6 sectors, and draw a symmetrical pattern for each ray.
There is nothing easier than to perform in the style of "Disco", with such toys you can decorate a tree that stands on the street, and they will play with bright highlights in the light of street lamps.
For such a ball, we will need a round foam base and thermo-glue that will securely stick the elements. SD should be cut with scissors into small squares, which then need to be glued to the base. We will glue the first row in the middle, placing shiny squares close to each other. Then you need to glue them in a checkerboard pattern until the base surface is completely filled. On the one hand, you need to make a loop so that the ball can be hung on a tree branch.

Do-it-yourself Christmas tree: crafts made of cotton pads
Now we’ll look at other materials for creating an original New Year’s decor, we have already done it, and now we will get a beautiful dIY tree - crafts made of cotton pads. This type of creativity will be interesting to children and needlewomen with experience.
As a result, we get a magnificent Christmas tree shrouded in white flakes of snow, and for this craft we need only a sheet of whatman paper, glue and a packing of cotton pads.

Quite easy make a Christmas tree do-it-yourself from cotton pads: the main element will be a four-fold disk (in half, and then again in half, and fixed at the tip itself with a stapler), and the paper cone will become the basis. Depending on what size you have chosen for your craft, you need to make a cone. A small base can be made from a sheet of cardboard, and for a large cone you will need a Whatman paper. A sheet of paper should be twisted into a “bag”, glued joints and cut off the excess part from the bottom.
It is necessary to glue the cotton elements from the bottom, placing them as close to each other as possible. At the very end of the work, we will give each element a volume by straightening it. Next, you need to glue the next row and so move to the very top of the cone.

Do not forget to also decorate our beauty, for example, the edges can be decorated with spangles: smear the edges with PVA glue and sprinkle with spangles. Glue beads or artificial pearls in the center of the elements.
For our tree, we must also come up with a decorative pot and a trunk, as for any topiary, so that do-it-yourself Christmas tree made of cotton pads took center stage in the festive decor.
DIY Christmas tree made of cotton pads
DIY Christmas tree made of cotton pads - It is also a simple application for a preschool child. It is very simple to carry out, you need three disks, from which with scissors cut three triangular elements of different sizes, and then stick them on a cardboard base.

You can still make a fluffy Christmas tree on a cone-shaped basis, but this time the elements are created in a slightly different way. This craft is somewhat reminiscent of the facing technique known to every child from an early age, when he performs applications using wipes. The essence of trimming is reduced to the fact that only the center of each element is glued to the base, and its edges "look" upwards, creating the volume of the craft. In this case, each next element must be glued as close to the previous one as possible so that the edges do not fall apart to the side.
Transforming your home for the New Year is a very exciting experience. But it will be equally interesting for you to create a New Year’s decor yourself. DIY craftsmanships look quite impressive and unusual. Therefore, hurry up to gather your children around you, because this creative process is very useful to a greater extent for them. And this is understandable, since children, being in preschool or school age, are at the stage of their personal development and, more than ever, they need a push in the right direction. But don’t worry, everyone will like this kind of work, because there’s nothing complicated, as a matter of fact, just one sheer pleasure. And in order for you not to dig around for a long time in search of what holiday is to make and what materials to use, we suggest you familiarize yourself with our article, which already presents 27 photos of the ideas of the best and easiest crafts from cotton pads for the New Year 2018 made by yourself to decorate your home and Christmas tree. We hope that our advice will be invaluable to you, and master classes will be indispensable.
New Year's crafts from cotton pads
Each family engaged in the preparation of decorations for the New Year 2018 strives to achieve excellence in creating their own and children's crafts. Everyone wants to spend as little money as possible on the purchase of auxiliary materials, but at the same time get the maximum beauty. Cotton pads are that simple and affordable element that does not require large financial costs. You just need to fork out for all kinds of beads, rhinestones, pebbles, bows, decorative ribbons and more, unless, of course, you have this house. Having gathered with your children at the round table on the eve of the New Year and Christmas holidays, you can create your own masterpieces of art from this material. But if nothing comes to your mind, then check out our photo ideas that offer a lot of gorgeous and uncomplicated crafts.


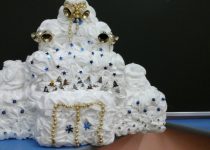


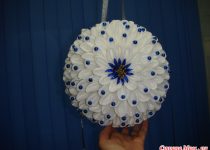
Christmas wreath of cotton pads

It is possible to make a very beautiful decor from cotton pads for the New Year 2018, one of which is a Christmas wreath. Naturally, this craft is not made as fast as Christmas toys, but it’s worth a try. With your own hands, if you really want and really try, you can literally create everything.
To work, you will need:
- cotton pads;
- large ring (made of foam or rubber);
- adhesive for foam;
- beads (large and small);
- satin bow.
Working process:
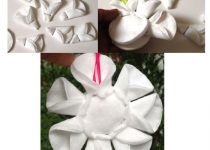
- First you need to prepare flowers from cotton pads. To do this, we fold one element with a kind of bag, and on top of the second and third. It turned out a snow-white rose, in the center of each we glue beads, if desired.
- Then we take our base, which consists of polystyrene foam or rubber, and by means of glue we attach roses to it. They should be located close to each other so that no gaps are visible. If nevertheless gaps have formed, then fill them with large beads, having also put on glue.
- We complement the resulting Christmas wreath with a satin bow, as in the photo. You can use for decoration and other decorative elements. Done!
This handmade DIY cotton wadding for New Year 2018 will fit perfectly into your room interior. It can be hung on the door, and on the windows, and on the Christmas tree, made in the form of small wreaths.
If you do not want to buy a base for a wreath, then it can be easily made at home. How to do this, tells our video tutorial.
Christmas Wreath Foundation Master Class
Christmas toy "Santa Claus" made of cotton pads

Among the Christmas crafts, it is also worth noting Christmas tree toys made from cotton pads. For example, a decoration in the form of Santa Claus will add creativity to the design of your pine tree for the New Year 2018. As you can see in the photo, nothing supernatural will be needed to create such a chic toy.
To work, you will need:
- disposable plastic spoon;
- skein of red yarn;
- finished plastic eyes (buttons or beads);
- cotton pads;
- glue stick;
- a small circle of red fabric (for a nose);
- red felt-tip pen;
Working process:
- We take a plastic disposable spoon and wrap it tightly with red yarn, leaving the tip of the spoon untouched, there we will attach a lush beard to Santa Claus. To do this, take a cotton pad and glue it on the inside of the spoon.
- To make a mustache for Santa Claus, you must do the following: the cotton circle should be made with small incisions around the entire circumference, and bend the edge slightly. It is in this position that you need to glue to the outside of the spoon. We got both a beard and a mustache.
- After that, we revive our Christmas tree crafts using the eye, nose and mouth. We perform everything as in the photo. But don't forget to stick Santa Claus cotton pompom on the tip of the cap.
Here is such an excellent toy made by yourself for the New Year 2018, it will amaze anyone with its unusualness.
Christmas toy "Angel" from cotton pads

To make your home look irresistible on New Year's Eve 2018, you just need to do it yourself with a small, but rather charming craft in the form of a snow-white angel. You don’t have to invest much effort, do not worry. Yes, and materials will not be required a large number of. Just a cotton pad and some decorative elements. Despite this minimum, on a Christmas tree such beauty will look gorgeous, if the number of copies is increased several times. Of course, you can show your imagination and make each toy individual and unique. In this case, you will definitely meet the New Year 2018 in a fabulous atmosphere.
To work, you will need:
- cotton pad;
- scissors - zigzag;
- beads for decoration and one slightly larger for the head of an angel;
- toothpick;
- pVA glue;
- silver thread.
Working process:
- In order to properly complete the craft, you need to take a cotton pad and divide it into two parts.
- We will process one of the parts with the help of scissors - zigzag, making the edges of the cotton circle zigzag. It looks pretty enough. But, if you don’t have such a tool, don’t worry, you can make any edging with simple scissors.
- Now we place a small bead on the processed round part right in the center and wrap it, wrapping it around the outside with a thread to make the head of an angel.
- Fold the second part in half. The edges of the resulting half on both sides are slightly bent so that there is a distance between them, and then we turn again, reconnecting the two parts.
- Then we take a toothpick and, having dipped it in PVA glue, we attach in the middle of the previously obtained cotton triangle, slightly protruding its curled edges. Gently clamp. So the torso of the future toy is ready.
- Our next step is to connect the wings and head with the body. To do this, take the glue and attach two parts.
- Getting to the decoration: we use beads in this process. We put them on the same PVA glue and give time for drying. You can use something else that you like, say, paints of different shades and colors.
- To give our craft the look of a New Year’s toy, we attach a silver thread to the head of an angel. That, in fact, is all.
Do-it-yourself similar work for the New Year 2018 will appeal to all your relatives and guests. But if you’re a bit confused about creating this decorative item, check out our video tutorial with step by step instructions, and your doubts will be dispelled at the same hour.
Master class on making an angel from cotton pads
DIY Christmas balls
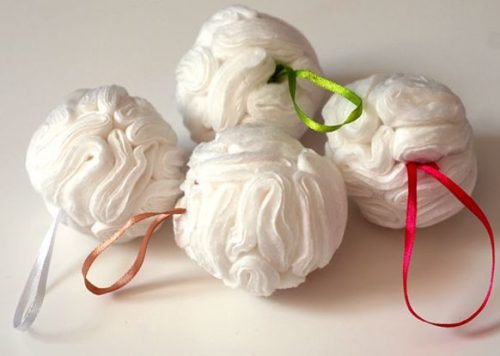
Wonderful decorations in the form of balls made by yourself from cotton pads will become an integral part of the Christmas tree decor. This voluminous craft will not take you much time and effort. While the New Year 2018 has not yet knocked on our doors, let's quickly produce such beauty.
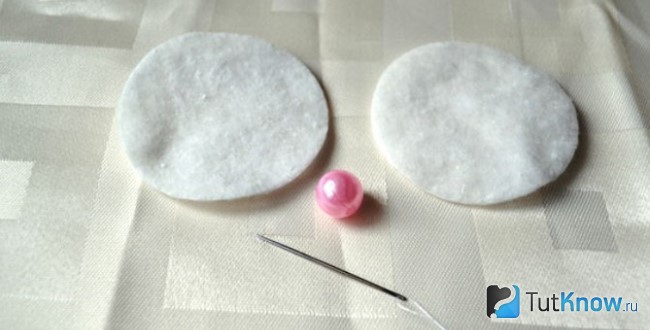
To work, you will need:
- cotton pads - 15 pieces;
- stapler;
- white threads;
- needle;
Working process:
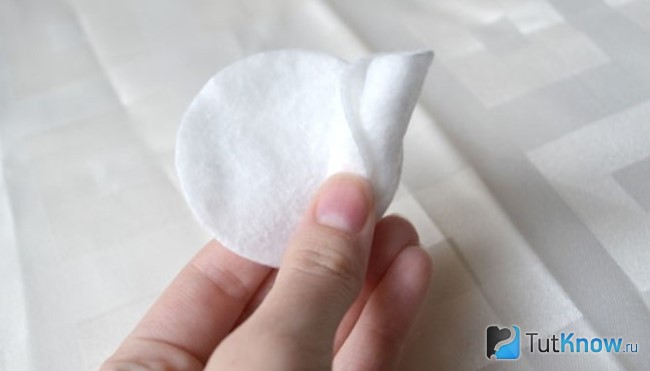
- Each cotton pad needs to be halved, and then again as well. Fix the resulting “paws” with a stapler at the base.
- After that, you should take a white thread with a needle and string each “foot” in this way. It turned out a kind of beads.
- Form a volume ball from them, carefully securing it with the same thread.
- Sew an elegant ribbon and decorate your Christmas tree to the Christmas craft made by yourself.
Do not be lazy, make as many of these snowballs as possible and decorate your entire house with them for the New Year 2018. But, in order not to repeat, you should create different toys. Browse our small selection of photo ideas.
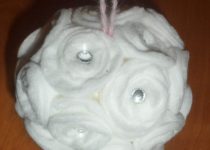
An excellent decoration for the New Year 2018 will be a cotton pad topiary, which is easy to do with your own hands at home. This craft will gather around you all your friends who come to visit you on New Year's Eve. We will not hesitate, but immediately proceed to its speedy implementation.
To work, you will need:
- cotton pads;
- foam ball;
- barrel from a flat stick;
- a flower pot or any other container;
- adhesive for foam;
- stapler;
- gypsum;
- decorative elements: artificial grass, fabric, cotton wool, rain, beads and much more.
Working process:
- To begin with, we make peculiar roses from cotton pads. To do this, we turn their edges into a tube so that one edge is narrower and the other wider. We fix the narrow part with a stapler, and turn the wide part in the form of a rose. We do this work with the rest of the elements, making the required number of them.
- The foam ball is completely glued with the resulting roses, placing them tightly together. From colored green paper, we cut out the leaves and complement them with our New Year's composition.
- We proceed to decorate the finished framework. We take the beads you have and insert them into the center of each rose, fix it with glue. You can revive the topiary to your taste by adding bows, Christmas decorations, rain, ribbons and much more.
- When the decorated part of the product dries out, reunite it with the barrel, cutting a small round hole in the foam ball in advance and fixing it with glue.
- And we proceed to the final part of our work with you. We take a flower pot and, having prepared a gypsum solution in accordance with the instructions located on the package, fill the selected container. We insert our decorative tree there. When the mixture hardens, you should decorate its top to look more aesthetically pleasing. To do this, you can use beads of any color, dry grass, fabric, pebbles, both natural and artificial. In a word, you are a designer in this matter and it is up to you how to transform your own crafts made from cotton pads with your own hands.
When preparing for the New Year 2018, you should not dwell on one idea that you have chosen, it is worth experimenting, expanding your knowledge and honing your abilities with your children. Indeed, sometimes it is necessary to make jewelry not only for the home, but also for kindergarten or school. To do this, watch our interesting video and your opportunities will expand.
Video: Christmas crafts for children from cotton pads
Santa Claus made of cotton pads
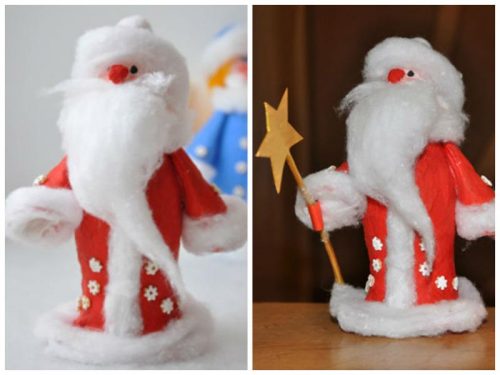
From such simple material as cotton pads, you can get a beautiful Santa Claus under the Christmas tree for the New Year 2018. Make this craft yourself and you won’t have to buy it.
This will require:
- Empty bottle of glue;
- Cotton pads;
- Glue;
- Scissors;
- Red gouache;
- Brush;
- Powder;
- Black pencil.
Working process:
- The glue bubble will serve as the basis of the toy and therefore it must be glued with cotton pads. On its top you need to install a head, which is also better to make from the same material, forming a circle.
- Then you need to glue the hands of Santa Claus, making them with the help of two folded halves of the main material, also a hat in the form of a flattened cap with an edge.
- Then you need to start painting the toy in red. Since cotton is hygroscopic, the brush must be touched carefully.
- After painting, the craft should dry, after which it is necessary to make a mustache and a beard from them. A black pencil is needed to create the eyes, red - for the mouth. Cheeks should be treated with powder. On top of the fur coat you need to glue the sleeves and the collar. So wonderful Grandfather Frost is ready for the New Year 2018, which you can proudly show to your loved ones, saying that this work was done with your own hands from ordinary cotton pads. This decoration is suitable for children, but because of the complexity it is better to perform it together with parents.
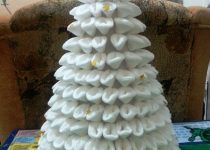
Christmas tree made of cotton pads

An extraordinary tree for the New Year 2018 can turn out of cotton pads with your own hands, if you make a little effort. Moreover, there is no need to buy materials for her.
This will require:
- Cotton pads;
- Cardboard in white and gold;
- PVA glue;
- Scissors;
- Stapler;
- Decor: beads, ribbons, pendants.
Working process:
- Take a thick cardboard and fold it into a cone. In order not to unfold, we fix it with PVA glue.
- We fold cotton pads in half, and then again and fasten them at the base with a stapler.
- Using PVA glue, we attach our blanks to a cardboard cone, starting from the foot of the tree and ending with the crown itself.
- After our tree dries, we begin to decorate it with beads, bows, pebbles and other elements, gluing them to the finished product. At the top we attach a star cut out of gold cardboard.
Such a voluminous crafts made of cotton pads, made on New Year 2018 with your own hands, will be a great decor for your home.
For more information, check out our video tutorial.
Video workshop on making Christmas tree made of cotton pads
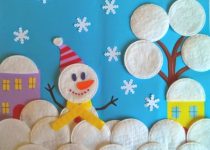
Cotton ball snowman
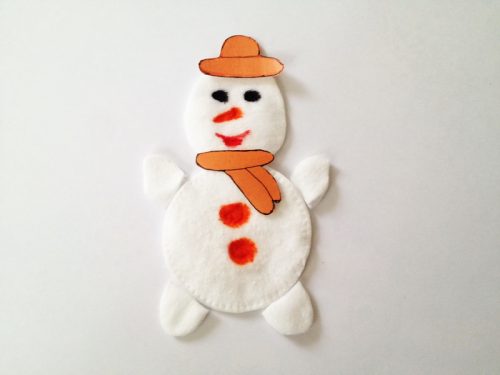
For the New Year 2018, a snowman can be made with his own hands in different ways, but the simplest thing is the creation of this craft from cotton pads.
This will require:
- Cotton pads;
- White cardboard;
- Colored paper;
- Scissors;
- Glue stick.
Working process:
- On a narrow strip of paper, you need to attach 3 cotton pads with glue.
- A bucket made of colored paper should be glued to the snowman’s head. You need to stick them on the back side, so that you get a double-sided snowman.
- From colored paper, you need to cut out the eyes, nose, mouth and buttons, and then stick them in place. Our Christmas craft is ready!
So, for the New Year 2018, a beautiful snowman was made with his own hands, which can be used as a Christmas tree toy.
Polar bears made of cotton pads
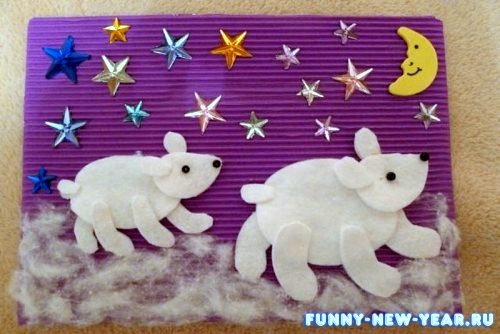
The master class for making this DIY craft for the New Year 2018 is very simple. All you need is cardboard, cotton pads and some decorative elements, such as beads and stars. A little effort, of course, also does not hinder in this creative endeavor.
This will require:
- Cotton pads;
- Beads;
- Glue;
- Cardboard;
- Scissors.
Working process:
- To create a craft, you need to use the templates with which you can get the details of a polar bear. To do this, cut the body, legs, head, ears and tail from cotton pads.
- 50 pieces of cotton pads;
- hot glue;
- beads;
- cotton swab;
- 1 meter green satin ribbon with a width of 5 cm;
- brown ribbon - 5 cm wide, and the length is two girths of the jar;
- polyurethane foam;
- pins, needle, thread.
- cotton buds;
- floristic ball;
- scissors;
- paint;
- wire;
- tape.
- cardboard;
- black and white paper;
- cotton buds;
- white plasticine;
- glue;
- black paint.
- a sheet of cardboard;
- paper of blue, green, brown colors;
- cotton buds;
- glue;
- yarn;
- small beads;
- scissors.
- scissors;
- yellow and green paint;
- color cardboard;
- glue;
- tweezers;
- cotton pads.
- blue cardboard;
- white, green, brown, blue, yellow paper;
- red, black paint;
- cotton pads.
- cotton pads;
- glue;
- gouache;
- green paper or tape;
- wire;
- tassel.
- cotton pads;
- beads;
- fishing line or thread;
- scissors;
- glue;
- stapler;
- thread with a needle;
- jewelry ring;
- rhinestones or sequins.
If you do not know what pasta crafts you can do for the New Year 2018 with your own hands to decorate your home, then our article is for you. In it you will find a lot of information, photos and master classes.
An interesting material for needlework is offered to your attention. It is inexpensive, but what amazing crafts from cotton pads are obtained as a result!
DIY cotton topiary

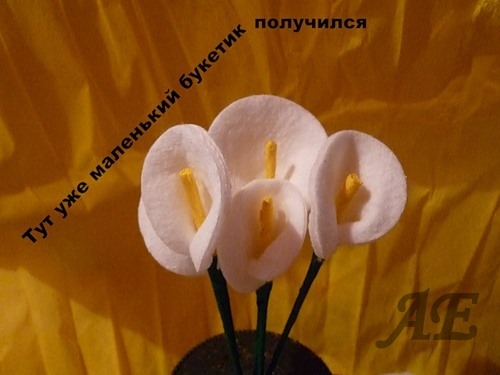
Is not it true that such a bouquet will be a great decoration and present? It looks tender and elegant, and is made of the most ordinary objects. Here is what was used in the work:
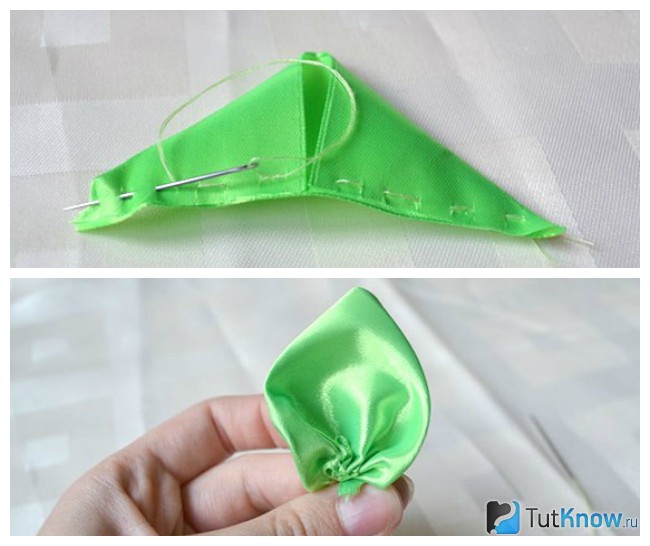
Take the first, twist it with a bag. Attach a second to it and wrap around the first.
Here is what you should get for now.

Fasten the bud with a thread with a needle, then thread it from the bottom and point it up to pin a bead on the tip of the needle.
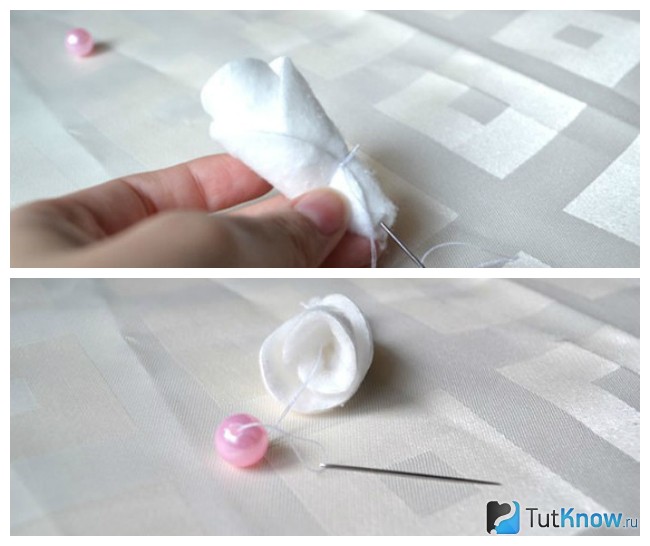
Initially, do not make a knot on the thread - it will not give a reliable fixation, since the cotton wool is soft. When you put a bead inside the bud, then cut the thread and tie its tip to the one on which the knot was not made.
For such crafts from cotton pads, with your own hands or with the help of an assistant, you need to make 25 roses. Let some be with beads, others not.
Now you need to make the leaves. For the first, cut a strip of 10 cm long from the green ribbon, wrap its right and left corners down so that the wrong side is up.
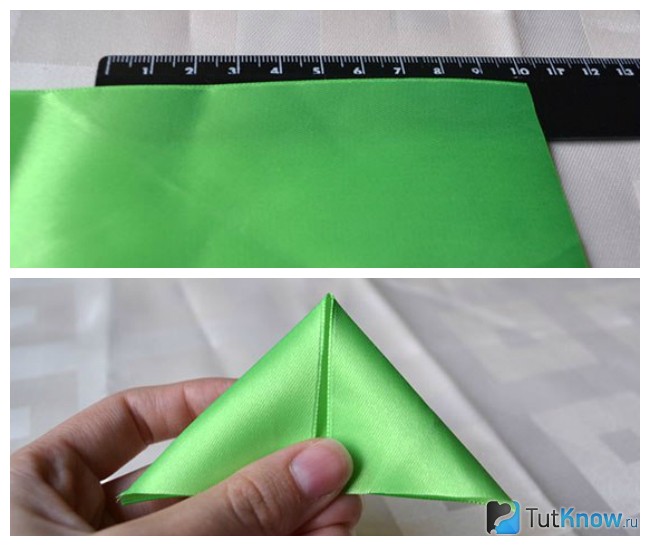
To make the crafts from cotton pads further, sew along the edge of this blank, and then turn it on the front side and collect on a thread to give the ribbon a leaf shape.
Flowers from cotton pads should be put in a beautiful container. To make it, fill the empty cotton swab jar with polyurethane foam. When it swells and dries, cut off the excess on top.

Decorate the outer sides of the container with a brown satin ribbon. It can be tightly pulled and sewn to the side or glued to a jar.
Evenly distributing, pin the leaves with pins to the outer circle of the foam.

Grease the flowers from the discs with hot glue, begin to attach them from the lower tier, moving up.
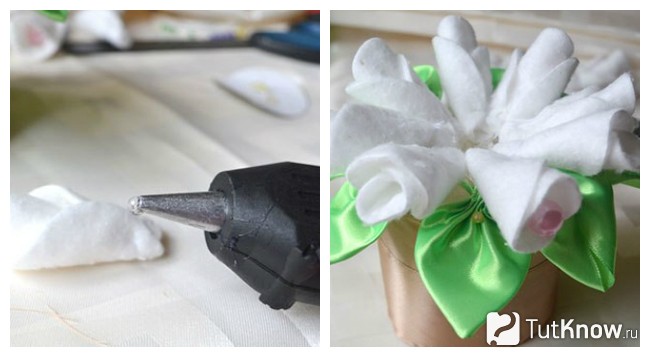
It remains to decorate the jar with a thin satin ribbon, tying a bow and you can enjoy the work done, with what wonderful topiary you made with your own hands. It can also be made from cotton buds. This is also fertile material for creativity. Creating it is fun and easy, so even a child can cope with the task.
Children's fake of cotton buds for the competition
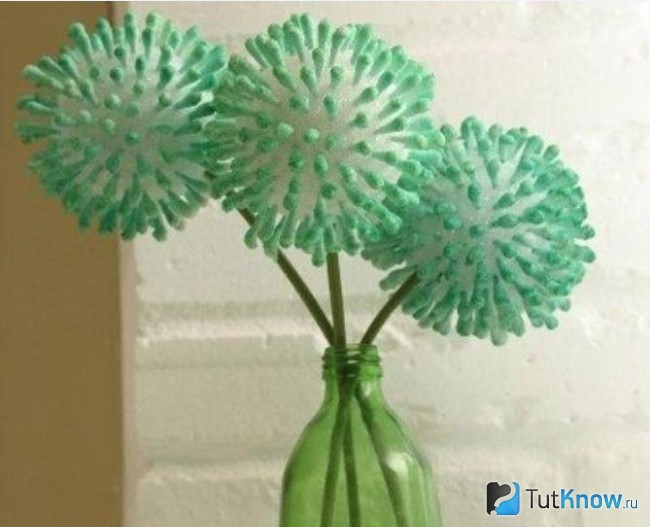
If you asked this question, then now you can quickly solve it. Such unfading flowers from cotton buds will certainly be noted at the competition.
Here are the materials and equipment you need to work:
Thus, you need to arrange all the cotton buds. Next, dilute the paint in a little water. Dip a cotton bud flower into it.

To avoid getting your hands dirty, use rubber gloves. You can first pierce the flower with the stem and, holding it, lower it into the paint.
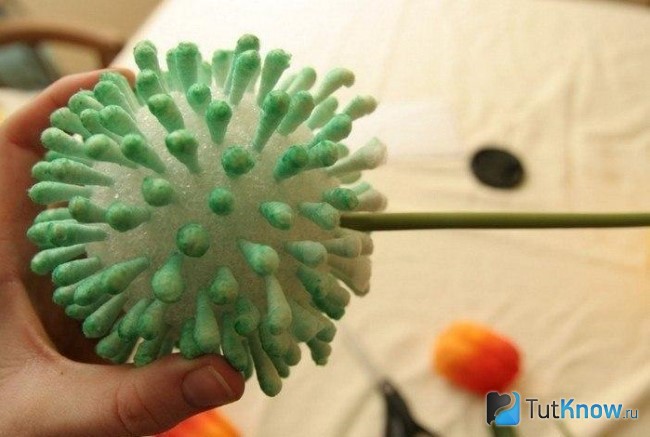
As a stem, you can use a wooden stick (skewer or from sushi), then it must first be painted green. There is another option - wrap a green electrical tape or floral tape on the wire and use this stem.
Such flowers from cotton buds can be brought not only to competitions of children's crafts, but also to decorate their home, office, store with them.

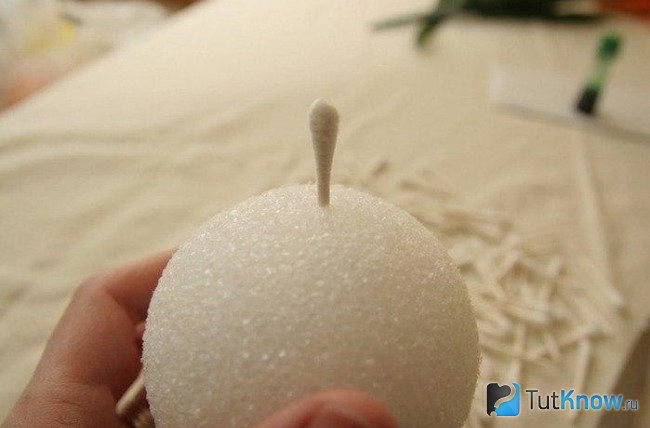
If you do not have a floristic ball, let the child replace it with plasticine, from which you need to mold a round blank. In this case, the halves of cotton buds should be painted first and then stuck in a plasticine ball.

Other cotton swab products
See what else you can craft at children's crafts contests using the same material.
Cotton buds form the basis of this charming panda.

To create it, you will need the following:
Glue the black blank on the cardboard, and the white one for the ears in their place. From paper of the same color, cut the claws, attach them to the paws with glue.
Let the child knead the plasticine and stick it on the face of the panda. Now you need to cut the cotton buds and stick them in plasticine. Design work from the outer edge, gradually moving to the inner. The belly of the beast is decorated in the same way. To make the panda look like a real one, you first need to dip a few cotton swabs in black paint, use them to make spots of this color on its body.
Oval eyes are cut out of white paper. Draw pupils, a fringing on them and glue into place.
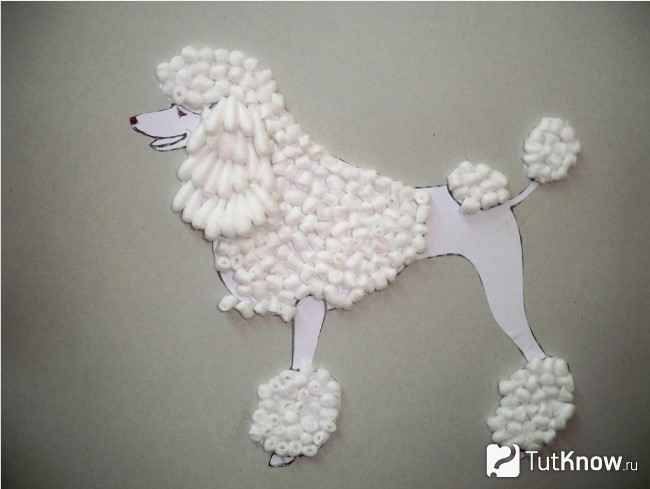
But what other crafts from cotton can be made. This fluffy poodle is made from cardboard and the top of cotton buds. Glue it as in the photo.
DIY do-it-yourself paintings
Cotton buds give ideas for paintings.
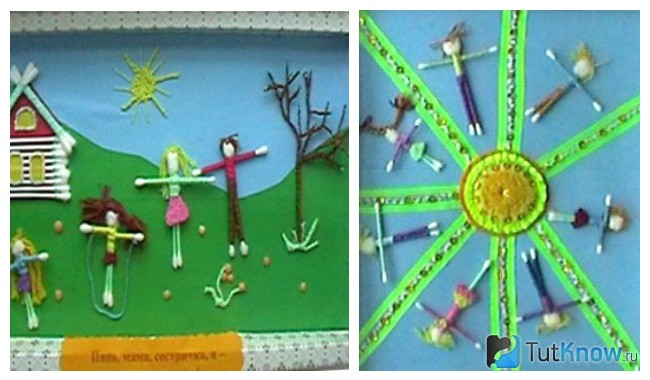
For the first we needed:
Next, let the child cut the house out of brown paper. To make the structure log, we use cotton buds. Glue them horizontally in place of the walls, at the top they repeat the outline of the roof. It remains to glue the windows, and a beautiful children's crafts-house is ready.
But the work is not completed yet. Two cotton buds fold together, the other 2 need to be cut in half - these will be the hands of a man. Now you need to attach the parts to each other with the help of yarn, at the same time making out the top of the body in the form of a sweater, and below, like a skirt or pants.
Wrap another cotton wool on the tops of two sticks, let the face become more voluminous. Hair is easy to make from brown or yellow yarn. The glued strands of threads are made in the form of a tree, and yellow was used for the sun.
It remains to stick people out of cotton buds, decorate the work with beads, and the three-dimensional picture is ready.
On the second panel, the braid is laid out in the form of the sun, and people from cotton buds are glued between its rays.
Swans and flowers made of cotton pads
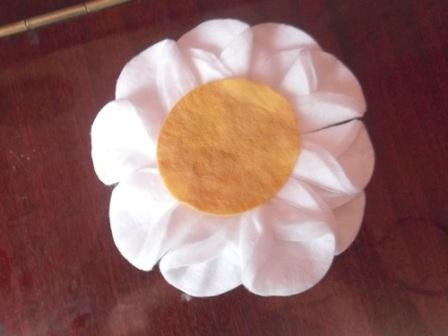
This stuff is very malleable. It can be cut with scissors, painted, rolled up, glued. Cotton pads easily turn into swans, daisies.
Here's how to make such a big picture. Take a cotton pad, roll it in the form of a bag, secure with a stapler. Make several such petals, arrange them on a table in a circle, connecting with a stapler. Cover one cotton pad with yellow paint and let it dry. Then glue this core into the center of the flower.
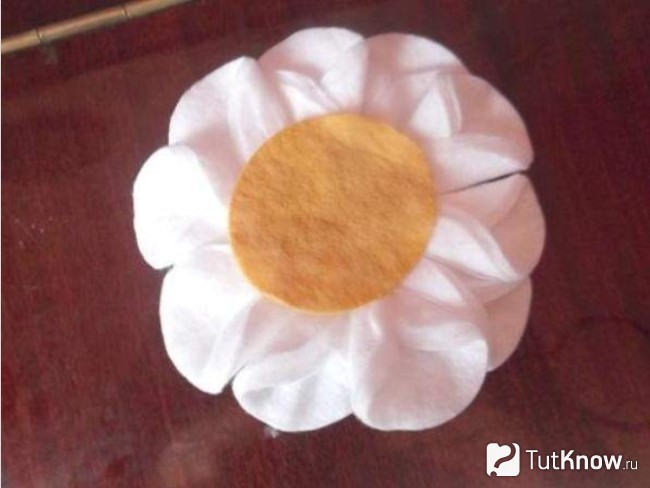
You can make daisies in another way.

To make flowers from cotton pads, which are in the photo on the left, you need this:
Cut the stems from green colored paper, and the leaves from cotton pads. Cut them with scissors at the edges, paint. Let dry, glue into place.
If the child wants to make swans with his own hands, help him with this. Such work begins with the preparation of the necessary, namely:
If only white cardboard is available, then you need to stick a sheet of blue paper on it, let it dry and it will turn out colored.
The lake is cut out of contrasting paper so that it can be seen on a blue background. Glue it on cardboard, and on top of a cotton pad is the body of a swan. Glue wings to it, a head with a neck. From brown paper you need to cut the reeds, from green leaves and stems, stick them on the picture, as well as the sun in the sky.
Waves can be cut out of blue paper or painted with paint of this color. It remains to draw eyes with black paint, and a beak with red paint, and a beautiful picture of cotton pads is ready.
From this material you can make such a picturesque poppy.
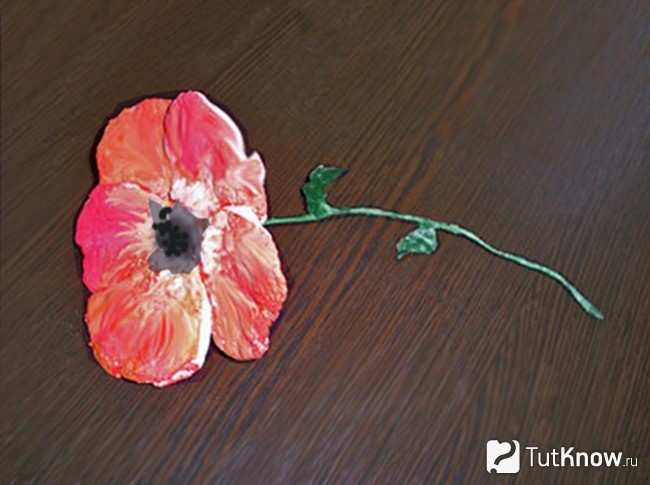
To do this, you will need:
For work, it is better to take thin cotton pads. A tape tape is an elastic tape. If there is starch in the house, use it, then the flower from the disks will have denser petals.
Pour 1 tbsp. l starch in a half cup of cold water, mix. Boil a glass of water separately, pour in a thin stream here, stirring, diluted starch, turn off the heat, cool. Soak 5 cotton pads in brewed starch, squeeze a little, straighten, put to dry on oilcloth.
After that, paint them with red gouache, when it dries, apply orange, white streaks. Now cut out poppy petals from these dried blanks, glue them together, giving the shape of a flower. Make stamens from a piece of cotton wool, which must be painted with black gouache.
Starting from the bottom, wrap the wire with a green ribbon. In the middle of the stalk, draw a leaf out of tape or paper, continue to wrap the stalk further, making another sheet. Glue this green twig to the poppy flower.
Christmas decorations made of cotton pads
They can also be made from cotton pads. And this angel will decorate the room at any time of the year. Such crafts can be made with children in kindergarten.

The next workshop with step-by-step photos will help you quickly understand the intricacies of work. First, we list the items needed for needlework:
![]()
To make it a long robe, fold the disk in half, then divide it into 3 parts, take the two side ones back. Fasten with a stapler or sew. Glue the robe to the wings. It remains to decorate the angel with sequins, sew or stick a ring to the head, and the craft from the discs is ready.

Such an amazing wreath for the New Year is also made from this material. First you need to prepare the foundation. It can be a large foam or rubber ring. If you do not have such, then roll up several newspapers, sticking them together, give the desired shape.
When the workpiece dries, glue the cotton pads. To make the first, roll up the disk in the form of a bag, wrap the second, third on it. Thus, you get a rose, twisted with your own hands.
In the center of some colors, you can stick a bead or sew it, as described above. Glue the roses to the base of the wreath, placing them close to each other. Fill the gaps with large beads, decorate the Christmas wreath with a large satin bow.
Here are the many crafts from cotton pads, sticks can be made, including children. The following videos will introduce you to other ideas:


