DIY Christmas tree made of disks - An interesting type of creativity for children and adults. Old CDs that have been gathering dust on a shelf for a long time will now find a new life, becoming a bright decoration of your home before the New Year holidays. They can be used to create original Christmas tree decorations, balls, snowflakes and garlands using the latest techniques and sophisticated materials. It will be interesting for children to create using cotton pads, because before they already worked with them in kindergartenwhen doing winter applications.
For several years, CDs have not been popular media, because movies and music can be found on the Internet and recorded on a USB flash drive, but do not rush to throw them away, because they can become excellent material for home creativity. If you are preparing for the New Year's party, where there will be loud music and fun, then collect all the old CDs at home, as well as borrow from friends, and put a big triangle on one of the walls of the room - a fantastic Christmas tree. It will sparkle with party lights and set a special mood for the whole holiday.
DIY Christmas tree made of disks
This is a present for your friend as a programmer, such a decoration can be put on the office desk. The musician will also be pleased with this gift, the main thing is not to spoil the disks with his favorite music.
Today, old and unnecessary CDs are in every house, if 5-6 years ago they were in demand, now heaps of CDs with films, music and programs that we have not used for a long time are stored at home. Increasingly, unnecessary DMs find themselves in a landfill, but creative people do not throw out unnecessary materials, but look for suitable ideas for creativity in order to breathe new life into them.
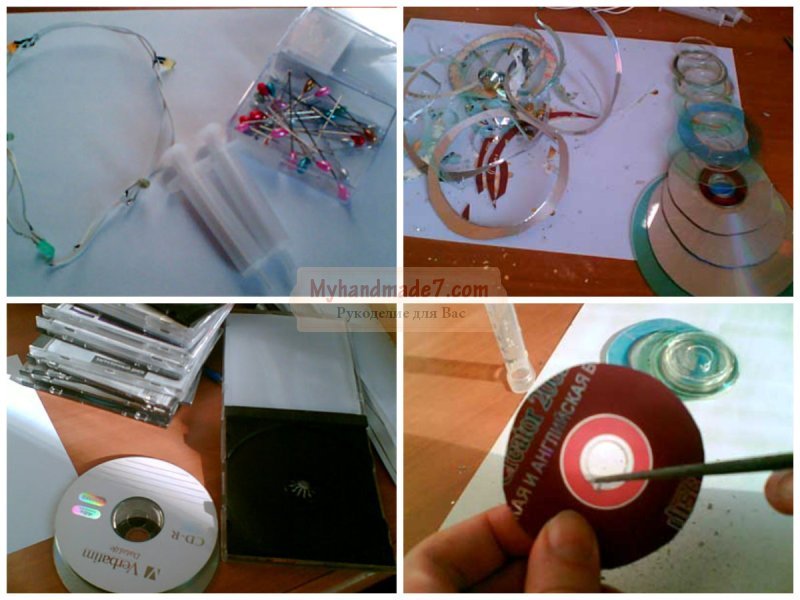
A CD with a shiny surface is an ideal option for creating and crafts, they themselves are bright and immediately striking, therefore they do not require special decoration and decoration. But in this case, we will make a real New Year's souvenir and decorate it with an LED garland, for it we need five LEDs that will be connected in parallel, and for their power - batteries. We recommend using a square 4.5 V battery or replacing it with two 1.5 V finger-type batteries connected in series. You may need the help of one of the men who are versed in electricity.
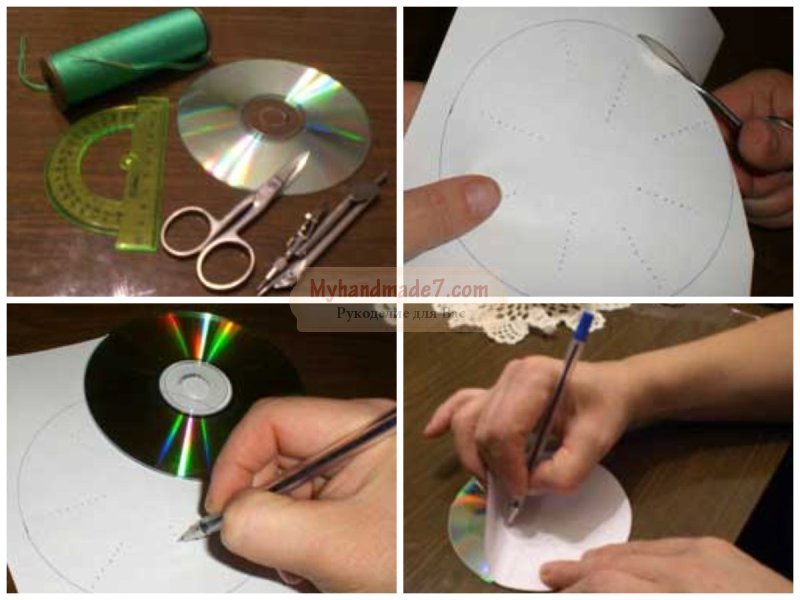
We will use two 5 ml syringes as the basis. For a Christmas tree-like pyramid, we’ll take 10 LEDs, since the Christmas tree should consist of ten circles with a successively decreasing radius. Each following circle should be one centimeter smaller than the previous one. To crop an even circle, it is advisable to pre-draw a contour with a pencil on the side where the drawing is applied to the SD, although even if your circle did not turn out perfect, in the final version of the craft this will not be noticeable.
Since we will also thread the wire for the garland, in each LED we need to cut a groove in which two wires would fit.
The easiest option to create a foundation is to use plastic syringes. The piston can be removed immediately, for this they are not needed. We put the first largest circle on the syringe base, and pass the garland through the central hole and fix it into the groove. Now under the lower LED we should have two wiring from the garland. To fix the position of the lower disk, you need to fix it with a clerical needle. Almost flush with the CD, you need to pierce the plastic case of the syringe. Thus, we will fix each next layer do-it-yourself Christmas trees from disks, photo The process will help you in doing the crafts.
DIY Christmas tree made of discs
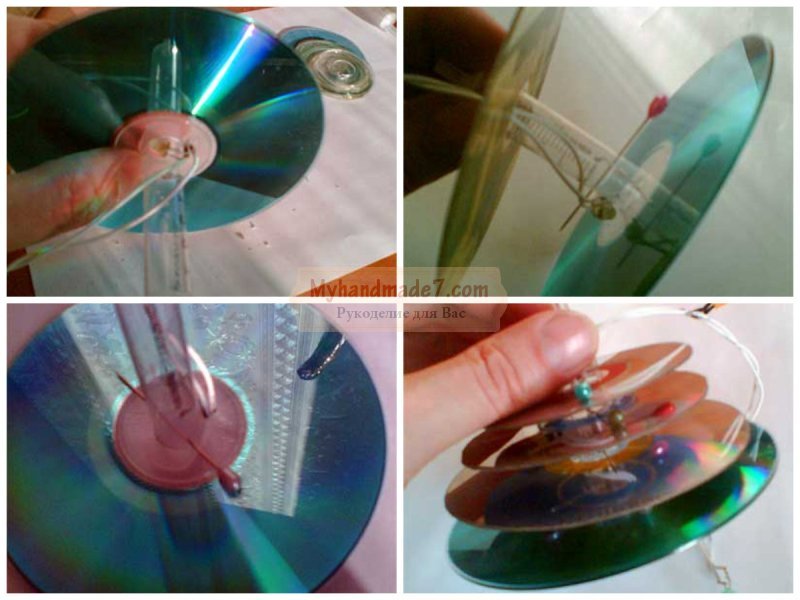
We continue to consider a step-by-step master class, how to make a Christmas tree from disks do it yourself: we will fasten the subsequent LEDs, now fixing them on both sides (bottom and top), while piercing should be in opposite directions so that the heads of the pins are randomly located on the base, because they will also serve as a kind of decoration.
For the next DM, you first need to prepare a place: pierce the base with a pin, stepping back from the previous one about one centimeter. Then put the disc on the base and secure it with a pin on top. When fixing the next layer, do not forget about the garland, which must be passed into the groove.
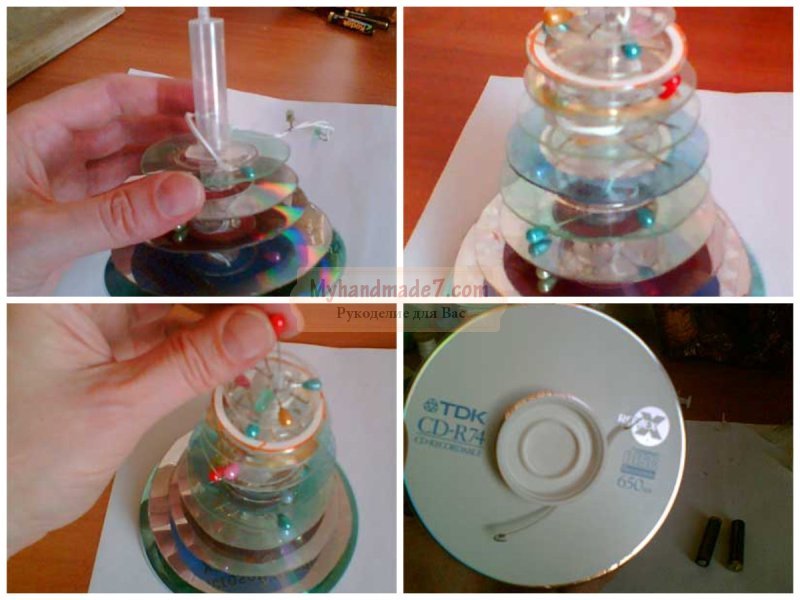
When the base of the first syringe is over, put on the second one on top and continue to string the CD on it. And the tip of the upper syringe must also insert a pin, this will be our peak.
Now you need to arrange a stand where you can put the batteries. You can use the lid of a shampoo or medicine bottle as a stand.
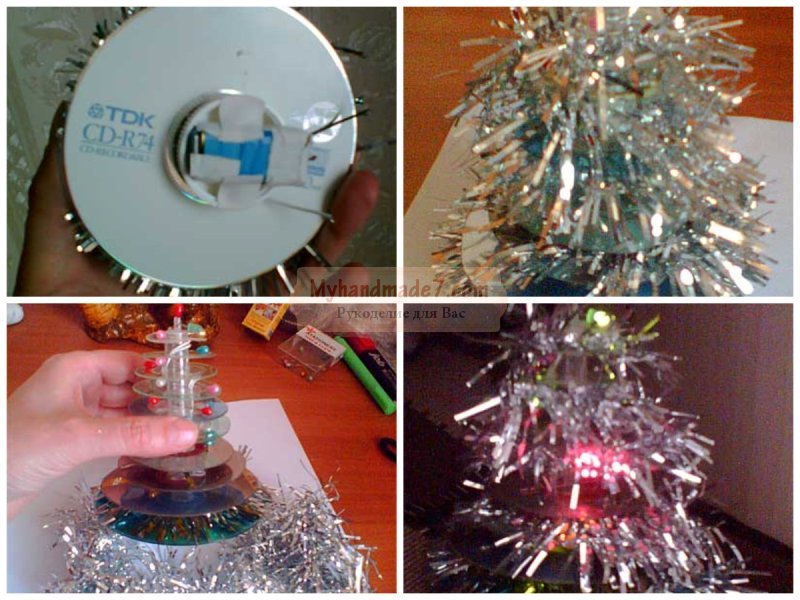
You can decorate the Christmas tree with tinsel, which will fill the space between the layers. It is advisable to choose not too fluffy tinsel, if necessary, long hairs can be cut with scissors. After decoration, the Christmas tree should not lose its conical shape.
In the end, it remains only to connect the ends of the wires of the garland with the poles of our battery, and you will see how ours do-it-yourself tree from disks, master class helped to fulfill it, light up and become a bright decoration of the office desk. You can connect the poles incorrectly, therefore, if the Christmas tree did not light up the first time, the poles should be changed.
DIY Christmas tree toys
You can execute dIY Christmas tree toys in the technique of sinking. This technique allows you to create various patterns on the surface (in this case, we will use the circular surface of the disk as the basis). To create a pattern, you can use silk threads, woolen, floss or ordinary sewing threads.
In addition to the old CD, we will also need scissors, a needle, a ruler and a pair of compasses. The drawing must first be drawn on paper: circle the circular base of the disk. Dots must be applied to the drawing, which will then be used to create the pattern. Our template must be cut and transferred to the surface of the disk.
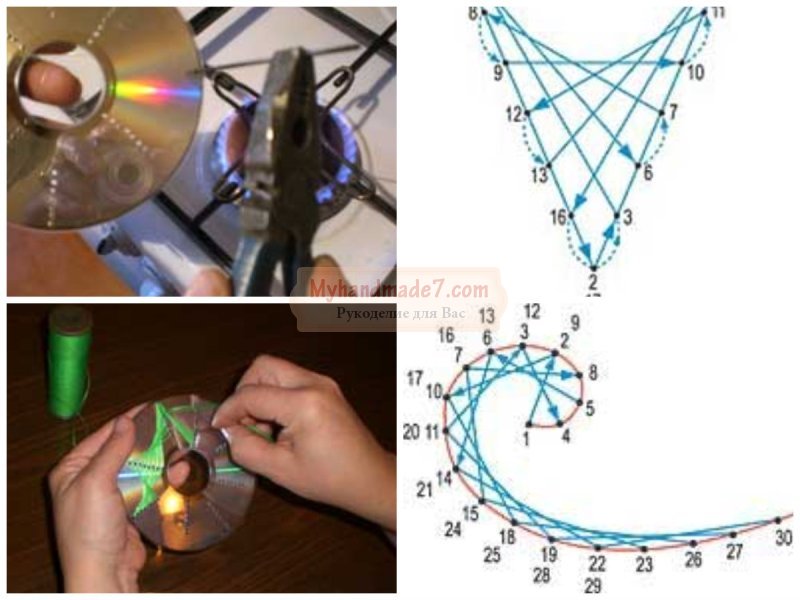
Holes should be made in the CD according to the pattern. To do this, we need a thick needle, which we will heat up on fire and make holes with them. Since when heated, the needle will become completely hot, you can hold it with pliers.
Next, you need to insert a thread into the needle, and proceed to create the original pattern, and you can find some schemes in our master class. Experienced craftswomen who have long been working in the technique of sinking can come up with various patterns on their own. In the isoniac technique, you can combine different shapes: circles, triangles, ovals and rhombuses, different colors of threads, overlapping each other, create fancy ornaments.
Using this principle, you can make a snowflake on an SD basis, but first you need to divide the circle into 5-6 sectors, and draw a symmetrical pattern for each ray.
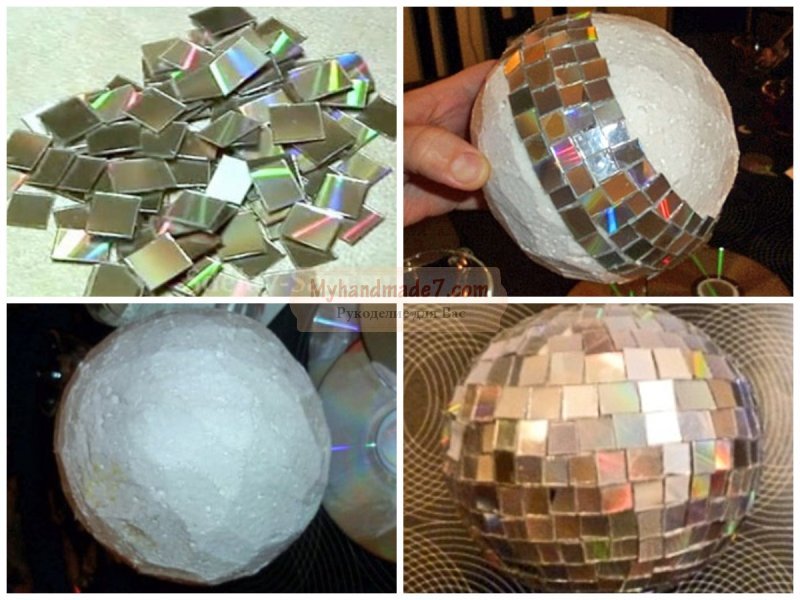
There is nothing easier than to perform in the style of "Disco", with such toys you can decorate a tree that stands on the street, and they will play with bright highlights in the light of street lamps.
For such a ball, we need a round foam base and thermo-glue that will firmly adhere the elements. SD should be cut with scissors into small squares, which then need to be glued to the base. We will stick the first row in the middle, placing shiny squares close to each other. Then you need to glue them in a checkerboard pattern until the base surface is completely filled. On the one hand, you need to make a loop so that the ball can be hung on a tree branch.
Do-it-yourself Christmas tree: crafts made of cotton pads
Now consider other materials to create the original new Year's decor, we already performed, and now we get beautiful dIY tree - crafts from cotton pads . This type of creativity will be interesting to children and needlewomen with experience.
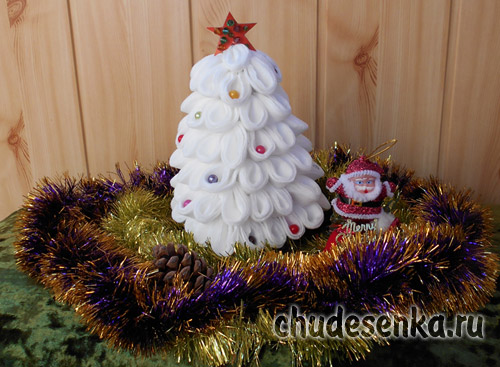
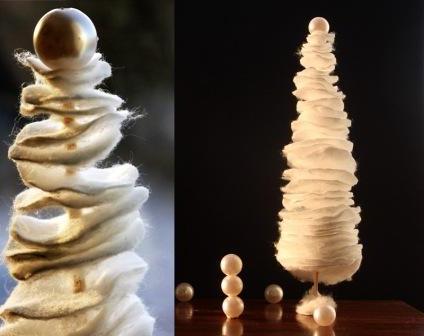
As a result, we get a magnificent Christmas tree shrouded in white flakes of snow, and for this craft we need only a sheet of whatman paper, glue and a packing of cotton pads.
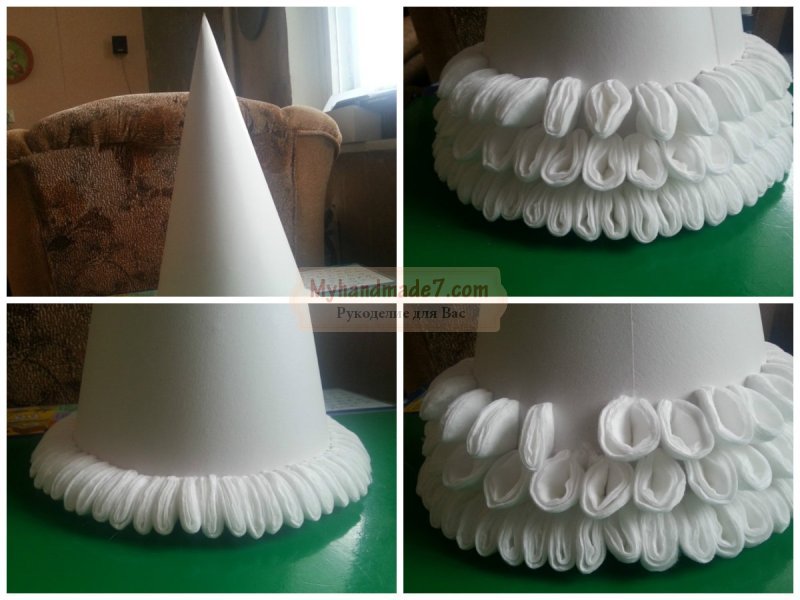
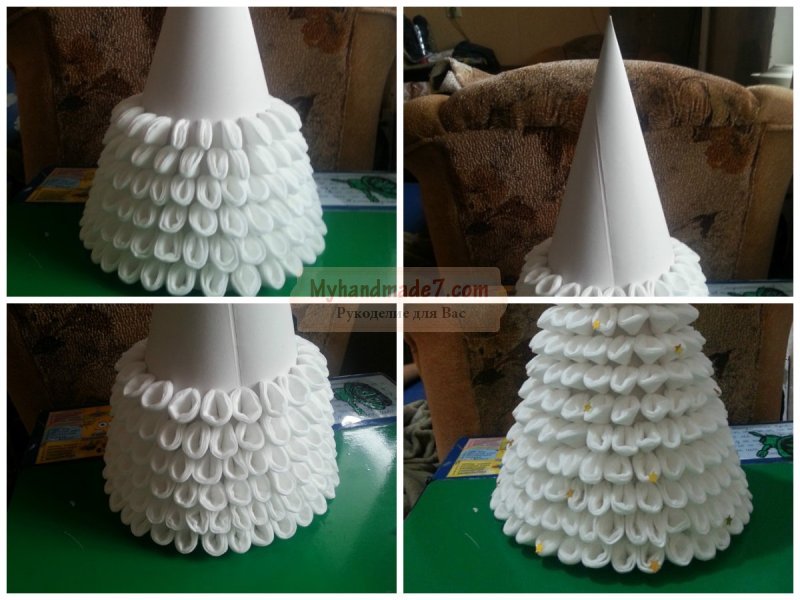
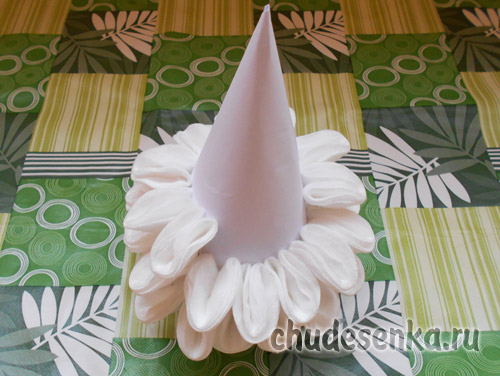
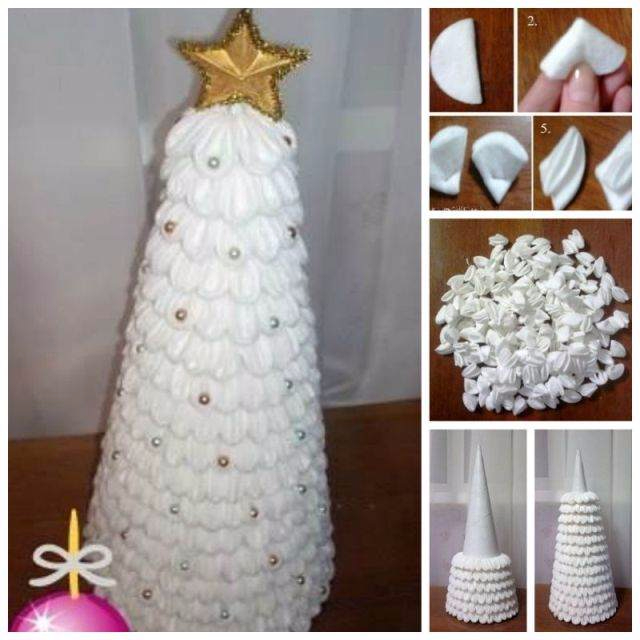
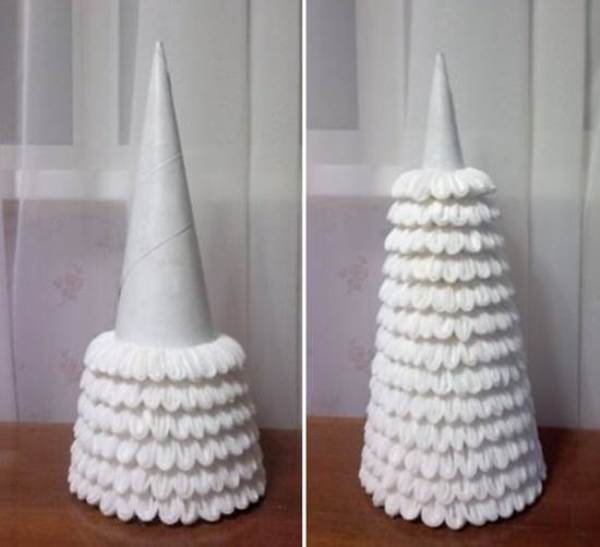
Quite easy make a Christmas tree do-it-yourself from cotton pads: the main element will be a four-fold disk (in half, and then again in half, and fixed at the tip itself with a stapler), and the paper cone will become the basis. Depending on what size you have chosen for your craft, you need to make a cone. A small base can be made from a sheet of cardboard, and for a large cone you will need a Whatman paper. A sheet of paper should be twisted into a “bag”, glued joints and cut off the excess part from the bottom.
It is necessary to glue the cotton elements from the bottom, placing them as close to each other as possible. At the very end of the work, we will give each element a volume by straightening it. Next, you need to glue the next row and so move to the very top of the cone.
Do not forget to also decorate our beauty, for example, the edges can be decorated with sparkles: smear the edges with PVA glue and sprinkle with sparkles. Glue beads or artificial pearls in the center of the elements.
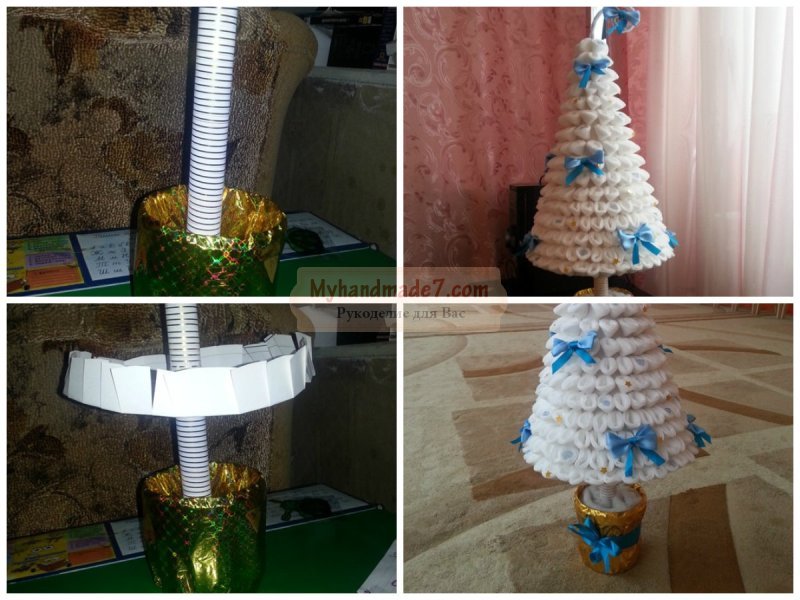
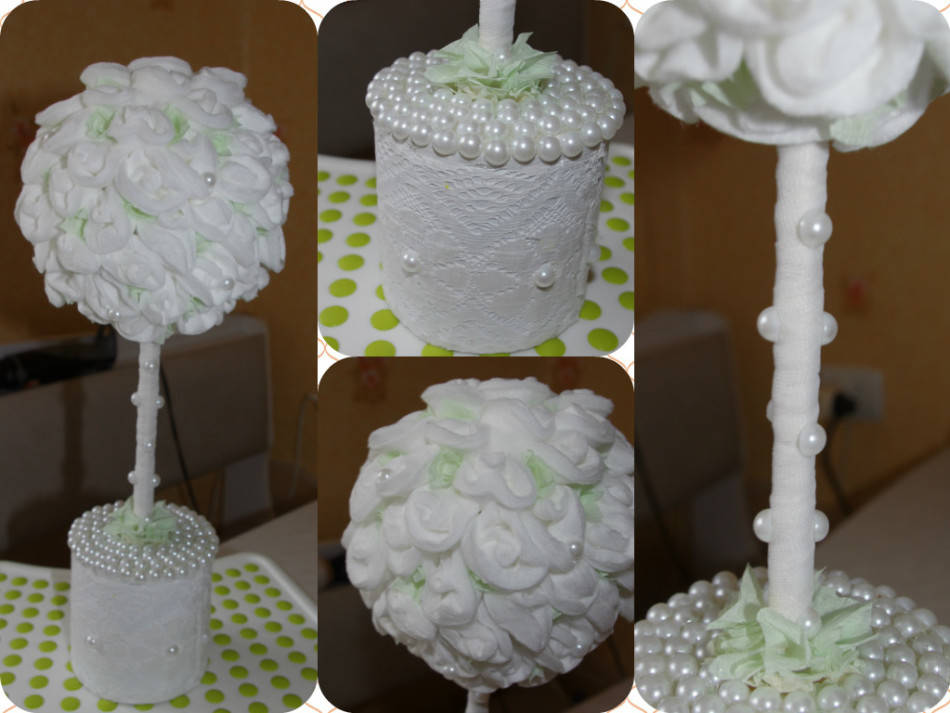
For our tree, we must also come up with a decorative pot and a trunk, as for any topiary, so that do-it-yourself Christmas tree made of cotton pads took center stage in the festive decor.
DIY Christmas tree made from cotton pads
DIY Christmas tree made of cotton pads - It is also a simple application for a preschool child. It is very simple to carry out, you need three disks, from which with scissors cut three triangular elements of different sizes, and then stick them on a cardboard base.
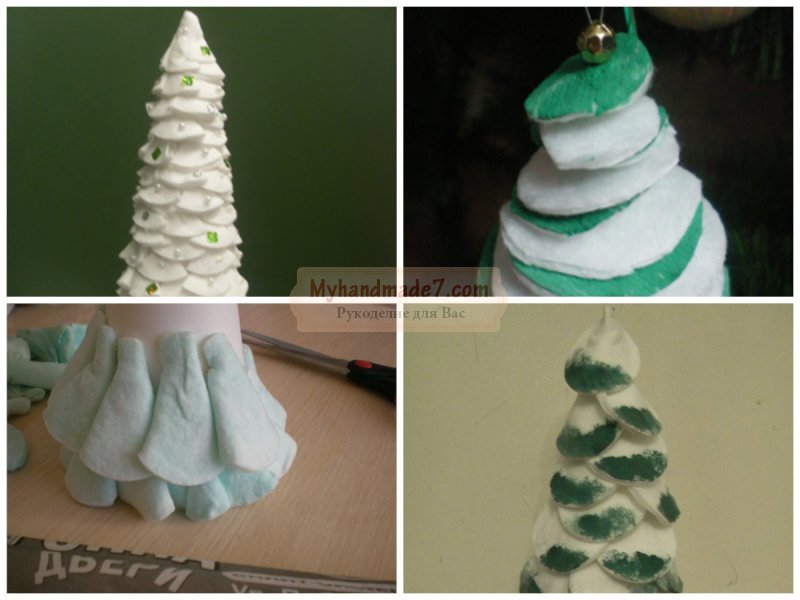
You can still make a fluffy Christmas tree on a cone-shaped basis, but this time the elements are created in a slightly different way. This craft is somewhat reminiscent of the facing technique known to every child from an early age, when he performs applications using wipes. The essence of trimming is reduced to the fact that only the center of each element is glued to the base, and its edges "look" upwards, creating the volume of the craft. In this case, each next element must be glued as close to the previous one as possible so that the edges do not fall apart to the side.
A Christmas tree made of cotton pads is another simple and original way of replacing the green symbol of the New Year from the forest. A few hours of work and a snow-white, airy Christmas tree is ready! Even a child is able to cope with such a task on his own. And another nice moment this process require minimal financial costs.
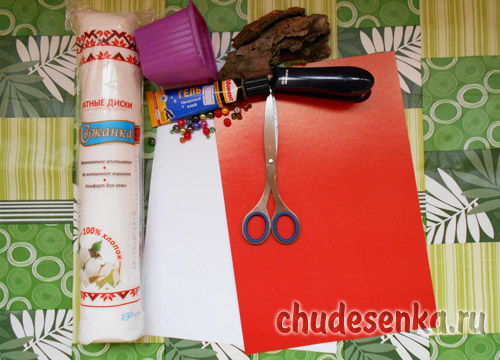
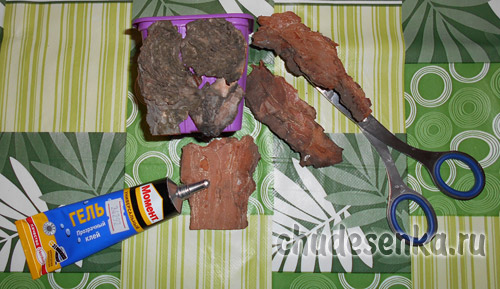
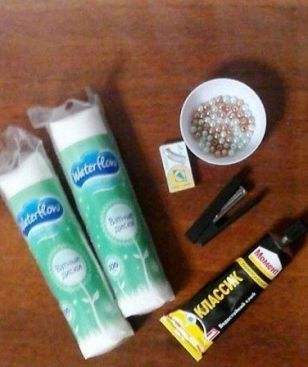
So, to make a Christmas tree from cotton pads you will need:
Cotton pads (18 cm for a Christmas tree - about 80 pads);
- White A4 paper;
- Cardboard red;
- A flower pot;
- Pine / spruce bark;
- beads;
- Stapler;
- A simple pencil;
- glue;
- Scissors.
The technology of manufacturing a Christmas tree from cotton pads
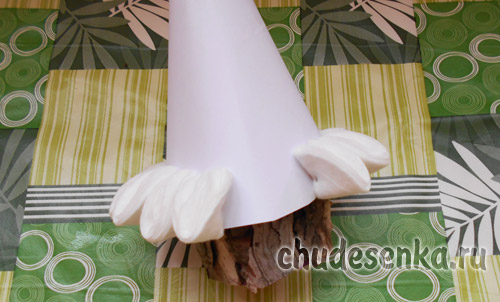
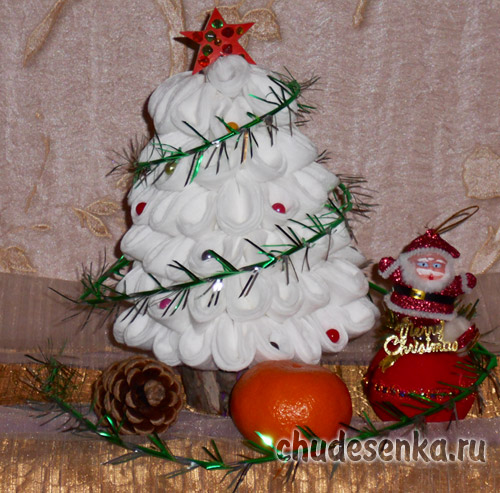
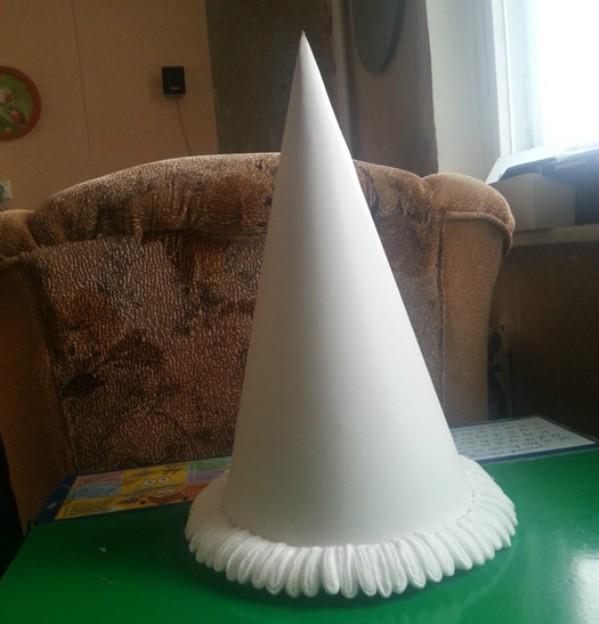
We start with the “trunk” - the foundation. Real pine bark will add naturalness. Glue a flower pot over the bark, which we select in size, cut off the excess.
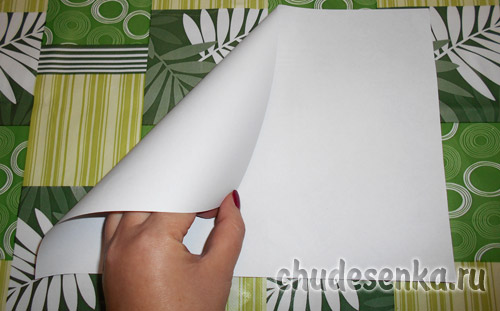
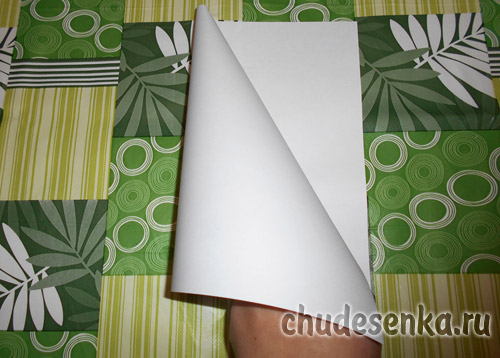
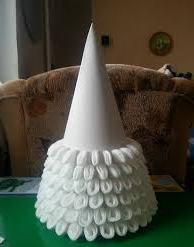
Next, we proceed to the manufacture of the cone. It can be done in several ways. In our case, we make a “bag” type from a sheet of paper, fastening the joint with glue.
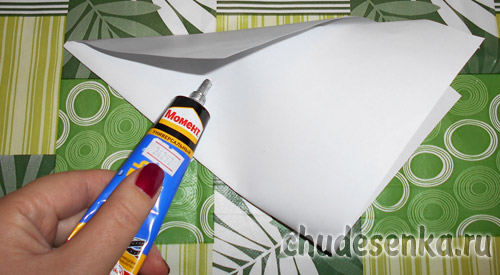
Then we cut off the bottom with scissors to make it smooth. 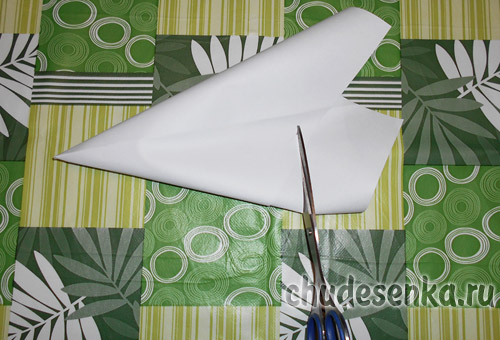
Now grease the cone with glue from the inside along the bottom edge. 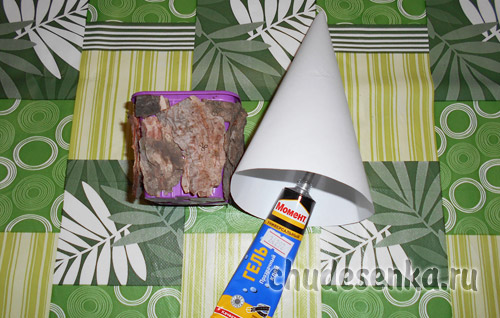
And "we plant" on the basis pasted over with bark. 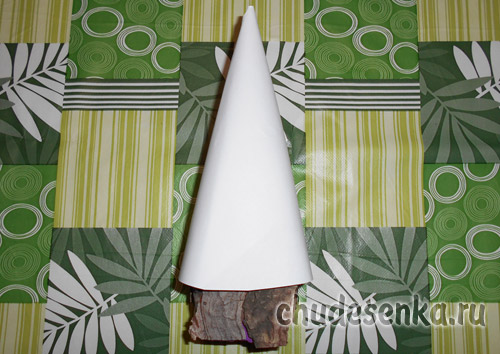
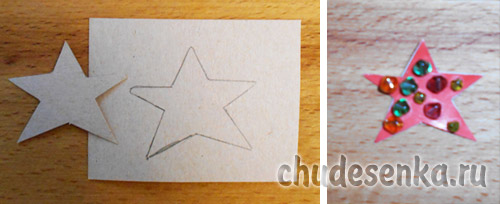
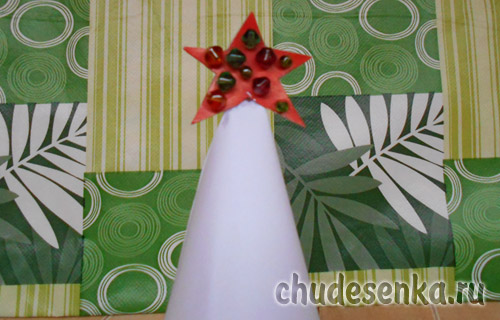
It's time to move on to creating the star. From a red cardboard we cut a star, then we put it on the cardboard, circle it with a simple pencil and cut it out. So we got two identical stars, glue them on the inside and glue the beads on top.
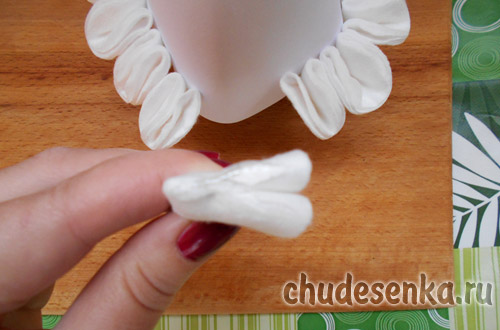
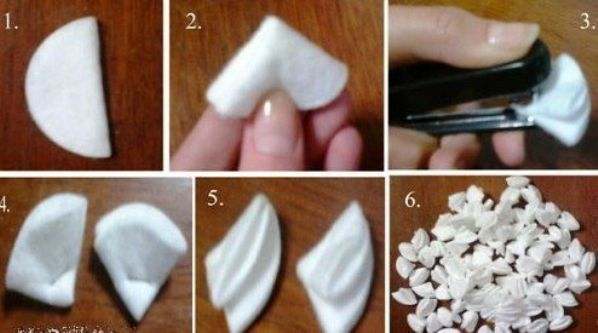
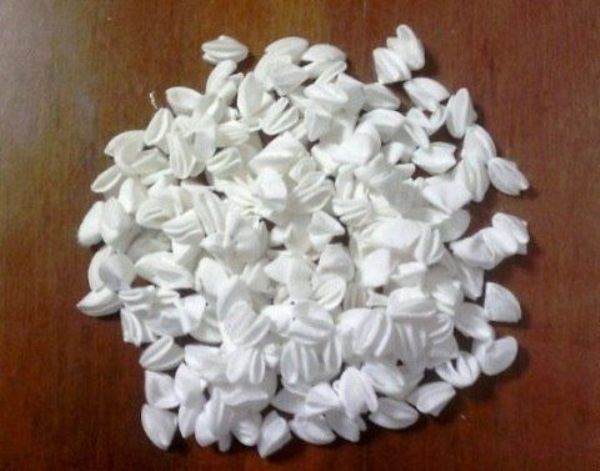
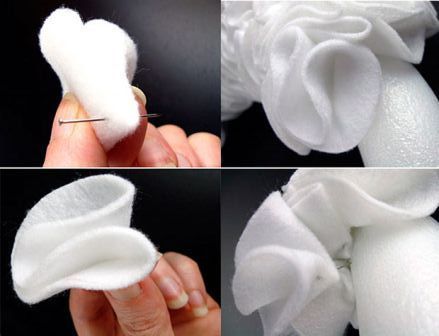
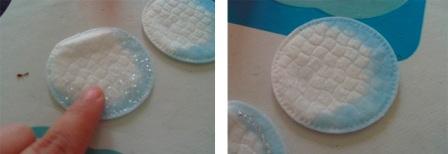
While the star with the beads will dry, we will begin to create “needles”. We fold the cotton pad in half. Then one more time in half. ![]()
And fasten with a stapler (you can prepare 20-30 "needles" in advance, and finish the rest along the course of the action, for example, in 2 rows - until the glue grabs well). 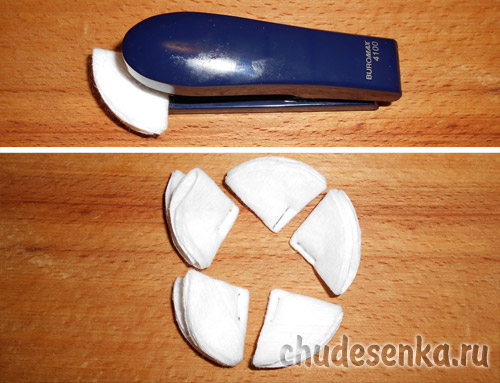
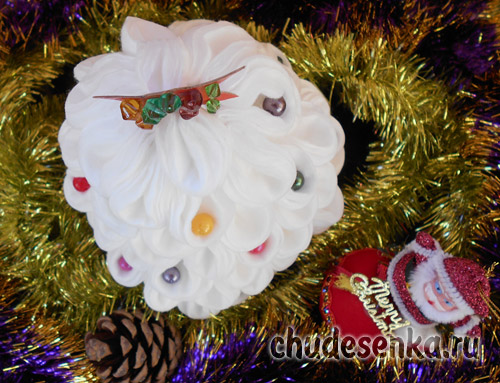
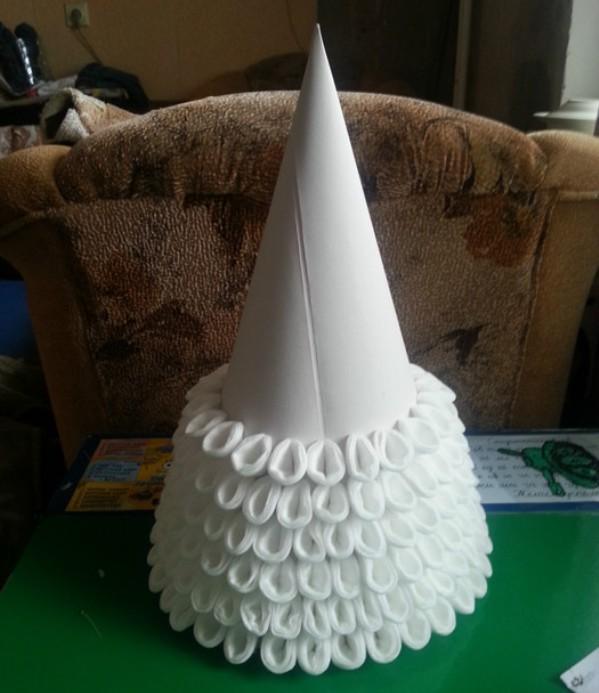
Side, where 2 parts meet cotton pad, grease with glue and glue all the base to the cone. We work in one row. The density of the "needles" to taste, if you leave a distance of about 1 cm between them, then these "gaps" will be visible to the naked eye.
The second row, as well as the subsequent ones, can be glued either in a checkerboard pattern, or a “needle” over a “needle”. 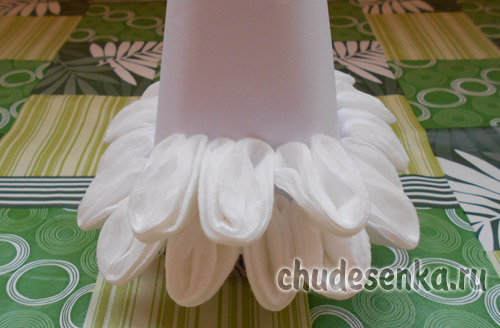
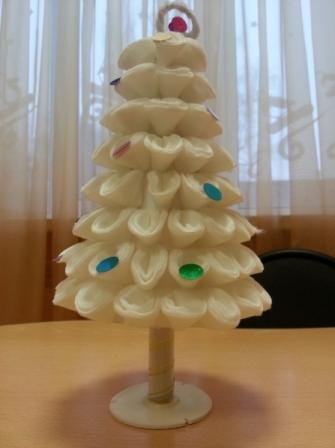
When half of the cotton pads are already glued, we set up a star. On one side, grease the bottom with glue and fix it to the top of the cone, pressing it with your fingers for a minute.
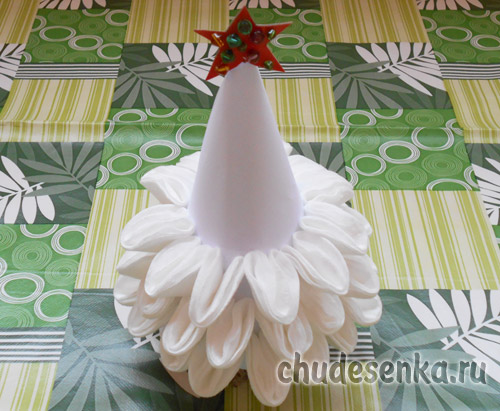
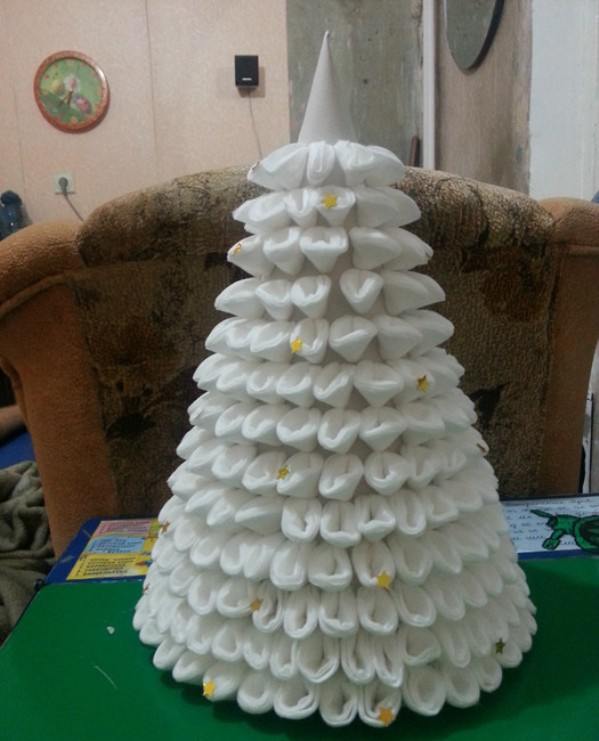
And now we “dress” the Christmas tree in “needles” to its very crown. 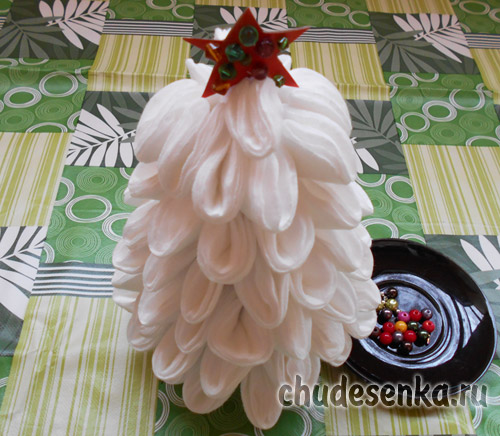
The final stage is decoration. Apply glue to one part of the bead, which we put in the cells, gently pressing for a moment. And that’s all! Our Christmas tree, fluffy and tender, like a cloud is ready!
Irina Nagibina
Сhudesenka.ru
From cotton pads, you can make many interesting crafts. The article has many ideas and step by step description such crafts.
Most people use cotton pads as a hygiene item in skin care for their face and body. But few know that cotton pads can also serve as cheap and affordable material for creativity. Yes, you heard right. From cotton pads, you can create real masterpieces that will take pride of place in your interior. We will share ideas for creating such crafts.
How to make a rose from cotton pads by March 8?
For such a craft, you must have the following materials:
- Cotton pads
- Wooden skewers
- Corrugated paper
- Thread
- Paint (acrylic or gouache)
Preparation method:
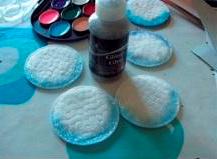
- First of all, you need to paint the wheels. About painting methods below
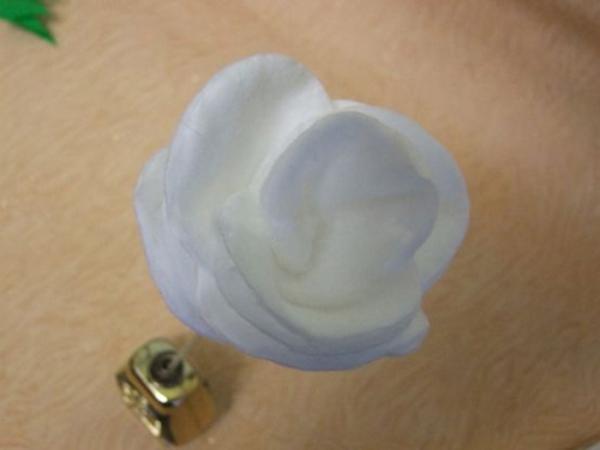
- Roll up one cotton pad. Attach one more to it, apply it not too tightly
- Then attach another disk. Shape the petals as you wish
- Glue the petals together if there are already enough petals on the flower.
- Fix the bud on a wooden skewer with threads. Or you can stick it
- Wrap the skewer with corrugated paper
There are several ways to paint discs:
Method 1 Dilute acrylic or gouache in water, then soak discs in this solution. Then remove and dry the cotton pads. After drying, you can add paint to some areas with a brush.
Method 2 Paint the cotton pads with gouache with a brush.
Instead of gluing, the petals can be sewn with a needle and thread. In addition, you can cope with fixing the petals using a conventional stapler.
Important: If you want your rose to be resilient, soak cotton pads in a starch solution before staining. But in this case, it is impossible to paint by immersion in colored water, only with a brush.
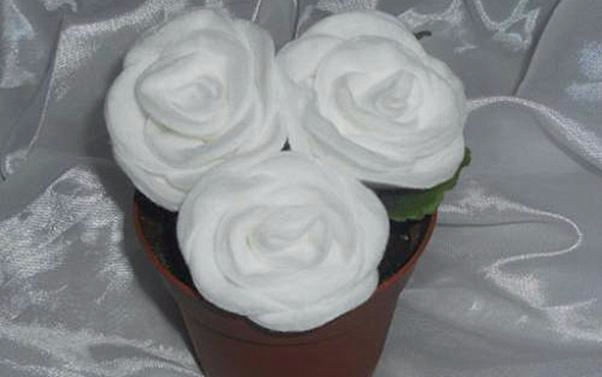
 Cotton Roses
  Bouquet of roses made of cotton pads
 Video: How to make flowers from cotton pads?
Craft - callas from cotton pads: photos
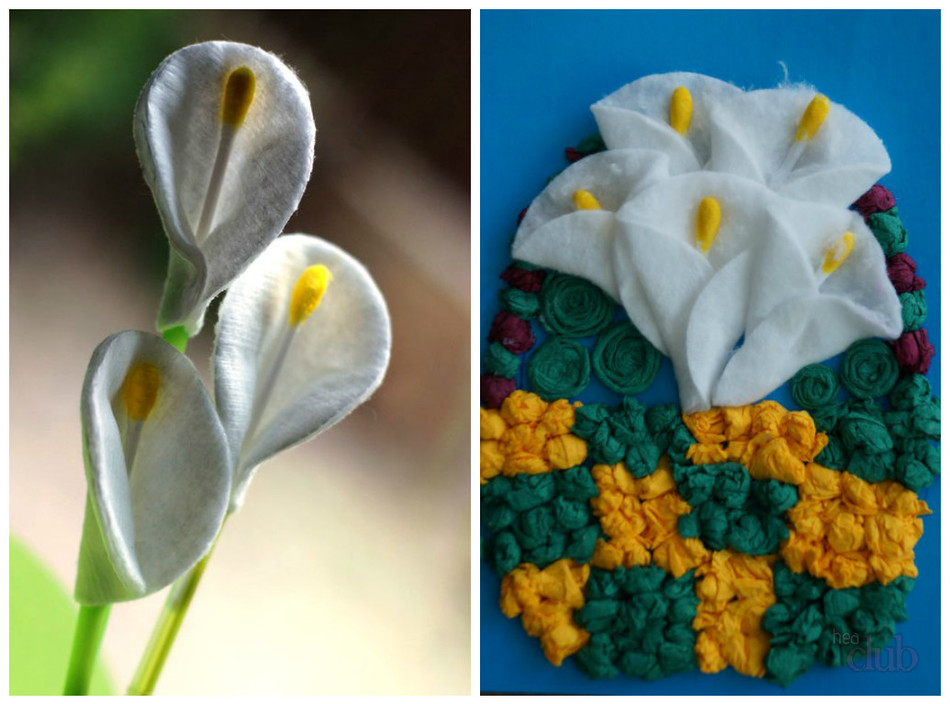
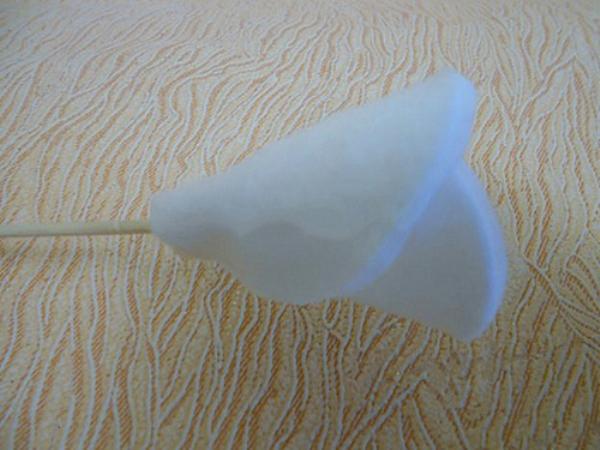
Calla is a beautiful delicate flower of white color with a yellow core. Making it from cotton pads is easy.
To do this, you will need:
- Cotton pads
- Cotton buds
- Cocktail straw
- Green corrugated paper
Preparation method:
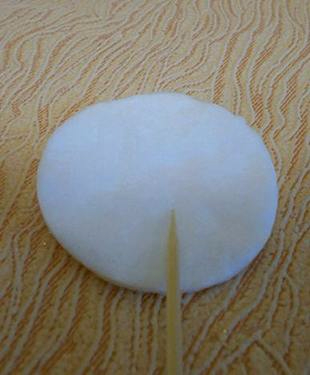
- Cut a cotton bud in half. We need only one part with a cotton head
- Color the cotton bud in yellow
- Insert the colored dry cotton swab into a cocktail straw
- Wrap a straw with corrugated paper
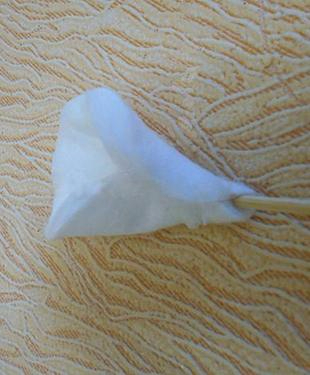
- Now take one cotton pad and form a flower out of it, glue the edges
- Fix the petal with glue on a straw so that the flower does not crumble
- You can add paper leaves to the stem
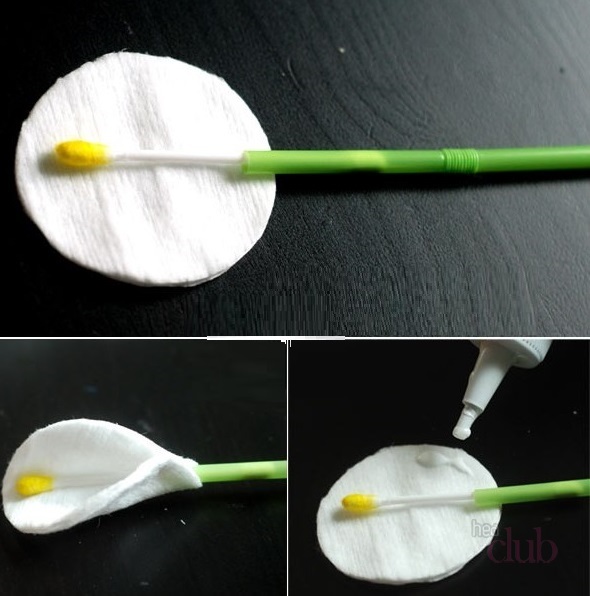 The process of making calla from a cotton pad
 In this way, many beautiful flowers can be made.
 Calla Pads
 Craft - daisies from cotton pads: photos
You can also make chamomile from cotton pads. There are several ways to do this:
Method 1:
- Take one cotton pad
- Cut the petals with scissors, but not completely
- From yellow paper, make a round core
Method 2:
- Glue cotton pads on the balloon holder, one disk equals one petal
- Glue in the middle a button covered with yellow paper. Or you can make a yellow circle out of paper
Method 3:
- The petal takes shape by bending the edges
- The core can be cut out of yellow felt
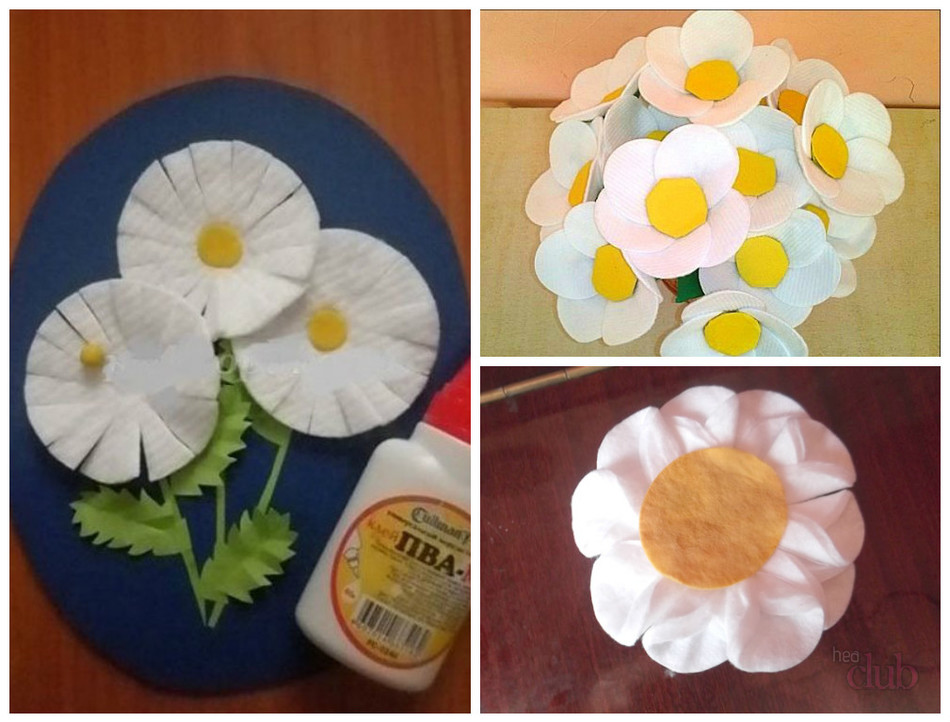 Three ways to make chamomile from cotton pads
 Crafts - snowdrops made of cotton pads
To make snowdrops you will need:
- Color cardboard
- Scissors
- Markers or green paper
- PVA glue
- Cotton pads
Master Class:
- Cut a snowdrop flower from one cotton pad
- Stick it on color cardboard
- Then draw the stems and leaves with a felt-tip pen. If there are no markers, you can cut out of colored paper
- Cut a few cotton pads in half, make snow out of these halves
Baby crafts made of cotton pads
Crafts with children are the development in a child of his creative potential, finger motility and logical thinking.
You can make simple but cute cotton pads with your children. Starting from two to three years, the child learns to work with a brush with glue, scissors. Parents or carers should monitor the process and help the baby. Crafts from cotton pads for children 4-5 years old - not a problem at all.
Looking at the photos, you can see that such crafts are a fascinating activity for children of different ages.
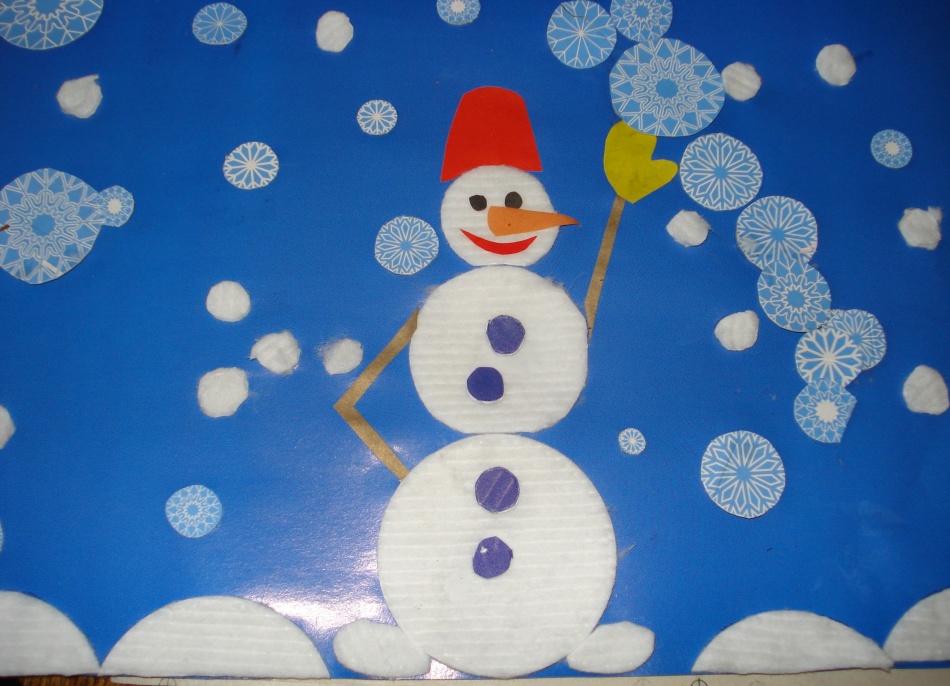 Children's crafts snowman from cotton pads
 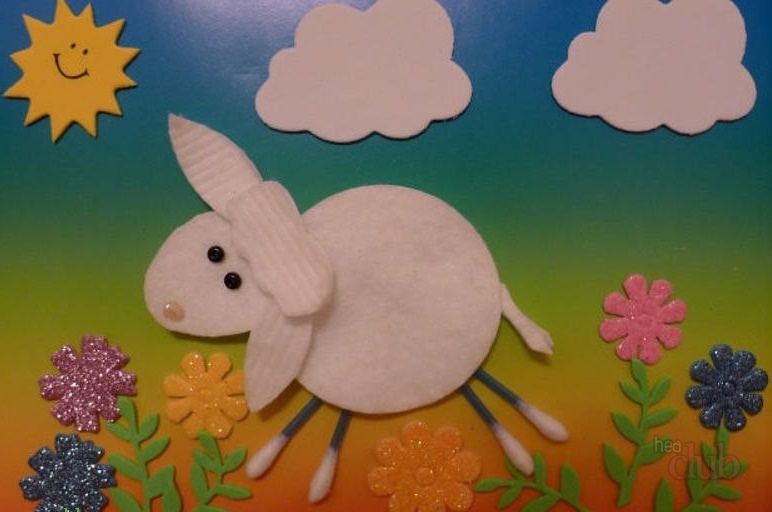 Craft Lamb
 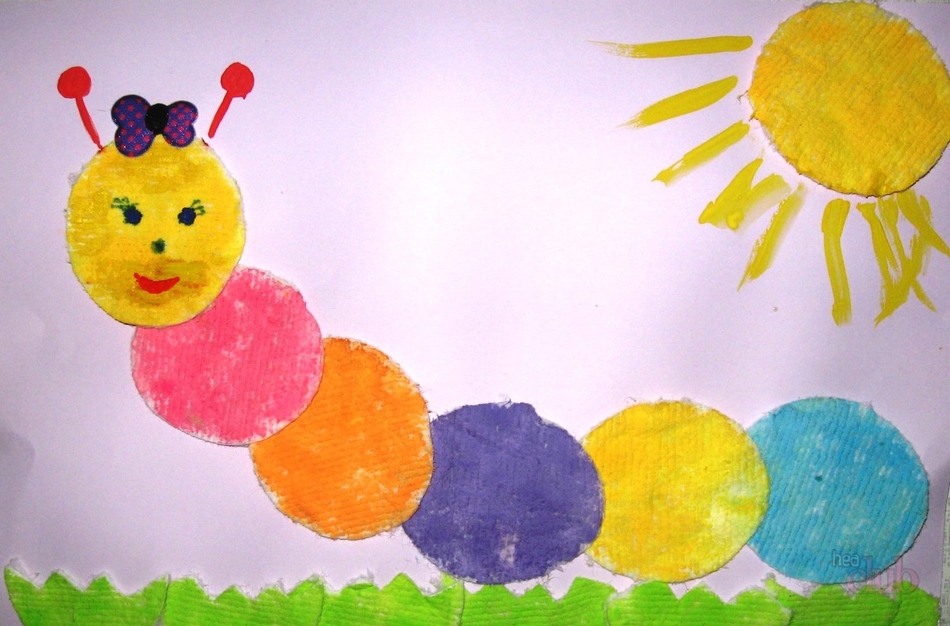 Caterpillar Craft
 Craft - a bird from cotton pads with a description: photo
From cotton pads, you can do almost anything that your fantasy tells you. For example, a white owl.
Necessary materials:
- Color cardboard
- A4 white paper sheet
- Markers
- Scissors
- PVA glue
- Cotton pads
- Simple pencil
Step by step description of the craft:
- Draw a silhouette of an owl on a white sheet of paper with a simple pencil.
- Cut it and glue it to the colored cardboard
- From black colored paper, cut out claws, beak, and eye circles
- Cut two more circles of yellow color, but smaller diameter
- From each cotton pad with scissors cut two feathers of the appropriate shape
- Stick on claws, beak, feathers, shape eyes
- Add a feather color to your black pen.
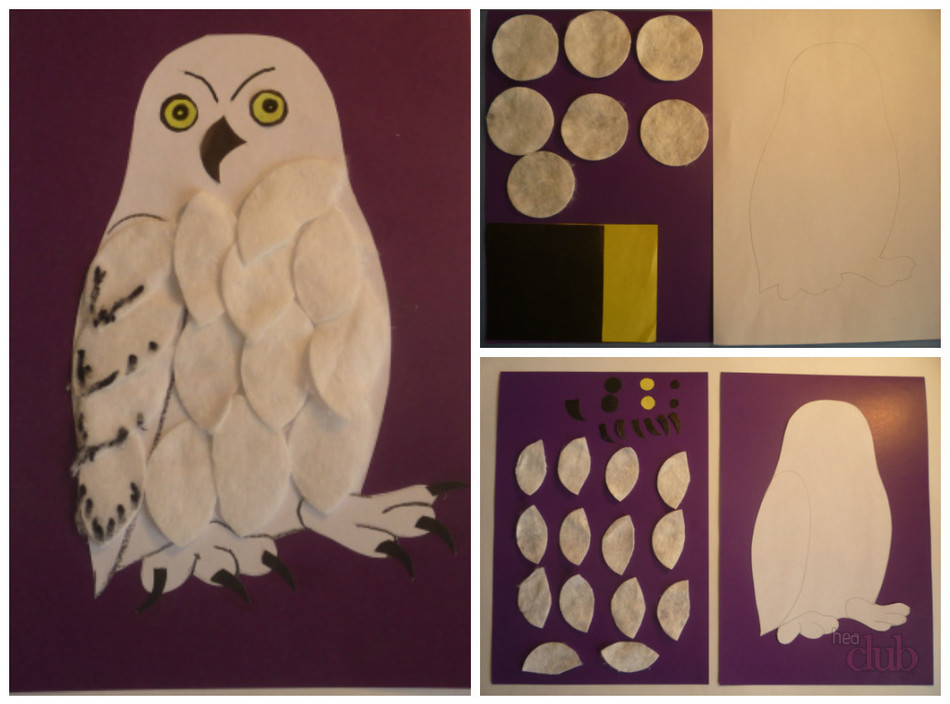 Cotton Owl
 Craft - a chick of cotton pads: photo
Important: It is convenient to do crafts from dense disks. Not very dense discs can fluff up during operation.
It is very simple to make a chicken out of cotton pads. Ideas for inspiration in the photo.
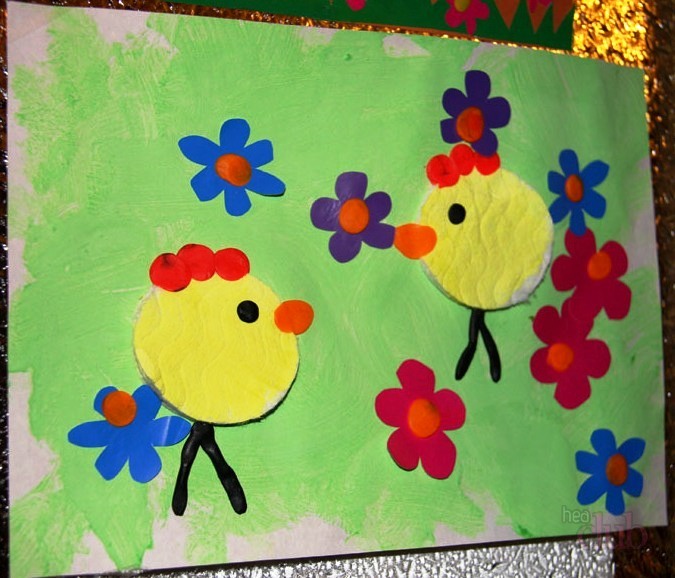 Cotton Chicks
 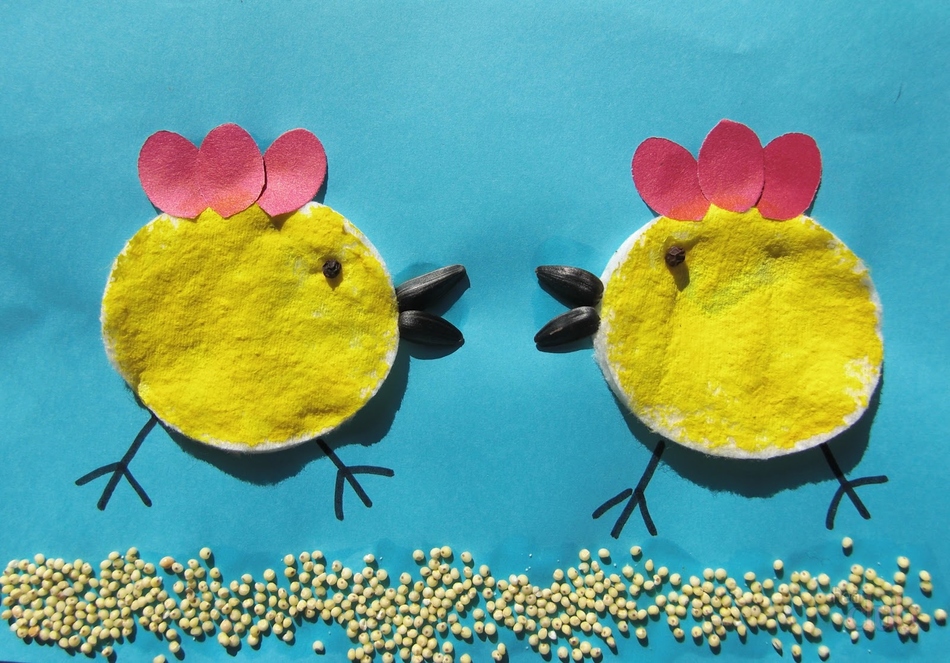 Making chicken out of cotton pads is easy
 Craft - monkey made of cotton pads: photo
If you have brown paint, you can make a monkey. You can use not only brown paint, but also red, orange.
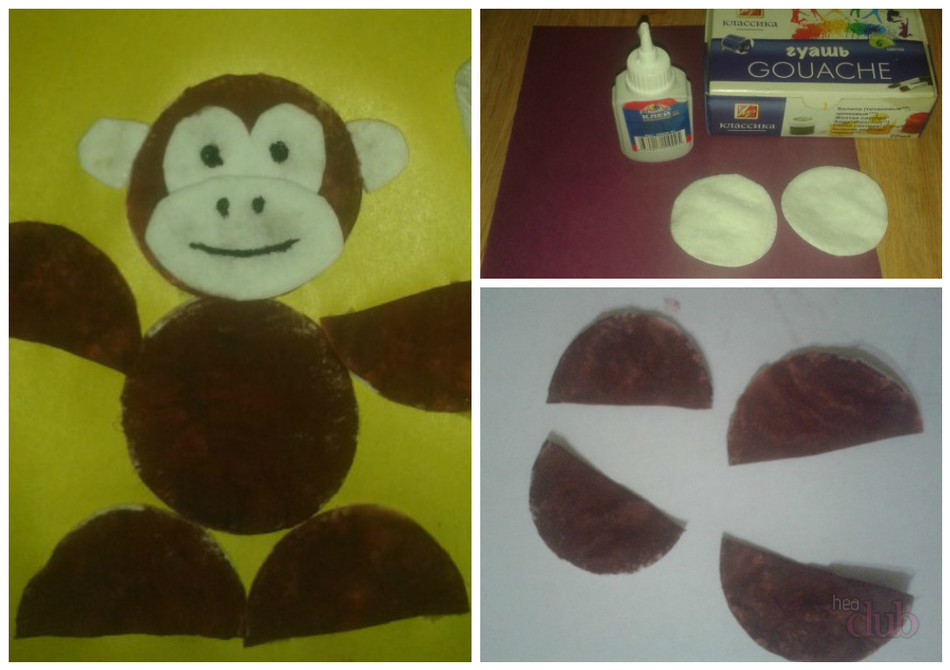 Craft Monkey
 Crafts from cotton pads on the theme of space: photos
Many boys dream of becoming astronauts. But while they have not yet grown, you can invite them to do crafts on the theme of space.
Cotton pads in such crafts will be planets. They need to be painted with certain colors. Also in this craft, you can use plasticine or colored paper.
 Craft on the subject of space from cotton pads
 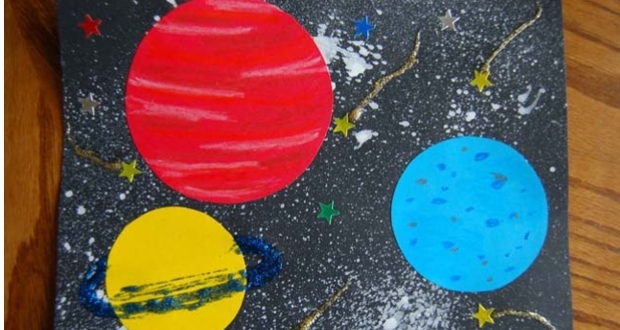 You can make planets out of cotton pads
 Cotton Topiary
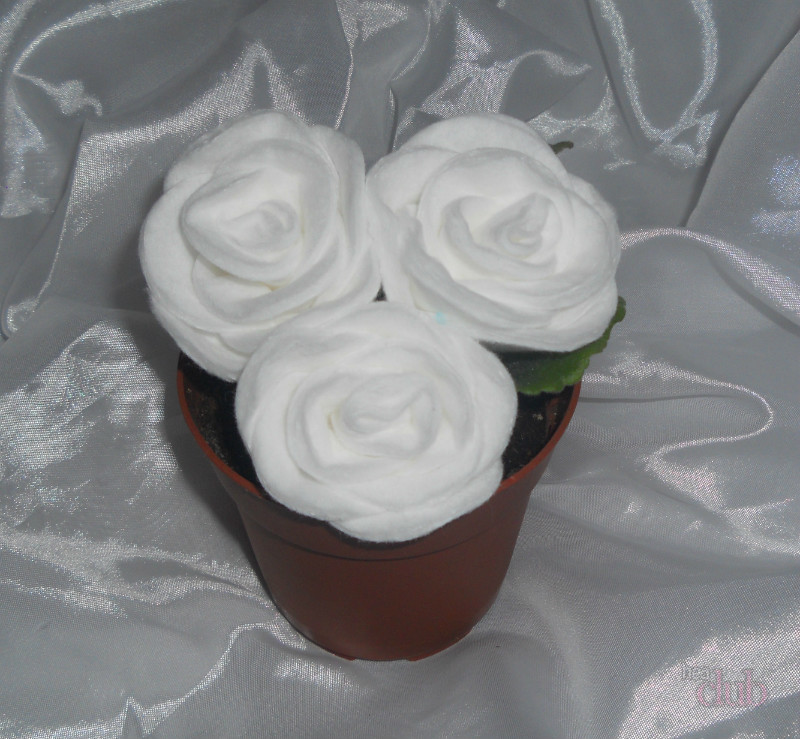
From cotton pads, you can make magnificent topiary. You can not paint the wheels, snow-white flowers will look very gentle.
For beauty, you can add beads, ribbons, sparkles. Such topiaries can be proudly displayed to your friends or used as a gift.
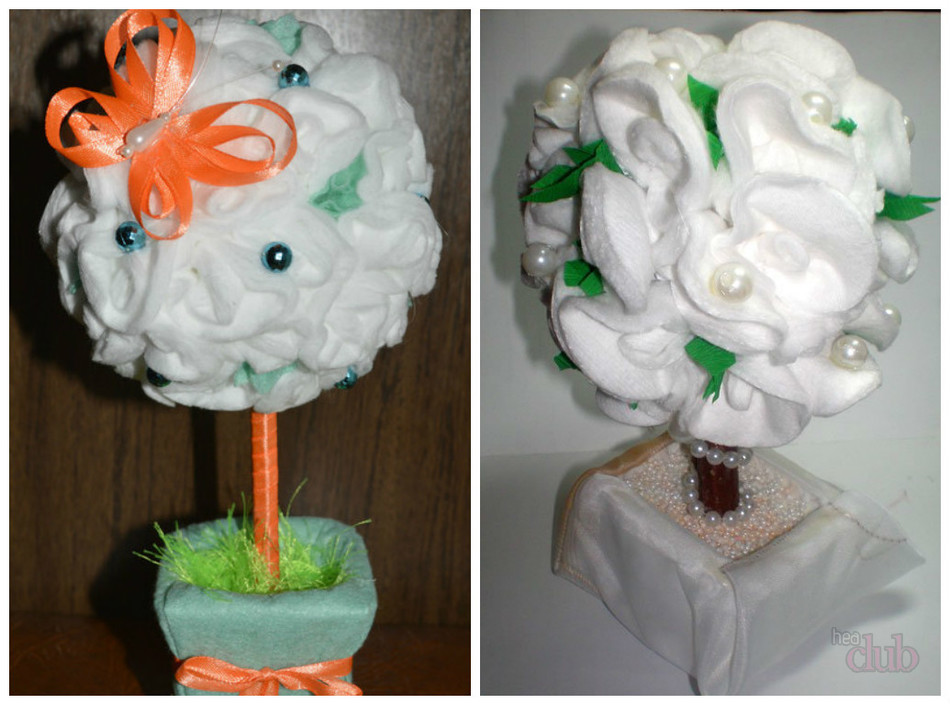 Crafts of Topiary
 Crafts from cotton pads for Easter: photos
In many families, it is customary to meet light not only with colored eggs and cakes, but also to decorate the whole house. Cotton pads come in handy in this matter.
You can make egg pendants. In the photo, pendants are made of felt, but felt can easily be replaced with cotton pads.
 Pendants for Easter
 Or cute angels.
 Crafts Angel for Easter
 As you know, Easter is a spring holiday. On this occasion, you can decorate the apartment with delicate topiary made of cotton pads.
 Easter Topiary
 Try and you make crafts from cotton pads, it is interesting and exciting.
Christmas crafts made from cotton pads. MKCotton pads can be used not only for cosmetic purposes, but also to create beautiful applications and crafts. They make beautiful New Year's crafts and postcards, as well as original flowers and toys.
.Christmas tree
You will need:
Cotton pads
Stapler
Jewelry (beads, asterisk, braid)
1. Make a cone out of cardboard.
2. Fold each cotton pad as shown in the image and use pins to attach each folded disc to the cone.
* If desired, the Christmas tree can be decorated with braid, garland, tinsel and other decorations.
Cotton Roses
You will need:
Cotton pads
Corrugated paper (color: green and brown)
Scissors
PVA glue
Foam sponge.
1. Put PVA glue on the tip of the skewer, put a cotton pad on it, wrap the skewer with it and press it so that it sticks well ..
Put a little glue on the outer part of the already glued disk, attach another disk to it and glue it.
3. To make the bud you need to glue another 6-7 cotton pads in a checkerboard pattern.
4. To make green sepals, like a real rose, you need to cut out a shape resembling a fence from corrugated paper.
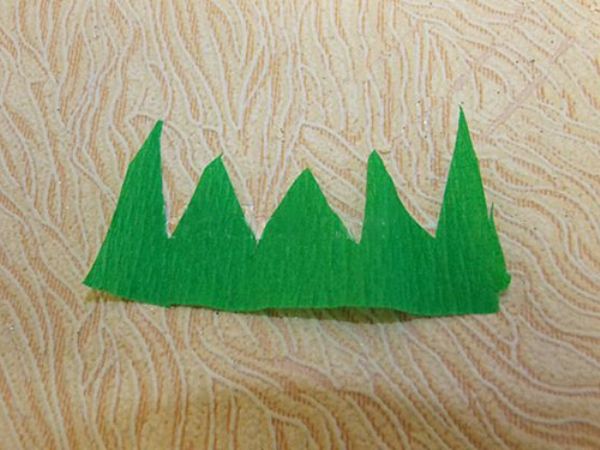
5. Apply PVA glue to the figure and wrap it with the bottom of the bud.
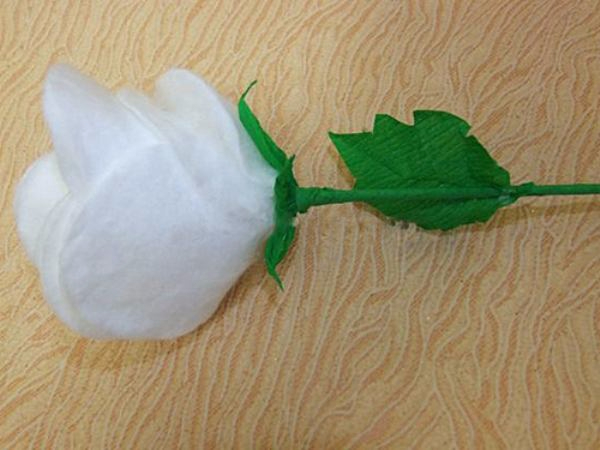
6. Now you need to make a stalk. To do this, you need to cut a long narrow strip of brown corrugated paper, apply glue to one end and wrap the skewer in a spiral. At the end, add glue to the tip of the strip to secure it.
7. Make a leaf. Draw a sheet shape on green corrugated paper and cut it out. Glue this sheet to the stem.
A Christmas tree is an evergreen tree that adorns parks and squares in the winter season. Each child would like at home to have a small Christmas tree that decorated his children's room. To refresh your baby’s room and give a winter atmosphere to the interior, try making cute christmas tree made of cotton padsdo it yourself. Such crafts will bring a winter fairy tale to your home. You can also try to make an artificial Christmas tree yourself in a kindergarten or school.
Christmas tree made of cotton pads, master class
Modern needlewomen have already suggested many ideas for making crafts from cotton pads. The main advantage of such products is that they are environmentally friendly, and in some cases collapsible. In order to make a Christmas tree, you will need to make a frame.
For its manufacture, you can use ordinary cardboard. Note the circle sector on the cardboard with a compass and cut. Then twist the cone and glue with a glue gun, PVA or stapler. If you made a frame from colored cardboard, paint it with white paint, otherwise it will be visible through the snow-white cotton pads. It is very convenient to make a Christmas tree frame made of cotton disks made of foam. In this case, you will not stick the “needles”, but fasten them with pins.
Christmas tree made of cotton pads on the leg
Craft Christmas tree made of cotton pads
We recommend making a cardboard frame, since it will be easy to glue cotton wool on it using PVA. Take the usual watercolor paints, dip the brush in water and paint, and then wet the edges of the cotton pads with painted water. If you want your Christmas tree to sparkle in the sun, sprinkle the edges of the cotton pads with sparkles. To ensure that the latter are fixed, do not forget to moisten the cotton surface with glue.
Before you begin gluing the prepared "needles", wait until the cotton pads dry completely. You can speed up the process if you put them on the battery. It remains to glue the cotton pads on a cardboard cone. Start from the bottom, while sticking the parts in a checkerboard pattern so that your Christmas tree looks visually fluffy.
There is another simple and original idea for making a small Christmas tree. For this you need a wooden skewer, scissors and cotton pads. Make round blanks from cotton pads of different sizes. The lowest tier of the tree will be from parts of the standard size of the cotton pad, and gradually reduce the rest in diameter. If desired, you can paint the workpiece with watercolors or shiny spray paint. Do not make the Christmas tree too long; try to make several crafts of different sizes.
Simple Christmas tree made of cotton pads
Craft Christmas tree made of cotton pads can be made in many ways. It all depends on your imagination and the materials available. Create your own collections of Christmas trees from improvised materials and spend interesting leisure time with your children.


