The following point is worth noting. Budget motherboards are equipped with a 4-pin CPU power connector. So we split the existing 8-pin cable into two 4-pin cables with our hands and connect to the board. Expensive motherboards, on the other hand, are equipped with an additional connector in addition to an 8-pin connector. The trick is that in this case everything will work from one 8-pin wire. An additional port is needed if, for example, you will seriously overclock the central processor. But then you will need an accompanying power supply or adapter.
Step 5: install drives and optical drive
For the desktop, there are two common drive form factors: 2.5-inch and 3.5-inch. Plus, solid-state drives with an M.2 slot are gaining popularity. As for the latter, everything is simple with this form factor: the device is installed directly into a port soldered on the motherboard. But 2.5- and 3.5-inch drives must first be fixed in the case.
In 99% of cases, the case is equipped with a special basket with a slide. The manufacturer also indicates in the specifications the number of slots for 2.5- and 3.5-inch drives, as well as 5.25-inch devices. In the case of the Fractal Design Define R5, two metal baskets are used. The first (top) can accommodate five 3.5-inch or the same 2.5-inch drives. The second (bottom) is three. In some cases, these baskets may be removable. Plus, this particular case has two slots for 2.5-inch drives behind the chassis.
Not all computer chassis optionally support 2.5-inch drives. True, many SSD manufacturers complete their products with special adapters for 3.5-inch sleds. They are usually packed in cardboard boxes, but not sealed in a blister.
Do you want to build a computer for games or for Photoshop? Looking for instructions with a photo on assembling a computer with your own hands? You have come to the right place.
The article continues the story about assembling a computer at home. As a reminder, we are building a computer for a photographer that can easily be transformed into a powerful gaming computer by simply adding a graphics card. The choice of components for the collected photo and gaming computer, as well as ways to protect electronic components from static electricity has been described.
Before starting the process of assembling your computer, make sure you have a Phillips screwdriver - this is the only tool you will need. Make sure you have all the components you need to build your PC. Check that you have taken care of the ESD protection of sensitive electronic components. All this was discussed in detail in the previous article. If everything is in order, let's start.
Computer assembly sequence. Step-by-step instruction
It is convenient to start assembling a computer by installing a processor (Core i5 6500) into a socket on the motherboard (H110M PRO-VD). To do this, we remove the motherboard from the antistatic bag, holding it by the ends, and put it on a cotton fabric (coarse calico, satin) folded in several layers. Several layers will gently hold the board, it will not slip and scratch the table. In addition, cotton does not accumulate static electricity. Raise the lever of the processor pressure plate (slightly press down and move to the side), fold back the processor pressure plate. There is a plastic plug on the pressure plate. We do not touch her, she will then go away by herself. Next, we take the processor out of the box, take it out of the blister. We hold the processor exclusively by the ends, without touching the contact pads. We combine the triangular key on the processor and on the board. Also on the processor on the opposite side of the key there are 2 notches on the sides, they should also go around the corresponding protrusions on the board socket. With the key and notches aligned, simply place the processor, contacts down, onto the socket without effort. If the key and notches are aligned correctly, the processor will lie flat, without distortion. Next, simply lower the pressure plate onto the processor and fix it with a lever. At this point, the plastic plug on the plate should bounce off by itself. We take it aside, it is no longer needed. All processor is installed on motherboard.
 MSI h110m pro-vd CPU installation
 The box with the processor also contains a fan, the so-called boxed cooler. Take it out of the box. Be careful not to grease the thermal grease that is applied to the heatsink where it touches the processor. The paste is needed to smooth out irregularities, for a tighter touch of the radiator and the processor case, so that heat is better dissipated. Each time the cooler is mounted and dismantled, a new paste must be applied. So if you want to remove the already installed cooler for any reason, do not forget to buy additional thermal paste in the tube. Installation of a boxed cooler is generally simple: you need to rotate the fan around its axis so that the power connector reaches the mating part on the motherboard. Align the 4 holes on the board with the clips on the fan. Press on the clips and they snap into place. Clips must be fixed in turn in the following sequence: first, opposite ones along one diagonal, then along the other. Clicking on the clips, we connect the fan power connector to the mating part on the motherboard (marking on the cpufan board).
Next, install 2 strips on the motherboard. random access memory(Kingston HyperX FURY Black Series 16GB). The planks are very easy to install. You need to move the levers on the sides of the memory connectors on the motherboard to the sides. Install the bracket into the connector, aligning the only notch on the bracket with the tab in the connector, and gently push down. The bar will sink down, and the side levers will rise and click into place.
 CPU cooler and memory sticks on the MSI h110m pro-vd board
 It's time to install our motherboard in the case system unit... We take our case (AEROCOOL MC3), remove the side covers, remove them to the side. We put the body in a horizontal position. The missing support bushings must be installed on the motherboard mounting panel. The four pieces that are found on all board sizes are already installed. We look at how many mounting holes there are on the board; under each hole you need to install a support sleeve. Support sleeves are in a bag with screws included with the body. The same bag contains a hex adapter for a Phillips screwdriver. The adapter is needed to tighten the grommet and panel threaded joint. At first I did not notice this adapter and tightened the bushings with pliers, but you do everything as expected using the adapter.
When all the support bushings are installed, you can mount the motherboard connector socket on the back of the system unit. The socket comes with motherboard... There are special notches in the case of the system unit, so this socket kind of snaps into place.
Now you can screw the motherboard itself onto the support bushings. We take the screws for this from the same package complete with the case. By tightening the screws, the board must be pressed against the back panel, since it rests on and springs with special antennae.
 Mounting the MSI h110m pro-vd motherboard in the system case
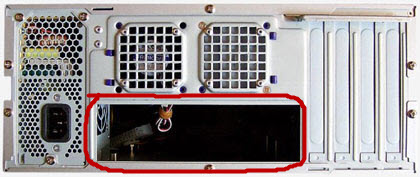
 For those who want to build a powerful gaming computer and bought an additional gaming video card such as the GeForce GTX 10 series, it's time to install it on the pci express motherboard connector and fix the socket on the back of the system unit.
We turn the body upright. We will now be installing an optical DVD drive (DVD-RW LG GH24NSD0). Further, in the pictures, the devices are conventionally shown with connected wires. You don't need to do this yet. Installation of wires is taken out in a separate operation. On the front panel of the case of the system unit, you need to remove one of the three removable panels for external devices 5.25 inches. This will be the topmost socket. To remove it, you need to bend one of the side latches from the inside and press on the panel from the outside. The panel will fall inside, after which it can be removed. We insert our optical drive into the resulting hole in the case, aligning the drive with the front panel of the system unit. We fix the drive in the basket for external devices... On one side of the basket there are clamps for quick fixing, there you just need to bend the lever. On the other hand, there are no such clamps, so we fasten 2 screws from the kit.
 Optical drive in the basket for external devices
 Now it's the turn of SSD (OCZ Trion 150 TRN150-25SAT3-240G) and HDD (1 TB WD Caviar Blue) drives. Solid state drive We put it in the basket for internal devices, 2.5 '' compartment. On the one hand, we put the pins of the basket into the holes for mounting the disk, and on the other, we fix the disk with two screws from the kit to the case of the system unit. For hard disk on one side, screw in the screws with a narrow pin head, they will slide along the guide. We put the pin heads in the guides and insert the disk into the basket for internal devices, 3.5-inch compartment. On the opposite side, we fix the disk with three screws from the system unit case kit.
 SSD and HDD drives in the basket for internal devices
 Now the next step is the power supply unit (Aerocool KCAS 600W). We take it out of the box and install it on the bottom of the case, with the fan down, towards the ventilation hole. The system unit is on high legs, so there is a place for air to enter. The power cord connector will face outward and the wire harness toward the inside of the chassis. We fasten 4 screws from the kit from the side of the rear wall.
 Power supply at the bottom of the system unit
 Now that all the components are in place, you need to connect them with electrical cables. All devices should be connected by interface cables to the motherboard. Plus, you need to connect a power cable from the power supply to each device. In the pictures, all power cables are black plastic braided. Almost all connectors are keyed, so they cannot be confused without excessive force. Plus, there are signatures of each connector on the board. You should immediately try to lay the cables through the channels and through the technological holes in the case of the system unit, so that then it remains only to fix them.
Let's connect the signal wires to the motherboard:
- 3 SATA3 cables from three devices: DVD drive, HDD, SSD. On one side of the cable, the connector connects to the device, on the other side of the cable, the connector connects to the motherboard. For the HDD, the connector on the motherboard side does not need to be connected yet. We will connect it after installing Windows on the SSD drive, this will be discussed later;
- Wires from the front panel of the system unit: USB3 connector of blue color, audio panel connector, USB2. The buttons and lamps on the front panel of the system unit come to the motherboard in the form of single contacts with markings. To install them, you need to check the diagram that comes with the motherboard. We also connect the front panel fan connector (marking on the sysfan board).
Let's connect the power wires to all devices. We take the wires from the power supply:
- Processor power connector;
- Motherboard power connector;
- Additional power supply for the front panel fan. The Molex connector is mounted in parallel with the signal wires, increasing the cross-section of the power wire;
- 3 SATA power connectors for each device: DVD drive, HDD, SSD.
- Those who installed the video card need to check if it has an additional power connector (for powerful video cards). If so, then you need to connect it.
Connecting connectors on motherboard msi h110m pro-vd is shown in the picture. In this and the rest of the pictures, the wires are conventionally shown with plastic clamps fastened together. There is no need to install clamps yet - this is done at the last stage, when everything is already working.
 MSI h110m pro-vd connector connection
 After connecting the wires inside the system unit, you can connect the power cord, plug it into an outlet, connect a keyboard, mouse, monitor, and then. If during the setup you need to tweak something, do not forget to remove the plug from the outlet, including from the monitor.
After setting up the BIOS and installing the OS, if everything works, it is necessary to fix the wires in the case of the system unit using plastic clamps so that they do not dangle when moving the computer. If you, as in this case, use an integrated video card, you need to install a plug on the hole of the first PCI expansion slot (on the back wall, there usually comes a panel discrete graphics card). The plug is included with the case of the system unit. You should end up with something like this:
 Fully assembled system unit. View from the side of the motherboard
  Securing the Cables on the System Board Panel
 It remains to screw the side covers of the system unit and the computer can be used.
In this configuration, everything was assembled and worked for me the first time. I solved my problem: developer camera raw Photoshop began to move and process the raw image from the photo matrix (RAW format).
The laptop and iMac lost the war to the desktop. You read it and run to the store for the system unit.
The advent of each new type of laptop is destroying the desktop block market. But in vain.
The desktop system unit lives with the help of upgrades for years: the motherboard and processor rarely need to be replaced more often than once every 4 years; the rest sometimes lives for 10 years.
It is not necessary to keep a huge Full Tower (body taller than 50 centimeters) under the desk. Powerful engineering system Fits into a Mac Mini-sized case and can hide anywhere in the house (even behind a TV).
Take a desktop PC, don't be like everyone else.
Selection and assembly rules. 1. Motherboard, processor and memory

Always take a motherboard with a large number of peripheral ports. It will be great if it can work with the new generation of processors.
There are life hacks for memory and storage. Always check:
- whether the memory will work on the current assembly;
- whether it is possible to seriously improve performance with faster memory;
- it is always easier to buy in addition than to sell, so buy one small, fast bar;
- start with a hard drive for file cleaning, SSD greatly increases performance, but it can be installed at any moment;
- Take a small but fast SSD; only for the system and main programs.
Selection and assembly rules. 2. Block, cooling and peripherals
You cannot save on the power supply. It must provide 20-30% more output power than the computer consumes at peak load.
It is better to change the unit when buying new hardware than to change the entire system unit due to constant power surges. And do not take the block as part of the body. It always ends badly.
The easiest way to save money is on cooling. Be patient with overclocking and save money at the start. Instead of fancy turbines and water cooling, use 120mm coolers mounted on the same level. Or don't bother at all.
The main thing is that the temperatures do not jump: a stably hot system unit (for example, at constant 70 degrees) works longer than one in which there are drops from cold to heat (even if it is from 25 to short-term 50).
What to build a computer from today?
The following systems should be considered as the most attractive options for a universal system unit:
Poor student

What to improve: install a more efficient i3-7350K processor and a motherboard on the Z170 / Z270 Express chipset; install AMD processor Ryzen 3 and matching motherboard Install 120GB SSD (SATA 6Gb / s) for the system.
How to save: abandon the discrete video card in the assembly with Intel, the integrated video core will pull out all the work tasks and allow you to play a little at the minimum settings.
I would go with an Intel based system. It scales better, allows for powerful processors and a decent amount of memory. Building on AMD is more productive in video rendering and multithreaded computing. But the lack of a large number of such applications almost ruined the company, so this is not a reason to choose an outdated and cheap FX.
Installing an i3 processor into an assembly on Intel will not increase performance much: the selected Pentium supports Hiper Threading and performs just as well.
But the ruler Intel Core Supports a number of additional instructions that greatly increase the speed of video and some work calculations. Consider when choosing.
Novice gamer

What to improve: install a processor with an unlocked multiplier and a motherboard based on the Z170 / Z270 Express chipset; replace the video card with a GTX 1070.
How to save: install GTX 1030, 1050Ti or GTX 1060 3 GB; abandon the second magnetic drive.
Here is the same story as with the previous build. Preferred i5 over new Rizen. But the taste and color of all markers is different, so you can choose the cheap AMD option.
Rizen has excellent overclocking potential. A small surcharge on the motherboard and changing the processor to a variant with an unlocked multiplier will greatly improve the results. But the younger ones do not work very well with memory, which often negates all performance.
On the other hand, the current i5s from the Skylake / Kaby Lake families do not offer the same advantages that the expensive and powerful i5 Haswell possessed, which were barely inferior to the top-end i7. The lack of Hiper Threadign makes it necessary to describe another configuration.
"... Work, play and for a long time"
What to improve: install the processor, motherboard from the following option; replace the video card with a GTX 1080; use a PCI-Express drive.
How to save: use smaller drives; replace the video card with a GTX 1060 6 GB.
These configurations rely on serious, almost flagship solutions. An important point: a system unit based on an AMD processor implies overclocking (as indicated by the motherboard chipset). The solution on Intel does not provide for this and, what is much worse, is picky about the quality of the power supply.
This build will allow you to run almost any game in 2K at maximum graphics settings, and will perform well in 4K. Unfortunately, the Radeon line of graphics cards is completely useless for this application.
However, for Full HD, you can opt for a 6GB GTX 1060; the performance difference between the two Nvidia lines is only 15-20%. This is hardly worth it.
God, caesar and for 3D modeling

What to improve: use water cooling; use a second video card.
How to save: replace the video card in accordance with the requirements; use smaller drives.
Performance record-breaking assemblies on this moment... The transition to a platform for enthusiasts based on server solutions will practically not give an increase in real use... So before going out Intel Core i9 and flagship Rizen it is this set of accessories that will become the ceiling.
Enough performance for any task. It should be noted that when buying a motherboard, you need to think about whether the second video accelerator will be used in the future and check if the selected motherboard supports SLI. Forget about Crossfire and Radeon cards.
Why not a replacement later? The GTX 1080 Ti is the most powerful graphics card today. This will not change in a couple of years. Acquiring the much-vaunted Titan is an unjustified luxury that brings little power.
I have enough money for everything, but I can't decide

A motherboard based on a flagship chipset (AMD X370 / Intel Z270 Express) and a mid-priced processor (AMD Ryzen 5 1600X / Intel Core i5-7400K) with 1 8-16 GB memory stick may become the right choice, regardless of the budget. With an SSD and GTX 1060, 6GB is enough for everything for years to come. If you don't like it, you can always improve.
Should you change your system unit today? If the current one is based on i5-2500 (K), i7-2600 (K), i5-3550 (K), i7-3770 (K) or similar processors with 4/8 physical / virtual threads, the upgrade can wait. All that is required is a new (scarce) video card: GTX 1060 or higher. And increase the memory.
(5.00 out of 5, rated: 1 ) ![]()
More and more people are wondering every day how to assemble a computer yourself from components from scratch. Assembling a computer on your own and with your own hands is a rather fascinating and educational process. Self-assembly and customization of a computer costs on average 30% less than buying an already assembled, ready-to-use machine.
Some people mean a computer system unit, but I hasten to remind you that a system unit without a monitor, keyboard and mouse is useless. Only with these peripherals does it become a fully functional personal computer.
What do you need to build a computer?
To start the assembly, you need to pick up a new set of parts. It is undesirable to buy parts that were in use, since in the absence of experience in setting up a PC, difficulties may arise.
So what does it take to build a computer? The points:
- computer case,
- power unit,
- motherboard,
- CPU,
- RAM,
- video card,
- sound card,
- DVD drive,
- HDD,
- monitor,
- keyboard,
- computer mouse.
How to choose a case for your computer?
Choose a solid computer case. It is necessary to pay attention to the fact that in stores there are Chinese-made cases, which are made of very thin sheet metal and are easily deformed under mechanical stress.
The computer case includes a power supply and network cable... Sometimes the case and power supply are sold separately.
How to choose a motherboard?
Motherboards come with integrated video and sound processing cards. These motherboards are easier to assemble and have average specifications.
If you need to equip your computer with more powerful means of playing sound and video information, then you need to use a motherboard, which is equipped with slots for a video card and a sound card.
When choosing a motherboard, it is necessary to determine the area of primary use of the computer.
How to choose a video card?
It makes no sense to use an expensive video card to watch news and video information on the Internet. But if you are a fan of computer games with cool video effects or plan to work in powerful programs video editors, then you cannot do without a good video card.
When choosing, always start from the purpose for which you are purchasing a video card. The power and price of the video card will depend on this.
Tell the store clerk why you need a video card. He will be able to help you find the right model.
How to choose a sound card?
The question is how to choose the right one sound card, is quite extensive, so I will limit myself to basic theses.
Sound cards integrated into the motherboard generally have two channels. If you are planning to listen to music through an amplifier or receiver, then buy a multi-channel sound card. There are some that support 5.1 and 7.1 sound systems when there are multiple speakers and a subwoofer in the system.
Sound cards are internal, which are inserted into a connector on the motherboard, and external, which can be connected to a computer via a USB or Firewire connector. Although the latter are more professional-level sound cards used by sound engineers, DJs and electronic musicians.
First of all, in order to answer the question of how to choose a sound card, ask yourself a question, why do you need an audio card in principle, and then look for a model that meets your criteria.
How to choose RAM?
To buy a suitable RAM, you first need to decide on its volume. For an ordinary modern computer, 4 GB is enough. For a gaming computer, you need at least 8 GB.
It is also important to know the type of RAM connectors on your motherboard. IN recent times You can find, basically, only DDR3, but in general you can find the following types of connectors:
The type of RAM connector is usually indicated in the description of the motherboard. In any case, check with the store if they can change the memory you buy for another type of memory of the same size, if you make a mistake with the choice of the memory type.
RAM cards are sensitive to static charges, so it is not recommended to unpack and keep them in open form before installation. Before installation, it is recommended to touch the metal case to discharge any build-up of static electricity on you.
HDD
The information that is on the hard drive also requires a certain amount of space. Depending on your goals, you may need additional storage space.
For work, a 500 GB hard drive is the best option. If you are going to play games or download Blu-ray movies to your hard drive, and there will be many of them, you can safely take a hard drive of 1 terabyte or more. I prefer to take hard disks Seagate Barracuda.
DVD drives
DVD drives differ by the manufacturer and the price, otherwise they are standard. Basically, they are needed to install programs and drivers for hardware at the initial stage of setting up a computer. Further, if you connect to high-speed Internet, most likely, you will rarely use your DVD drive.
How to choose a processor?
The processor power used to depend only on the clock frequency. The higher the frequency, the more powerful processor... But now such a factor as the number of processor cores has been added. The more powerful the processor, the higher the speed of the computer. The motherboard must support the platform or socket of the processor of your choice. Therefore, it is better to choose them together and in advance.
The answer to the question of how to choose a processor depends, again, on what you are going to use the computer for.
Monitor, keyboard, mouse
I have had a Phillips widescreen monitor for a long time and has been working successfully, wireless mouse Logitech MX Performance Mouse and the most common USB keyboard.
But the choice of these peripheral devices I leave it to your personal taste. The number of opinions and options here is huge. I recommend using simple but reliable ones.
Do-it-yourself computer assembly: How to assemble a computer yourself?
Important tip:
When assembling the computer yourself, it is not recommended to wear synthetic clothes that condense an electrostatic charge. Electrostatic voltage is detrimental to microcircuits. Therefore, you should use cotton clothing.
So how do you build your own computer? PC assembly begins with installing the processor and heatsink with fan on the motherboard. The processor is installed in the socket and fixed with a lever. Thermal paste is evenly applied to the surface of the processor and the heatsink is fixed, as shown in the figure in the instructions. The fan cable connector must be plugged into the power socket located next to the processor panel.
You can immediately install the RAM card on the motherboard. It is necessary to be extremely careful and not make large mechanical efforts, so as not to damage adjacent elements boards. I already wrote detailed with pictures. Detailed description for installing the processor is supplied with the motherboard.
The next step in the assembly is to install the hard disk and DVD drive into the PC case. Then the motherboard is installed and secured. The wires with connectors that come from the power supply must be connected to the corresponding sockets of the motherboard, DVD drive and hard drive. Then connect all the wires that go from the front panel of the computer case to the corresponding connectors on the motherboard, guided by the connection instructions.
Now you can proceed to the installation operating system... After full customization software the computer, you can close the case cover.
In general, assembling a computer with your own hands takes place in this order. The nuances of how to independently assemble a computer are not deliberately described, since in each case they are different. Leave questions about assembling your computer in the comments.
Before we start assembling the computer ourselves, let's take a look at the picture below. It presents all the main components from which the computer will be assembled by our own hands (by our hands) :)
When you click on a picture, it will open in a modal window in improved quality.
Let's briefly go over the individual components of our "experimental", so that assembling a computer with our own hands seems to us more holistically. Using the link below, open a new window with the top image, which will contain numbers (from 1 to 10), and on this page below we will give short description each of the components.
- Under the number "1" we have -
- number "2" - standard PCI Express
- "3" - cooling system (aluminum radiator and cooler for heat dissipation)
- "4" - itself for the socket (socket) LGA 775
- "5" - two DDR2 modules
- "6" - IDE cable (for connection or old standard CD-DVD)
- "7" - DVD-ROM
- "8" - computer
- "9" - hard drive (hard disk) SATA standard
- "10" - ribbon cable (for connecting a hard drive or CD-DVD of SATA standard)
- "11" - floppy disk (disk drive) and its data cable
Naturally, all this "economy" must be packed somewhere. For this we need a good one.
Do-it-yourself assembly of a computer takes place in the following sequence: first, we install (actually screw) the motherboard into our case, install the processor and its cooling system into it, and then connect and fix the remaining necessary elements to this "foundation".
Another link, which in a separate window schematically shows in what sequence the computer should be assembled.
So, at the initial stage of self-assembly of a computer, we need to install the motherboard into the case. With regard to it, there may be such recommendations: the case must be spacious enough so that we can easily install all the components we need into it.
The board is attached to it with screws that are screwed into special mounting sleeves (metal hexagons). They come with the case.

The sleeves are screwed into special holes on the back of the computer (from the inside of its right side wall), the motherboard is placed on top of them and attracted with screws.
Hexagons are needed in order to form a gap between the board itself and the metal surface of the system unit (to exclude the possibility of electrical contact between the soldering of the elements from the back surface of the board and the case). Such a contact may well cause a short circuit () and disable its electronics. The more bushings you manage to use, the more reliable the fixation will be (see the number of mounting holes on the case and on the board itself).

Tip 1: remember mounting sleeves for the motherboard must go complete with computer case ... If you buy a case, then only together with them. This is important because these fastener elements are different in height and differ in the width of the thread at the base. With others, you simply won't be able to install the board!
Tip 2: If you plan to change the motherboard (buy it from hands or in a store), then be sure to make sure whether it comes with a panel with holes for connectors? When assembling a computer with your own hands, the socket will need to be installed on the back wall of the system unit. Pay attention to the photo below:

Note that the location of the holes for the connectors is different for each batch of boards, and if you are not sold the panel corresponding to the motherboard right away, then it will be very difficult to get it separately later.
The panel is installed in a specially designated place for it. This needs to be done before placing the motherboard in the case.
Orient it correctly in relation to the main connectors and install using firm finger pressure. The plug should "sit" tightly and lock with a characteristic click.
Below you can watch a video that clearly demonstrates the whole process:
We continue assembling the computer with our own hands. After we have fixed the motherboard in the case, we need to install the central processor in the slot (connector) of the board. Let's look at the picture below and comment on some points.

The order of installation in the slot is as follows: press down and bend to the side of the pressure latch (indicated in the photo above under number 2). To do this: pull it out from under a special hook (pictured number 1), raise the metal frame (number 3), which fixes the processor in the socket. After that, we just have to install the CPU itself (indicated by the number 4).
Attention! Take a good look at the processor and determine on which side the "key" is located (a corner specially cut on one side or two small indentations on the sides). The socket has a similar corner or protrusions in the appropriate places. When installing the processor in the socket, they must be combined with each other.
When the installation is complete, we repeat all the steps in reverse order: put the fixing cover (No. 3) on the processor, lower (already with a certain effort) the clamping metal rod (No. 2), move it a little to the side at the bottom point and thread it under a special hook on the side # 1.
How to install an old PGA processor (believe me, you need to know) see the video below:
In the process of self-assembly of a computer, we need to be able to install a cooling system (a radiator with a fan). It should be noted that now we are installing a cooling system for a product from Intel, in the case of AMD it looks a little different.

In theory, it looks like this: at the four corners of the processor slot there are special holes in the motherboard, it is through them that the entire air cooling system is attached.
Accordingly, there are four special plastic clips on the heatsink, which, when pressed, press the heatsink against the processor and, along the way, fix the entire structure on the motherboard.
Here's a close-up view of the cooling system for our CPU we just installed:

And this is one of its latches on the board in close-up and we snap it.
Pay attention to the photo below:

See the slots (grooves) on each of the four plastic clips? The position when the grooves are located perpendicular to the radiator fins corresponds to the closed state of the latch-retainer (in the photo above, all the latches are closed). It is in this position that all of them should be before installing on the board! Remember this!
The arrows indicate the direction in which you need to turn (you can do this with a screwdriver) the latch in order to move it to the open position.
Advice: After placing the radiator clamps strictly above the holes around the landing slot (you need to make sure that the plastic tips of the fastener "fall through" a little in them), you need to simultaneously gently but firmly press the two clamps located diagonally from each other (until they click and securely fix them in the board ). Then we carry out the same procedure for the two remaining clamps. Everything! The cooling system is installed!
It is much easier to show the whole process once in a short video than to describe in words, so watch the video below:
If it becomes necessary to remove the cooling system, then simply move all four latches to the "open" position and pull the structure towards you (it can be removed quite easily).
Advice: some people find it more convenient to install a computer cooling system before that how the motherboard will be secured in the case. This makes it possible to clearly see what and where snaps into place, and to measure the force of the applied force for reliable fixation of the elements.
The design for mounting the cooling system on AMD processors is somewhat different from what we can observe in Intel products. It consists of two parts: a plastic base frame, which is securely fixed around the processor socket, and a heatsink with a fan, which are attached (snapped into place) on this frame. For example, this is how it looks for the AM3 processor socket:

As you can see, with this approach, the downward pressure force from the radiator is first transmitted directly to the plastic base (frame) and only then is evenly distributed over the PCB of the motherboard itself.
By the way, when removing cooling systems from motherboards controlled by Intel processors, it is quite often necessary to observe how the very base of the motherboard (textolite) has a visually noticeable curvature (from constant pressure on it from the cooling system radiator) attached directly to the motherboard itself ... This is bad and can potentially lead to micro-cracks in the very base of the motherboard.
Assembling a computer with your own hands, in particular, installing a processor and a motherboard is often associated with installing third-party cooling systems on the processor, which can weigh half a kilogram, or even more! In this regard, to prevent deflection of the motherboard in the place of attachment, in their comes with a special metal crosspiece, which is located on the back side of the board (under the processor).
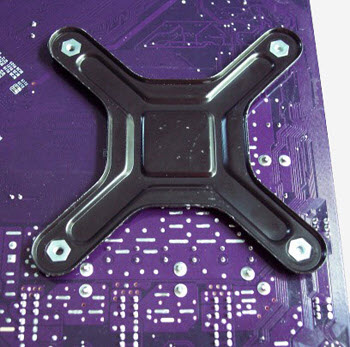
This additional mount is called the Backplate and serves, as we said, to remove unnecessary physical stress from the motherboard. The only caveat of this design is that it must be installed before fixing the board in the computer case.
Don't forget: right installed system cooling can be avoided in the future!
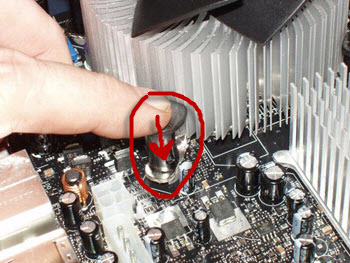
When assembling a computer on our own, we need to remember to do one more thing: there is a small (3 or 4) pin wiring from the cooling system fan, which supplies power from the motherboard to the fan so that it spins and dissipates heat. We need to find the corresponding connector on the board (usually 3-4 pins next to the processor socket) near which there is an inscription “CPU_FAN” and connect our power cord to it.
The most important components and the cooling system are installed. Now we need to install all the remaining devices. And since assembling a computer with your own hands is a rather responsible and painstaking business, then, for the general readability of the text, let's continue our description on the next page.
In conclusion (for better fixing the material), you can watch a video on how to install a processor and a cooling system on Intel products: