1. How to rename images in Lightroom?
The “F2” button calls up the image renaming dialog. If several photos are selected, they can be renamed in bulk.
2. Why don't the hotkeys work in Lightroom?
When the Russian layout is activated, the keyboard in Lightroom does not work. It is necessary to switch to the Latin alphabet.
3. How to view the changes that were made during image processing?
The function of simultaneous viewing of the image before and after processing makes the process more fun and makes the task a little easier. Before & After mode is called up faster by pressing the “Y” key (while in the Correction mode), or by clicking the second icon on the toolbar on the left, or along the path: View-Before / After.
By clicking on the arrow next to the button for enabling the Before & After mode, you can select the desired display mode from the list:
Before / After Left / Right - the original image will be displayed on the left side of the work area, and the processed image on the right;
Before / After Left / Right Split - the image will be split in half, with the left half of the original image in the left part of the workspace and the right half of the processed one in the right;
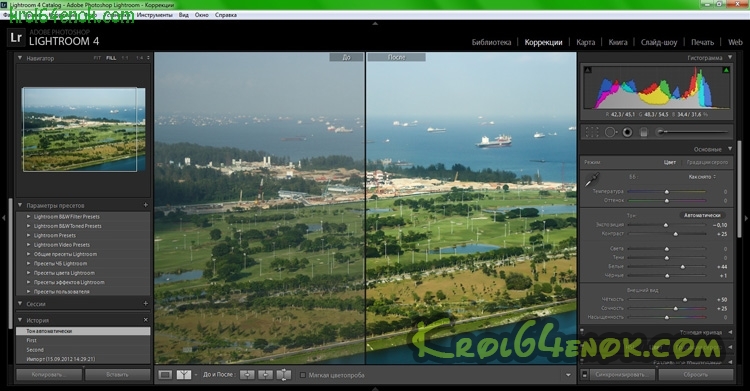
Before / After Top / Bottom (before / after Top / Bottom) - in the upper part of the work area the original image will be displayed, in the lower - processed;

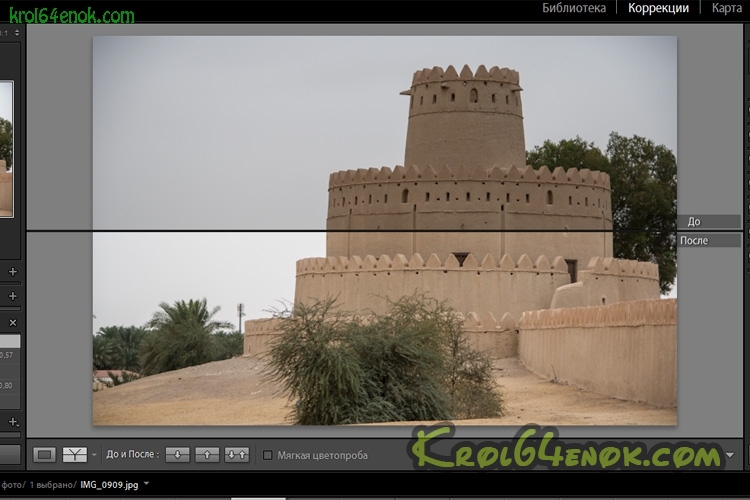
Before / After Top / Bottom Split (Before / After Top / Bottom, Split), the image will be divided in half, with the upper half of the original image in the upper part of the work area and the lower half of the processed one in the lower part.
In order to return to the normal view, press the D key or click on the Loupe View button (this is the leftmost button on the toolbar
4. Illustration of applying a gradient filter
The principle of the gradient filter I described here: Tips for working with Adobe Lightroom. After a little practice, applying the gradient filter became easier for me.
Original photo with a little preliminary processing:
![]()
Gradient filter application:

Final photo processing (applying the Tone function automatically):
5. Lightroom lessons
In addition to this workflow, you can also configure your Lightroom for optimal performance. However, in this article I will focus only on the technique of work, and not on optimizing the configuration of the program.
Note: tips and screenshots are for Lightroom 4.2, but most tips apply to older versions.
So let's move on to the tips:
1. Start with Spot Removal and the 2003 process.
The more you work with photography in Lightroom, the more some tools slow down. This is the principle of non-destructive editing. None of your actions change the original image data, therefore, the more actions you take with the image, the more work for a computer to update the image for viewing in real time when moving the slider or working with other tools.
I found that this phenomenon is most annoying when retouching with the Spot Removal tool. Using it at the end of the workflow can prettyly undermine the nervous system due to slowness. To solve this problem, I always use the Spot Removal tool first, before applying any other changes. This is much faster and is a kind of warm-up before more serious editing.
To further improve the performance of the Spot Removal tool, you can change the process version to 2003. This is especially useful if you have an outdated computer. The process version is an algorithm that Lightroom uses to decode an image from rAW format in the Develop module. The various process options also have differences in settings and adjustments, with significant improvements in later versions. The 2003 process is the base and oldest for Lightroom, and therefore the fastest. The 2012 process provides much more editing options, but requires significantly more computer resources.
You can select the process version on the Camera Calibration tab.
In my workflow, especially for portrait retouching, I start work in the 2003 process, do the retouching with the Spot Removal tool, and then go into the 2012 process for the final correction.
Note: since the versions of the process are very different, some controls are reset to zero when switching versions. Avoid making changes such as contrast, tone curve, noise reduction, sharpening, and so on during the 2003 process, as you may lose some changes when switching to the 2012 process. Do only the retouching with a toolSpotRemoval is in process 2003, and for other changes, switch to process 2012.
2. Learn and use Lightroom keyboard shortcuts
The Lightroom interface is quite complex and multi-level. Therefore, using a mouse or trackpad to get to some menu items slows down your work very much. Use keyboard shortcuts to quickly jump to the necessary tools and perform the necessary actions.
In order to quickly display the list of hot keys for the module you are in, you can go to Help\u003e Lightroom Module Shortcuts or use the keyboard shortcuts CTRL + / for Windows and CMD + / for Mac.

In addition to this, I also recommend learning the Lightroom keyboard shortcuts while you work. That is, when you can’t remember the combination or don’t know it, go to the menu, find the corresponding operation, pay attention to the key combination that is assigned to it, try to remember it and use it in future work.

The keys for various processing tools (for example, the Crop tool) are easy to remember using the tooltips that occur when you hover the mouse over the tool icon. Place the cursor on the tool, remember the key and apply in work.

it good ways Learn the Lightroom keyboard shortcuts you need to work. Study them in the order that suits you best. There are so many shortcuts in Lightroom, but most often I use the following:
Switching modules and viewing modes:
E - Single View Loop View
D - Transition to the Develop module
G - View in Grid View
Develop module hotkeys:
\\ - view switch before / after
Q - Spot Removal Tool
M - Graduated Filter Tool
K - Adjustment Brush Mode tool
V - switch between black and white and color display mode
W - White Balance Selector Tool
R - Crop Tool
SHIFT + CMD + C (SHIFT + CTRL + C on Windows) - copy processing settings
SHIFT + CMD + V (SHIFT + CTRL + V on Windows) - paste processing parameters
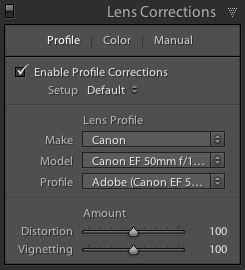
3. Apply Lens Correction at the end of processing.
Lightroom has a profile library for many lens manufacturers. It is used in the Lens Correction tool, which eliminates optical distortion and vignetting, especially for wide-angle lenses. Sometimes it improves the image, sometimes not.
If you decide to use Lens Correction for a specific photo, turn it on at the end of the workflow after you have done all the basic correction. Many adjustments and tools in Lightroom are slow, such as Adjustment Brush or Spot Removal if the Lens Correction tool is on.
4. Create presets for frequent operations.
In addition to using presets to quickly apply the desired visual effects, I also use them to reduce the number of mouse clicks needed to access certain controls for which there are no hotkeys. This is especially useful for quickly changing the version of a process as described in point 1 or switching lens profile correction in the Lens Correction tool.
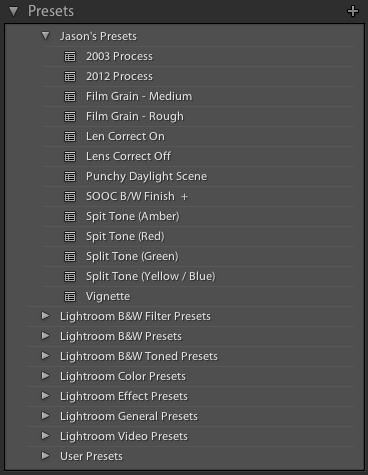
I mainly use presets to create something like custom buttons for quick control of some settings.
To create a preset for processing, do the following:
- Apply the necessary settings to the photo in the Develop module.
- Go to the Develop menu and select New Preset.
- In the window that opens, stop the checkboxes next to the settings that you want to write to the new preset.
5. Use smaller files when shooting.
Not in all shooting situations, you will need all 18, 22 or 36 megapixels of your matrix. Depending on the shooting tasks, 10 MP or even less is enough. Your computer will run much faster with smaller RAW files. Personally, this is difficult for me - when I shoot with a smaller file size, it constantly seems to me that something is missing. Of course, you should not always use this technique. What are you going to do with the photo? If your tasks do not need the full size (for example, publishing on the Internet), select a smaller RAW file size in the camera.
I hope this article was useful to you and you have found at least one piece of advice that will come in handy to speed up your work in Lightroom. Learning how to process photos improves your creative eye, which over time will allow you to shoot more efficiently. Thus, a well-organized workflow is essential for your development as a photographer.
One of the great features that Adobe Lightroom has is that the program allows you to view the original version of the edited image and the version after the changes. And Lightroom makes it so easy, because in fact the program does not immediately apply the settings made, but writes them to the change log. She applies them only at the time of exporting the image.
Hence the simple conclusion: if everything is so simple, why not use this opportunity in our ongoing work. Indeed, comparing photos in the Before and After options, it is so easy to control everything and move in the direction you need.
Here are some ways to use the Before / After comparison feature in Lightroom:
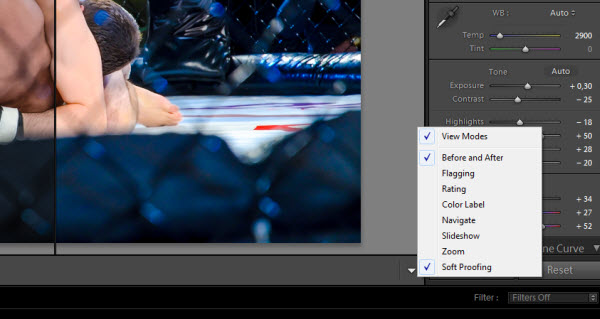
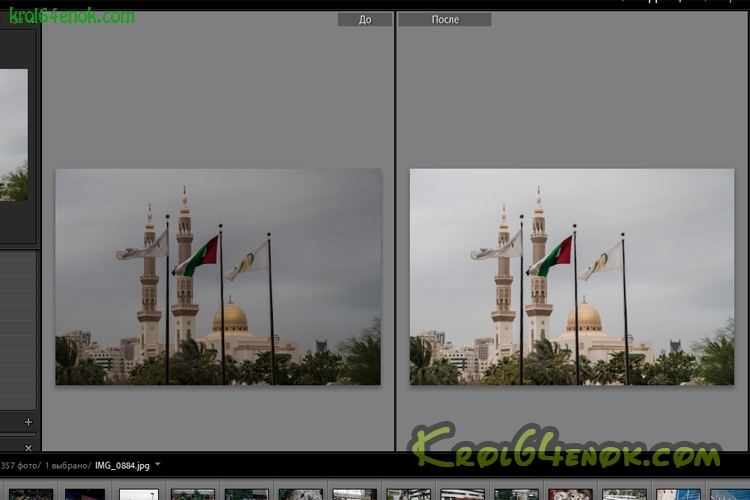
If you are in the “Develop” module, make sure that the “View Modes” function is activated (as shown in the figure). To do this, click on the small inverted triangle at the bottom right and select “View Modes”.

As soon as you turn on the “View Modes” function, at the same level, but two buttons will appear on the left: Loupe View and Befor and After View, the second has the form Y | Y. Turn it on to see the image Before and After processing.

A dropdown marker appeared next to the button. Each user can choose a convenient way for placing photos on the desktop. At the same time, “Before / After Right / Left” or vice versa, it is convenient to use when working with photographs taken in portrait format.
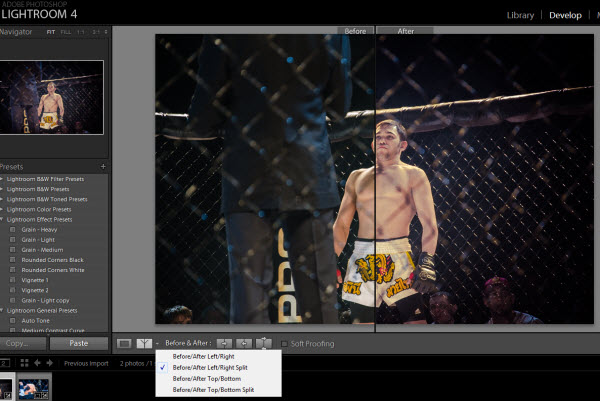
If you select the “Before / After Left / Right Split” mode, the Lightroom program will visually divide one photo into two equal parts, where on one side half of the photo will be in the “BEFORE” option, and the second half will be in the “AFTER” option.

The “Before / After Top / Bottom” mode shows the images in the original version on top and in the modified version - below. It’s convenient to work when your photo is created in landscape format.
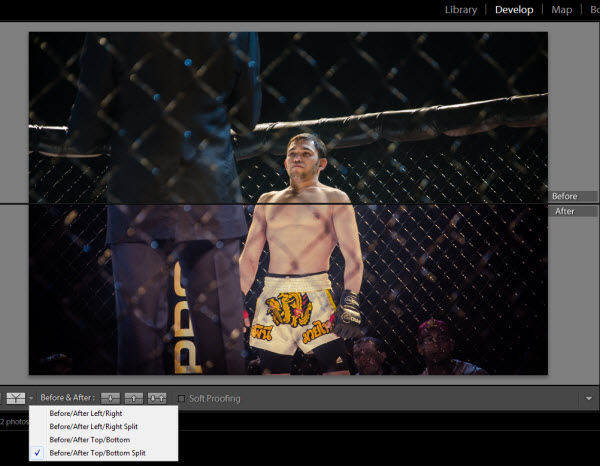
And again, the Before / After Top / Bottom Split mode divides one image into two equal parts, where the upper part is displayed in the original version, and the lower in the changed one.

In general, hot keys are not needed here, but if you like to use them and like to work with the image in the maximum possible size, then the backslash (\\) will help you quickly switch between the image in the options BEFORE and AFTER.
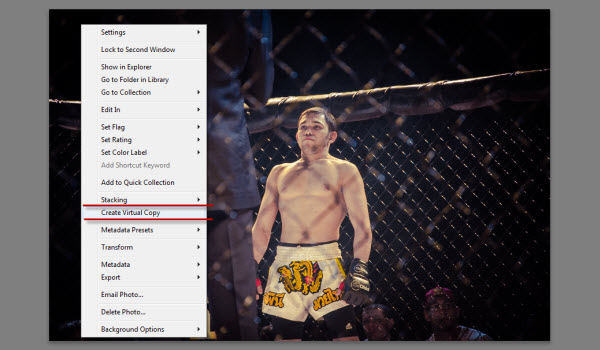
It happens that we need to compare the image before applying the sharpness settings and after. But all of the above does not allow this, because the sharpness settings apply to both options. In this case, you need to create a virtual copy of the photo BEFORE applying the settings, and then compare them.
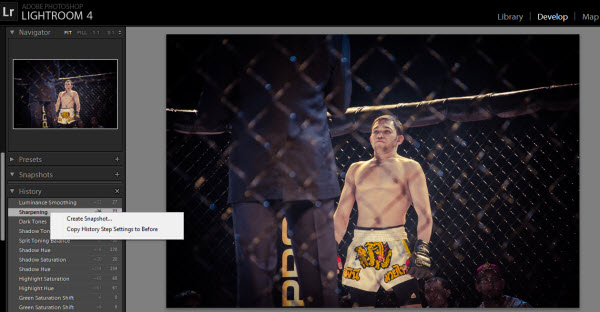
The second method works well when you have already made changes and want to compare the options BEFORE and AFTER. Go to the "History" panel on the left side of the screen, find a record of changes made to the sharpness (or other changes, if necessary) and, switching between history records, compare the image before making corrections and after.

In addition to all the above, you can switch between the display modes of the edited image using the commands from the main menu: View - Befor / After.
On this I bow. I wish you successful shots and comfortable processing.
In Lightroom, every edit made to the photo is tracked, and all edits are displayed in the current list in the order they are entered in the History panel in the Develop module. Therefore, if you need to cancel any previous editing step in order to return to the photo view before this stage in the process of editing it, you can do it very simply. Unfortunately, you cannot exclude one step from the editing process and leave the rest, but you can always go back, discard any errors made and start new changes from the selected editing step. Below it will be shown how this is done.
Before moving on to the History panel, it’s worth mentioning that the cancellation last action in Lightroom, by pressing the key combination “Cmd + Z” (on Macintosh) or “Ctrl + Z” (on Windows), whenever you press this key combination, the next step in editing the photo is canceled, so by continuing to press it, you you can eventually return to the very first edit you made to the photo in Lightroom. This means that the History panel may not be used, although this method of canceling edits is not very convenient. If you want to see a list of all your edits for a particular photo, click on it, and then go to the History panel in the left pane of the side panels, as shown. At the top of the list are the most recent changes. Note: for each photo, a separate list of the history of its edits is supported.

If you place the cursor on one of the statuses of the history of edits, then on the top panel of the Navigator a small preview view of the photo at the moment of the history of editing it will appear. The figure shows that the cursor is set at one of the previous stages of editing the photo, when I converted it to black and white, and then, changing my mind, returned to the color version.

If you really need to return to the view of the photo at a specific stage of editing it, then, instead of moving the cursor to this state, click on it and the photo will return to this state. By the way, if you use the above key combination instead of the History panel to cancel your actions while editing a photo, the action to be canceled is displayed in capital letters at the bottom of the photo, as shown in the image on the left. This is very convenient, since you can see what exactly you are undoing without leaving the History panel open all the time.

If during the editing process you reach the moment when the photo will look the way you need, and by that point you will need to quickly return in the future, then go to the Snapshots panel, located directly above the History panel, and click on the small button with the " + "in the upper right corner of this panel, as shown in the figure on the left. The moment of editing you have chosen is saved in the Snapshots panel and appears on it with a highlighted field of its name, which you can assign to it so that you can understand what kind of moment it is. The image on the left shows the moment the photo was edited, saved as a snapshot called Grayscale with Exposure Increased, which is highlighted in the Snapshots panel. From this name it is clear that if you click on this snapshot, you will return to the black and white version of the photo with the adjusted exposure. By the way, you don’t have to click on the previous step of editing the photo to save it as a snapshot. Instead, press the Ctrl key and click (on Macintosh), or right-click (on Windows) the edit stage you want in the History panel and select the Create Snapshot command from the pop-up context menu. It is very comfortable.
Adobe Photoshop Lightroom allows you to save time processing photos thanks to the possibility of using presets and batch functions. But how to save time if you do not use them, but prefer to process each photo individually?
There is a way out - this keyboard shortcuts. Each operation in Adobe Photoshop Lightroom can be performed in several ways - from the menu bar, from the context menu, from the control panel, and using hotkeys. Therefore, you can only remember the keyboard shortcuts that you most often need.
You can see them in the menu bar - next to each operation are indicated and hot keys that perform it. Or by pressing a combination Ctrl + /, which will show you a list of keyboard shortcuts for the module in which you are currently located. By using keyboard shortcuts in Lightroom you will achieve maximum productivity. In addition, it is often much more convenient, for example, when working with the Correcting Brush.
Library module hotkeys
|
Command |
||
|
Return to previous view |
||
|
Enter Loop mode or view 1: 1 |
||
|
Enter Grid Mode |
||
|
Enter Magnifier Mode |
||
|
Enter comparison mode |
||
|
Review mode |
||
|
Enter Quick Slideshow |
||
|
Full Screen Mode |
||
|
Go to next screen mode |
||
|
Return to normal mode screen |
Command + Alt + F |
|
|
Change backlight mode |
||
|
View Options |
||
|
Change Grid Mode |
||
|
Show / hide filter list |
Hotkey Ratings
|
Command |
||
|
Set color tags |
||
Hotkey Labeling
Quick Collection Keyboard Shortcuts
Hot keys for working with photos
|
Command |
||
|
Import photo |
Ctrl + Shift + I |
Command + Shift + I |
|
Export photo |
Ctrl + Shift + E |
Command + Shift + E |
|
Turn left |
Ctrl + [ |
Command + [ |
|
Turn right |
Ctrl +] |
Command +] |
|
Editing in Photoshop |
Ctrl + E |
Command + E |
|
Ctrl + S |
Command + S |
|
|
Zoom out |
Ctrl + - |
Command + - |
|
Zoom in |
Ctrl + \u003d |
Command + \u003d |
|
Scale 100% |
||
|
Put photo on stack |
Ctrl + G |
Command + G |
|
Remove photo from stack |
Ctrl + Shift + G |
Command + Shift + G |
|
Show in Explorer |
Ctrl + R |
Command + R |
|
Rename file |
||
|
Copy correction settings |
Ctrl + Shift + C |
Command + Shift + C |
|
Paste correction settings |
Ctrl + Shift + V |
Command + Shift + V |
|
Previously selected photo |
Ctrl + ← |
Command + ← |
|
Next selected photo |
Ctrl + → |
Command + → |
|
On off. Library Filters |
Ctrl + L |
Command + L |
|
Send selected photos |
Ctrl + Shift + M |
Command + Shift + M |
Panel shortcuts
|
Command |
||
|
Show / hide sidebars |
Tab |
Tab |
|
Show / hide all panels |
Shift + tab |
Shift + tab |
|
Show / hide toolbar |
||
|
Activate Search Box |
Ctrl + F |
Command + F |
|
Include field keywords |
Ctrl + K |
Command + K |
|
Return to previous module |
Ctrl + Alt + |
Command + Option + |
Hotkeys for the Correction module
|
Command |
||
|
Tone automatically |
Ctrl + U |
Command + U |
|
Convert to Grayscale |
||
|
White balance automatically |
Ctrl + Shift + U |
Command + Shift + U |
|
Editing in Photoshop |
Ctrl + E |
Command + E |
|
New shot |
Ctrl + N |
Command + N |
|
Create virtual copy |
Ctrl + " |
Command + " |
|
Turn left |
Ctrl + [ |
Command + [ |
|
Turn right |
Ctrl +] |
Command +] |
|
Shift + 1-5 |
Shift + 1-5 |
|
|
Set color tags |
6-9 |
6-9 |
|
Set colored tags or go to the next photo |
Shift + 6-9 |
Shift + 6-9 |
|
Copy correction settings (a dialog box appears with a choice of copy settings) |
Ctrl + Shift + C |
Command + Shift + C |
|
Paste correction settings |
Ctrl + Shift + V |
Command + Shift + V |
Hotkeys for output
Navigation Hotkeys
Editing mode hotkeys
|
Command |
||
|
Enable crop mode |
||
|
Enable stain removal mode |
||
|
Enable Gradient Filter |
||
|
Enable radial filter |
Shift + M |
Shift + M |
|
Enable brush correction |
||
|
Enable Magnifier |
||
|
Show: Before / After - Left / Right |
||
|
Show Before / After - Up / Down |
Alt + Y |
Option + Y |


