Distinctive features of Samsung technology have always been quality and reliability, which is no exception for laptops from this manufacturer. For the one who purchased samsung laptop, "how to disassemble it if necessary" is the first question. With all the variety of price categories and configurations of Samsung laptop models, they can be divided into several main categories.

Face recognition is the fastest of them, but it is less secure and hated in low light. Iris is recognized slower, much safer, and also does not like the dark. In truth, we ended up using an uncomfortable combination of a fingerprint sensor and a pattern lock on the display.

Finally, there is a slight problem of strength. Imagine how a beautifully crafted phone with two huge pieces of glass and a thin metal frame will cope with even the slightest drop. Replacing this screen cannot be simple or cheap. This is a shameless marketing term, but one that annoyingly holds some kind of value, because, as you can see, it actually occupies almost the entire front of the phone. It also helps that it is absolutely amazing.
Main categories
- Ultrabooks - ultra-thin, expensive indicators of prestige, convenient for a mobile lifestyle.
- Tablet PCs - A hybrid touchscreen tablet that turns into a laptop using a keyboard or dock. Not the most powerful, but extremely comfortable.
- Productive - standard size laptops with a powerful processor and a productive graphics card.
Remember that at the moment, the Internet can help, which Samsung will tell you. How to disassemble it in stages, we will consider later.

Personally, we are not convinced. Most of us watch this content either on the train or while traveling, and at this moment we are just happy to have something to let us do. Assuming that he is going to transform a screen that does not exceed your wallet, he hopes at best.

One trick we love is the built-in home button. This is a small implementation. ![]()
It is also one of the most customizable. operating systemsthat we have seen for a long time. The actual screen resolution, font size, icon design, colors and layout can be fully customized to create the interface you need.
Samsung R540 Notebook: Description
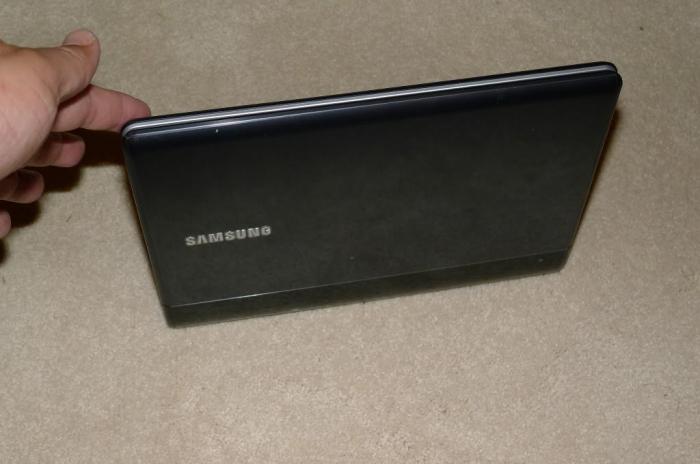
Bright representative of a productive laptop. The first thing this model attracts attention is an extraordinary color scheme. Among the overwhelming mass of black and white plastic, a warm, unusually structured tree not only attracts the eye, but also is an excellent protection against scratches. Yes, Samsung R540 will not delight a professional gamer, but if you need a great “workhorse”, powerful, equipped with all the necessary connectors and wireless interfaces - the choice is clear. This laptop will pull and heavy games, it is only necessary to slightly change the settings.

Another impressive feature worth mentioning is the selective focus mode. Using nothing but software settingsThe phone was able to isolate the objects that we selected with alarming accuracy. So, here is the first part of the bad news, it is not ready yet.

This is a smart camera that can recognize objects in front of it and then offer content. Finally, it can recognize the sights, allowing you to take a picture of where you are, and then see recommendations for food and drink nearby. 
Finally, we move on to everyday use.
The specifications speak for themselves - powerful Intel Core i5 processor, 4096 MB random access memory, roomy 320 GB hard drive, decent video card - ATI Mobility Radeon HD 5145. A wide range of peripherals: camera, card reader, network connections - Bluetooth, wired EtherNet LAN and WIFI. Widescreen 16: 9 LED HD screen with a diagonal of 15.6 inches.
This indicates the quality of the product, then it can still be so good, even when some of its functions feel in a hurry or just not finished yet. It is amazing to look at a powerful and brilliant camera phone. Just remember, you really need to buy a case. Its battery life will be annoying. It is also incredibly expensive to buy, and we suspect that repair is so expensive.
Even some of you have experienced first hand problems with your phone’s battery exploding, discharged while charging, and so on. Strengths and weaknesses are internal factors for the company, and opportunities and threats are external factors. Well, the battery explodes, drain the battery while charging. Who needs a phone that explodes in a pocket and hurts them?
How to make the correct analysis of the Samsung laptop?
Have you already purchased a Samsung laptop? How to disassemble it and in what cases it is necessary, now we will understand. Often there is a situation when a laptop that has worked perfectly for several years suddenly starts to “glitch”, “slow down”, and a warning about overheating of the processor appears on the screen. Is the service center far, or is there no way to part with the “workhorse” for a long time? Do not panic.
Even airlines have forbidden to levy money on them on their flights. Threats: incidents of exploding batteries, a jeep catching fire from galaxy 7 left inside to charge, gave the phone a bad light. Now the game: Watch this: Explanation of Note 7 “Battery Disadvantages”.
You connect your smartphone to the charger for the bed and carefully place it on the bedside table. You wake up to find a bedside table on fire, smoke soaring everywhere. Simple: your phone is one of more than a hundred that spontaneously flashed. This is said to be 1 million of the 5 million that were produced. Why can a battery do so much damage?
You need to know how to disassemble a Samsung laptop. If the laptop case is hot when working with light programs and the processor is not “overclocked” for heavy applications, such as your favorite toy, then it is likely that the time has come for preventative cleaning. This raises questions about what preventative cleaning is and how to disassemble and clean a Samsung laptop.
The science of fires on the phone is actually quite simple and pretty well understood. Like telephones, lithium-ion batteries use for their power, and the only way that the fluid floating inside most lithium-ion batteries is flammable.
If the battery is short-circuited - say, by piercing an incredibly thin sheet of plastic that separates the positive and negative sides of the battery - the puncture point becomes the road of least resistance to electricity. He heats the liquid electrolyte in this place. And if the liquid heats up fast enough, the battery may explode.
Prevention is a necessary measure
Prevention is a complex event, and, in addition to removing dust and dirt from the cooling system, that is, the fan and radiator, it is necessary to replace the thermal grease. This is necessary, since it dries up and ceases to conduct heat from the processor to the cooling system, which leads to overheating even in the absence of dust. At the same time, it would be nice to remove dust from the motherboard and remove all debris from the keyboard. Why clean the "motherboard"? The dust accumulated on it at high humidity begins to act as a current conductor, which can lead to a short circuit and malfunction of the motherboard.
Above: what happens when you pierce the phone’s battery. Galactic Note 7, of course, is not the first phone to light up, or even the first giant recalls. Exploding phones even allegedly killed people. For many years, we have known that lithium-ion batteries pose a risk, but electronics continues to use a combustible formula because the batteries are so small and lighter than the less destructive chemicals. Lithium-ion batteries pack a punch, better or worse.
Just because a simple phone can turn into a destructive hell does not mean that it will be, even if this is a new note about the galaxy. Or, in plain English: the thin plastic layer that separates the positive and negative sides of the battery, punctured, became the shortest route for electricity to break through the battery and became a huge risk for fire.

What should the owners of a Samsung laptop ask the second question? How to disassemble it? Korean manufacturers provided each model with unique characteristics as well as individual snap fasteners. Dismantling the Samsung laptop of each model is strictly individual, and the use of instructions for another type of Samsung will lead to fatal damage to the plastic latches.
What pressure puts pressure on him? Imagine if you had a roll of toilet paper and it wasn’t packed tightly, says Sadoway. With the same roll of size, you run out faster. Or maybe it's the sponge separator itself, which is being compressed. Usually, says Sadoway, a separator allows liquid electrolyte to pass through the pores connecting the negative and positive sides of the battery, even when it holds the two terminals separately. If they press hard, they compress the pores, the resistance increases, and you release more heat, ”says the professor.
Operating principle
Let's understand how to disassemble a Samsung R540 laptop. Despite the rather complicated mounting system of this model, cleaning must be carried out at least once a year. The layout of the Samsung is more complicated than, for example, the Toshiba units, and the question of users about how to disassemble a Samsung laptop is very popular.
Why didn't the phones light up right away?
Today batteries cell phone they usually charge faster when they first connect to the wall, and not at the end when they “pump” the last few percent to achieve maximum power. How could this help if everything gets hot the moment the phone is connected to the wall? Sadowy has a theory - albeit without proof. What if only part of the battery was flattened improperly so that the phone couldn’t tell when it was 100 percent charged and continued to charge the camera?
- Attention! Disassembly of the R540, like any laptop, should begin with a power outage. Remove the power supply plug from the laptop case and remove the battery.
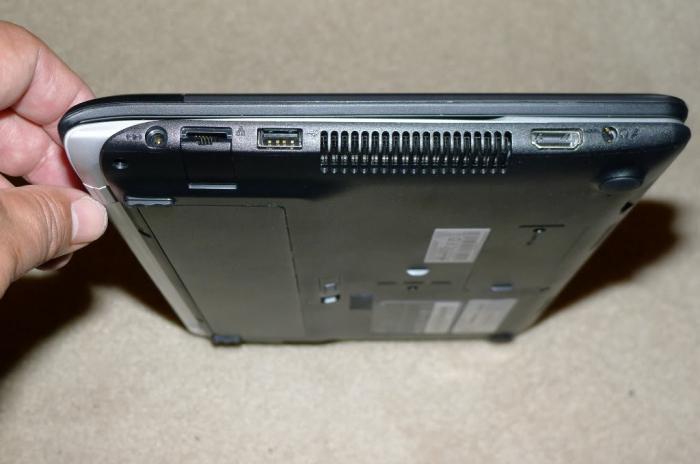
- DVD Rum Removal, hard drive and WIFI. To do this, turning the laptop case over, unscrew the screw holding the DVD drive and marked ODD. DVD-ROM take out and disconnect the cable. The Winchester is located under a blank cover without slots, also located on the bottom of the laptop. To remove it, unscrew the two screws. After removing the cover, the screw that directly holds the hard drive is unscrewed, after which hDD can be removed from the connector. To remove the WI-FI unit, located under the cover with ventilation slots, located also on the bottom, two screws are unscrewed. Under the removed cover is a square hole, one corner of which is provided with a slot extending beyond the hole. Pull the two black wires in the slot and remove them from the connectors. The small board visible in the slot is removed from the connectors by unscrewing the screw.
- Removal is held by screws marked ODD and KBD. Therefore, the remaining KBD screw is loosened. Five latches that hold the keyboard and are located between the Esc, F2, F8, Pause Break, Delete buttons and the laptop case, we snap off using any plastic card. In order to avoid creases on plastic, it is better not to use a metal tool. The keyboard rises above the case and disconnects from the connector on the motherboard. To do this, the black part of the connector - the lock - is lifted perpendicular to the "motherboard" and pulled up until disconnected.
- Removing the back cover. Before you unscrew the remaining 19 screws on the bottom cover of the laptop, you need to disconnect two cables, the connectors of which are located in the recesses under the keyboard above the touchpad and in the lower left corner.
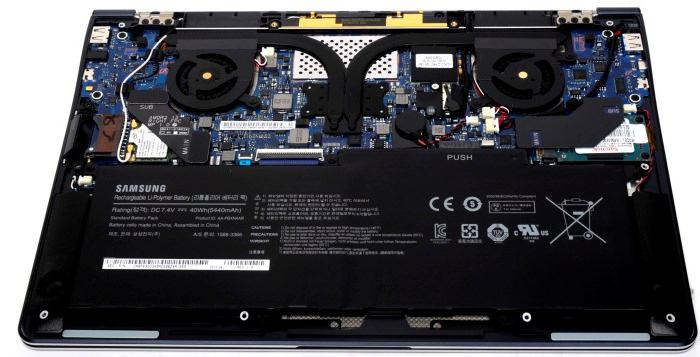
- Removing the heat sink system. After opening the back cover, the cooling system hardware becomes available. The power cable is disconnected, after which the fan unit with the heat sink tubes is unscrewed.
- Prevention Dust, dirt and old thermal grease are removed. New thermal grease is applied in a thin layer using special spatulas or conventional plastic cards.
This appears to correspond to “voltage fluctuations.” “My assumption is that we are giving up a 60 percent charge, they will be well below the threshold where this happens,” says Sadoway. Imagine that we are trying to fill our gas tank, we don’t have a really good regulator, and we don’t want to spill gas on all our shoes. We want us to stop the flow long before this thing goes into overflow conditions.
Just one riddle: why replaceable batteries can also explode. Some basic tips will not hurt repetition :. - Read this manual before starting. - If possible, read one or two others for the same brand. If possible, watch a few videos. Find a room with little dust and no drafts. - After each step, read the next step in advance to avoid the risk of going too fast or going too fast.
Negative emotions
It's not at all difficult to understand how to disassemble a Samsung R540 laptop. Of course, representatives of service centers will react extremely negatively to self-analysis of a laptop, which is under warranty service. However, if expired or an emergency has occurred, which made the owner of the device think about how to disassemble a Samsung laptop to restore its working capacity, then observing the disassembly sequence and patience will give a brilliant result.
To prepare for your repairs, you must keep your tools, your phone, and a spare part handy. Backup data, your contacts and photos, etc. You will also need a hard putty knife. Both tools are available in the store, separately or in kit.
You will also need to use some kind of heat source, and once again we suggest you buy a heat gun, which you can use again and again; and if you cannot afford it, a hair dryer or an electric gun, but make sure that you are not using gas.
Denial of responsibility: Samsung warns that only a certified specialist should open the device. Otherwise, you lose the right to receive a free warranty service. In addition, I note that these manipulations are the fastest way to break your phone forever. You understand and agree that the administration of the site SAMSUNG club.org does not bear any responsibility for your actions.
This led to the dismantling of screens made in front; make repairs much harder. To summarize, repairing an entry-level smartphone is one of the less easy repairs, especially if you change something other than glass, since in this case the main risk that glass breaks is much less. Back to the topic.
If you must hold the glass, protect it with a flexible protective film and do not grip the film for cooking. If the glass is broken into pieces, this is another reason with the same result; protecting it with a film will protect you from cuts and from getting broken glass fragments all over the world. The conclusion is always the same; glass can always be tempered by several centimes, and it is difficult to understand why at the moment only the upper part of the range has tempered glass.
Well and still: be prudent. Do not use force, this is never required. If you see that your actions will lead to physical destruction of the material (crack, tear, split, etc.), then you are still doing something wrong.
Turn off the smartphone, remove the back cover, remove the battery, SIM card and MicroSD. The back of the case is mounted on 4 screws. Unscrew them.
As soon as the first section is raised, do not try to pull it out, but use a spatula as a lever to release the entire cover. This plastic is quite soft and brittle, and if you pull it, you can mark it or even break it. When the phone is connected at the front, the screen is located at the back. Now we do the opposite, having previously disconnected the screen with our spatula.
You can see that there is a second cover that is designed to remove the ear handle, if necessary; however, it is necessary to disassemble in advance motherboard, and there’s no need to get to it to make out the rest, so we won’t touch it. The first stage is unconventional, and it will help you with the second.
Now go with a thin plastic object ( bank card, ruler, etc.) around the perimeter of the case. If you use a metal object, barbs will remain on the case. Start from the bottom and go up.
After that, the back of the case can be disconnected.

On the right you will see a large display connector. Take it off. Before continuing, wring out the two latches on the sides. Do not use excessive force.


