There are different opinions on this. For one or another option, there are undoubted pros and cons. There are also storage options in external databases and some others.
It all depends on whether you have a 1C programmer on staff and how much money you are willing to invest in optimizing the performance of your information base.
However, if you think about it, the user must choose where and how the required files should be stored. For example, images for goods are in the infobase, as this provides the most fast access and opening images. And various documents sent by e-mail are on the disk, since the speed of access to them is not so critical, but sometimes they are not small in size. However, you can decide on the need for one or another option yourself. It depends on various conditions and the best option is selected individually.
How to store and in what order is up to you. And we help to realize additional opportunities in this matter.
This development allows you almost unlimited options for managing attached files.
Some time ago, one of the clients asked about the following problems with the UT 11 base: brakes began to be felt during operation, the disk space “disappeared” quickly, the base increased significantly over a rather short period of time.
A small survey of the database showed that the main problem is the large amount of attached files. The client used a typical subsystem for working with e-mail, conducting intensive document management in it, with many prices, contracts and other supporting files. It was decided to add distributed file storage capabilities. The circle of files necessary for storage in the infobase and “secondary” is defined - the storage of which in the database is not critical. Typical solutions do not allow such a distribution.
The result was tangible:
- base size decreased from 350 GB to 75 GB;
- work in the database has become more comfortable;
- place on the system fast drive ceased to practically decline;
- daily backups decreased in size and began to be created faster.
In addition to the purely “visual” effect, there was also an economic effect: the partition made it possible to more rationally use the “fast” system server disk, increasing its operability and the period of use without buying a more capacious one (which was originally proposed), and all “secondary data” should be stored on “regular” and much cheaper drive.
The presented development has a second edition and allows you to manage the attached files according to the saved settings in auto modeusing a scheduled task.
To use processing Not required change the configuration.
Processing will work in any 1C 8.3 configuration built on the basis of BSP 2 and having the built-in subsystem "Attached Files".
To test the health on your base, it is recommended to first use the demo version.
Processing Capabilities:
- Generating a report on the current position of the attached files
- Create virtually any number of selection settings
- Detail settings up to one specific file
- Ability to perform any selection in "manual mode"
- Ability to perform automatic distribution to selected settings
- "Rollback" of the changes made at any time (back to the database or to disk)
Using.
Important! Processing is intended for use from the directory "Additional reports and processing."
1. The settings table is located on the main processing form.
"User" - the user of the information base under which the settings will be saved.
Each setting has the ability to turn on and off right in the table, with one click on the corresponding cell.
The "Report" button from the main form displays a report on the current status, the position of the attached files in the context of the owner's directory. With file size.
The button “Perform processing” moves files according to the settings of the table, with the checkbox “Use” turned on. Processing of settings is performed in sequence according to the table, settings can be moved.
2. On the add button, the setup form opens, according to which the processing of files will subsequently be performed.
2.1 Example settings for the user:
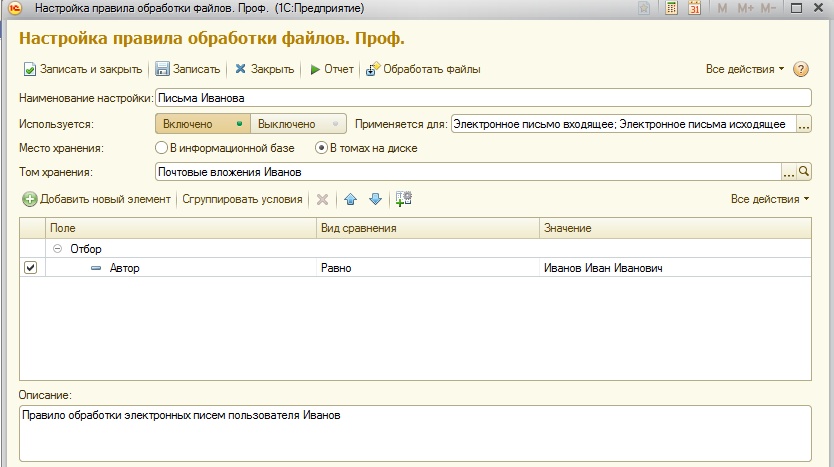
This setting processes all attachments email for the user "Ivanov".
2.2 Example settings by type and size of files:

With this setting, the processing of investments for customer complaints is performed.
Files are moved to the directory on the disk specified in the props "Storage volume".
3. Settings are made in the ACS system implemented through the 1C Enterprise platform.
When setting up, you can restrict the list of objects (directories) for which this setting is performed:


If the list is not marked, then the configuration is performed for all objects of the infobase containing the attached files.
Important! To move the volume files, this house must be previously created or in the configuration process created in the infobase!
4. Report generation from the settings and file processing is performed ONLY in relation to this setting.
The report will show the selection of files according to the configured selection, and processing will perform their movement according to the settings.
5. For processing, the creation of a scheduled task is available:

The scheduled task will automatically perform the move according to the settings made and turned on at a time that is convenient for you.
Published processing versions:
Demo. This version is free and has the following restrictions:
- Closed code
- Lack of technical support and version updates
- No file transfer functionality
It is possible to generate reports and save settings.
Basic. This version comes with a minimum cost and has the following restrictions:
- Closed code
- Lack of technical support (only updating versions within 30 days after purchase)
Otherwise, there are no restrictions; according to the functionality, it corresponds to the "older" versions.
Versions Standardand Professionalhave open source, the same functionality and differ only in extended support for the version Professional.
The purchase of additional technical support is possible only for those who have already acquired the development.
Buying additional technical support allows you to increase current version. For example, the acquisition of technical support for those who bought Basicversion, allows you to translate to version Standard.
Extended Tech Support - assistance in installation and configuration upon request, implementation of additional requirements (customization) to the customer’s base according to the requirements in the amount of not more than 12 working hours during the year after purchase.
Infostart LLC guarantees you a 100% refund if the program does not match the declared functionality from the description. Money can be returned in full if you declare this within 14 days from the date of receipt of money in our account.
The program is so tested in operation that we can give such a guarantee with full confidence. We want all our customers to be satisfied with the purchase.
Instruction manual
If you need to attach a file to a letter composed using a program installed on your computer (for example, Outlook Express or The Bat), then everything is very simple. After writing the text of the message, drag the file onto the text of the letter - this is enough to attach it to the message. You will see the icon of the attached file - you can send an email with an attachment.
If you use a resident email client, you can attach the attachment in another way - by writing a message, click the corresponding button in the top row. When you hover over it, the prompt “attach file” pops up. A dialog box will open in which you need to select the file prepared for sending and click the "Open" button. The attached attachment icon, as in the first version, will appear in the body of the message - the message with the attachment is ready to be sent.
And if you want to attach a file to a letter sent using any of the online mail services (for example, Mail.ru or Gmail.com), then you need to do this a little differently. After the text of the message is ready, you need to find the link to attach attachments to the letter. For example, in Gmail, such a link is located below the field for entering the subject of the message, equipped with a paper clip and the caption “Attach file”. If you click it, an additional field with the Browse button will appear - click on the button or the field itself and a window will open to select a file. Locate the file on your computer that you want to attach, and click the "Open" button. If you have more than one file that should be sent with this letter, use the link to attach the next file. For example, in Gmail, it appears below the file you just attached and is labeled “Attach another file.” Actions to attach the second attachment (and if necessary - and the third, etc.) do not differ from the attachment of the first. After the process of uploading files to the mail service server is completed, you just have to send a message.
Most of the most famous films are translated and equipped only with a Russian soundtrack. However, if there was a desire to watch a movie with original audio to learn a language or improve it, then you can connect additional tracks to the video file using the appropriate software.
You will need
- - VLC Media Player
Instruction manual
First you need to find the right sound track. There are many foreign resources that have an appropriate database of various translations in the form of audio files in mp3, aac or ac3 format.
You can not attach this track to the video file, and just through two players run a separate movie and a separate sound. In the video window, just turn on the silent mode, but it is unlikely that you can achieve fully synchronous sound.
Some players have the appropriate functionality and allow you to add track directly into the movie, synchronizing the duration of audio and video. To do this, you can use the VLC Media player, which must be downloaded from the official website of the developer.
Install the program and use it to open the movie you want to translate. Right-click on the video file and select “File” - “Open with ...” - “VLC”, or simply click on the created player shortcut on the desktop. Go to “Audio” - “Audio Track”. This menu displays the translations attached to the video file.
Choose “Media” - “Open file with parameters” or press the key combination Ctrl, Shift and O. In the window that opens, click the Add button, specify the path to the movie file and click Open.
Highlight “Show advanced options” and then “Play media file in parallel”. Click "Browse" and in the pop-up window, click the "Add" button again. If you need to add a subtitle file, check the box next to “Use subtitle file”. Then click on the "Browse" button and specify the path to the downloaded file with subtitles.srt. In the same way, specify the path to the audio track and press the "Play" key.
Audio track attached. Go to the tab “Audio” - “Audio tracks”, where select the second appeared item “Track 2”.
Sources:
- Official site of VLC
- like me audio tracks in a movie
A database is a collection of data that is organized in accordance with certain rules and located in the computer's memory. It characterizes the current state of a specific subject area.

You will need
- - a computer;
- - server;
- - Sql database.
Instruction manual
Go to SQL Server Management Studio to connect base data, then go into the object browser and connect to the instance of MicrosoftSQL Server Database Engine, expand it. Call the context menu on the “Databases” node. Click on the “Join” command.
Last time, we added the ability to our configuration reserve copy data. In today's example, let's try to figure out how to use the BSP to easily organize file attachments to configuration objects. You must admit that such a task very often arises in practice. Often the customer needs to save the image of the goods in the database. Another common task will be the preservation of scanned contracts or documents related to a particular counterparty. There can be quite a few tasks. And now we will see how to solve them.
To begin, create a directory to which we will attach an image or more. Let it be the Jura_Kontragenti reference book from the BSP demo database, copy the _DemoNomenclatureAddedFiles directory and rename it Jura_Kontragenti AttachedFiles, then create the Jura_Kontragenti directory - we will attach the “ScannedContent” attribute to which we assign the type
Now you need to edit the general command Attached Files to the object and specify our reference book Jura_Kontragenty in the type of the object’s parameters.
After these steps, our directory element should look something like this
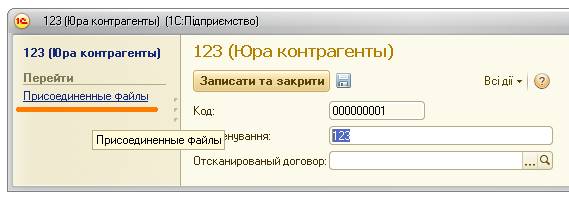
(pay attention to the “Go” item, for more details about general commands, see my article on the managed interface).
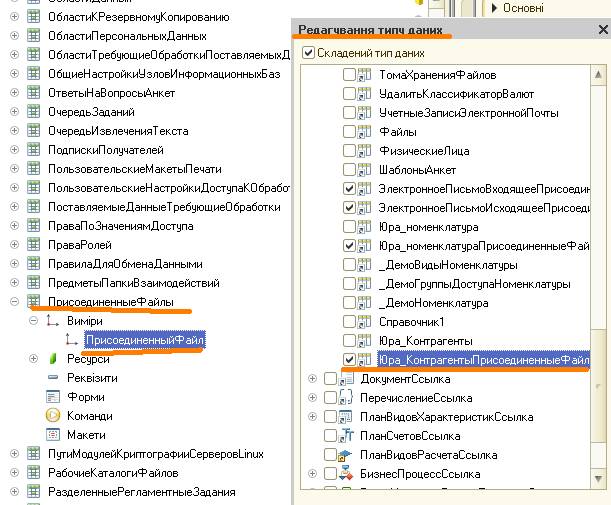
But if we try to attach a file, then an error will pop up so that it does not occur we need to specify our new directory Jura_KontragentaApplied Files in the "AttachedFile" dimension type in the data register.
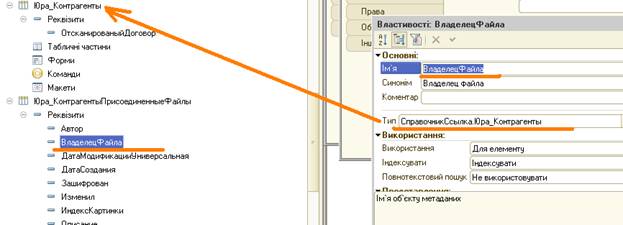
By the way, I almost forgot, the type of props “OwnerFile” of the directory “Jura_KontragentiPrivedlennyeFayli” should be “Directory.Yura_Kontragenti” as in the screenshot.
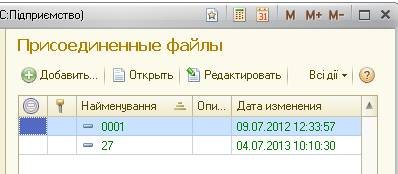
After all these manipulations, we can attach any files in any quantities to our directory.
But let's also use the code with which you can select and display one of the attached files on the screen. For this, we will use the “Scanned Contract” attribute. We will create the form of the directory element, add to it the requisite “Picture Address” and drag it onto the form, specifying the “picture field” as the view

To display the picture, we need one function to Get the Navigation LinkPictures, as well as the code of the procedures when creating on the server and reading on the server.
The full listing looks like this:
& On ServerWithout Context, Function GetNavigationLinkPictures (FilePictures, Form ID) Return Attached Files. Get FileData (FilePicture, Form ID). Link to BinaryDataFile; End of Function & On Server Procedure When Creating On Server (Failure, Standard Processing) If Not Value Filled (Object. Link) Then If Not Object. Scanned Contract. Empty () ThenPicture Address \u003d Get the NavigationPicture Link (Object. Scanned Agreement, UniqueIdentifier) \u200b\u200bOtherwisePicture Address \u003d ""; The Endsley; End If; End of Procedures & On the Server The Procedure of Reckoning on the Server (Current Object) If Not Current Object. Scanned Contract. Empty () ThenPicture Address \u003d GetPictureNavigationLink (CurrentObject. Scanned Agreement, UniqueIdentifier) \u200b\u200bOtherwisePicture Address \u003d ""; The Endsley; End of Procedures & On Client Procedure Scanned Contract When Modified (Element) If Not Object. Scanned Contract. Empty () ThenPicture Address \u003d Get the NavigationPicture Link (Object. Scanned Agreement, UniqueIdentifier) \u200b\u200bOtherwisePicture Address \u003d ""; The Endsley; End of Procedures & On the Client Procedure Scanned Contract Start of Selection (Element, Selection Data, Standard Processing) Standard Processing \u003d False; Attached Files Client. Open the File Selection Form (Object. Link, Elements. Scanned Agreement); EndProceduresAs a result, we will be able to show on the form one of the images associated with the reference book. Unfortunately, promotion of files of other formats is not provided. But if you visit “Assigned files” and try to open them with a double click, then the program responsible for given file. For example, for Word documents, a word is started.


