If your hard drive is out of order, you can take it apart into parts. But such a procedure requires certain skills. In order to correctly disassemble a hard drive, it is important to know a few useful rules.
If you want to get your hard drive repaired, then be aware that it cannot be opened at home. During the assembly of the hard drive, a vacuum is specially created inside the box, thanks to which the device can work for a long time. If you pull out the hard drive, it will become unusable after a few seconds in the air. Therefore, you can disassemble the device only if you are completely sure of its malfunction. Before removing the hard drive, turn off the computer and unplug the cable from the outlet. If you are using a desktop computer, remove the side panels from the system unit. There are six bolts on the back of the cover. Unscrew them to remove the hard drive without unnecessary obstacles. Disconnect all wires and cables that are connected to the hard drive. Do this very carefully so as not to damage the wires. Then you can start loosening the hard drive mounting bolts. If you want to remove the hard drive that is in the laptop, first completely disconnect it from the power, close the lid and turn it over. Remove the battery from the computer. There is a special latch on the laptop case. Grasp it with one hand and push up on the back of the computer with the other. Proceed with caution to ensure that nothing breaks, apply even pressure. Then the lid will give way - and you can remove it from the case.


Now you know how to disassemble a hard drive into small parts. Try to act slowly and carefully - then you will not damage anything and remove the necessary elements safe and sound.
Sometimes the user needs to disassemble the HDD type of his laptop:
What tools to stock up on before disassembling a hard drive
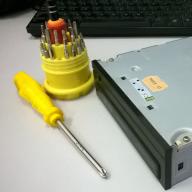
Before disassembling a hard drive from a laptop, you need to acquire the appropriate set of tools. To determine its composition, you need to carefully consider the drive itself. Different HDD manufacturers use screws with different head slot shapes, so there is no one-size-fits-all solution. As a rule, to disassemble a laptop hard drive, you need a small ("watch") Phillips screwdriver and a wrench, the cross section of which has the shape of a 6-pointed star (the so-called Torx). The sizes of the screwdriver and the key, however, must be selected individually, for a specific drive model. The design of some HDDs does not contain fasteners with a slot for Phillips screwdrivers - in this case, only a key will be enough. It is also useful to have special flat levers that can be easily replaced with a regular office knife.
Also, before disassembling the hard drive, you need to determine where the screws are located. The difficulty lies in the fact that very often manufacturers place them under various stickers. In addition, the stickers also act as seals: the product warranty becomes invalid when removed. Therefore, it is not recommended to disassemble the laptop hard drive yourself before the warranty period has expired.
So, you have removed the drive from the computer, acquired the necessary tools, located all the screws. How to disassemble a hard drive from a laptop? This operation must be started by removing the controller. A controller is an element in a drive that controls the drive and transfers data. Technically, the controller is implemented in the form of a printed circuit board, which is connected by a loop to the mechanical part of the HDD. Unscrew the screws holding the controller to the case, then carefully - so as not to damage the ribbon cable - turn it over. After that, you can disconnect the ribbon cable from the board. On modern devices, very often the flat cable adjoins the board with the help of contact pads, i.e. not attached to it. However, it is not recommended to abruptly remove the controller to avoid damage to the loop.
The next step is to analyze the mechanical part of the laptop HDD itself. It should start by loosening the screws holding the cover. Sometimes, in addition to them, manufacturers resort to various latches - this is where a clerical knife may be needed.
After removing the cover, you gain access to the internal mechanisms of the drive. The next step is to unscrew the screw holding the plates ("pancakes") to the spindle. By removing them, you can also easily remove other structural elements: magnets, a parking space for the head, a block that moves the read head. All these elements are fixed with screws. It is worth noting that the magnets of the linear motor, which ensure the movement of the head, have an extremely high induction - because of this, it is extremely difficult to separate them from the case, even if there are no additional fasteners.
Disassembling a laptop drive should not cause any difficulties, provided that the appropriate tools are available and the disassembler is careful. The main rule when working with this technique is mindfulness. Do not make sudden movements and apply excessive force: if you cannot detach the part, make sure that you unscrew all the screws, that the element is not held by the latch, and so on.
When some hardware problems appear with the hard drive, if you have the proper experience, it makes sense to inspect the device yourself, without resorting to the help of specialists. Also, those people who only want to gain knowledge related to assembly and the general view from the inside resort to self-disassembly of disks. Usually, non-working or unnecessary HDDs are used for this purpose.
First, I want to warn newbies who want to try to fix the hard drive on their own if any problems arise, for example, knocking under the cover. Incorrect and inaccurate actions can easily damage the drive and lead to irreversible damage and loss of all data stored on it. Therefore, you should not take the risk, wanting to save money on the services of professionals. Whenever possible, back up all important information.
Do not allow debris to fall on the hard drive plate. Even a small grain of dust is larger than the flight height of the disk head. Dust, hair, fingerprints, or other obstacles to the movement of the read head trapped on the platter can damage the device, and your data will be permanently lost. Disassemble in a clean and sterile environment with special gloves.
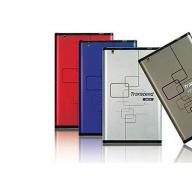
A standard hard drive from a computer or laptop looks like this:

The back is usually the back of the controller, which is held in place by sprocket screws. The same screws are also found on the front of the case. In some cases, the additional screw can be hidden under the factory sticker, therefore, after unscrewing the visible screws, open the cover very smoothly, without sudden movements.
Under the cover there will be those components of the hard disk that are responsible for writing and reading data: the head and the disk platters themselves.

Depending on the volume of the device and its price category, there can be several disks and heads: from one to four. Each such plate is put on the engine spindle, is located according to the "number of storeys" principle and is separated from the other plate by a bushing and a bulkhead. There can be twice as many heads as disks, since each platter has both sides for writing and reading.

The disks are spinning due to the operation of the engine, which is controlled by the controller through a loop. The principle of operation of the head is simple: it rotates along the disc without touching it, and reads out the magnetized areas. Accordingly, all the interaction of these parts of the disk is based on the principle of an electromagnet.
The head has a coil at the back, where the current flows. This coil sits in the middle of two permanent magnets. The strength of the electric current affects the strength of the electromagnetic field, as a result of which the bar chooses one or another angle of inclination. This design depends on the individual controller.

The controller contains the following elements:

In this article, we talked about how to disassemble a hard drive, and what parts it consists of. This information will help you understand the principle of HDD operation, as well as possible problems that arise during the operation of the device. Once again, we remind you that the information is for informational purposes only and shows how to disassemble an unusable drive. If your disk is functioning normally, then you cannot parse it yourself - there is a great risk of disabling it.
Sometimes the user needs to disassemble the HDD type of his laptop:
What tools to stock up on before disassembling a hard drive
Before disassembling a hard drive from a laptop, you need to acquire the appropriate set of tools. To determine its composition, you need to carefully consider the drive itself. Different HDD manufacturers use screws with different head slot shapes, so there is no one-size-fits-all solution. As a rule, to disassemble a laptop hard drive, you need a small ("watch") Phillips screwdriver and a wrench, the cross section of which has the shape of a 6-pointed star (the so-called Torx). The sizes of the screwdriver and the key, however, must be selected individually, for a specific drive model. The design of some HDDs does not contain fasteners with a slot for Phillips screwdrivers - in this case, only a key will be enough. It is also useful to have special flat levers that can be easily replaced with a regular office knife.
Also, before disassembling the hard drive, you need to determine where the screws are located. The difficulty lies in the fact that very often manufacturers place them under various stickers. In addition, the stickers also act as seals: the product warranty becomes invalid when removed. Therefore, it is not recommended to disassemble the laptop hard drive yourself before the warranty period has expired.
So, you have removed the drive from the computer, acquired the necessary tools, located all the screws. How to disassemble a hard drive from a laptop? This operation must be started by removing the controller. A controller is an element in a drive that controls the drive and transfers data. Technically, the controller is implemented in the form of a printed circuit board, which is connected by a loop to the mechanical part of the HDD. Unscrew the screws holding the controller to the case, then carefully - so as not to damage the ribbon cable - turn it over. After that, you can disconnect the ribbon cable from the board. On modern devices, very often the flat cable adjoins the board with the help of contact pads, i.e. not attached to it. However, it is not recommended to abruptly remove the controller to avoid damage to the loop.
The next step is to analyze the mechanical part of the laptop HDD itself. It should start by loosening the screws holding the cover. Sometimes, in addition to them, manufacturers resort to various latches - this is where a clerical knife may be needed.
After removing the cover, you gain access to the internal mechanisms of the drive. The next step is to unscrew the screw holding the plates ("pancakes") to the spindle. By removing them, you can also easily remove other structural elements: magnets, a parking space for the head, a block that moves the read head. All these elements are fixed with screws. It is worth noting that the magnets of the linear motor, which ensure the movement of the head, have an extremely high induction - because of this, it is extremely difficult to separate them from the case, even if there are no additional fasteners.
Disassembling a laptop drive should not cause any difficulties, provided that the appropriate tools are available and the disassembler is careful. The main rule when working with this technique is mindfulness. Do not make sudden movements and apply excessive force: if you cannot detach the part, make sure that you unscrew all the screws, that the element is not held by the latch, and so on.
Good time to all! This article is devoted to the topic of the HDD hard drive device, working through the SATA interface and is for informational purposes only! We will clearly see how to disassemble a hard drive. Let's just disassemble it and visually study its device.
Therefore immediately
WARNING: Do not disassemble the hard disk of your computer! Never, under any circumstances, do with your "hard" what is described in this article! Next, you will see and understand why you cannot disassemble a "working" hard drive. In this article, we will disassemble a completely faulty HDD that cannot be restored.

Let's start with an external examination. The front side with a metal cover and a sticker looks quite nice. I draw your attention to the fact that this cover is fastened with special “star” screws. However, absolutely all hard drive assemblies are fastened with such screws.

But what you and I see from the back side (bottom) will shock any radio amateur, and any person who has anything to do with electronics. Deep scratches on the control board are clearly visible, as well as the absence of a loop from the motor control controller.

So the conclusion is unambiguous: our "hard" was in the hands of a vandal or, most likely, a small child and is not a worker with a 100% probability.
And the second conclusion: a hard drive is fragile and requires special handling. Therefore, you cannot drop, throw, throw, disassemble and, even more so, leave it alone with small children.
So, armed with a star screwdriver, unscrew all the cover screws. For some reason she doesn't want to act! It turns out that another screw is hidden under the factory sticker. We unscrew it, remove the cover and admire the beauty of this engineering miracle. Nice, isn't it? It looks like some kind of expensive turntable. Although, in general, in fact it is so.

The basis of our "hard" is made up of two aluminum disks covered with a ferromagnetic layer (disks can be made of any other non-magnetic material, for example, durable glass, only the coating matters). The second most important part is the moveable arm with the read / write head.
The principle of operation is similar to a conventional turntable: the discs rotate, and the head moves along the discs, reading the magnetized areas. The recording takes place in the same way, only the head itself magnetizes / demagnetizes certain areas. However, if in a turntable the head is equipped with a needle for reading sound from a record and, as it were, crawls along it, scratching, then in a hard disk the head does not touch the surface of the discs - everything happens electromagnetically.

The rotation of the disks is controlled by a small motor controlled by a controller on the board (the loop from which in our case is cut off). The movement of the rod with the head is carried out according to the principle of an electromagnet. At the rear, it has a coil to which an electric current is supplied. The coil itself is located between two permanent magnets. Depending on the strength of the current, the strength of the electromagnetic field changes and the bar is deflected by a certain angle. This mechanism is controlled by a separate controller. Do you see a train in the picture above to the right of the boom? It is through him that control takes place, as well as the exchange of data between the head and the board (the brain of the hard disk).

As we have already noted, in the "hard" design there are two discs, put on the motor spindle and separated by bushings and a special bulkhead. Since there are two disks, then there should also be two heads. No, no! There are actually four heads, since read / write occurs on both sides of each disk.

Unfortunately, it was not possible to remove the board neatly, since the "stars" with which it is fastened are much smaller. Therefore, I just broke it as carefully as possible.

The board contains:
- a chip, like a BIOS, which records the manufacturer, model, capacity and other factory parameters
- multiple controllers for mechanical parts
- cache (small RAM) for data exchange
- directly the data transfer module, including via the SATA interface (at the bottom of the board you can see the contacts from it)
- microprocessor that controls and synchronizes the operation of all modules
- other auxiliary microcircuits
USEFUL:
Summing up, I would like to say two things.
At first, the article is for informational purposes only. She simply demonstrates how you can theoretically disassemble a hard drive and demonstrates its internal structure. It is impossible to disassemble a working, normal hard disk.
Second moment linked to the first. I would very much like the reader, now knowing about the device of the hard disk and looking clearly at what parts it consists of, once again, trying to connect his disk to another computer (no matter which way) or during production, understand that the hard disk - the device is electronic and at the same time electromechanical. It contains many small and fragile parts, an open board, and many moving mechanical parts. However, this "device" is not cheap. Therefore, my friends, be with your "hard" softer, love it)))
But seriously, be extremely careful when connecting and transporting hard drives, so that their service life lasts as long as possible.
P.S. You can see a full photo report on how the disassembly of this hard disk took place.