Let's talk about CD and DVD drives, they are amazing! You can find many cool and useful (hobby) things to use in your projects. There are so many things you can do with one or more drives that you will be impressed.
Let's get started!
Step 1: Finding a Future Victim
You can find dead CD and DVD drives at old computers, perhaps one of these "dinosaurs" is in your home. But if you don't have that, don't be discouraged. You can find such a drive in the closest to your home. workshop.
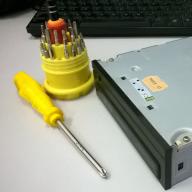
Step 2: Tools
To open the drive you only need a few screwdrivers, in my case, I used one Phillips screwdriver. Ideally, however, it is desirable to have a variety of screwdriver sets. You will need wire cutters, for removing the magnets from the laser system.

Also you will need a little solder and the ability to use it.
Step 3: start the operation
The first task will be unscrewing 4 screws on the drive, then you can remove the cover.


Step 4: removing the rest of the metal parts

Now push on the sides marked tags picture and pull forward, then finish removing the metal parts of the drive.


Step 5: Removing the electrical board

In my projects, I do not use an electrical board from the drives, look at the images for how to remove it.


Step 6: motor tray
The images show how to remove motor tray.

You need some knowledge when wiring and removing parts from the board.


- Green LED
- Constant voltage electric motor
- Simple Button
- Strange button
Step 7: tray mechanism
There are several gears that you can use with the motor.

Step 8: the thing that has no name
Yeah ... I don't know if this item has a name. Let's call this the "laser motion mechanism".

For me, this is a real treasure inside these drives, because I have seen people who used them to make a homemade laser cutter, engraver, 3D printer and plotter. (Comment from sTs)

Step 9: brushless motor
The motors that are used to rotate the CD or DVD are brushless, meaning you cannot start the motor by simply connecting two wires to the battery, so you need an electrical speed controller and possibly a few modifications.


Step 10: stepper motor
A stepper motor is used to move the laser. Such motors are positional, the signal that is sent to the motor clearly determines the distance traveled by the shaft.

Stepper motors in drives are bipolar and therefore are used together with H-shaped bridges. I am using L239D chip, double H bridge to drive them.

(Comment from sTs) Also, by disassembling the engine, you can make unusual decorations from the coils. For example and.
Step 11: laser
DVD / CD drives have two lasers, while CD drives only have one. The laser used for recording can be strong enough to ignite matches and other things.

Do not point laser into eyes! Do not point the laser at people or animals, as this may result in serious
damage your eyes or burn your skin, it's not fun!


Especially when soldering a couple of walls.
Now we can stop. I hope you enjoyed this article. Experiment, be creative, and share tips.
Thank you all for your attention.
You will need
- - paper clip;
- - cross screwdriver;
- - small flat screwdriver;
- - rubber bulb;
- - soft, lint-free cloth;
Instructions
The easiest way to restore normal operation of a drive is to clean its movable follower lens using a special cleaning disc. Unfortunately, this method does not always give results. If dust on the lens is causing the drive to malfunction, a cleaning disc can help. But in some cases, a dirty lens has to be cleaned by hand.
You should be aware that the cost of repairing a drive in a workshop is comparable to the cost of a new one. Considering this, you should try to repair the drive yourself, as you still have nothing to lose. Disconnect the computer from the network, remove the side covers of the system unit, disconnect the power and data cables from the drive. Unscrew the fastening screws that hold the drive and remove it from the case of the system unit.
Now carefully disassemble the drive. To open the drive deck, insert a straightened paper clip into the hole on its front side and push. Then press down on the latches at the front of the sides of the drive and remove the front bezel of the drive. Use a cross screwdriver to remove the fixing screws on the bottom of the case. Then remove the top and bottom covers of the drive.
You need to get to the movable lens - it is through it that the laser beam that reads and writes information passes. There are two main ways to remove dust from it. First: take an ordinary rubber bulb and blow off the dust particles with a strong jet of air. You should try this method first. Reassemble the drive, reconnect the cables and test it to make sure it works. If the drive is still discs, wipe the lens with a brush or soft, lint-free cloth. This option is more restrictive, so be very careful.
In the event that you clean the lens, but this does not help, the reason for the poor performance of the drive may be a decrease in laser power. It is regulated by a trimmer, so you can try to increase it slightly. To get to the laser head, you need to remove the electronics board and find a trimming resistor on the laser head - it has a slot in the center. Use a screwdriver to gently turn it 90º counterclockwise.
Reassemble the drive and check it works. If necessary, you can turn the trimmer another quarter of a turn, but not more. If all the described procedures did not help, you will not be able to restore the drive.
Sometimes a perfectly functional drive is not in some formats. In this case, you can try to fix the problem by flashing the drive - that is, installing new software on it. To do this, go to the website of the manufacturer of the drive, find your model and see if there are firmware for it. Usually this is a simple executable file: you launch it, after flashing the computer will automatically reboot. After that, you can assess the success of the operation.
You often come across the fact that a previously perfectly played disc suddenly stopped loading or the files loaded on it simply do not open, although the drive seems to have detected their presence. What happened in this situation? Is the drive broken or is it time to throw such a disc in the trash? There are several ways you can try to solve this problem yourself without drastic measures to replace the drive or remove the drive itself from use.
- To determine whether the drive is the cause or not, you need to try to play multiple discs with it. And if he does not read only a specific version, then it is not about him. In the event of a repetition of the situation with the stopping of reading discs or their problematic playback, then this is a problem with the drive.
- In the case of a problematic disc, you must first clean it of dirt. There are many means for cleaning them, but from experience we can say that there is no point in spending money on some kind of liquid - discs lend themselves well to processing them in warm water and soap. After this procedure, they must be blotted with a well-absorbent towel and allowed to dry before putting them back in the drive.
- In the case of a dirty laser readhead drive, a dedicated "cleaning disc" can be dispensed with. Alternatively, you can remove the drive from the computer, detach the protective cover backward and upward. Then you need to use something thin, but durable, for example, a pins on the front panel through the hole, press the latch and open the tray that blocks access to the lens by pressing it. It is necessary to blow off coarse dust from the surface of the lens using a can of compressed air or even an ordinary pear, but in no case with your mouth. The pear must be free of talcum powder inside, otherwise things will get worse. Using a brush and lens cleaning fluid, rinse the lens well, making light movements that do not press on it at all. After that, the lens must dry, and so that the dust cannot get on it again, it is better to cover it with something during the drying period. In case of plaque formation after drying, it must be removed with a dry soft brush. This is followed by the assembly procedure of the drive.
The disc itself can be not only dirty, but also severely scratched, which also affects the ease of playback. It is possible to restore its surface by polishing. With large and deep scratches, it is unlikely that anything will work, but if there are many thread-like damage on it, this option can be "cured".
The easiest way will require a clean rag and goyi paste. The disc must be well moistened with water and a little paste is applied to it, which must be spread evenly over the entire surface of the disc. Then, with a rag, you need to polish from the center of the disc to the edges, until the paste simply disappears. The number of such processes will depend on the state of the disk after each stage. As soon as the most conspicuous scratches have disappeared, the disc can be considered polished. After polishing, the disc must be rinsed well, blotted and allowed to dry. Then you can try to play his recording.
And at the end a little advice. If you need to download a driver for your printer, scanner, modem or laptop, you can always do this on the website www.hwdrivers.com or www.driver.biz.ua.
Related articles:
05/08/2019 18:20 24
ZTE starts selling its first 5G smartphone
Chinese telecommunications equipment manufacturer ZTE begins selling smartphones that support fifth generation (5G) networks. The company says that 5G smartphones provide ...
Complex electro-optical-mechanical devices, CD / DVD drives are among the most unreliable components of a computer. The causes of breakdowns can be very diverse. Most often, the laser dies or loses its emission, the chipset flies even more often, especially if both drive motors and laser focusing coils are hung on a single microcircuit. I am not even talking about mechanical breakdowns and contamination of optical surfaces. Is it realistic to repair a failed drive at home or is it easier not to suffer, but to buy a new one?
Introduction
Not every drive failure is fatal. Often, the drive can be repaired at home, without having any special equipment or preliminary training that goes beyond the competence of an ordinary craftsman electronics engineer. Don't be afraid to experiment with a broken drive! It won't get any worse anyway (of course, provided that the drive is not under warranty). You can, of course, take it to a service center, but ... it's long, expensive, and not interesting.
You will need spare parts for repairs. Where can I get them? Go to the market, shake up your friends - and you will surely find a lot of "scrap", which will be given to you for next to nothing. First of all, pay attention to drives built on the same element base as yours (this primarily concerns the laser head and chipset, the marking of which is determined by the inscriptions on their case). Let's say your electronics board has crashed, and your friend's gears have crumbled. Then the entire non-working board can be replaced entirely, without even figuring out what the malfunction is. All other models are also useful. From there, in particular, you can pull out some specific spare part - for example, a fuse.
The troubleshooting methodology is not provided here, since this is too broad a topic. Our task is much faster - to give the reader a first impulse, orienting him in which direction to dig, listing the main categories of breakdowns and methods with them, sorted in descending order of their relevance. Well, the rest, as they say, is a matter of technology ...
Picture 1.
Laser
Laser emitters used in reading (and especially writing!) Drives are rather short-lived devices that massively fail after several years of operation. Why is this happening? Well, firstly, the natural loss of the emitter's emission affects, and secondly, the unfavorable operating mode. Self-respecting manufacturers adjust the parameters of each laser strictly individually, either by setting the required modes with trimming resistors (in cheap models), or by entering them directly into the firmware itself (in more expensive models). Noname sets all parameters to an average level, which is too low for some heads, and too high for others. By the way, when unlocking DVD drives and replacing the firmware with its "hacked" version, the previous settings are not saved, and if the hacker does not attempt to save them beforehand, the laser will quickly fail or become unstable.
Reducing the brightness of the laser light increases the number of read / positioning errors (some disks are no longer recognized), and starting from a certain point, the drive refuses to recognize the disks at all, often without even trying to spin them up (usually the drive motor spins up only when the sensor detects the reflected signal , and if there is no signal, it is considered that the disc is not inserted and there is no need to spin it up).
After carefully disassembling the drive, connect it to the computer and see if the laser flashes when the tray is closed. With normal emission, you will see the beam even in daylight, and a "stuck" laser is visible only in a darkened room. If, even in complete darkness, there are no traces of the presence of the beam, look for the cause of the failure in the electronics (just remember that the laser is not visible from every angle). Actually, this is a rather risky operation, because if the beam hits the eye, you can get blind, but this risk is not so great ...
On average, laser head replacement services cost half the cost of a new drive, and given that scientific and technological progress does not stand still and new drives are much better than old ones, there is little sense in such repairs. Alternatively, you can try to bring the laser back to life by simply increasing the supply voltage. Trace the conductors leading to the laser emitter - on their way they should rest against a resistor, in parallel to which you have to solder another one, choosing its resistance so that the drive can confidently identify all the disks. A more honest option is to find out the brand of the chipset that controls the laser (usually the largest chip), surf the Internet in search of its technical specification. There, among other useful information, the mechanism for adjusting the power of the laser beam should be described. As a rule, one or more resistors connected to the chipset (not to the laser head!) Are responsible for this. Some models allow the laser to be configured via the SCSI / ATAPI interface (via special commands described in the technical documentation for the drive) or via the technological connector.
In principle, the laser head can also be disassembled by replacing the emitting element itself, which can be ripped out of another drive, but few succeeded in assembling the head correctly. Just in case, below are explanatory photos showing its structure, principle of operation and disassembly procedure.
Figure 2.
Figure 3.
Figure 4.
Figure 5.
Chipset
The chipset is the heart of the drive. It not only provides information processing, but also controls the positioning / rotating motors, laser head and focusing coils. Thrifty manufacturers integrate the entire chipset into a single microcircuit, often without worrying about cooling it. As a result, the chipset quickly breaks down, literally burning through, and the drive completely or partially refuses to work.
The behavior of a broken chipset can be very diverse - from complete reluctance to recognize a drive at all to a decrease in read speed. The minimum efficient chipset recognizes the drive and, when power is applied, moves the optical head to the beginning of the disc, after which the focusing lens begins to bounce. If this does not happen, the chipset is unusable or the electrical components serving it are faulty (but they fail quite rarely).
It is unrealistic to replace a burnt out chipset at home. firstly, there is nowhere to buy it, secondly, its price is comparable to the cost of the drive, and thirdly, without special equipment, only Lefties and extreme people can perform this jewelry operation.
But it is quite possible to prevent the failure of the chipset. Glue at least a tiny heatsink to the largest drive chip using double-sided tape or special glue. You can buy scotch tape at a stationery store, and glue at the radio market (glue is better, but scotch tape is more affordable). Also equip the drive with a fan by attaching it to the back of the case, after drilling a few holes there. Well, or at least do not place the drive above the hard drive, because hard drives (especially high-speed ones) get very hot and overheat the drive.
The cache memory is not formally included in the chipset, but it is very closely connected with it. Often she gives oak and breaks down. If a defect affects one or several cells, then in the overwhelming majority of cases this does not affect the operation of the drive (after all, it has correction codes), but in case of severe damage (and even more so in case of complete failure), the drive either stops reading disks altogether. either reads them extremely slowly and with a lot of errors. Since the drives use the same memory as the DIMM "ah, it can be replaced (at least in theory, almost everything depends on the art of high-quality soldering).
Figure 6. The largest chip is the chipset, the smaller chip is the memory.
Figure 7.
Mechanical damage
CD / DVD drives are great dust collectors, especially if they have a fan underneath to cool the hard drives. Dust passes through the slots of the housing and settles on moving mechanical parts, increasing their wear, smoothly flowing into chronic seizure. The drive either refuses to close the tray at all, or after closing it immediately spits out the disc, or cannot turn the disc (it rotates the disc with a strange sound). The same applies to the positioning mechanism.
Disassemble the drive, remove all dirt, lubricate the rubbing elements (just not so that it drips from the tail and remembering that plastic gears do not require lubrication), if necessary, adjust the backlash so that everything rotates without effort, but does not dangle. Make sure that the gears / worms are not overworked, chipped teeth, and nothing foreign has got into them (this primarily applies to disc fragments, torn by the drive, as well as wires getting tangled underfoot).
Figure 8. Assembled drive mechanics. This plastic will not last long and may fail at any time, then the broken parts will either have to be grinded out on their own or pulled out of other drives.
Figure 9. Dust accumulation on moving mechanical parts can lead to seizure.
Other electronics failures
First of all, check all mechanical contacts (connectors, trimming resistors, buttons and switches, tray closure sensors, etc.), as well as the integrity of the lead wires. If the power connector (interface cable) is carelessly pulled out, thin tracks may break, and this break is often invisible to the eye or an ohmmeter, but at high frequencies (normal operating state of the drive) it makes itself felt.
Carefully inspect all rubbing cables - they often rub to holes, causing either a short circuit to the case or a break in the conductor. Or both at the same time (this is especially true of New-Vasyuki, ugh New-TEAC "and drives sold under the TEAC trademark, but assembled by third-rate firms - currently TEAC has left the CD drive market, selling its label noname- manufacturers).
Don't forget about the fuses. If the drive is incorrectly connected or voltage surges, they could well have burned out, saving the drive from inevitable death. A modern fuse is such a little crap, completely unlike the glass tube we are used to with a thin wire inside, and it is not so easy to notice it at a cursory examination of the board. By the way, there are usually many more than one fuse, so check whatever you find.
Pay attention to the condition of the remaining elements. Swollen varnish, traces of burning, deformation or physical defects (such as chips or fractures) are eloquent enough to indicate the source of the malfunction. Unfortunately, the vast majority of electronics failures dispense with visual manifestations.
To check the serviceability of the motors, connect them to a 5 volt source (the black wire is a minus), naturally having previously disconnected them from the drive. Since the motors are usually more or less standard, it is not difficult to find replacements for them. Well, in general, check everything that can be checked: the electrolytes are not dry / broken, whether the resistors have broken, whether the diodes, stabilizers, key transistors are intact and everything, everything, everything ...
Small logic almost never fails, but for power elements it is in the order of things.
Figure 10.
Optics
If you do not abuse smoking and do not exhale a stream of smoke aimed at the actuator, you do not need to clean the optics. One of my drives has already been in use for 10 years and has never been cleaned.
Forget about cleaning kits - they can easily disfigure an optical lens (usually made of organic glass, by the way) without the slightest hope of restoring it. It is strongly not recommended to wipe optical surfaces. Try to blow off the dust with a rubber enema (guards, not a word about perversions!), After making sure that there is no talcum powder inside, and in no case do it with your mouth (droplets of saliva are deadly for optics). If the tarry substances of tobacco smoke have formed a characteristic oily film, do not try to scrub it off. It is better to put a drop of a thick solution of laundry soap on the lens and, after letting the chemistry work for fifteen to twenty minutes, remove it with a napkin, gently bringing it to the drop, but without touching the lens surface. Then rinse the lens from the soap with a few drops of distilled water.
Figure 11.
Summary table of main symptoms
| Symptom | Diagnosis | |
| The drive is not recognized by the computer | When turned on, it does not make any sounds, does not blink anything | Electronics failure, possibly broken track or blown fuse |
| The indicator flashes or constantly speaks | Electronics failure, possibly an interface unit or a chipset, also check the contact of the interface connector, the integrity of the conductors and the value of the supply voltage | |
| Recognized by the computer | Does not pull out the tray | Failure of the mechanical part, an open in the ejection button, failure of the engine or its servicing elements (for example, a chipset) |
| Does not push the tray in, or does push it in, but immediately throws it out | Mechanical failure | |
| Doesn't see the disk | Disc does not spin, lens and carriage do not move | Mechanical failure, engine failure, chipset out of order |
| The disc does not spin, the lens moves | Dead laser | |
| The disc spins up to normal speed, then stops | The laser is dead, the setting is out of order, the chipset is out of order | |
| The disc spins up to a reduced speed | Failure of mechanics, settings are out of order | |
| The disc spins up to breakneck speeds | The chipset is out of order, the settings are out of order | |
| Sees the disc | Disc cannot be read | Electronics failure |
| The disc is read with a lot of errors | Decreased laser emission, dirty optics, lost settings, electronics failure | |
| When the eject button is pressed, the drive spits out the spinning disc | Electronics failure | |
Conclusion
Every day the drives are getting cheaper and cheaper, making their repair meaningless. Meanwhile, their quality is steadily declining. The overproduction crisis is forcing manufacturers to save on everything they can, and first of all, on reliability and durability. It is often much cheaper to occasionally repair good old drives than to race for new models. However, everyone is free to choose the upgrade policy on their own ...
As I wrote earlier in other articles, the biggest problem for a computer is dust. It gets hammered wherever possible in such quantities that sometimes you just wonder. The DVD optical drive is no exception.
Dust, if left uncleaned, affects the drive tray, reduces the accuracy of the laser mechanism, and affects the quality of the pressure mechanism. In general, the DVD drive should be cleaned at least once a year. Optimally - once every six months.
You will need grease, cotton swabs, and alcohol to clean and maintain your DVD drive. After removing the DVD drive from the system unit, you need to remove its front panel. The first step is to pull out the drive tray. This is done using any long and thin object (needles, paper clips, piece of wire 3 cm long).
There is a small hole on the front panel of any DVD drive (item 2 in the bottom photo). Behind it (on the inside of the panel) is a mechanism for manually opening the tray. It is necessary with a little effort to push on this mechanism through the hole and the tray will move out 1-2 centimeters, after which it can be pulled out to the end by hand.
Next, remove the dust cover from the tray. To do this, turn the drive over and, bending the cover with your fingers, pull it down. On the lid, as a rule, there are two latches (item 1 in the bottom photo) and two guides on which the lid is held. She is removed without much effort.
Next, you need to drown the front panel latches. There are usually four of them (two on the bottom, two on the sides), or five (two on the sides, three on the bottom). After removing the front panel, the screws (4 or 5 pieces) on the bottom cover of the DVD drive are unscrewed and the cover is removed.

Then take the top cover of the DVD drive and shake it slightly. The plastic drive mechanism will fall out of the top cover (see photo below). After removing the covers, the optical disc tray itself is removed. It extends until it stops, then the latches located on the back of the tray at the corners are bent (see photo below) and the tray is removed.

All unnecessary spare parts have been removed from the DVD drive, you can start cleaning. The main body of a DVD drive has many notches, grooves and indentations. They must be thoroughly purged to remove dust accumulations. Even a small amount of it at the back wall or in the slots of the tray's path can cause the tray to stop opening (closing).

The tray is driven by a motor, which communicates with the mechanics with a rubber strap (belt). Remove the belt carefully so as not to stretch it. The mechanical operation of the drive tray depends on the condition of the belt. By the way, problems often arise with the tray after a long (more than two years) operation without maintenance. First, dust is stuffed into the guides and the tray does not get into the extreme position because of this, and then the belt is stretched due to the fact that the drive mechanism cannot open the tray due to the incorrect position of the tray.

Following the belt, remove the mechanics control board (1 or 2 latches). Care should also be taken not to damage the motor control cable from the main board. On inexpensive models, the cables may well be fragile or poorly soldered. We remove dust from the mechanics with a soft brush or air from both sides (top and bottom). Ideally, it is advisable to walk the entire DVD drive first with a brush and then blow through with air (for example, using a rubber blower, which is sold at any pharmacy).

After all the dust from the drive housing has been removed, the rubber parts are degreased with alcohol and the old grease is removed from the guides (usually by the time of maintenance there is a mixture of fine dust and dirt with a small amount of remaining grease).

In conclusion, the moving rubbing mechanical parts are lubricated with a small (scanty) amount of grease, just to form a film (no longer desirable). There should be no visible accumulation of grease.


The final touch is blowing (only with a rubber bulb) the lens of the laser mechanism (it should never be wiped clean) and the drive is assembled back.