Today we will use canvas JavaScript to draw a circle that will follow the mouse cursor.
Basic approach
Before we get into the code, let's talk about how we will create a circle that follows the mouse cursor. But first we need to draw this circle:
Picture caption: The circle is not drawn to scale.
The position of the circle will change depending on where the mouse cursor is located. This means that every time we change the position of the mouse cursor, we need to redraw the circle:
This example is not that hard to figure out. But that doesn't mean there is nothing interesting behind the scenes. Next, when we look at JavaScript, we will touch on some important aspects of the above code that you may not have understood.
How to get started?
The first thing we need is a canvas JavaScript ready page. If you don't already have it, place the following code in a blank HTML page:
Draw a circle
The first thing we're going to do is draw a circle. Inside the tag
I will not describe the work of the script, I will pay attention only to some points. The first is the first two lines. They indicate the IDs of the left and right manholes. if you rename them in styles and HTML, then you need to do this in the script itself.
The second is the cursor tracking area. In this script, line 7 indicates - html... That is, in essence, the entire page. Sometimes used body... But if the page is not full and the footer is not pressed to the bottom of the page, it happens that the body is only half the page and going beyond it, the script will stop working, so html is better. You can also set a specific block, inside which the cursor will be tracked, while on the rest of the page it will not. In such cases, instead of html, you need to specify an id block, for example #block_name. Place the HTML code from this article inside the block with ID - #block_name and that's it.
That's all you need to install this script on your site. As I wrote at the beginning, this script is not very useful and exists only to give your site an unusual look.
That's all, thanks for your attention. 🙂
This article introduces the best web user interface (UI) elements and animations that have been hosted on the CodePen site. All projects were created using CSS and JavaScript.
Julian Garnier's animated model depicts eight planets orbiting the Sun in 3D (Boffins recently decided that Pluto is no longer officially a planet). This demo was inspired by projects by Alex Giron and Nicolas Gallager.
Whale
It looks just like any other menu until you scroll to see that it is made of jelly! Menu items bend as they move and return to a stationary state with a twang.
Draggable overflow
Draggable overflow lets you style your web page neatly without having to compromise on content. The text disappears when it falls outside the stripes and can be scrolled using drag and drop.
Fluid grid using text align: justify
Squishy buttons
This incredible project creates a pseudo-tactile touch effect, even if the buttons are operated with the mouse.
Pure CSS peeling sticky
This CSS Velcro has a nice pseudo-tactile feel and is presented as a label that can be easily removed to reveal what is hidden underneath.
Color smoke
Animation of colored particles following the mouse cursor.
These balls are afraid of the mouse pointer. If you move the cursor aggressively, they panic and spread out, but if you approach slowly, they will drift away at the same speed, always keeping a certain distance. If you leave, then they gather together and move to you with interest and imperceptibly.
Tearable cloth

- Translation
The author of the article, the translation of which we publish, proposes to talk about solving problems from the field of computer vision exclusively by means of a web browser. Solving this problem is not too difficult thanks to the TensorFlow JavaScript library. Instead of training our own model and offering it to users as part of a finished product, we will give them the opportunity to independently collect data and train the model directly in the browser, on their own computer. With this approach, server-side data processing is completely unnecessary.
You can experience what this material is about to create. To do this, you need a modern browser, webcam and mouse. Here is the source code for the project. It is not designed to work on mobile devices, the author of the material says that he did not have time for the corresponding improvements. In addition, he notes that the problem under consideration here will become more complicated if you have to process a video stream from a moving camera.
Idea
Let's use machine learning technologies to find out exactly where the user is looking when looking at a web page. Let's do this by observing his eyes with a webcam.It is very easy to access your webcam in a browser. If we assume that the entire image from the camera will be used as input data for the neural network, then we can say that it is too large for these purposes. The system has to do a lot of work just to determine where the eyes are in the image. This approach can work well if we are talking about a model that the developer trains himself and deploys on the server, but if we are talking about training and using the model in a browser, this is already too much.
To make it easier for the network, we can only provide it with a portion of the image — the one that contains the user's eyes and a small area around them. This area, which is the rectangle that surrounds the eyes, can be revealed using a third-party library. Therefore, the first part of our work looks like this:

Webcam input, face detection, eye detection, cropped image
To detect a face in an image, I used a library called clmtrackr. It is not perfect, but it is notable for its small size, good performance, and, in general, it copes with its task with dignity.
If a small but clever image is used as an input to a simple convolutional neural network, the network can learn without any problems. This is what the process looks like:

Input image, model - convolutional neural network, coordinates, the place predicted by the network on the page where the user is looking.
A fully working minimal implementation of the idea discussed in this section will be described here. The project, the code of which is in this repository, has many additional features.
Preparation
First, let's download clmtrackr.js from the appropriate repository. We'll start with a blank HTML file that will import jQuery, TensorFlow.js, clmtrackr.js and the main.js file with our code, which we'll work on a little later:
Receiving a video stream from a webcam
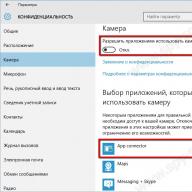
In order to activate the webcam and display the video stream on the page, we need to obtain the user's permission. Here I do not provide the code that solves the problems of the project's compatibility with different browsers. We will proceed from the assumption that our users surf the Internet using the latest version of Google Chrome.Let's add the following code to the HTML file. It must be located within the tag
but above tags