The Windows 10 operating system has built-in a large number of various tools and processes that take on the task of helping the user to work with the computer. This includes the so-called Automatic Maintenance, which is a mechanism that regularly checks the health of your computer and makes appropriate adjustments to its operation. operating system if necessary. For example, automatic maintenance checks the disk for errors, performs a quick virus check, makes a copy of the operating system registry, sends crash reports, and so on.
Automatic maintenance runs every day and is configured to run when the computer is idle so as not to interfere with normal user experience.
Note: all steps in this article are performed from account with administrator rights. If your profile does not have these privileges, then you will need an administrator password to change automatic maintenance settings, manually activate or suspend a service.
How to set up Widows 10 Automatic Maintenance
The section with automatic maintenance parameters is located in the Computer Control Panel.
How to turn off Windows 10 Automatic Maintenance
I must say right away that you should not turn off automatic maintenance just like that. The computer will not work faster because of this (you can try to paint it black or red if the games have little FPS). This principle applies whenever you try to change how system services or processes work. But still, there are times when automatic maintenance does not help the computer, but rather harm the workflow. For example, you notice device freezes during idle times, too much disk / processor load at the wrong time, or frequent crashes blue screen of death. In this case, disabling automatic maintenance can be done for diagnostic purposes in order to determine the source of bugs or instabilities. Not the fact that this will help, but it will definitely narrow the search for the problem.

If this is not the problem, do not forget to activate the maintenance function back. To re-enable automatic maintenance, go to the previously created key in the registry editor and change its value from 1 to 0. Restart the computer again and everything will return to its place.
You are running Windows 8, it really doesn't matter if you are still on Windows 8 or upgraded to Windows 8.1, then you may have noticed that the system suddenly starts running system maintenance jobs. tasks that are defined to be executed only when the system is idle and not in use, you may also notice that tasks are performed regardless of what settings you have. So if you are playing games, watching HD movies or running other tasks that require a lot of processing power and system resources, you may have noticed that things slow down during this time.
This will not happen if you are using a high-end machine, it is very possible that such a problem can appear on low to mid-end systems. Another thing to consider is that Windows 8 will wake up the computer to perform normal system maintenance tasks.
Preventive work
Automatic maintenance is designed to address a range of operational issues that users have experienced in previous versions Windows.
The goal is to combine all operational tasks such as Windows check and software, updates, disk defragmentation or performing antivirus scans, including programs third party developers to run them without affecting the performance or energy efficiency of the PC.
schedule automatic start Windows 8 is set to 3 am or 2 am, and every day by default. The daily limit is set at 1 hour, which means it will run no longer than that day. Auto start will also only work if the computer is in standby mode, and stop the maintenance task when the user comes back and starts using the PC. maintenance resumes when the PC is in standby mode again with important changes. Tasks are marked as critical and will run regardless of user action or boot.
Disable maintenance tasks
To do this, you need to go to Task Scheduler Library> Microsoft> Windows> TaskScheduler
Right-click on the Regular Maintenance item and select Disable from the drop-down menu.
Disabling Tasks can fix these problems for you. Disable Tasks to see if this is the case. If this is not the case and the problem persists, it may be caused by something else, then you might want to consider enabling tasks again.
- In the window interface, click on the key to open the Start screen. If you are already there, skip this step.
- Select the Task Scheduler type and click on the task schedule. The Windows 8 Task Scheduler window will open.
- Navigate to the following folder: Task Scheduler Library> Microsoft> Windows> TaskScheduler
- The contents of the tasks are displayed on the right.
Right click on regular maintenance and from the context menu select Disable. This turns these tasks so that they no longer run. You can perform the same operation on a non-running maintenance task, although it shouldn't really be necessary.
Windows 8 will no longer run these tasks. This is done for you to determine if it will be beneficial to determine the performance of the system or not. If you are using the system as usual, it should become obvious whether this is your case or not.
As a side effect, you can turn off the alarm as it is included in the service to complete the task. If this is a matter of what you notice, you can also change the running time of tasks.
You can change the time and wake up option using a task. You need to double-click a task in the Task Scheduler to do this.
- Select "Edit" to switch triggers. Here you can change the time of the task when it is running on the PC.
- After making changes, press the "Enter" button.
- Uncheck the box "Wake up the computer to run this task" to disable this function.
Windows 8.1 users may have noticed that after 4 - 5 minutes of inactivity, the switched on computer starts "doing something". This is especially noticeable in the example with a laptop: the processor fan starts to make a lot of noise, and the indicator boot hard disk on the case does not just blink, but glows all the time. At the same time, in the Windows tray, you can see the clock icon on the notification flag icon, and if you hover over it with the mouse, the prompt "Service in progress" pops up.
The fact is that in Windows 8.1, by default, Task Scheduler includes an automatic maintenance task during computer idle time. When no one is using the computer, the back ones automatically start and perform all sorts of system optimizations, including disk defragmentation. If the computer is powerful enough, such automatic maintenance may not be noticeable, but in the case of weak budget PCs (which usually have slow hard drives with a small cache), starting and stopping such a task takes quite a long time and for users who are often away from the computer may cause discomfort when working with it.
Disconnect method 1
To disable automatic maintenance, go to Control Panel (Start> Applications> Control Panel) and open Task Scheduler (Control Panel> System and Security> Schedule Tasks under Administrative Tools). On the left side of the Task Scheduler window, open the TaskScheduler folder (Task Scheduler Library> Microsoft> Windows> TaskScheduler) There should be four tasks in the folder: Idle Maintenance, Maintenance Configurator, Manual Maintenance, Regular Maintenance
On the Internet, it is advised to disable only the Regular Maintenance job by right-clicking on it and choosing Disable.

But as shown personal experience to disable automatic maintenance when the computer is idle, it is not enough to disable only the Regular Maintenance job. You should also disable the Idle Maintenance and Maintenance Configurator jobs. Remember to restart your computer after performing the above operations.
If the instructions above did not help, then follow the steps described in Disconnect Method 2.
Disconnect method 2
On some Windows 8.1 computers, only this second method works. If, after performing the steps described in method 1, the system still continues to load the computer after 4 - 5 minutes. inactivity, then try deleting the Idle Maintenance, Maintenance Configurator and Regular Maintenance tasks from the Task Scheduler, having previously exported the tasks somewhere to the computer, so that if something goes wrong, you can restore them back to the Scheduler. To export, select each task in turn, right-click on it and select the "Export ..." command in the context menu, specify the location on your computer in the dialog that appears and click the "Save" button.

To delete a task from the Scheduler, select the "Delete" context menu command. After deleting the above tasks, only the Manual Maintenance task should remain in the TaskScheduler folder.
![]()
Hello everyone! Many users of Windows 8.1 and 10 are aware of the fact that systems tend to perform the maintenance process on their own. This process begins without any notification to the user.
It is possible to detect the initiation of automatic maintenance actions to reduce the performance of the computer, since the procedure takes up a lot of RAM and loads the processor. That is why users often ask how to turn off automatic maintenance in Windows 8.1 and 10. But first, let us learn the features of automatic maintenance.
What is automatic maintenance?
Automatic maintenance of Windows 8.1 and 10 is a process by which the operating system is maintained and optimized to improve the speed of the device. This process takes place in the background, that is, the user is not notified that an automatic system maintenance procedure has been started.
Automatic maintenance is based on checking for system updates and defragmenting disk partitions. If there are temporary files, the process of deleting them occurs during maintenance. The system also provides for scanning files, detecting malware in them and then deleting them. Despite all the benefits of automatic system maintenance, many people choose to disable this feature.
Features of disabling the automatic maintenance option - why is it necessary?
The automatic maintenance process is present not only in the operating systems Windows 8.1 and 10, but also in the popular version of the "seven". The only difference with this option is that on Windows 7, the maintenance process is started exclusively when the computer is idle (usually at night). This immediately gave a lot of advantages, since the processor was not loaded, and the user did not need to feel on himself how the computer was "dull".
On the Windows versions 8.1 and 10, this process takes place only while the computer is running, thereby loading the processor and RAM devices. The absorption of resources occurs not only on computers with low power indicators, but also with good hardware.
This is an inconvenience faced by every user of operating systems such as Windows 8.1 and 10. Disabling this option is undesirable, but many still decide to take such a desperate step, since it is simply impossible.
How do I set up automatic maintenance?
If you do not want to disable OS maintenance, then the startup time this process can be installed manually. In this case, the start of the service will begin exclusively at the time you specify. To realize this possibility, you should perform the following manipulations:
On the keyboard, press the key combination Win and X, and then select the "Control Panel" section.
For Windows 8.1 you need to go along the path: "System and Security" - "Support Center".
In the menu that appears, we find the "Service" section, and it already has two commands to choose from: "Start service" and "Change service parameters". We select the last command and make the necessary adjustments.

For Windows 10, you need to follow the System and Security - Security and Maintenance path. The window that opens also contains the buttons "Start maintenance" and "Change maintenance parameters".

After entering the "Change service parameters" section, several items will be displayed, the settings of which can be changed. In this window, you can change the start time of the automatic maintenance process.
If you do not want the computer to be taken out of sleep mode for maintenance, then you need to uncheck the box.

If you are thinking of completely disabling this option, then consider the principle of disabling service.
How you can turn off automatic maintenance
For operating rooms Windows systems 8.1 and 10 the process for disabling the automatic maintenance service is different. For Windows systems 8.1 you will need to do the following:
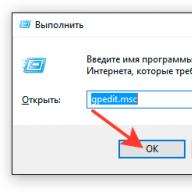
Press the key combination Win + R, and in the Run field that opens, you need to enter the command: taskschd.msc

The scheduler window opens, in which you need to go along the following path: "Task Scheduler Library" - Microsoft - Windows - TaskSchtduler.
In the central part of the window that opens, you need to find the RegularMaintance task. Stand on it with the right mouse button and bring up a menu in which you need to click on the "Disable" item.

The RegularMaintenance file is the automatic maintenance option. After disabling it, the process will not start on its own, but you will need to resort to carrying out such actions yourself. If you want to customize the update, then in the pop-up menu of the RegularMaintenance file, select the "Properties" item, and configure certain maintenance parameters at your discretion.
In Windows 10, the above manipulations will not be possible, since the developers specifically hid this file. By hiding this file, Microsoft has permanently removed the option to disable automatic maintenance. However, this does not mean at all that it is impossible to disable this option in the top ten. All this can be implemented, but for this you will need to perform slightly different steps:
First, you need to download the archive with the linked REG files. You can do this using this link: https://cloud.mail.ru/public/2whN/vrayNwrty After unpacking the downloaded archive, you need to find a file called "disableautomaticmaintenance" in it.

Run this file as Administrator. After launching, you need to agree with all the comments.

The registry changes will then be made and automatic maintenance will not be enabled on its own.
In conclusion, I would like to add that if you need to enable this option on the top ten, then you need to run the file "enableautomaticmaintenance" in the downloaded archive.
The principle of disabling automatic maintenance does not have any difficulties, but do not forget that you cannot disable this option for a long time or forever. As a result, this will negatively affect the operation of your computer, and after a month, various failures, errors and breakdowns will appear on the monitor.
There are many tools available for the operating system microsoft windows... Some of them are quite well-known and used by most users every day, but there are also unknown ones for most users. One of these is automatic windows maintenance, which was included in windows 8. This function is useful for the operating system, but many do not like it when it starts working at the wrong moment. In this regard, you need to change or disable the windows 10 automatic maintenance time.
Windows automatic maintenance- is responsible for performing all updates, these are applications from the store, programs, and also performs scanning using windows defender, performs system diagnostics, disk cleanup, defragmentation, etc. All of these tasks are performed at specified times and even when the computer is in standby mode. Someone comes home from work and has little time left to do work or just play on the computer, and then there are incomprehensible lags, slow Internet speed and other factors when this service is triggered according to the schedule.
Change windows 10 automatic maintenance time
Go to " Control Panel"and type in the search above" Service".

Now we can change the time to a convenient one for us. You can check the box to wake up the computer at the scheduled time.

How to permanently disable Windows servicing
Open the registry editor using the combination of buttons win + R and write in line regedit.


Follow the path in the registry:
HKEY_LOCAL_MACHINE \ SOFTWARE \ Microsoft \ Windows NT \ CurrentVersion \ Schedule \ Maintenance
If there is no key with the name " MaintenanceDisabled", then right-click on an empty field and create a key with the parameter DWORD (32 bits)... Name or rename the new key "MaintenanceDisabled".

Double click on the file we created and assign the value 1 ... Then restart your computer. You can also turn it back on by changing the value to 0.