Unfortunately, when installing programs, most of them are automatically registered in Windows autostart 7 , even if these are not the programs themselves, then these can be their specific components, for example, designed to send requests for updates. Many computer users are attracted by this fact and want disable autoplay in Windows 7... Also, autorun sometimes becomes a way for various viruses to get on your computer. The computer automatically opens some files that may be infected.
Also due to the fact that Windows 7 autorun has accumulated a large number of programs that will start when the computer is turned on, this is hello to the fact that the computer will slow down and dull, since programs consume computer resources, such as processor time and operative memory, this is one of the main reasons for the slowdown in computer performance. In order to get rid of these problems and increase the speed of work, you just need to disable Windows 7 autorun.
The Windows 7 operating system easily allows you to configure, enable / disable startup programs.
In order to find out which programs are in autorun and start working together with turning on the computer, follow these steps:
Start → All Programs → Accessories → RunIn the window that appears, in the open line, type the command:
msconfig
And press OK, in the "System Configuration" menu that appears, go to the "Startup" tab

On the autorun tab, uncheck all the checkboxes of programs that you do not use, or if you do not know what it is, then disable it too, there is even a button - "Disable all"... If necessary, everything can be returned back by ticking the boxes again. There are not many programs that really should be in startup, as a rule it is an antivirus.

After making the changes, click "Apply" → "Ok", the system will offer to restart the computer in order for the changes to take effect, you can do it immediately or do it later.
In Windows 7 autorun, viruses are often registered that begin to work and harm, immediately upon starting the computer, therefore, if there are programs in the autorun that are not known to you, with crooked names, then it is likely that this is a virus that needs to be removed.
Method 2 - Disable Windows 7 autostart
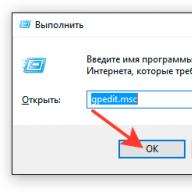
As in the first case, you must have administrator rights to perform these actions. In order to disable autorun, click "Start", type gpedit.msc into the search bar and press "Enter".

The "Local Group Policy Editor" will open, in which you need to open the following path in the left menu:
Computer Configuration -> Administrative Templates -> Windows Components -> Startup Policies
You will see the item - "Disable Autostart", double click on it. Select Enable, select for which devices and click "OK".

Windows 7 disable autorun flash drive
There is another type of autorun, which is responsible for autorun from removable media and flash drives.
In order to disable autorun flash drive Windows 7, need to open "Control Panel" and drive into the search bar "Autostart" and open it.

Windows 7 disable autoplay drives
Uncheck the first checkbox "Use autorun for all media and devices"

Optionally, you can add the necessary devices to autorun, it is very easy to do this using the drop-down menu.
Are you familiar with this situation. You insert a USB flash drive, a window with options for actions opens automatically. This triggered the autostart function. On the one hand, this is convenient, but on the other, it is potentially dangerous. Let's consider how to disable autorun of a USB flash drive in Windows in different ways.
What it is
Autostart is a function built into Windows OS. It automates some processes so that the user does not do it himself. When you connect a removable media, the OS automatically opens the explorer, launches a photo or a player.
Why disable
Let's say there is a virus on the flash drive. It is located in the file that is responsible for automatic start- aurorun.inf. When connected, an executable file with a virus will be launched. To protect yourself from viruses, this function.
Disabling this function will not protect one hundred percent from viruses. Use.
How to disable autorun flash drives in Windows 10
We use the "hot" keys "Win + I", go to the "Devices" section.
We find the item "Autostart". We set the switch to the "Off" position, or select devices that are prohibited from opening automatically. To do this, select "Do not execute" from the menu. 
Disconnect from the "Control Panel"
Press the key combination "Win + R", then write "control". 
Further "Autostart". 
Disable the checkbox opposite the "Use for all" item. 
Now all devices connected to the PC will not automatically start. Use this method if you need to temporarily disable autorun for a flash drive.
Select individual shutdown from the dropdown menu for specific device... Check the box "Do not execute". 
We work with the registry
When using this method Account must have Administrator rights.
Open the "Registry Reactor". Press "Win + R", write the command "regedit". 
Navigate to the registry branch as in the screenshot. We find the parameter "NoDriveTypeAutorun". Click on it twice with the left mouse button and assign the value 000000FF. 
Reboot your PC to activate the changes
Disable using Group Policy Editor
There is no such Editor in Windows 10 Home, so use the other methods described.
Press "Win + R", write the command "gpedit.msc". 
Further, as in the screenshot. 
We find "Politicians". Double click on it with the left mouse button. Click "Shutdown". 
Set the checkbox to the "Enabled" position.
How to disable autorun Windows 7 flash drives
Use the methods described above. When editing the registry, you will need two registry branches. The first is the same as in the method described above. The second is as in the screenshot. 
Set the NoDriveTypeAutorun parameter to the hexadecimal value 000000FF. Reboot your computer.
Output
We looked at how to disable the autorun of a flash drive on Windows (Windows) 10. Use the methods described above to protect yourself from malicious code entering the system. Be careful when editing the registry. Incorrect actions can lead to a malfunction of the OS. So create.
For the convenience of users, Microsoft has created such a built-in function in operating system like autorun flash drive. Its main task is to simplify the user's work. But the main disadvantage is the introduction of viruses onto the computer, which are registered on removable media during copying, which was previously used on another PC. And in order to protect your "machine" from malware, you should know how to enable or disable autorun flash drives and other removable media.
This is a function that allows you to quickly and without any human action to launch a program on a removable device. It was originally designed for DVD and CD only. Whereas now it can start automatically, even when smartphones are connected. For example, for media with movies and music, a player is loaded, for clean disk- software for recording, for photos - viewer, etc. If the removable drive contains files of different types, then a window pops up offering several actions.
The essence of the function is to create an autorun.inf for the flash drive in the root folder of the removable media. This is a file that contains a command to automatically launch a specific program. When the drive is turned on, the system will check for the presence of this file and, if it finds it, it will launch it without making unnecessary requests. Many viruses also use this. But there is good way to secure removable equipment is to create an autorun file for the flash drive. In this case, the malware will not be able to register it by itself, since it already exists and thus will not start when the device is connected to the computer.
IMPORTANT. Many virus writers know this trick and can easily delete this file from removable media. Therefore, the question of equipment infection with viruses should be taken more seriously.
Turning AutoPlay on and off
For Windows 7, 8
Before turning on the autorun flash drive, you need to open the control panel in the "Start" menu and select "Autorun". Opposite the entry "Use for all media and devices" check the box.

Opposite the entry "Use for all media and devices" must be ticked
For Windows XP
The process of enabling and disabling this feature in XP is a little more complicated. To do this, you need to go to the "Group Policy". In the "Start" menu, find the "Run" tab, register the command gredit.msc and press "enter". In the window that opens, select "Computer Configuration", "Administrative Templates" and "System". On the right side, find the line "Disable startup".

Click on Disable autostart
To enable the function, mark the item "Disabled" (not set) and confirm "OK". And to disable it, select the line "Enabled" and "For all drives with confirmation of selection."
After you have done the autorun of the flash drive, you should insert the removable drive into the PC and check the operation of the system.
Basics of using the AutoPlay feature
- You should be aware that the autorun for a flash drive itself does not contain malicious code, but only has a link to an existing file with a virus from the Internet.
- Malicious utilities are also written to the Autorun folder when copied with the extensions .inf, .bat, .exe, .pif, .ini, .cmd, etc.
- You cannot immediately launch a file or group of autorun files. You need to open them using software for viewing (for example, notepad) and check for viruses.
- If, when copying data, in addition to the necessary information, an autorun is found, then it should be deleted. And if it is not deleted or disappears, and after a minute is recreated, then the computer is infected.
- Also, to disable the function, you can use various optimization programs (tweakers). But it's better to do it manually, for greater security.
Why create Autorun.inf
Before making an autorun for a flash drive, you need to know that you should not just create a folder, but make it such that malicious software cannot delete it. And in order for the virus to be unable to understand how to remove autorun.inf from the flash drive, it must be hidden. In this case, it can act as an indicator. For example, if a flash drive contains viruses, then they probably already tried to delete this folder, and during this operation it ceases to be hidden. Thus, it becomes clear that there is malware on the media. And since how to remove the autorun from the flash drive in a simple way will not work, you need to either format it, or clean it with the AVZ antivirus, or use the FlashGuard program.
Now, knowing how to enable or disable the autorun of removable equipment, securing it with the autorun file, you can significantly reduce the attack of viruses on your computer or laptop.
I can assume that among Windows users there are a lot of those who autorun disks, flash drives and external hard drives not really needed and even annoying. Moreover, in some cases, it can even be dangerous, for example, this is how viruses appear on a USB flash drive (or, rather, viruses that spread through them).
In this article I will describe in detail how to disable autorun external storage, first I'll show you how to do this in the local group policy editor, then - using the registry editor (this will work for all OS versions where these tools are available), and also show how to disable Autoplay in Windows 7 through the control panel and the method for Windows 8 and 8.1, by changing the parameters of the computer in the new interface.
If in your Windows versions there is no local group policy editor, then you can use the registry editor. To do this, launch the Registry Editor by pressing the Win + R keys on your keyboard and typing regedit(after that - press Ok or Enter).
You need two registry keys:
HKEY_LOCAL_MACHINE \ Software \ Microsoft \ Windows \ CurrentVersion \ Policies \ Explorer \
HKEY_CURRENT_USER \ Software \ Microsoft \ Windows \ CurrentVersion \ policies \ Explorer \

In these sections, you need to create a new DWORD parameter (32 bit) NoDriveTypeAutorun and assign the hexadecimal value 000000FF to it.
Reboot your computer. The setting we have set is to disable autoplay for all drives in Windows and other external devices.
Disable autoplay disks in Windows 7
To begin with, I will let you know that this method is suitable not only for Windows 7, but also for the eight, just in latest Windows many of the settings made in the control panel are also duplicated in the new interface, in the item "Changing computer parameters", where, for example, it is more convenient to change the parameters using touch screen... However, most of the methods for Windows 7 continue to work, including the way to disable autoplay of drives.

Go to the panel Windows management, switch to the "Icons" view if you had the category view turned on and select the "Autoplay" option.

After that, uncheck "Use autorun for all media and devices", and also set for all types of media "Take no action". Save your changes. Now, when you plug a new drive into your computer, it won't try to play it back automatically.
Autoplay on Windows 8 and 8.1
The same thing that was performed in the section above using the control panel can be done in changing the settings of Windows 8, to do this, open the right panel, select "Settings" - "Change computer settings".

Thank you for your attention, I hope I helped.
In this tutorial we will look at how to disable autoplay of disks in the operating room Windows system XP. It happens that along with autorun, various viruses are loaded into the computer, which are disguised as the autorun file, so it is highly advisable to disable the autorun of disks.
If there are viruses on the disk or flash drive, then when we insert the disk into the floppy drive or the USB flash drive into the usb connector, then autorun is triggered and installs malware... And in general, why do we need this waste of time, when we insert the disc, it starts spinning and the system searches for the autorun file.
There are several ways to disable autorun disks. We will look at a way where Group Policy will help us in disabling. Group Policy will allow us to disable autoplay of disks with just a few clicks.
To do this, we go to "Start" and click "Run".

In the window that appears, write Gpedit.msc and press the Enter key.

After that, we get into Group Policy. Select "Computer Configuration" on the left, then "Administrative Templates" and then the last "System".
Now on the right we are looking for the line "Disable autorun", click on it twice.

In the next window, put the switch in the "Enabled" position, and in the lower one we select "Disable autorun on: all drives".
That's all, now we press "Apply" and "OK".