Let's take a look at LED products ranging from the old 5mm LEDs to super-bright high-power LEDs up to 10W.
To choose the “right” flashlight for your needs, you need to understand what kind of LED flashlights are and their characteristics.
What diodes are used in flashlights?
Powerful LED lights began with devices with a 5mm matrix.
LED flashlights in completely different designs, from pocket to camping, became widespread in the mid-2000s. Their price has dropped significantly, and the brightness and long battery life have played a role.
 5mm white ultra-bright LEDs draw 20 to 50 mA of current at a voltage drop of 3.2-3.4 volts. Light intensity - 800 mcd.
They show themselves very well in miniature flashlights-trinkets. The small size allows you to carry such a flashlight with you. They are powered either by "mini-finger" batteries, or from several round "pills". Often used in lighters with a flashlight.
These are the LEDs that have been installed in Chinese lanterns for many years, but their age is gradually expiring.
In search lights with a large reflector, it is possible to mount dozens of such diodes, but such solutions are gradually fading into the background, and the choice of buyers falls in favor of lights on powerful Cree-type LEDs.
 Search light with 5mm LEDs
 These flashlights run on AA, AAA or rechargeable batteries. They are inexpensive and lose both in brightness and quality to modern flashlights on more powerful crystals, but more on that below.
In the further development of flashlights, manufacturers went through many options, but the market for quality products is occupied by flashlights with powerful matrices or discrete LEDs.
What LEDs are used in powerful flashlights?
Powerful flashlights are modern flashlights of various types, ranging from those that are the size of a finger, ending with huge search lights.

In such products in 2017, the Cree brand is relevant. This is the name of an American company. Its products are considered one of the most advanced in the field of LED technology. An alternative are LEDs from the manufacturer Luminus.
Such things are far superior to LEDs from Chinese lanterns.
What are the most commonly installed Cree LEDs in flashlights?
Models are named consisting of three to four characters separated by a hyphen. So diodes Cree XR-E, XR-G, XM-L, XP-E. Models XP-E2, G2 are most often used for small flashlights, while XM-L and L2 are very versatile.
They are used starting from the so-called. EDC flashlights (everyday wear) are from small flashlights smaller than the palm of your hand, to serious large search lights.
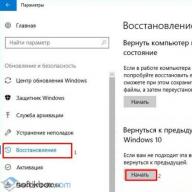
Let's look at the characteristics of high-power LEDs for flashlights.
| Name | Cree XM-L T6 | Cree XM-L2 | Cree XP-G2 | Cree XR-E |
| Photo |  |
|||
| U, V | 2,9 | 2,85 | 2,8 | 3,3 |
| I, mA | 700 | 700 | 350 | 350 |
| P, W | 2 | 2 | 1 | 1 |
| Operating temperature, °C | ||||
| Luminous flux, Lm | 280 | 320 | 145 | 100 |
| Luminescence angle, ° | 125 | 125 | 115 | 90 |
| Color rendering index, Ra | 80-90 | 70-90 | 80-90 | 70-90 |
The main characteristic of LEDs for flashlights is the luminous flux. It determines the brightness of your flashlight and the amount of light that the source can give. Different LEDs, consuming the same amount of energy, can differ significantly in brightness.
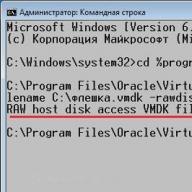
Consider the characteristics of LEDs in large flashlights, searchlight type :
| Name | ||||
| Photo |  |  |  |  |
| U, V | 5,7; 8,55; 34,2; | 6; 12; | 3,6 | 3,5 |
| I, mA | 1100; 735; 185; | 2500; 1250 | 5000 | 9000...13500 |
| P, W | 6,3 | 8,5 | 18 | 20...40 |
| Operating temperature, °C | ||||
| Luminous flux, Lm | 440 | 510 | 1250 | 2000...2500 |
| Luminescence angle, ° | 115 | 120 | 100 | 90 |
| Color rendering index, Ra | 70-90 | 80-90 | 80-90 |
Sellers often indicate not the full name of the diode, its type and characteristics, but an abbreviated, slightly different alphanumeric marking:
- For XM-L: T5; T6; U2;
- XP-G: R4; R5; S2;
- XP-E: Q5; R2; R;
- for XR-E: P4; Q3; Q5; R.
The lantern can be called just that, “EDC T6 Lantern”, information in such brevity is more than enough.
Flashlight repair
Unfortunately, the price of such flashlights is quite high, as well as the diodes themselves. And it is not always possible to purchase a new flashlight in case of breakage. Let's figure out how to change the LED in the flashlight.
To repair a flashlight, you need a minimum set of tools:
- soldering iron;
- flux;
- solder;
- screwdriver;
- multimeter.
To get to the light source, you need to unscrew the head of the lantern, it is usually fixed on a threaded connection.

In diode test or resistance measurement mode, check if the LED is working properly. To do this, touch the black and red probes to the LED leads, first in one position, and then swap red and black.

If the diode is working, then in one of the positions there will be low resistance, and in the other - high. This way you determine that the diode is good and conducts current in only one direction. During the test, the diode may emit a weak light.
Otherwise, there will be a short circuit or high resistance (open) in both positions. Then you need to replace the diode in the lamp.

Now you need to unsolder the LED from the lamp and, observing the polarity, solder a new one. Be careful when choosing an LED, consider its current consumption and voltage for which it is designed.
If you neglect these parameters - at best, the flashlight will quickly sit down, at worst - the driver will fail.
A driver is a device for powering an LED with a stabilized current from various sources. Drivers are manufactured industrially for power supply from a 220 volt network, from a car electrical network - 12-14.7 volts, from Li-ion batteries, for example, size 18650. Most powerful flashlights are equipped with a driver.
Increasing the power of the flashlight
If you are not satisfied with the brightness of your flashlight or you figured out how to replace the LED in the flashlight and want to upgrade it, before buying heavy-duty models, study the basic principles of LED operation and limitations in their operation.
 Diode matrices do not like overheating - this is the main postulate! And replacing the LED in the flashlight with a more powerful one can lead to such a situation. Pay attention to the models in which more powerful diodes are installed and compare with yours, if they are similar in size and design, change them.
If your flashlight is smaller, additional cooling will be required. We wrote more about making radiators with our own hands.
If you try to install such a giant as the Cree MK-R in a miniature keychain flashlight, it will quickly fail from overheating and it will be a waste of money. A slight increase in power (by a couple of watts) is acceptable without upgrading the flashlight itself.
Otherwise, the process of replacing the brand of LED in a flashlight with a more powerful one is described above.
Lanterns Police
 Police LED flashlight with shocker
 Such flashlights shine brightly and can act as a means of self-defense. However, they also have problems with LEDs.
How to replace the LED in a Police flashlight
A wide range of models is very difficult to cover in one article, but general repair recommendations can be given.
- When repairing a flashlight with a stun gun, be careful, it is advisable to use rubber gloves to avoid electric shock.
- Lanterns with dust and moisture protection are assembled on a large number of screws. They differ in length, so make notes where you unscrewed one or another screw.
- The optical system of the Police flashlight allows you to adjust the diameter of the light spot. When disassembling on the body, make marks in what position the parts were before removal, otherwise it will be difficult to put the block with the lens back.
Replacing the LED, voltage converter unit, driver, battery is possible using a standard soldering kit.
What LEDs are in Chinese lanterns?
Many products are now bought on aliexpress, where you can find both original products and Chinese copies that do not match the stated description. The price for such devices is comparable to the price of the original.

In a flashlight where the Cree LED is declared, it may not actually be there, at best there will be a frankly different type of diode, at worst one that will be difficult to distinguish from the original outwardly.
 What might this entail? Cheap LEDs are made in low-tech conditions and do not give out the declared power. They have a low efficiency, from which they have increased heating of the case and crystal. As already mentioned, overheating is the worst enemy for LED devices.
This happens because when heated through the semiconductor, the current increases, as a result of which the heating becomes even stronger, the power is released even more, this avalanche-like leads to a breakdown or breakage of the LED.
If you try and spend time searching for information, you can determine the originality of products.
 Compare original and fake cree
 LatticeBright is a Chinese LED manufacturer that makes products very similar to Cree, probably a design match (sarcasm).
 Comparison of the Chinese copy and the original Cree
 On the substrates, these clones look like this. You can see the variety of shapes of LED substrates produced in China.
 Counterfeit detection by substrate for LED
 Fakes are quite skillfully made, many sellers do not indicate this "brand" in the product description and where the LEDs for the lights are made. The quality of such diodes is not the worst among Chinese junk, but far from the original.
Installing an LED instead of an incandescent lamp
Many old things have horse races or lanterns on an incandescent lamp gathering dust and you can easily make it LED. For this, there are either ready-made solutions or home-made ones.
With a broken light bulb and LEDs, with a little ingenuity and solder, you can make a great replacement.
An iron barrel in this case is needed to improve heat dissipation from the LED. Next, you need to solder all the parts to each other and fix with glue.
When assembling, be careful - avoid shorting the leads, hot glue or heat shrink tubing will help with this. The central contact of the lamp must be soldered - a hole is formed. Pass a resistor lead through it.
Next, you need to solder the free output of the LED to the base, and the resistor to the central contact. For a voltage of 12 volts, you need a 500 Ohm resistor, and for a voltage of 5 V - 50-100 Ohms, for power from a Li-ion 3.7V battery - 10-25 Ohms.
 How to make an LED from an incandescent lamp
 Choosing an LED for a flashlight is much more difficult than replacing it. It is necessary to take into account a lot of parameters: from brightness and scattering angle, to case heating.
In addition, we must not forget about the power supply for the diodes. If you master everything described above, your devices will shine for a long time and with high quality!
Hey Habr!
I want to tell a story about how a Chinese Cree XM-L LED headlamp fell into my hands and what happened to it next.
background
Once upon a time, I ordered a flashlight with a bright LED from a Chinese site. The flashlight turned out to be quite ergonomic (although it could be lighter), but its driver left much to be desired.
It shone quite brightly, but the driver had only 3 modes - very bright, bright and strobe, switching between which was done by pressing a button. In order to simply turn the flashlight on and off, it was necessary to go through these 3 modes each time. In addition, this flashlight, when turned on, drained the battery to the last - so a couple of my cans of 18650 went into a deep discharge.
All this was inconvenient and annoying, so at some point I decided to make my own driver for it, which will be discussed further.
Flashlight with old driver
Here is such a flashlight, for sure many have dealt with similar
This is what the original driver looks like
Technical task
As you know, to achieve a good result, any development must have a good technical specification, so I will try to formulate it for myself. So the driver must:
- Be able to turn on / off by a short press of the button (button without fixation). Perhaps this is the main reason why all this started.
- Have a smooth (stepless) brightness control, from the brightest - "turbo", to "moonlight", when the diode barely glows. The brightness should change evenly.
- Remember the set brightness for the duration of the shutdown.
- Monitor the battery charge by warning when it is almost empty (approximately 3.3V) and turning off when it is completely discharged (approximately 2.9V). For different batteries, these parameters may be different. Accordingly, the operating voltage should be in the range of 2.7~4.5V.
- Have 2 special modes - emergency beacon and strobe (well, why not?)
- Be able to turn on / off the rear LED (this is true when cycling at night, it turns out something like a parking light).
- Have protection against polarity reversal and static electricity. Not necessary, but it will be a nice addition, because in the dark you can mistakenly put the battery on the wrong side.
- To be smaller than the original driver in size, but at the same time have the same seats. The Chinese driver is simply huge, it will not be easy to make it bigger.
Well, if the flashlight is being modded, why not build a charger with a micro-USB connector into it? I always have such a cable and USB charging at hand, and I have to look for my own power supply.
Iron
I have some experience with Arduino, so it was decided to make a driver for the MK of the AVR family. They are widely available, easy to program and have low power (sleep) modes.
The Attiny13a microcontroller was chosen as the "brain" of the driver - this is one of the cheapest MCs from Atmel (now absorbed by Microchip), it has everything you need on board - a GPIO for connecting a button and an LED, a timer for generating a PWM signal, an ADC for measuring voltage and EEPROM to save parameters. Only 1 KB of flash memory is available (but how much is needed for a flashlight), as well as 64 B of RAM and the same amount of EEPROM.
The Attiny13 comes in several package options, most notably a DIP-8 that can be plugged directly into a standard 2.54mm pitch breadboard.
Since there are only 3 wires from the back to the head of the lamp, the button is forced to close to the ground (about the impossibility of shorting to plus - later), you will have to switch the LED on the plus - which means you need a P-channel field switch. I took the AO3401 as such a transistor, but you can take the SI2323, it is more expensive, but has a lower open channel resistance (40 mΩ, while the AO3401 has 60 mΩ, at 4.5 V), so the driver will heat up less.
From words to deeds, I collect a preliminary version on a breadboard
So far, it is powered directly from the programmer, with a voltage of 5 V (actually less due to losses in the USB cable). Instead of the XM-L LED, for now, I stuck a regular LED on legs and put a weak transistor with a high threshold voltage.
Then a circuit was drawn in Altium Designer, which I added with protection against polarity reversal and ESD.

Detailed description and purpose of all components
Required components:
C1 - decoupling capacitor for microcontroller power supply, should be around 0.1 microfarad, case 1206 or 0805, temperature coefficient X7R
R1-R2 is a resistor divider for measuring battery voltage, you can set any ratings, here the main ratio is (750K / 220K, division factor 4.41) and the leakage current, which will be greater if you increase the ratings (at the current it is about 4 μA). Since an internal reference is used (1.1 V, according to the datasheet it can be within 1.0 V - 1.2 V), the maximum voltage at the output of the divider should not be more than 1 V. With a divider 750/220, the maximum allowable voltage at the input of the divider will be 4.41 V, which more than enough for all types of lithium batteries.
I calculated the divisor using this calculator.
R3 - protection of the output of the microcontroller port from short circuit (if suddenly PB1 is pulled to VCC, a large current will flow through the pin and the MK may burn out)
R4 - tightening RESET MK to power, without it, reboots from pickups are possible.
Q1 - P-channel field effect transistor in a SOT-23 package, I installed AO3401, but you can use any other with a suitable pinout (for example, SI2323)
R7 is the gate current limiting resistor. Since the gate of the transistor has some capacitance, when this capacitance is charged, a large current can pass through the pin and the pin may fail. You can set it in the region of 100-220 ohms (no more, the transistor will start to be in a half-closed state for a long time, and, as a result, it will heat up more).
R6 - gate pull-up resistor to power supply. In case PB0 goes into a high-impedance state, a logic 1 will be set through this resistor at the gate of Q1 and the transistor will be closed. This can happen due to an error in the code or in programming mode.
D2 - "blocking" diode - allows, when the voltage "sinks" (when the LED turns on for a short period at full brightness), the MK is powered from the capacitor for some time, it also protects against polarity reversal.
You can put any Schottky diode in the SOD323 package with a minimum voltage drop, I put BAT60.
Initially, power reverse polarity protection was done on a field effect transistor (this can be seen on boards made by loot). After desoldering, an unpleasant feature came out - when the load was turned on, a voltage drop occurred and the MK rebooted, since the field worker does not limit the current in the opposite direction. I first soldered a 200uF electrolytic capacitor between VCC and GND, but I did not like this solution due to its size. I had to solder the transistor and put a diode in its place, since SOT-23 and SOD-323 have similar dimensions.
In total, there are only 10 components in the circuit that are required for installation.
Optional components:
R5 and D1 are responsible for the backlight (LED2). The minimum rating of R5 is 100 ohms. The higher the rating, the weaker the rear LED glows (it turns on in a constant mode, without PWM). D1 - any LED in the 1206 package, I set it to green, because visually they are brighter at the same currents than others.
D3 and D4 are protection diodes (TVS), I used PESD5V0 (5.0V) in SOD323 package. D3 protects against power overvoltage, D4 - by button. If the button is covered with a membrane, then it does not make much sense. It probably makes sense to use bidirectional protective diodes, otherwise, when the polarity is reversed, current will flow through them and they will burn out (see CVC of a bidirectional protective diode).
C2 - tantalum capacitor in case A (similar to 1206), it makes sense to install it when the driver is unstable (the supply voltage of the micron can sag at high switching currents of the LED)
All resistors are size 0603 (for me this is an adequate limit for hand soldering)
Everything is clear with the components, you can make a printed circuit board according to the above diagram.
First of all, you need to build a 3D model of the future board, along with holes - IMHO, in Altium Designer this is the most convenient way to determine the geometry of the PCB.
I measured the dimensions of the old driver and its mounting holes - the board should be attached to them, but have smaller dimensions (for versatility, suddenly it will have to be built somewhere else).
A reasonable minimum here turned out to be about 25x12.5mm (2:1 aspect ratio) with two holes with a diameter of 2mm for attaching to the lantern body with native screws.
I made a 3D model in SolidWorks, then exported it to Altium Designer as STEP.
Then I placed the components on the board, made the contacts in the corners (it’s more convenient to solder and it’s easier to spread the ground), I put Attiny13 in the center, the transistor is closer to the LED contacts.
I laid out the power tracks, placed the rest of the components as it turns out and spread the signal tracks. For the convenience of connecting the memory, I brought separate contacts under it, which duplicate the contacts of the battery.
I did all the wiring (with the exception of one jumper) on the top layer - in order to be able to make a board at home with a LUT.
The minimum width of the signal tracks is 0.254 mm / 10 mil, the power tracks have a maximum width where possible.
This is what a wired board looks like in Altium Designer
Altium Designer has the ability to see what the board will look like in 3D (this requires models for all components, some I had to build myself).
Perhaps someone here will say that the 3D mode for the tracer is not needed, but for me personally this is a handy feature that makes it easier to place components for ease of soldering.

At the time of this writing, 3 versions of the board were made - the first for LUT, the second for industrial production, and the 3rd, final with some corrections.
Board manufacturing
Homemade method
LUT - laser-ironing technology, a method of manufacturing circuit boards using etching on a mask obtained by transferring toner from paper to copper. This method is great for simple single-sided boards like this driver.
There are a lot of articles on the network on this technology, so I will not go into details, but will only briefly talk about how I do it.
First you need to prepare a template that will be printed on thermal paper. I export the top_layer layer to PDF, I get a vector image.

Since the board is small, it makes sense to take a piece of textolite with dimensions several times larger and do what is called panelization in the industry.
For these purposes, CorelDraw is very convenient, but you can use any other vector editor.
I place copies of the templates on the document, I make gaps of 0.5-1mm between the boards (depending on the method of separation, more on that later), the boards must be arranged symmetrically - otherwise it will be difficult to separate them.
I pick up a piece of one-sided textolite a little larger than the assembled panel, clean it and degrease it (I prefer to rub it with an eraser and then with alcohol). I print a template for etching on thermal paper (here it is important not to forget to mirror the template).
With the help of an iron and patience, gently stroking the paper, I transfer it to textolite. I wait until it cools down and carefully tear off the paper.
Free areas of copper (not covered with toner) can be varnished or sealed with adhesive tape (the smaller the copper area, the faster the etching reaction).
Such is home panelization - a large number of boards allows you to compensate for production defects
I poison boards with citric acid in a hydrogen peroxide solution, this is the most affordable way, although quite slow.
The proportions are as follows: for 100 ml of peroxide 3% there are 30 g of citric acid and about 5 g of salt, all this is mixed and poured into a container with textolite.
Warming the solution will speed up the reaction, but may cause the toner to peel off.
Unknown chemical magic begins: copper is covered with bubbles, and the solution acquires a blue tint
After some time, I take out the etched board, clean it from the toner. I cannot wash it off with any solvents, so I remove it mechanically - with fine-grained sandpaper.
Now it remains to tin the board - this will help with soldering and protect copper from oxidation and facilitate soldering. I prefer to tin with Rose alloy - this alloy melts at a temperature of about 95 degrees, which allows it to be tinned in boiling water (yes, perhaps not the most reliable composition for tinning, but it is suitable for homemade boards).

After tinning, I drill the board (for contacts I use carbide drills f1.0, for jumpers - f0.7), I drill with a dremel for lack of another tool. I don’t like sawing textolite because of dust, so after drilling I cut the boards with a clerical knife - I make several cuts along one line on both sides, then break them along the notch. This is similar to the V-cut method used in industry, only the cut is made with a cutter.
This is what the board looks like ready to be soldered
When the board is ready, you can start desoldering the components. First I solder the small things (resistors 0603), then everything else. The resistors are close to the MK, so soldering in reverse order can be problematic. After soldering, I check if there is a short circuit in the power supply of the driver, after which it is already possible to start flashing the MK.
Drivers ready for firmware download
industrial way
LUT is fast and affordable, but the technology has its drawbacks (like almost all "home" PP manufacturing methods). It is problematic to make a double-sided board, the tracks can be overetched, and one can only dream of plating the holes.
Fortunately, enterprising Chinese have long been offering industrial printed circuit board manufacturing services.
Oddly enough, a single-layer board from the Chinese will cost more than a two-layer board, so I decided to add a second (bottom) layer to the PCB. Power tracks and ground are duplicated on this layer. Also, it became possible to make a heat sink from the transistor (copper polygons on the bottom layer), which will allow the driver to work at higher currents.
The bottom layer of the board in Altium Designer
For this project, I decided to order a printed circuit board from the PcbWay website. The site has a convenient calculator for calculating the cost of boards, depending on their parameters, size and quantity. After calculating the cost, I uploaded the gerber file created earlier in Altium Designer, the Chinese checked it, and the board went to production.
Making a set of 10 TinyFL boards cost me $5. When a new user registers, they give a $5 discount on their first order, so I only paid for shipping, which also costs somewhere around $5.
This site has the ability to share the project, so if someone wants to order these boards, you can simply add this project to the cart.
After a couple of weeks, I received the same boards, only beautifully manufactured in an industrial way. It remains only to unsolder them and fill them with firmware.

Program (firmware)
The main difficulty that arose when writing the driver firmware was the extremely small size of the flash memory - the Attiny13 has only 1024 bytes.
Also, since the change in brightness is smooth, it turned out to be a non-trivial task to change it evenly - for this we had to do gamma correction.
Driver control algorithm
The driver is turned on by a short press on the button, turned off by it.
The selected brightness mode is retained for the duration of the power off.
If you make a double short press of the button (double click) during operation, the additional LED will be turned on / off.
With a long press during operation, the brightness of the flashlight will begin to change smoothly. Repeated long press changes direction (stronger/weaker).
The driver periodically checks the battery voltage, and if it is below the set values, it warns the user about the discharge, and then turns off to prevent deep discharge.
A more detailed description of the driver algorithm
- When power is applied to the MK, the peripherals are configured and the MK goes to sleep (if STARTSLEEP is defined). When power is applied to the driver, both LEDs flash a number of times if STARTBLINKS is defined.
- Dream. Attiny13 falls asleep in power-down mode (this is the most economical mode, according to the datasheet, the MK consumption will be ~ 1 μA), from which it can only be exited by some kind of interrupt. In this case, this is interrupt INT0 - pressing a button (setting PC1 to logic 0).
At the same time, the internal weak power pull-up must be enabled on PC1. The ADC and comparator are the main current consumers from all peripherals, so they must also be turned off. During sleep, the contents of the registers and RAM are saved, so EEPROM is not needed to remember the brightness. - After sleep, the peripherals and PWM turn on and the driver enters an endless loop in which the button is pressed and the battery voltage is periodically checked.
- If the button is pressed, the time of pressing is detected.
4.1. If the click is short, a double click is expected (if BTN_DBCLICK is defined).
If it was, the additional LED2 switches.
If not, then go to step 2 (sleep)
4.2. If the press is long (longer than BTN_ONOFF_DELAY) - the brightness control mode is turned on. In this mode:- Inverts the change direction (more/less) and changes the PWM duty % while the button is pressed.
- If the maximum/minimum value (RATE_MAX / RATE_MIN) is reached, the LED starts flashing;
- If n-blinks (AUXMODES_DELAY) have elapsed and the button is still pressed, the auxiliary mode is enabled. There are two such modes - stroboscope (turns on for 25 ms, frequency 8 Hz) and emergency beacon (turns on at full brightness for 50 ms, frequency 1 Hz). In these modes, there is no battery check, and to exit, you need to keep the button pressed for some time.
- If it's time to check the battery voltage - readings are taken from the ADC2, the result is compared with the preset values.
- If the ADC value is greater than the BAT_WARNING value, everything is fine
- If less than BAT_WARNING - the user is warned about the discharge, the driver blinks the main LED. The number of flashes will be proportional to the degree of discharge. For example, with default values, when fully discharged, the flashlight will blink 5 times.
- If less than BAT_SHUTDOWN - MK goes to step 2 (sleep).
LED brightness control
As you know, the easiest way to control the brightness is to change the PWM duty cycle, while the LED turns on for a while at full brightness, then turns off. Due to the nature of the human eye, the LED appears to be less bright than if it were on all the time. Since the LED is connected through a P-channel FET, to open it, you need to pull the gate to the ground, and to close it, vice versa, to power. The transistor's open time relative to its off time will correlate with the PWM fill.
The variable rate is responsible for the duty cycle of the PWM, 255 rate = 100% PWM.
With a clock frequency of 1.2 MHz and a timer prescaler of 1, the PWM frequency will be 1200000/256 = 4.7 kHz. Since this is a sound frequency (perceived by the human ear), at some duty cycle the PWM driver may start to beep (more precisely, it is not the driver that beeps, but wires or batteries). If it interferes, you can increase the operating frequency to 9.6 (CKSEL=10, CKDIV8=1) or 4.8 MHz (CKSEL=01, CKDIV8=1), then the PWM frequency will be 8 or 4 times higher, but the power consumption of the MK will also increase proportionally .
It is believed that the diode needs to be powered by stabilizing the current through it, and in this mode it will quickly fail. Here I agree and say that in my flashlight (and in many headbands of a similar design) the LED is not connected directly to the driver, but rather long and thin wires go to it, the resistance of which, as well as the internal resistance of the battery and the resistance of the driver, limit the maximum current is around 1.5 A, which is 2 times less than the maximum current for this LED (the maximum current for Cree XM-L according to the documentation is 3 A).
If you have a driver connected to the LED with short wires and the battery holder has good contacts, the current at maximum brightness (rate=255) can exceed 3A. In this case, this driver is most likely not suitable for you, as there is a risk of LED failure. However, you can adjust the RATE_MAX parameter to obtain acceptable current values. In addition, although according to the specification of the SI2323DS transistor, its maximum current exceeds 4 A, it is better to set the threshold to 2 A, otherwise the driver may need cooling.
Gamma Correction
The human eye perceives the brightness of objects non-linearly. In the case of this driver, the difference between 5-10% PWM will be perceived as a multiple increase in brightness, while the difference between 75-100% will be almost invisible to the eye. If you increase the brightness of the LED evenly, at a rate of n percent per second, it will seem that at the beginning the brightness rises very quickly from zero to the average value, then it increases very slowly from the middle to the maximum.
This is very inconvenient, and to compensate for this effect, a simplified gamma correction algorithm had to be made. Its essence is that the brightness change step increases from 1 at minimum PWM values to 12 at maximum values. In graphical representation, this looks like a curve whose points are stored in the rate_step_array array. Thus, it seems that the brightness changes evenly over the entire range.
Battery voltage monitoring
Every n-seconds (the BAT_PERIOD parameter is responsible for the interval in milliseconds) the battery voltage is measured. The positive contact of the battery, which is connected to VIN and enters the resistor divider R1-R2, to the midpoint of which pin PB4 is connected (aka ADC2 for the ADC multiplexer).
Since the supply voltage changes with the measured voltage, it will not be possible to measure it using Vref as a reference voltage, so I used an internal 1.1 V source as a reference. This is exactly what a divider is for - the MK cannot measure a voltage greater than the voltage reference source (for example, a voltage of 1.1 V will correspond to an ADC value of 1023 or 255 if using 8-bit resolution). Passing through the divider, the voltage at its middle point will be 6 times less than the input, the value of 255 will no longer correspond to 1.1 V, but as much as 4.33 V (divider by 4.03), which covers the measurement range with a margin.
As a result, a certain value is obtained, which is then compared with the preset values of the minimum stresses. When the BAT_WARNING value is reached, the LED starts blinking a certain number of times (the more discharged, the more it blinks - BAT_INFO_STEP is responsible for this, more details in the code), and when BAT_SHUTDOWN is reached, the driver turns off.
I don’t see the point in converting the ADC value to millivolts, because this wastes extra memory, which is already so small in tinka.
By the way, the divider is the main consumer of power when the MK is in sleep mode. So a 4.03 divider with R1 = 1M and R2 = 330K would have a total R = 1330K and a leakage current at 4V = 3µA.
During the voltage measurement, the load (LED) is switched off for approx. 1 ms. This is almost invisible to the eyes, but it helps to stabilize the voltage, otherwise the measurements will be incorrect (and making any corrections for the duty cycle of the PWM and so on is too difficult).
Making changes to the firmware
This is not difficult to do, especially if you have experience with Arduino or just C/C++.
Even if you have not had such experience, you can customize almost all operating parameters by editing the definitions (defines) of the flashlight.h header file.
To edit the source code, you will need to install the Arduino IDE with support for Attiny13 (a) or Atmel Studio - it is no more complicated than the Arduino IDE, but much more convenient.
Arduino IDE
First you will need to install Attiny13 support in the IDE. Sufficiently detailed instructions are available in the article.
Next, select Tools>Board Attiny13(a) from the menu and Tools>Frequency 1.2MHz from the menu.
The "sketch" is contained in a file with the .ino extension, it contains only one line of code - this is the inclusion of a header file in the project. In fact, this sketch is just a way to compile the firmware through the Arduino IDE. If you want to make any changes to the project, work with the .cpp file.
After opening the project, you need to click on the checkmark, compilation will start, if successful, the log will contain a link to the * .hex file. It must be poured into the microcontroller according to the instructions below.
Atmel Studio
The project for this IDE is contained in the flashlight.atsln file, and the source codes - in the files flashlight.h contains definitions (settings) and flashlight.cpp contains the actual code.
I don’t see the point in describing the contents of the sources in more detail - the code is full of comments.
After making changes to the code, you must press F7, the firmware will be compiled (or not, then the compiler will indicate where the error is). Flashlight.hex appears in the debug folder, which can be loaded into the microcontroller according to the instructions below.
To download the firmware and set up the fuses, I use the USBASP programmer in combination with the AVRDUDEPROG program. The program is a kind of GUI for the avrdude program, there is a convenient built-in fuse calculator - just check the boxes next to the necessary bits. In the list of controllers, you need to select the appropriate one (in this case, Attiny13 (a), go to the Fuses tab and press the read button. Only after the fuse values are read from the MK, you can change them. After changing, you need to press programm, new fuses will be written to MK Suitable fuse values are recorded in the file flashlight.h
USBASP programmer connected to the driver via a cable clip
To connect USBASP to a tin, I use a clip for an 8-pin SOIC. Not a very convenient device, you have to suffer for about 10 minutes before you catch the contact (maybe I just got a defective clip). There are also SOIC-DIP adapters where a microcircuit is inserted before soldering and firmware is poured into it - this option is more convenient, but the ability to program the driver in-circuit is lost (that is, update the firmware after soldering the MK to the board).
If all this is not there, then you can simply solder the wires to the MK pins, which are then attached to the Arduino.
Calibration
The currents passing through the driver and the LED must not exceed the maximum values. For an XM-L LED it is 3 A, for a driver it depends on the transistor used, for example for SI2323 the maximum current is about 4 A, but it is better to drive at lower currents due to excessive heating. To reduce the current at maximum brightness, the RATE_MAX parameter is used (#define RATE_MAX xx, where xx is the maximum brightness from 0 to 255).
Calibrating the ADC is optional, but if you want the driver to accurately track the threshold voltage, then you have to tinker with it.
The calculations will not give high measurement accuracy, because, firstly, the resistor values can vary within the tolerance (usually 1-5%), and secondly, the internal ION can have a spread from 1.0 to 1.2 V.
Therefore, the only acceptable way is to set the value in ADC units (BAT_WARNING and BAT_SHUTDOWN), experimentally selecting it for the right one. This will require patience, a programmer and a regulated power supply.
I set the BAT_PERIOD value to 1000 in the firmware (checking the voltage once a second) and gradually lowered the supply voltage. When the driver started to warn about the discharge, I left the current value of BAT_WARNING as needed.
This is not the most convenient way, perhaps in the future it is necessary to do an automatic calibration procedure with saving the values in EEPROM.
Assembling the flashlight
When the board was ready and the firmware was uploaded, it was finally possible to put it in place of the old driver. I unsoldered the old driver and soldered the new one in its place.
The new driver is connected instead of the old one according to this scheme

After checking for a short circuit in the power supply, connected the power and checked the performance. Then I mounted the charging board (TP4056), for this I had to drill a hole in the charging connector with a dremel, and fixed it with hot glue (here it was important that the glue did not flow into the connector, it would be difficult to get it out of there).
I did not fasten the board with screws, because the thread in the case broke off from repeated twisting, but simply filled it with glue, I also glued the wires in the soldering points so that they would not fray. I decided to cover the driver and memory with acrylic colorless varnish, this should help against corrosion.

Testing and manufacturing cost calculation
After all the operations, it was possible to start testing the drivers. The current was measured with an ordinary multimeter, connecting it to the open circuit of the power supply.
Power consumption of the old driver (measured at 4.04 V):
- During sleep - not measured
- Maximum mode: 0.60 A
- Medium mode: 0.30 A
- Strobe: 0.28A
Power consumption of the new driver (measured at 4.0 V):
- In sleep mode, it consumes around 4 μA, which is much less than the self-discharge current of a lithium-ion battery. The main current in this mode flows through the resistor divider.
- In the minimum mode, the "moonlight" is about 5-7 mA, if we assume that the capacity of one 18650 cell is about 2500 mAh, then it turns out about 20 days of continuous work. The MK itself consumes somewhere around 1.2-1.5 mA (at an operating frequency of 1.2 MHz).
- At the maximum mode, "turbo" - consumes about 1.5 A, in this mode it will work for about an hour and a half. The LED at such currents starts to get very hot, so this mode is not intended for long-term operation.
- Emergency beacon - consumes an average of about 80 mA, in this mode the flashlight will work up to 30 hours.
- Strobe - consumes about 0.35 A, will work up to 6 hours.
Issue price
If you buy components in Chip and Dip, it will come out about 100r (60r Attiny13, ~40r the rest of the bulk). It makes sense to order from China if several pieces are made - then in terms of a piece it will be cheaper, the Chinese usually sell in batches of 10 pieces.
The boards will come out at a price of around 300 rubles for 10 pieces (without delivery), if you order them in China.
Unsoldering and flashing one driver takes me about an hour.
Conclusion
The Chinese flashlight has become much more convenient, although now I have complaints about its mechanics - the front part is too heavy, and focusing is not really needed.
In the future I plan to make a version of this driver for flashlights with a power button (with fixation). True, I am confused by the abundance of such projects. Do you think it's worth making another one like this?
Driver close-up (version 2_t)
UPD: Added support for Arduino IDE.
This flashlight was bought on EBAY about 4-5 years ago. The link to the seller has not been preserved, and it is unlikely that he still sells this product. But even now I repeatedly see the twin brothers of this flashlight on many trading floors, so it seems to me that this review is still relevant.
Moreover, the principles of finalizing this flashlight can be applied to other similar products.
Flashlight faithfully served me for several years.

I can't recognize the LED. Something small, with low heat dissipation, but bright enough.

I did not use it particularly intensively and it suited me. There were no modes that I didn't need. The off button is at the end, just the way I like it. There are rubber seals. Initially, he worked on three AAA elements. Then I got LiIon 18650 batteries and I tried to stuff such an element into a flashlight.

Oddly enough, he fit without problems. Why did I decide to disassemble and modify it? It's just that my little son somehow pulled out my other flashlight, played with it all day and the LED in it burned out from overheating. I dismantled that flashlight and saw that the LED is installed so there is no heat sink and no driver at all. Horror! Therefore, I decided to look at how the hero of my today's review works. I would not like that if you suddenly have to use them intensively, he let you down at the most inopportune time. Will have to disassemble.


There is no need to disassemble the switch, but the clip in which the LED is located and the driver will have to be looked at.

It can be seen that this clip is metal, which is not bad. I came across flashlights in which this part was made of plastic.
It can be seen that there is a large hole inside and the LED board touches the clip only with its edges, the contact area is small and without thermal paste.

Raise the LED board. Where is the driver?

The driver consists of a contact board and a piece of wire. Yes, the Chinese apparently relied on reliability

There is a spring on the contact pad. That is why there was such a margin in size and the 18650 element fit into the case without any problems.

I can not stop looking at the concise Chinese driver before sending it to the trash.

For good, I would change this clip to one that does not have such a hole inside, so that the LED board is completely adjacent to the entire surface for better heat dissipation.

But I don’t have a lathe, and it’s unprofitable to order a turner at the factory to manufacture this part, it’s easier to buy another flashlight, the price will be comparable. Therefore, I decide here to leave everything as it is, only to improve contact and anoint the contacting surfaces with thermal paste before assembling.
Digging through my bins I find a real driver. This is probably not the best copy, but it really works and I already have it, no need to order and wait for the parcel. Here he is, handsome.


There is also a spring, it is a must, silicone wires and 3 modes.

The new driver entered the clip tightly, with an interference fit, as it was here.

Slightly damaged the track on the driver. Himself to blame. I had to connect with wire. It would work without it, but soldered for reliability.
At the same time I decided to replace the LED with something more interesting. I dug up the following in the bins:

The first is too big, the second is more powerful, but it heats up like a stove. I choose the third one, СREE XP-E.
Warm White / Cold White
LED Emitter: 1-3W
Model Type: CREE XPE LED
Lumens: 328Lumens/ 3W
DC Forward Voltage (VF) : 2.8-3.6Vdc
DC Forward Currect (IF) : 350-1000mA
Beam Angle: 115 degrees
Lens color: water clear
PCB board: Diameter 20mm base
Resin (Mold): Silicone Resin
Certificate: CE&ROSH
LifeSpan Time: > 50,000 hours
Power: 1W-3W
Model Name: CREE XPE
Emitted Color: Blue
Wavelength: 470-480nm
Brightness: 60LM~70LM
Maximum Pulse Voltage: 3.8V
Maximum Pulse Current: 1200mA
LED Viewing Angle: 115 degree
Diameter: 20mm
Usage: House/Street/Architecture Illumination
Power: 1W/3W
Model Name: CREE XPE
Emitted Color: Green
Wavelength: 520nm-530nm
Brightness: 90LM~100LM
DC Forward Voltage (VF): 3.2V-3.6Vdc
DC Forward Current (IF): 350mA~1000mA
Maximum Pulse Voltage: 3.8V
Maximum Pulse Current: 1200mA
LED Viewing Angle: 115 degree
Diameter: 20mm

Here it is bigger.

And here is the one that was originally. Maybe someone can identify him?

I coat with thermal paste the contact points of the clip and the LED board. It is unlikely that this will solve the problem drastically, but it should slightly improve the cooling of the LED. A little bit of thermal paste and on the thread through which the clip is screwed into the flashlight body to improve heat dissipation to the body. We collect.

The crystal diameter of the CREE LED is smaller than the one that stood before and it protrudes more forward. In order for the beam of light to be without a dark spot in the center, you need to slightly move the reflector away from the LED. But since the LED board is pressed against the heat sink by the reflector itself, it is necessary to place a photoplastic washer under the reflector.

We check - it works. The brightness is comparable to the brightness of the LED that was originally installed. But okay, let CREE remain. Hope it doesn't overheat...
The button works as it should, turns it on and off. If you do not press the button all the way, but only slightly press down, the flashlight mode switches. There are only 3 modes: full brightness, half brightness and strobe. There is no SOS mode, thank God. I definitely don't need it. I would have refused the strobe, especially since I came across information on flashing such drivers. But after thinking, I decided to leave the strobe, what if it comes in handy?
ZDL 23-06-2010 23:30
A good driver costs 5 times more than a good diode...
Here is a question that will work longer:
1. Diode, driver + 1 lithium cell
The current, diode and lithium cells are the same.
P.S. I haven’t read about diodes for a very long time, but now something is hooked again. Literature on the net, I certainly look for and read. Maybe this issue has already been discussed in detail.
KAR2009 24-06-2010 01:13
2. Diode, resistor + 2 lithium cells
Let the LED need 3.4 Volts and a current of 0.9 A at a power of 3 watts. We take 2 lithium-ion batteries at 3.7. In the charged state, they have up to 4.2 V. So, on the resistor it is necessary to pay off 4.2V * 2 - 3.4V = 5V.
The resistor is needed at 5.56 ohms. At the same time, a power of 5V * 0.9A \u003d 4.5 W will be allocated on it, i.e. more than LED. In fact, the 2nd battery will work to heat up the resistor, when, as in the first case, the LED. I am silent that in the driver it is possible to implement different algorithms with a change in the duty cycle of the PWM, which significantly increase the savings ...
ZDL 24-06-2010 05:52
MauserFL, thanks for reading with pleasure.
ilkose 24-06-2010 06:04
Yes, fools, these drivers came up with the idea to rip off more money from people, directly to the batteries and it’s normal, but the lights like light bulbs will need to be changed))
ZDL 24-06-2010 08:30
Soon I will have a good driver and diode. So I'll check what's there and how.
sergVs 24-06-2010 09:41
Lithium is not the only and not always the best power source (and sometimes available). This must be kept in mind.
rkromanrk 24-06-2010 20:03
quote: Soon I will have a good driver and a diode
You just don’t try to write here which ones - there will be no limit to disappointment! ..
John Jack 24-06-2010 21:09
Without a driver, the flashlight first shines for a short time and brightly, and then for a long time and dimly. With alkaline batteries it turns out especially sad. Lithium batteries are a little better, they have a relatively flat discharge curve, so in the first minutes the brightness drops to medium and slowly dims almost to the very discharge. A direct drive with a lithium battery is already relatively usable, but not economically feasible - the simplest linear driver costs several times less than one lithium-ion battery.
ZDL 24-06-2010 22:31
the simplest linear driver costs several times less than one lithium-ion battery.
Yes? Previously, there were only PWM converters. Now there are linear ones, which change their resistance depending on the voltage? I'll take a look and find out. Could you indicate the order of prices?
Yes, and the PWMs are now some kind of unimportant.
Here in the radio magazine there were PWMs, so PWMs. The output voltage is 5 volts, when the input changes from 3 to 15 volts, and only 2 transistors.
I bought a driver for 600 rubles ... With this money I could buy 7 pcs. 123 elements...
Yes, in general, what to guess, you need to put an experiment. But I don’t have a lux meter, I need to collective farm something.
John Jack 24-06-2010 22:39
PWM is not a driver (current stabilizer), but a means of limiting brightness. Single-mode drivers simply stabilize the current on the LED (as far as possible), and multi-mode drivers consist of a stabilizer tuned to the maximum mode current and PWM, which provides smaller modes and all sorts of strobes with color music.
The line driver works like a smart variable resistor, yes. It has a narrow input voltage range, but high efficiency, and making a good linear driver is much easier than a good switching one. Starting from a hundred rubles: http://www.dealextreme.com/details.dx/sku.6190
ZDL 24-06-2010 22:42
Diode R2 140 lux at 1 watt, maximum current 1500 mA. 3-mode driver on the reflector from the outside the inscription is 0.8-4.2 V. The maximum output current is 1 ampere. The seller said that one of the best.
ilkose 24-06-2010 22:49
Probably not a driver but a module bought? Anyway, 600 rubles is expensive, I buy drivers for 110 rubles (8-24 volts, 1-3 one-watts) Chinese lights for 100-130 rubles, optics are generally a penny
ZDL 24-06-2010 23:40
Joker12 24-06-2010 23:51
By the way, here is a good flashlight. Pure water direct drive, with a resistor for the second mode.
KAR2009 24-06-2010 23:52
quote: Originally posted by ZDL:
Diode R2 140 lux at 1 watt, maximum current 1500 mA.
John Jack 25-06-2010 02:00
quote: Originally posted by ZDL:
Let's look at the worst case:
The LED has a non-linear CVC. If you drop a little voltage on the driver / resistor, then the current on the LED will drop quite noticeably. Your reasoning would be correct if the diode would be a blunt resistance. And he is a very stupid resistance.
In addition, the statement
quote: Originally posted by ZDL:
4.2 in. gives out a battery, 3.2v and 1.5 a.
wrong. The battery puts out 4.2V without load. If you turn it on directly to the diode (direct drive), then the voltage will drop to 3.2 V at a current of 1.5 A. And in order to get 1 A on the diode, you need to dissipate only 0.1 V voltage with a driver or resistor. Why - see the CVC tables.
PWM, on the other hand, changes the pulse duration, yes, but the current in the pulse will be the maximum possible. That is 1.5A or more with a fresh battery, dropping as it discharges. It is impossible to stabilize the current using PWM, but to stabilize the brightness (increasing the pulse length as the battery discharges) is theoretically possible, but practically not necessary.
quote: Originally posted by Joker12:
By the way, here is a good flashlight.
Why is he good? The fact that a ten-watt LED is powered by only 1.5-2 amperes, and then with a good battery, and only for the first few minutes? A P7 or MC-E requires at least two 18650s.
KAR2009 25-06-2010 02:39
quote: Originally posted by John JACK:
It is impossible to stabilize the current using PWM, but to stabilize the brightness (increasing the pulse length as the battery discharges) is theoretically possible, but practically not necessary.
But "vaska" claims that it is possible on the forum http://forum.fonarevka.ru/showthread.php?t=239 :
"Pulse-width modulation itself in relation to the power supply of LEDs can conditionally be divided into two types: primary PWM and external PWM.
The first means that the current stabilization on the LED is carried out by a pulse converter, at the output of which there is a filter that turns the meander produced by the converter into a direct current. If we make this kind of converter adjustable (usually for this we change the reference voltage of the current feedback comparator), then, as Malkoff rightly explained, we can achieve good efficiency in all operating modes.
The second means that the stabilized current provided by the primary source (whether pulsed or linear) is interrupted at a low frequency and is not further filtered. Thus the diode is not powered by direct current, as in the first case, but by current pulses, which, of course, adversely affects the efficiency of the system in low light modes."
So if we have a filter, we can use PWM to stabilize the current.
ZDL 25-06-2010 04:34
Luxes and lumens are different units ... R2 does not have 140 lumens per 1 watt, this is how much R5 has and the maximum current for XP-G 1.5A is given, and not for XR-E.
Yes, I'm still confused. I promise to fix it.
ZDL 25-06-2010 05:04
John JACK, LED is not like resistance at all. More like a zener diode, when the stabilization voltage is reached, its resistance decreases significantly. Only the LED glows differently from the zener diode.
For PWM. There are pulse-width stabilizers and they stabilize the voltage or current with high efficiency. They can increase the voltage and current, as well as lower. And there are circuits that change the pulse duration without stabilizing anything. A sort of "pulse" resistor. Their efficiency is lower, the voltage range is smaller, but they are simpler. In general, in electronics, you can get into such a jungle.
vaska 25-06-2010 08:49
quote: Originally posted by ZDL:
Does the linear driver have good efficiency?
Let's look at the most difficult case: 4.2 in. gives out a battery, 3.2v and 1.5 a. eats a diode, hence 1v. and 1.5a driver simply translates into heat. The diode eats 4.8 watts, and we take 6.3 watts from the battery. Efficiency ... in my opinion there is not, but there are 24% losses in the form of heat generated. And as the supply voltage increases, the losses will increase. And PWM, as far as I am familiar with them, changes the pulse duration depending on the supply voltage, leaving the current unchanged. Those. the diode eats 4.8 watts and consumes 5 watts from the battery.
In the general case, the statement is absolutely true, but an ordinary lamplighter is interested in special cases, for example, powering one diode from one lithium ion. And here the linear with the proviso that it is built on a field-effect transistor with an ultra-low saturation resistance, is a real competitor to PWM. When the PWM is powered by a voltage of 4 V, it is difficult to achieve an efficiency above 90%, and the overall efficiency of the linear is comparable. If, for example, we operate the most advanced XP-G at 1.5 A (3.36 V drop), then we get 80% efficiency from freshly charged lithium. When discharging, when the battery voltage and the diode drop equalize, the efficiency is close to 100%, so the total is about 90%. Taking into account the fact that the voltage drop during the discharge process is non-linear, and is maximum at its beginning, the real total efficiency is even higher.
vasee 25-06-2010 15:51
http://www.4sevens.com/product_info.php?cPath=297_306&products_id=1654
LiaGen 25-06-2010 16:20
quote: O. It's good that I noticed the topic). There is no need to produce extra). Dear forum users, please tell me), do I understand correctly that Power: Two CR123A Batteries (3.0V ~ 9.0V) in the characteristics indicates the presence of a driver, so you can not look for a 3V battery, but take 3.6V?]http://www.4sevens.com/product_info.php?cPath=297_306&products_id=1654
As for the presence of a driver, it is true, it is, it works as indicated in the range of 3-9v.
And now for the power: the flashlight eats 2 cr123 batteries marked 3.0v, but their voltage is actually higher, so the flashlight is powered not from 6, but from about 7-plus volts (I can’t lie, I didn’t measure it like a fresh battery) in with new batteries.
An analogue / replacement for cr123 batteries is lithium batteries of the rcr123 (16340) type marked 3.6v, their real voltage when fully charged is 4.2v - i.e. two Akuma will give 8.4v - the driver eats such a voltage normally.
It should only be borne in mind that most Chinese Akum with protection are longer and thicker than kr123 batteries. Therefore, first check with the users of the flashlight if they will fit in there ..
ZDL 25-06-2010 16:34
I connected the module and the diode to the 123 element. Who is not impressed. Looks like it needs battery power.
vaska 25-06-2010 17:06
What I have established is that I mass-produce lanterns powered by a converter. But, since I don’t consider myself a blinkered person, I also pay attention to other solutions. The active do-it-yourselfer StasikOFF has been sculpting lanterns on linear current sources for many years, and they are very impressive with their efficiency. And in order to convince me, it is enough to state it with arguments and with numbers, because for my part I have provided a sufficient number of convincing numbers
ZDL 25-06-2010 17:45
And so I bought XPG R5, Solarforse driver 0.8 -4.2 3 mode. From one element 123, the diode does not swing to the maximum current ... But if the diode is powered from two 123, then I think a current-limiting resistor will be needed.
I don't have batteries yet.
Virgo_Style 25-06-2010 17:51
quote: Originally posted by ZDL:
From one element 123 the diode does not swing to the maximum current
ZDL 25-06-2010 18:28
And what is strange. Connected 3 finger batteries. on a diode 3.02v 1.01a. On batteries 3.45v 1.2a. What is the efficiency? The driver simply converts excess, in his opinion, energy into heat.
quote: Originally posted by rkromanrk:
You just don’t try to write here which ones - there will be no limit to disappointment! ..
Yes, there is disappointment...
Which is done in Chinese for 300 rubles.
Virgo_Style 25-06-2010 18:46
quote: Originally posted by ZDL:
on a diode 3.02v 1.01a.
How much is a driver? Most likely - at 1A ... well, here it is, like in a pharmacy.
KAR2009 25-06-2010 19:12
quote: Originally posted by ZDL:
And what is strange. Connected 3 finger batteries. on a diode 3.02v 1.01a. On batteries 3.45v 1.2a.
Issues normally. The XP-G R5 was originally allowed around 1A, but later expanded to 1.5A maximum current. So the driver could have been released and designed to old norms.
quote: Originally posted by ZDL:
But if the diode is powered from two 123, then I think a current-limiting resistor will be needed.
Do you want a resistor in front of the driver?
If without a driver, then I already answered at the beginning of the topic about the senselessness of this undertaking.
quote: Originally posted by ZDL:
In general, you have established definitions and concepts. It's more expensive to convince you.
Yes, there is disappointment...
So the direct inclusion of the diode taxis.
Which is done in Chinese for 300 rubles.
It seems that the contents of this thread did not clarify the charms of the Chinese for 300 rubles.
ZDL 25-06-2010 21:14
I will not convince you who understood the topic. The linear regulator in the simplest low-efficiency way matches the diode to the battery.
Chinese lantern for 300 rubles. It shines in the same way, only blue, like a super diode fed through a current stabilizer. Maybe I don’t understand something, but the Chinese eat 1.5W, and the XPG R5 + driver is 4.4W ...
vaska 25-06-2010 22:31
quote: Originally posted by ZDL:
If you use a resistor instead, you won't lose much if you notice any difference at all.
We will lose, however. First of all, we will lose half of the original brightness after fifteen minutes of operation.
KAR2009 25-06-2010 23:02
quote: Originally posted by ZDL:
If you use a resistor instead, you won't lose much if you notice any difference at all.
Chinese lantern for 300 rubles. It shines in the same way, only blue, like a super diode fed through a current stabilizer. Maybe I don’t understand something, but the Chinese eat 1.5W, and the XPG R5 + driver is 4.4W ...
The conversation was about 2 CR123 elements ("But if the diode is powered from two 123 then I think a current-limiting resistor will be needed.") And this is from 6 to 8 volts, depending on the type of CR123. As a result, one battery will work for the resistor, heating it.
If we take into account that initially CR123 batteries have a high internal resistance, which is no longer correct, since an ideal voltage source should have zero internal resistance. That excess voltage will be dissipated in the internal resistance of the element, heating it and not doing useful work. Moreover, the value of this resistance is not constant and depends on many factors. Limiting the LED current with a resistor is justified when the LED is low-power or we have a small voltage drop between the source and the LED voltage at which the specified operating current is provided. Moreover, as "vaska" noted, "we will lose half of the original brightness after fifteen minutes of work." It is generally accepted to consider the operating time of the flashlight from the initial brightness to 50% reduction ...
Well, Chinese lanterns barely smoldering for hours after 15-30 minutes of operation and blinking or burning LEDs for 300 rubles are not the best choice ...
Der Alte Hase 26-06-2010 03:09
quote: Originally posted by vaska:
The active do-it-yourselfer StasikOFF has been sculpting lanterns on linear current sources for many years, and they are very impressive with their efficiency.
Like these, in essence?
http://www.candlepowerforums.com/vb/showthread.php?t=264687
Der Alte Hase 26-06-2010 04:51
Yes, fools, these drivers came up with the idea to rip off more money from people, directly to the batteries and it’s normal, but the lights like light bulbs will need to be changed))
By the way, my diodes have degraded in normal Chinese with relatively normal drivers more than overheated light bulbs burned out over the same period. Although I use incandescent lamps much more ...
vaska 26-06-2010 06:25
quote: Originally posted by Der Alte Hase:
Like these, in essence?
In fact - yes, I laid out his circuit in some branch: a reference source, an opamp, a field device, three resistors. The whole package easily fits in a hundred rubles.
ZDL 26-06-2010 08:13
Should I see the difference in the glow when applying 2 W and 4 W to the diode? Precisely to see and not to measure with a lux meter?
So I don't see her. I compare the brightness of the light spot on the wall with another lamp. Of course, it is necessary to confirm with beamshots, but there is no time yet.
Virgo_Style 26-06-2010 10:30
quote: Originally posted by ZDL:
Should I see the difference in the glow when applying 2 W and 4 W to the diode?
Try to shine into the distance - the difference is hard to see on the wall.
John Jack 26-06-2010 11:02
The difference between 2W and 4W per eye is less. than one and a half times. I had exactly the same thing with the module on XP-G. 700 mA and 1400 mA, by eye - the same, with a luxmeter - 3000 and 4000 parrots, respectively.
The main essence of the driver is to maintain the same current on the diode, regardless of the degree of battery discharge. Therefore, it cannot be said that at some point a direct drive or a resistor is more effective than a driver - at the next moment the battery will run out and the current will drop with brightness. A resistor is suitable when we have a source of relatively constant voltage - a mains power supply or a car generator, for example, and we do not need to get maximum efficiency from the LED.
ZDL 26-06-2010 13:17
That's what I'm talking about too!!! The difference in radiation and power consumption is non-linear.
In general, I need to find the characteristics of the diode.
I figured out my module, the Chinese is focused better, so it seemed that it was brighter.
Virgo_Style 26-06-2010 13:31
quote: Originally posted by ZDL:
Experts tell me which driver can produce direct current, say 1 ampere, when powered from 1.5v to 8v. And preferably its price. ?
ZDL 26-06-2010 14:52
Virgo_Style 26-06-2010 15:04
vaska 27-06-2010 20:12
quote: Originally posted by ZDL:
And so XGP R5 at 3.5v., 1.4A gives out 350lum, and at 3.2v., 0.65a. - 175lum.
So if you lose 50% of the brightness, you can completely do without a driver. True, at the very beginning of the discharge, we rise, and calculate the maximum diode current on it. We won’t get the maximum brightness, but the circuit is quite efficient with very acceptable parameters, in my opinion.
In fact, the current 2C is more than four amperes! And you, as I understand it, were guided precisely by the lower chart.
Now about the fall and light output. Read here: http://www.candlepowerforums.com/vb/showpost.php?p=3115908&postcount=354 The numbers are a little different from your assumptions.
Just try hooking the XP-G directly to the 18650 once, and then tell me how many seconds it lasted.
Actually, your approach is not very clear to me. You started the thread to consult and ask for advice. They gave you useful advice, but you always have some objections, and you start arguing with people who understand the subject clearly better than you, after which you offer another ill-conceived solution, and completely without taking into account the information that forum users post especially for you spent some time. If you have your own opinion on everything, then why ask for advice, but if you ask, then be a little more loyal to those who responded, and at least think about what they wrote for you, otherwise it seems that you live in monologue.
Virgo_Style 27-06-2010 20:31
I had one XR-E that I powered directly. Current - two amperes, he did not bother to burn out. However, I didn’t turn it on for a long time - for 10 seconds, maybe 20.
Naturally, I would not use such a flashlight all the time. It's just that from this lantern I needed mainly the body
In principle, if you are curious, you can repeat the experiment -)
But - only after ZDL
ZDL 27-06-2010 21:22
I applied 2.5 to some CREE and within a few seconds nothing exploded and continues to work.
Now assembled a flashlight for show. That
the most CREE, resistor on 1 ohm., 2 elements CR2. Current consumption 1 a. I'll buy more elements, see how long it lasts.
Yes, and I'm thinking how to make a switching current stabilizer with an operating voltage of 3-9v.
I DO NOT HAVE BATTERIES, I can’t attach a diode to the battery, I would immediately attach it.
ilkose 27-06-2010 23:51
quote: I applied 2.5 to some CREE and within a few seconds nothing exploded and continues to work.
It is very significant, I somehow revved the car, the pedal to the floor, and nothing exploded, it works. seriously, somehow I turned on the 18650 directly to the rebel (of course, not so hot what a comparison, the max current is 700 according to the datasheet), it lasted 1 second and became forever blue.
ilkose 27-06-2010 23:54
quote: That
the most CREE, resistor on 1 ohm., 2 elements CR2. Current consumption 1 a
quote: I DO NOT HAVE BATTERIES, I can’t attach a diode to the battery, I would immediately attach it.
Here that was the most interesting. There are 18650 in laptop batteries, you can go where laptops are repaired and ask for a jar.
Virgo_Style 28-06-2010 12:01
quote: Originally posted by ilkose:
How many of these 1a are left on the resistor?
pnvkolya 28-06-2010 09:18
quote: How many of these 1a are left on the resistor?Um... You probably meant volts or watts?
that's it, if the resistor is not parallel to the LED, then as I understand it, everything that went from the battery and everything to the diode and it got to, that regarding amperes, there are no other circuits.
ilkose 28-06-2010 10:50
Virgo_Style this figuratively meant. I wanted to push to the fact that there will be losses. 3 watts of power will dissipate the resistor.
vaska 28-06-2010 11:07
quote: Originally posted by ilkose:
3 watts of power will dissipate the resistor.
One ampere squared and multiplied by one ohm = 1 watt.
ZDL 28-06-2010 16:08
So let it scatter if the brightness and duration of the glow suits. Since the resistor + battery is much cheaper than my worthless expensive driver, which is designed to work only with lithium batteries, and produces 1.5 watts for 123 batteries and it is not yet known whether it is stabilized.
KAR2009 28-06-2010 16:32
quote: Originally posted by ZDL:
Since the resistor + battery is much cheaper than my worthless expensive driver
Virgo_Style 28-06-2010 16:36
Can you see a link to an expensive crap driver?
ZDL 28-06-2010 18:03
quote: Originally posted by KAR2009:Here in the EU, 1 piece of CR2 costs between 6.5 and 7.5 Euros. In total, for 2 things you have to pay about 14 Euros, i.e. over 500 rubles. In the UltraFire WF-606A Cree Q5 (3 W) flashlight, the lifetime of the 1st CR2 is about 20-30 minutes at a current consumption of 1.82 A.
Wow, your prices. Thanks for the info, now I have something to compare.
Virgo_Style, I took the module from my hands. The seller said that this is solarforse 0.8-4.2 3 mode. What I intended for him at the exit wrote in this topic.
Virgo_Style 28-06-2010 18:56
And by the way,
quote: Originally posted by ZDL:
Since the resistor + battery is much cheaper than my worthless expensive driver, which is designed to work only with lithium batteries, and produces 1.5 watts for 123 batteries
And you?
andory 28-06-2010 20:59
quote: Since the resistor + battery is much cheaper than my worthless expensive driver .....
1. There must be very good contacts everywhere and thick enough wires. For experiments, it is better to use soldering everywhere. Then the currents will begin to turn out, and the LEDs will burn. If you just lean the wire against the battery, it is easy to get a contact resistance of 0.2 ohms or more. For 2xCR2, you can assemble a linear current regulator, while the efficiency will always be more than 70% (at currents> 1A). The switching stabilizer is a complex device, and 85% is almost the limit. So if you are satisfied with throwing away 1/10 batteries, then a home-made driver consists of 1 microcircuit, an LED and a powerful field worker.
ZDL 28-06-2010 22:19
Is it by any chance not the one that dsche gave away for free?Although in any case, solarforce does not pull well on the "expensive" one.
No, I bought it for 600 rubles. About what he wrote. I expected more for the money.
quote: Originally posted by Virgo_Style:
And by the way,1.5 watts is not enough, of course ... but how much did it turn out with a resistor?
For some reason, from the PSU and without any resistor, it turned out exactly two times less - 0.25A at 3V.
And you?
Virgo_Style 28-06-2010 22:59
quote: Originally posted by ZDL:
No, I bought it for 600 rubles.
~20 bucks?! Mother dear. Then I understand you. Probably overpaid four times
Virgo_Style 28-06-2010 23:08
quote: Originally posted by ZDL:
A resistor is simpler, isn't it?
It would not be bad to decide, however, what characteristic we are discussing.
In other words, a resistor.
More reliable - a resistor.
Cheaper to manufacture - resistor.
Cheaper to operate - driver.
More functional - the driver.
Allows you to use different types of power - driver.
Although some points may still be clarified if you add the original data. For a number of power sources, a direct drive is simply impossible, for a number of others it will be ineffective.
andory 28-06-2010 23:12
quote: Originally posted by ZDL:
I have 2 CR2 elements + 1 ohm resistor.
Andory, the resistor is still simpler, isn't it?
Easier. Only the brightness drops in the process and does not shine for long. In fact, a toy for 30 minutes. Given the hefty price tag of the CR2, it's hard to see this as a full flashlight. In any case, I have no idea how to use it and for what.
Then a resistor would be a more reasonable solution.
And the drivers "for a penny" are quite decent.
The discharge curve allows you to power the LED with a current of 800-1000mA (XRE)
and XP-G even more (but you need a more powerful driver)
and there will be fewer problems.
Virgo_Style 29-06-2010 09:15
quote: Originally posted by dsche:
This is not a 600 driver, but a D26 module. Well, it actually costs $20. At the request of the topikstarter, a cutter's R5 was put in place of R2 (+350 diode +50 rosin). Native R2 transferred along with the module.
I periodically wake up feeling that the topikstarter hangs noodles on our ears. And this is the moment...
ZDL 29-06-2010 15:05
You are evil, I will leave you ...
Yesterday I waited for darkness and tested in the field. The Chinese is naturally the dimmest, R5 + driver is brighter (apparently you need to apply 1.5a to R5.) Well, R2, 2 CR2 elements through a resistor on the 1st is the brightest. The beam is visible by itself, and if you look along it very poorly, you need a little from the side. In general, for show, that's it.
rkromanrk 30-06-2010 02:08
quote: You are evil, I will leave you
For a long time already I want to say (my wife just hates me for this phrase ...): "But I warned you !!!..."
andory 01-07-2010 01:04
quote: Originally posted by rkromanrk:
I propose at the same time to suck this bourgeois WOW:
the transformer can be wound directly on the battery case. it will look even cooler
rkromanrk 01-07-2010 01:21
quote: the transformer can be wound directly on the battery case
As far as I understand, THIS does not stabilize the current, but only increases the voltage ???...
ZDL 01-07-2010 10:27
quote: Originally posted by rkromanrk:
As far as I understand, THIS does not stabilize the current, but only increases the voltage ???...
Yes, stabilization is due to the diode. The converter is weak and cannot burn the diode.
I found the same diagram on the internet. Transistor KT315. transformer 20 turns of wire 0.2, no resistor. Declared performance up to 0.6 V. If you use a germanium transistor, then up to 0.2 volts.
KAR2009 14-07-2010 05:10
I apologize for bringing this topic up again. Before going to bed, I wanted to theoretically calculate how much the flashlight will shine on the 1st 18650 element, for example, with a capacity of 2400 with a 2.8 V protection operation and using a 1.3 Ohm limiting resistor as a "driver" (taken from a real Chinese lantern) . We take the standard Cree 7090 XR-E Q5 as an LED. We neglect the resistance of the wires and the internal resistance of the 18650 battery.
The circuit consists of 3 elements connected in series: a battery, a resistor and an LED. Accordingly, the current through all elements is the same. The voltage across the battery is the sum of the voltage across the LED and the resistor.
Voltage across the resistor Ur=I*R.
The voltage on the battery depends on its residual capacity. For simplicity, we consider the dependence in the section 2.8 ... 4.2 V to be linear. We assume that a fully discharged battery has 2.8 V. Accordingly, the voltage at 18650, depending on the current residual capacity C and full capacity B: U=2.8+C*(4.2-2.8)/B=2.8+C*1.4/B
As a result, we get that before the protection is triggered, the 18650 with a capacity of 2400 mAh will work for about 16 hours. At the same time, at the beginning, the flashlight will shine brightly (I = 0.64A, about 170 lm), and at the end, the current in the circuit will be about 30 mA, i.e. about 10 lumens per LED.
As can be seen from all this, the operating time without a normal driver of this design is not impressive.
Addendum. If, however, as a criterion for the duration of work, we take a drop in luminosity to 50% of the initial one, then it follows from the table to plot the dependence of the LED luminosity in lumens on the current in Amperes: L (I) \u003d 1 / (0.0027615 / I + 0.0014839). This approximation describes the luminosity of an LED with an accuracy of 1 lumen in the current range from a few milliamps to 1.5 A.
By adding the J(t) function - the value of the current in the circuit (A) after t seconds and L(I) to the MatCad task, we get a graph of the dependence of the LED luminosity in lumens on time in minutes:
Initially, the luminosity was about 170 lumens. The graph shows that 85 lumens will be in approximately 200 minutes or 3 hours and 20 minutes.
andory 14-07-2010 19:12
With a PWM driver without inductors at 20 mA, we get the same 10 lumens for 120 hours.
John Jack 14-07-2010 20:05
And we need - 170 lumens for four hours
andory 14-07-2010 20:53
And for others, 300 lumens for an hour. The symptoms are obvious, and the driver (multi-mode), as a medicine, is extremely cost-effective.
For a long time, an old flashlight - a Duracell pen - was gathering dust on a shelf. He worked on two AAA batteries, on an incandescent light bulb. It was very convenient when you need to shine a light into some narrow slot in the body of an electronic device, but all the convenience of use crossed out the “zhor” of batteries. It would be possible to throw out this rarity and look for something more modern in stores, but ... This is not our way...© Therefore, an LED driver chip was bought on Ali, which helped to transfer the flashlight to LED light. The alteration is very simple, which can be mastered even by a novice radio amateur who knows how to hold a soldering iron in his hands ... So, for those who are interested, welcome to Kat ...
The driver chip was bought a long time ago, more than a year ago, and the link to the store already leads to the "emptiness", so I found a similar product from another seller. Now this driver is cheaper than I bought it. What is this "bug" with three legs, let's take a closer look.
First, a link to the datasheet:
The microcircuit is a Led driver capable of operating from low voltage, for example, one 1.5V AAA battery. The driver chip has a high efficiency (COP) of 85% and is able to “suck out” the battery almost completely, up to a residual voltage of 0.8V.
Characteristics of the driver chip
under the spoiler

The driver circuit is very simple...

As you can see, in addition to this “bug” microcircuit, only one part is needed - a choke (inductor), and it is the inductance of the choke that sets the LED current.
For a flashlight in place of a light bulb, I picked up a bright white LED that consumes a current of 30mA, so I had to wind a choke with an inductance of 10uH. The driver efficiency is 75-92% in the 0.8-1.5V range, which is very good.

I will not give a drawing of the printed circuit board here, because it makes no sense, the board can be made in a couple of minutes, simply by scratching the foil in the right places.

The throttle can be wound, or taken ready. I wound on a dumbbell that came to hand. When self-manufacturing, it is necessary to control the inductance using an LC meter. As a housing for the driver board, a two-cc disposable syringe was used, inside which there is enough space to accommodate all the necessary components. On one side of the syringe there is a rubber stopper with an LED and a pad, on the other side there is a second pad. The size of the syringe segment is selected locally and is approximately equal to the size of an AAA battery (little one, as it is popularly called)

Assembling the flashlight

And we see that the LED shines brightly from one battery ...

The pen-flashlight assembly looks like this

It shines well and the weight of the flashlight has become less, because only one battery is used, and not two, as it was originally ...

This is how a short review turned out ... With the help of a driver chip, you can convert almost any rare flashlight to be powered by a single 1.5V battery. If you have questions ask…
I plan to buy +73 Add to favorites Liked the review +99 +185