Virtualization- an interesting feature of modern computers, which allows you to use part of the device's resources to run any operating system inside the main OS. This technology reached its maximum relevance in Windows 10 due to the increased need to run programs that are compatible only with older versions of this OS.
Programs of this kind for servers and desktop computers began to appear a long time ago, but over time, Oracle has been the most successful in this field. Her product is called virtual box made it easy to configure and use such features even for a simple user, while being very stable.
But even in such a long debugged and stable program, a situation often arises when the user was unable to open a session for the virtual machine due to an error 0x80004005.
When the problem appears
The problem has been observed on all kernel versions of Microsoft operating systems with version 6.1 and older. In other words, an error when starting an image already installed on a virtual machine occurs on operating systems from Windows 7 to the latest Windows 10. The appearance of the problem does not depend on the type of system that you installed on your PC and the version of VirtualBox.

Such an error becomes especially unpleasant when the user has already managed to install, configure and even use the virtual machine for some time. A banal restart of the result in this case no longer gives, that is, further operation of the OS on VirtualBox is impossible without taking urgent measures.
First option
After, during an attempt to activate the virtual machine, you see on the screen error code 0x80004005, close the program.
We go to the system drive, usually indicated by the letter " WITH».

Next, look for a folder with information for your account. You can see it at the login window, launch the menu " Start» in Windows 7/10 or activating the tiled menu at the top of the screen when using Windows 8.
We go there and find the folder " VirtualBoxVMs”, in which we are looking for the directory of the non-starting virtual machine. There you will see three files, the list of which will look like this:
- example.vbox.
- Example.vbox-prev.
- Folder "Logs" (we ignore it, we won't need it).
Pre-copy Example.vbox" And " Example.vbox-prev” to any other location on the computer, for example, to the “D” drive.
Then we perform a simple combination:
- We return to the folder with the non-working virtual machine.
- Delete the Example.vbox file.
- Rename the Example.vbox-prev file to Example.vbox by calling the options on a right-click.
In new versions of the program, the contents of the folder may be somewhat different, for example, it may contain the files " example.xml" And " Example.xml-prev».
For all of them we perform exactly the same operations:
- We make a backup copy.
- We erase the file with permission.xml.
- Change the name "Example.xml-prev" to "Example.xml".
The procedure described above takes no more than five minutes, and it is worth trying it initially. It will work almost always, except in another case.
Another solution to the problem
There are a number of situations where the user receives the message " Failed to open session for virtual machine» due to a single Windows update labeled KB3004394. In this case, it is possible to fix the problem by removing this update from the system. There are two ways to do this at once:

Third option
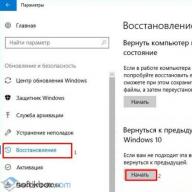
If you tried both solutions, but the above error code still appears instead of the system boot window, then you should roll back to the previous version virtual box.

The list of stable versions of the program can be found at this link.
Before installing the old version, remove the current version from the system, while leaving the data. The list of actions is:
- Enter Control Panel, and then in the menu " Installation and removal of programms».
- Choose a program there virtual box.
- When prompted to delete the program's user data, click No.
- Download and install another stable version of the program from the list above.
It is possible that if you cannot install an older version, you will have to completely uninstall the program along with all the data, as the old version may not be compatible.
Outcome
So, we have indicated several ways to solve the problem of opening a virtual machine session. If you know any other ways - feel free to leave them in the comments, and we will definitely add them to the main text of the article.
Related videos
To date, many programs have been released that allow you to use virtualization for various operating systems. Among them, VirtualBox is very popular - a product of Oracle, which is distributed under the GNU GPL license and is compatible with all released operating systems, including Windows 10.
Where to download and how to install Virtualbox on Windows 10?
If you want to install and test some operating system or program, but do not want to use your own OS for this, the Virtualbox program will help solve this problem.
To download Virtualbox, go to the "Programs" section and download the installation file or download the latest version of the software from the official website of the developer. For the Windows 10 operating system, Virtualbox 5.0.20 or earlier version 5.0.8 is perfect, which is also compatible with the top ten. The principle of their work is the same.
After downloading the installation file, it is worth starting the installation.

In the next window, a list of additional components of the future virtual machine will appear, namely
- Virtualbox USB Support - is responsible for supporting all devices that connect to the virtual machine via a USB port.
- Virtualbox Networking - responsible for supporting network adapters and accessing the Internet;
- Virtualbox Python 2 x Support - Required to support programming languages.

In the next window, you should leave all three marks. They are responsible for the presence of a program shortcut in the Start menu and on the desktop, and also allow you to associate files of other virtual machines.

The next step is to install some network components. The installer will notify you of this. Click "Yes" and wait until their installation is completed.


As soon as the installation of the software for creating a virtual machine is completed, the following window will appear. Put a check mark "Run the program" and click "Finish".

The initial window of the program will open.

How to create a virtual machine with Virtualbox on Windows 10?
In order to create a virtual machine on Windows 10, you should first download the distribution of the operating system that you want to install on Virtualbox. After loading the system, click on the "Create" button in the main program window.

We assign a name to the virtual machine, indicate the version of the OS that you will install and its type.
In the next window, you should specify the amount of RAM that you allow Virtualbox to use.

Choose which disk you want to install the machine on. Click "Create a new virtual hard disk".

Select the type of disk. Since we are creating a virtual disk, we press VDI.

In the next window, specify which disk it will be: dynamic or fixed. If you are creating a virtual machine for testing and will not use it in the future, you should choose a fixed one. But if you use a virtual OS, install programs on it, you need to select a dynamic disk. It will expand as it fills up.

Specify a name for the disk and select a size.

Now the virtual machine is created on Windows 10.

If you click on the "Configure" button, you can change the volume of the video adapter, increase or decrease the load on the processor. To start the machine, you should click the "Start" button.

After clicking the "Run" button, the program will ask you to specify the location for storing the installation file of the new OS.

An installer window will appear. We follow the prompts. Installing an operating system on a virtual machine is very similar to installing it on a regular PC.

IMPORTANT! When installing the OS, the monitor screen may prompt "Press any key to boot from the CD / DVD". To prevent this message from appearing, it is worth disconnecting the ISO file from the virtual drive. To do this, before installation or during (you need to minimize the installation window), go to the "Settings" section and select the "Media" item.

Here you need to click on the disk icon.

A list of options will appear. Set "Remove disk from drive".

Only after completing these steps, the installation of a new OS on a virtual machine will be successfully completed.
Why won't VirtualBox start on Windows 10?
- If, when trying to run VirtualBox on Windows 10, the program does not work and does not respond to user requests, the reason lies in the fact that the software does not detect network interfaces. To fix this problem, you should go to the developer's website and download the latest version of the program.
- If the application crashes with the code 0xc0000005, you should run the program as Administrator.


- Also, if VirtualBox worked on a previous version of the OS, but does not start with an upgrade to Windows 10, you should configure the software to work in compatibility mode.
For details on how to install VirtualBox on Windows 10, see the video:
For information on how to create a virtual machine with a different operating system on Windows 10, see the video:
Getting started with VirtualBox
(for Dummies)
2014.12.12. |
Recently, in the article "Getting Started with VMware Workstation", I described the basics of working with a VMware virtual machine, hoping to show that working with virtual machines is simple and useful. VMware is good for everyone, but it has one drawback - it is paid and not cheap. Today I want to talk about a free alternative to VMWare - the VirtualBox virtual machine.
As an example, I will use VirtualBox 4.3.20 for Windows and the guest operating system ubuntu-12.04. And I will install and configure all this in the host operating system Window 7.
1. Install the VirtualBox 4.3.20 for Windows virtual machine.
It is most convenient to download the virtual machine distribution kit from the official website "www.virtualbox.org", from the page https://www.virtualbox.org/wiki/Downloads. There you will find all the latest versions of the virtual machine for most popular operating systems. I am downloading for the Windows operating system (Figure 1).
The VirtualBox 4.3.20 for Windows distribution kit is presented as a single 105 MB VirtualBox-4.3.20-96997-Win.exe executable file.
After launching the executable file, a window opens informing about the preparation for the start of the installation of the program (Figure 2).

After a few seconds, the installation assistant window will open. To start the installation, click the "Next" button. After that, a window for selecting the volume and installation location will open (Figure 3).

By default, you will be prompted to install all the components of the virtual machine, I do not advise unnecessarily disabling the installation of any components, since all of them will be needed even with minimal use of the virtual machine. Also, by default, you will be prompted to install the program in the “Programs Files\Oracle\VirtualBox\” folder, and here I will not change anything. To proceed to the next stage of the installation, click the "Next" button.
In the window that opens (Figure 4), the basic settings for starting the virtual machine will be offered:
Create a shortcut on the desktop;
- create a shortcut in the quick launch panel;
- register Virtual Box file extensions in the operating system.
Of these settings, I will leave the first and third, but this is a matter of taste and habit.

To continue the installation, click "Next", after which a window will open (Figure 5) warning that the network connection will be disconnected during the installation process. To avoid data loss, it is advisable to ensure the operation of applications using a network connection and wait for the download of all data from the network to complete.

The network connection will be interrupted for just a few seconds and then automatically restored, so feel free to click the "Yes" button to proceed to the next stage of preparation for installation. In the window that opens (Figure 6), it is reported that all the necessary preparations for installing the program have been made and you can proceed with the installation. To start the installation, click the "Install" button and a window will open showing the installation process (Figure 7).


During the installation process, the operating system will ask for permission to install USB channel controllers for the virtual machine (Figure 8), network adapters (Figure 9), and network services (Figure 10).


For convenient work with a virtual machine, it is desirable to be able to access USB controllers and work with the network, so we agree with the installation of these components.
After the installation is completed, a window will open on the screen informing about this long-awaited event (Figure 11). Click the "Finish" button to complete the installation and move on to creating and configuring a virtual machine.

2. Create a virtual machine.
Well, let's start creating a virtual machine. It will be no more difficult than installing VirtualBox. And so, we launch VirtualBox and the main window of the program opens in front of us (Figure 12).

To create a virtual machine, press the button or select the menu item: “Machine-> create” or press the key combination Ctrl + N. In the window that opens (Figure 13), set the name of the virtual system, type and version of the guest operating system.

My virtual machine will be called "VM". Since I decided to use ubuntu-12.04 as a guest system, the guest system type will be Linux, and the version will be Ubuntu (32 bit). After setting the required parameters, click "Next".
In the window that opens (Figure 14), select the amount of RAM allocated for the virtual machine.

In most cases, the default 512 MB of memory is sufficient. If you have little RAM, then this size can be reduced, but do not set it too low, as this may affect the performance of the virtual machine. If necessary, if you need to run resource-intensive applications in a virtual machine, the amount of allocated RAM can be increased. After choosing the amount of RAM, click "Next".
In the next window (Figure 15), you need to select the virtual hard disk with which the virtual machine will work.

There are two options: choose an existing one or create a new one. Since we are just starting to work with VirtualBox, we do not have already created virtual hard disks, so we select "Create a new virtual hard disk" and click "Create".
In the window that opens (Figure 16), first of all, click on the "Hide details" button. In this version of VirtualBox, there is an error in the translation or naming of this button, and when you click the "Hide Details" button, a window with detailed settings for the created virtual hard disk is displayed.

After clicking the "Hide Details" button, a window with advanced hard disk settings opens (Figure 17).

First of all, select the type of virtual hard disk. To ensure compatibility with other virtualization programs, it is possible to create several types of virtual hard disks, for example, VMDK hard disks can be used with VMware virtual machines.
Since the purpose of this article is to provide basic skills for working with a VirtualBox virtual machine, I will choose the VDI virtual disk type - a hard disk format designed to work with VirtualBox virtual machines.
WARNING: Make sure you have enough space on your hard drive to create a virtual hard drive before you start creating one.
To create a virtual female disk, click "Create". After that, a window will open illustrating the process of creating a hard disk (Figure 18). This may take several minutes.

The created virtual disk is an ordinary file in the host operating system with the name you specified and the VDI extension. This file can be moved, copied, transferred to another computer. For example, if you need to work with the same virtual machine at home and in the office, you can transfer a hard disk file on a flash drive and work at home and in the office with the same virtual machine.
After creating a virtual hard disk, a new virtual machine will appear in the main window of the VirtualBox program, ready for use (Figure 19). It remains only to install a guest operating system on it.

3. Install the guest operating system.
The installation of the guest operating system will start automatically after the first start of the virtual machine. And so, we start the virtual machine by pressing the button. After a few seconds, a window will open (Figure 20) prompting you to specify the path to the boot disk or boot disk image.

I will be installing the operating system from a boot disk image (ubuntu-12.04-oem-i386.iso) downloaded by RuTracker.org beforehand. To select the image of the boot disk, press the button and in the window that opens (Figure 21) select the file ubuntu-12.04-oem-i386.iso, click the "open" button and to start installing the operating system in the window (Figure 20) click the "continue" button.

Immediately after pressing the button, the virtual machine will start (Figure 22) and after a few seconds the installation of the guest operating system will automatically begin. During the installation of the operating system, prompts will appear in front of you, designed to make working with the virtual machine easier.

Installation of a guest operating system will proceed in exactly the same way as when installing this operating system on a real computer or on a VMWare virtual machine. Since I already described the process of installing a similar operating system in the article “Getting Started with VMware Workstation”, in the Installing a Guest Operating System section, I will not repeat myself and immediately proceed to describe the basics of working with a virtual machine.
4. Basic operations with a virtual machine.
4.1. Starting the virtual machine
Launch the VirtualBox virtualization program. The main program window will open on the screen (Figure 23).

If in the left part of the window that opens, in the list of available virtual machines, there is no one you need, then select the menu item:
Machine->Add
In the file manager that opens, select the virtual machine you need (file with .vbox resolution) and click the "open" button. The selected virtual machine will appear in the list of available virtual machines on the left side of the main window of the VirtualBox program.
In the list of virtual machines in the window (Figure 23), select the one you need. I will select the virtual machine named "VM" and start the selected virtual machine in one of the following ways:
By clicking the button at the top of the window, under the "Edit" menu;
- by selecting the menu item: Machine->Run.
After starting the virtual machine, if its state was saved, the state of the virtual machine will be automatically restored and you will be able to continue working as if you had not turned off the virtual machine. If the state of the virtual machine was not saved, then the installed guest system will start, similar to the start of the operating system when the real computer is turned on.
4.2. Pausing the virtual machine.
Often it is necessary to temporarily leave the workplace. If a certain program is running at this moment and you cannot miss any important moment in the process of running this program, then VirtualBox provides the ability to temporarily suspend the virtual machine. To do this, select the menu item: Machine->Suspend, and the virtual machine will automatically pause. To resume work, select the menu item again: Machine->Suspend.
Of course, you can shut down the stateful virtual machine and then start the virtual machine again, but this is much longer. If setting to pause takes a fraction of a second, then saving the state can take several tens of seconds. If you have to be distracted often, then pause is much more convenient.
4.3. Shutdown the virtual machine.
There are several ways to shut down a virtual machine:
1. Click the shutdown button in the upper right corner of the window (Figure 24). In the menu that opens (Figure 25), select one of the following items:
- "Save machine state", which will save the state of the machine, and then the virtual machine will shut down. At the next start, the state of the virtual machine will be automatically restored and work will continue as if you did not turn off the virtual machine.
- "Send a shutdown signal", this will open the shutdown window, the appearance of which depends on the operating system used. Using this window, you can properly shut down the guest operating system, and after the guest operating system is shut down, the virtual machine will shut down automatically.
- Turn off the machine. This action is equivalent to de-energizing the real machine.
I would like to draw your attention to the fact that in the version of VirtualBox used in this program, regardless of your choice in the shutdown window of the operating system, a few seconds after selecting "Send a shutdown signal", the virtual machine turns off.


2. Shut down the guest operating system in the regular way provided by the guest operating system, and the virtual machine will automatically shut down after the guest operating system shuts down.
3. Select a menu item: Machine -> Send Ctrl-Alt-Del, while the actions of the virtual machine will be similar to the action of a real computer when pressing the keyboard keys of the same name, i.e. The task manager will start, the appearance of which depends on the operating system used. With the help of the task manager, it will be possible to shut down the entire guest operating system or individual threads. After shutting down the guest operating system, the virtual machine will automatically shut down.
4. Select a menu item: machine -> reboot, after which a window will open (Figure 26) warning about the loss of all unsaved data in applications running in the guest operating system if you continue to reboot. If you press the "Reboot" button, then the further actions of the virtual machine will be similar to the actions of a personal computer when you click the "Reboot" button on the "system unit".

5. Select the menu item: Machine->shut down, this will open the shutdown window, the appearance of which depends on the operating system used. Using this window, you can properly shut down the guest operating system, and after the shutdown of the guest operating system and the system, the virtual machine will shut down automatically.
I would like to draw your attention to the version of VirtualBox used in this program, regardless of your choice in the shutdown window of the operating system, a few seconds after selecting the menu item "Machine->Shut Down", the virtual machine is shutting down.
4.4. Connecting removable devices to a virtual machine.
Consider connecting removable devices using the example of connecting and disconnecting a USB drive.
To connect a USB drive, select the menu item: Devices->USB Devices and in the opened list (Figure 27) select the USB device you need. In my case, the USB drive was identified as "Generic Mass Storage".

After selecting the “Generic Mass Storage” menu item, the USB drive will be connected, as if you connected the flash drive to a real computer, and in the list (Figure 27) the selected device will be ticked. Further actions are determined by the operating system you are using. To disable the USB drive, uncheck the box in the same menu. As you can see, everything is very simple.
ATTENTION! When you connect a removable device to a virtual machine, it is disabled in the host operating system, which can lead to the loss of unsaved data. Therefore, before connecting a removable device to a virtual machine, make sure that you do not perform any actions with it in the host operating system.
4.5. Switching between host and guest operating systems.
When working in a virtual machine, the keyboard and mouse are “captured”, that is, all keyboard presses or mouse actions are processed by the virtual machine and ignored in the host operating system. In order to switch to working with the host operating system, you must press the "Host" key or a key combination. For different versions of virtual machines and depending on their settings, the "Host" key may be different, but the name of the key is displayed in the lower right corner of the virtual machine window (Figure 28).

When you press this key, the processing of all events from the keyboard and mouse will again be processed by the host operating system. In order to return to work with the virtual machine, simply click the mouse in an arbitrary place in the window of the ritual machine.
This is quite enough to start working with a virtual machine, and in the future, if you like the new tool, and you will certainly like it, you can easily explore all its features, and I will try to help you in one of the following articles.
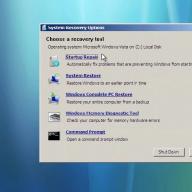
On some computers, when starting the VirtualBox virtual machine, an error occurs stating that "Failed to open a session for the virtual machine." For me it looked like this:

If you click on the word "Details" in the window of this error, you can see the code for this error - E_FAIL (0x80004005):

It is especially frustrating if you already had a working virtual machine set up in VirtualBox, which you used, and after a while it simply stopped starting, giving the error E_FAIL (0x80004005) "Failed to open a session for the virtual machine." In this article, we will sequentially consider three solutions to this problem with starting a virtual machine.
First decision
We go to drive C, then to the Users folder (Users), then select the user under which you installed VirtualBox (my name is Sasha), then to the VirtualBox VMs folder, and there should be a folder with the name of your virtual machine. In we created a virtual machine called Win8.1, so the full path to the required folder will look like this: C:\Users\Sasha\VirtualBox VMs\Win8.1

As you can see in the screenshot above, I have two files in this folder with the name of my virtual machine "Win8.1": "Win8.1.vbox" and "Win8.1.vbox-prev". You must first copy both files to another location on your computer (make backup copies), and then delete the “Win8.1.vbox” file in the original folder, and rename the “Win8.1.vbox-prev” file to “Win8.1. vbox. Just remember that you will have your own virtual machine name. After that, the virtual machine should start without error. If the error remains, then simply return the copied files to the original folder.
Sometimes the specified folder will not contain the files that I described above, but with the xml extension - for example, "Win8.1.xml-prev" and "Win8.1.xml-tmp". In this case, it is enough to rename the "Win8.1.xml-prev" file to the "Win8.1.xml" file, and the virtual machine should start without errors.
Second decision
Another reason for the E_FAIL (0x80004005) error may be one of the Windows operating system updates KB3004394. You must uninstall this update so that your virtual machine can restart without error.
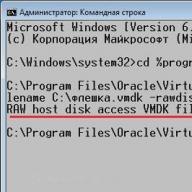
Go to the "Start" menu in the lower left corner of the Windows desktop, and then click "Run" in the right column, as shown in the figure:

A dialog box will open, and in it you need to type the word "cmd" in English and then click OK:

A black screen will open with a command line and a blinking cursor:

In it, you will need to carefully type the following command:
wusa /uninstall /kb:3004394
and press Enter. It should turn out something like this:

Windows will look for the specified update on your computer, and if it finds it, it will remove it. This usually helps if solution #1 didn't help.
However, there are times when even this method does not help, and you have to move on to the third method.
Third decision
If the first two methods did not help, then you need to install one of the stable versions of the VirtualBox program (at the moment these are versions 4.3.12 and 4.3.10), after uninstalling the version of VirtualBox with which you currently have installed (just do not delete it yourself virtual hard disk file). In versions 4.3.12 and 4.3.10, the E_FAIL (0x80004005) error was not observed.
You can download these versions from the official website using the following links:
How to install the downloaded VirtualBox program, I described in detail in this article. Please note that when you remove the old VirtualBox from your computer, your Internet connection will most likely be temporarily disconnected, just like installing another version of this program. There is nothing to worry about, a simple restart of the computer solves this problem.
I hope this article was useful to you. If you have additional questions, please ask them in the comments.
Post navigationIt differs in stable operation, but it may stop starting due to certain events, whether it be incorrect user settings or an operating system update on the host machine.
Various factors can affect the operation of the VirtualBox program. It may stop working, even if it was launched without difficulty recently or at the moment after installation.
Most often, users are faced with the fact that they cannot start the virtual machine, while the VirtualBox Manager itself is running in normal mode. But in some cases, the window itself does not start, allowing you to create and manage virtual machines.
Let's see how to fix these errors.
Situation 1: Unable to perform the first start of the virtual machine
Problem: When the installation of the VirtualBox program itself and the creation of the virtual machine were successful, it's time to install the operating system. It usually happens that when you try to start the created machine for the first time, the following error appears:
"Hardware acceleration (VT-x/AMD-V) is not available on your system."
At the same time, other operating systems in VirtualBox can start and work without problems, and such an error can be encountered far from the first day of using VirtualBox.
Solution: you need to enable the virtualization support feature in the BIOS.

Situation 2: VirtualBox Manager won't start
Problem: The VirtualBox Manager does not respond to the launch attempt, nor does it throw any errors. If you look into Event Viewer, then you can see an entry there indicating a startup error.

Solution: Rollback, upgrade or reinstall VirtualBox.
If your version of VirtualBox is outdated or installed / updated with errors, then it is enough to reinstall it. Virtual machines with installed guest OSes will not go anywhere.
The easiest way is to repair or uninstall VirtualBox through the installation file. Run it and select:
- Repair- fixing bugs and issues that prevented VirtualBox from working;
- Remove- uninstalling VirtualBox Manager when the fix doesn't help.

In some cases, specific versions of VirtualBox refuse to work correctly with certain PC configurations. There are two exits:
- Wait for the new version of the program. Check the official website for updates.
- Roll back to the old version. To do this, first uninstall the current version. This can be done in the manner described above, or via "Add/Remove Programs" on Windows.
Don't forget to back up your important folders.
Run the installation file or download the old version from the official site with archived releases.

Situation 3: VirtualBox won't start after OS update
Problem: As a result of the latest operating system update, VB Manager does not open or the virtual machine does not start.
Solution: Waiting for new updates.
The operating system may be updated and become incompatible with the current version of VirtualBox. Usually in such cases, developers promptly release VirtualBox updates that fix such a problem.
Situation 4: Some virtual machines won't start
Problem: when trying to start certain virtual machines, an error or BSOD appears.

Solution: disable Hyper-V.
An enabled hypervisor prevents the virtual machine from starting.

Situation 5: Errors with kernel driver
Problem: When I try to start the virtual machine, I get the following error:
"Cannot access the kernel driver! Make sure the kernel module has been loaded successfully."

Solution: reinstalling or updating VirtualBox.
You can reinstall the current version or update VirtualBox to a new build using the method indicated in "Situations 2".
Problem: Instead of starting the machine with a guest OS (typical for Linux), an error appears:
Kernel driver not installed.

Solution: Disable Secure Boot.
Users with UEFI instead of the usual Award or AMI BIOS have a Secure Boot feature. It prohibits the launch of unauthorized operating systems and software.
- Restart your PC.
- During boot, press the key to enter the BIOS.
- Paths for ASUS:
Boot - secure boot - OS Type - Other OS.
Boot - secure boot - Disabled.
Security - secure boot - Disabled. - Path for HP: System Configuration - Boot Options - secure boot - Dsabled.
- Paths for Acer: Authentication - secure boot - Disabled.
Advanced - System Configuration - secure boot - Disabled.
If you have an Acer laptop, then disabling this setting just won't work.
First go to the tab Security using Set Supervisor Password, set a password, and then try disabling secure boot.
In some cases it may be necessary to switch from UEFI on CSM or Legacy Mode.
- Path for Dell: Boot - UEFI Boot - Disabled.
- Path for Gigabyte: BIOS Features - secure boot -Turned off.
- Path for Lenovo and Toshiba: Security - secure boot - Disabled.
- Paths for ASUS:
Situation 6: UEFI Interactive Shell starts instead of a virtual machine
Problem: The guest OS does not start and an interactive console appears instead. 
Solution: Changing virtual machine settings.

If no solution helped you, then leave comments with information about the problem, and we will try to help you.