DIY bookmarks. Master class with step by step photos
Do-it-yourself corner bookmarks for paper books
Derkach Anastasia Sergeevna, Teacher of additional education, MBOUDOD CDT "Commonwealth", Creative association "Peacock", Novosibirsk
Description: This master class is intended for children from 7 years old, teachers of additional education, parents and creative people who like to create beautiful and unique things with their own hands.
Gift loop made of paper instead of plastic
To decorate gifts, loops made of plastic tape are widely used. On the other hand, this handmade paper loop is much more environmentally friendly and original, with which you can decorate gifts, greeting cards and much more!
Paper roses instead of African roses
Roses will never fade when you bring them! If there is no aroma, it may contain another drop of essential rose oil, and the whole room is immersed in a wonderful aroma.Special Occasion Accessories
Special occasions require special outfits and accessories. You can do it yourself or with some skill yourself. Next video shows how a fly just folds out of paper. You are already the caretaker at the next party. You have two options to do this, and they are very light.
Appointment: Bookmark for book, souvenir, gift.
A bookmark is a small but very useful thing when reading books. With its help it is more convenient to read books and find the desired page in them. The bookmark helps children, especially in elementary school, navigate along the lines, and at the same time it helps to foster a culture of handling books. And although there are a lot of bookmarks on sale now, a child will be more willing to use it, take care of it, because it’s a piece of his soul embedded in it.
We started reading the book and completely abandoned the use of the delimiter. To fix this, we will damage the pages by folding corners. Sometimes these bent corners disappear, and it becomes a titanic job to find a page. It also happens that we use delimiters that fall all the time, and this is catastrophic. Or we even choose those who give us bookstores when buying books, and although they are useful, they are not.
It is good that the subject can be resolved with plain square paper. Applying two very simple methods Origami, you will turn this paper into a cute and very functional book separator. It will look good and will no longer fall from your book.
I am a beautiful bookmark.
You need me for order.
Do not flip pages in vain -
Where is the bookmark, read there!
Goal: DIY bookmarking
Tasks:
- teach to make bookmarks from paper;
- develop interest in artistic creation;
- develop fine motor skills of the hands, eye, imagination, aesthetic taste;
- improve application skills and abilities;
- to cultivate independence, accuracy in work
Fold the paper in half from right to left


And again in the middle from top to bottom
Fold the squares in half. Then insert the triangle from the top inward. This baggage of stories that we value so much deserves a better solution, so forget to bend the corners of your pages or scratch the leaves to remember where you can resume reading. We have the best book separator ideas you can make for yourself.
Manufacturing Technique:
- origami
- application
Materials and tools:
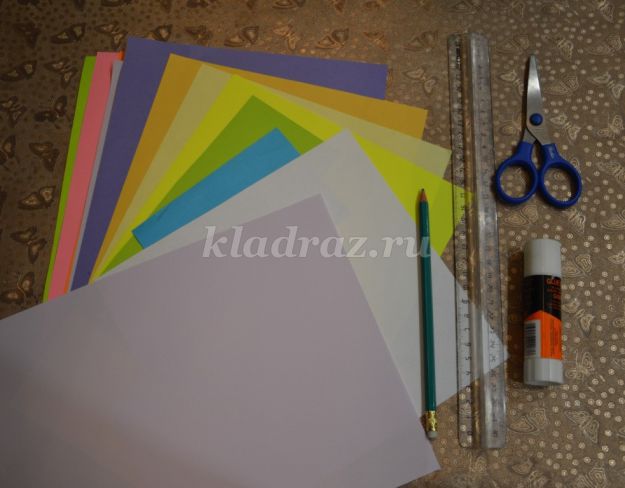
- scissors
- PVA glue
- color paper for photocopy
- glue stick
- black marker
Safety rules for working with scissors
1. Work well-adjusted and sharpened scissors
2. The scissors should have blunt, rounded ends
3. Scissors put rings to yourself
4. Follow the movement of the blades during cutting
5. Do not leave the scissors open
6. Pass the scissors rings forward
7.Do not play with scissors, do not bring to face
8. Use the scissors as intended
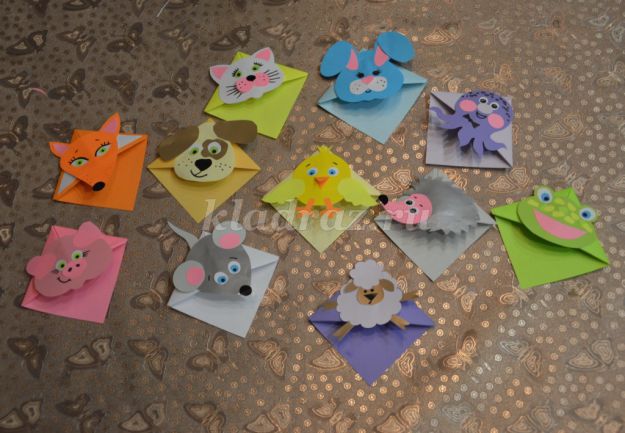
Animal Bookmarks
You can download the template for this beautiful burn separator in this link. 
Separators with paper fasteners. Take large bras and add some details, like ribbons with bows. Fernanda Lacerda returns to the blog one more step by step in an incredible sense. Add this extra charm to your parts catalog!
Follow the step by step to the felt and make this beautiful girl already!
Lists of materials - Page marker - Fox. Step by Step Page Marker - Fox. Remembering that the details of the ears and spots of the face and tail were cut using a paper-thermo-coco, therefore: draw the pencils on the paper thermocouple of the shapes just mentioned. Leave the glue only at the ends. Or, if you prefer, you can just paste. Wrap a line about 1 cm in the center of the face. And glue the semi-black pearl to make the face. Mark the position with your pen to draw small eyes and eyebrows. At the end of the brush pen, draw small eyes using fabric dye. And with a pin tip, note the glow, also with fabric paint now white. Using hot glue, glue the details of the ears. Now keep your face close to your body. Pass the glue along the contour of the head at the base of the marker. Glue the tail spot as well as hot glue. The back of our marker is made with two felt halves, gluing to each other, keeping the pointed part. Very quickly using a No. 7 needle and a two-layer line. We will marry only the lower part of the marker, and for this we pinch! Glue the rabbit in front of the marker, leaving a little tip. This tip, insert inside the marker. Make a rosy cheek with fabric paint and a soft bristle brush. To refine the marker structure with cardboard paper, use liquid silicone glue.
- Cut all the parts that make up our fox, according to the indications of the forms.
- Now just cut it, taking risks!
- Glue the stain on your face using a hot cola to make it firm.
Rules for working with PVA glue
1. When working with glue, use a brush if necessary
2. Take the amount of glue required to complete the work at this stage
3. It is necessary to apply glue in an even thin layer
4. Remove excess glue with a paper towel
5. Make sure that glue does not get on clothes, face and especially in eyes.
6. After work, glue tightly close and remove
7. Wash hands and work area with soap
Step by Step Page Marker - Sheep. Now our Sheep! For a cute little sheep fringe, let's replay the War, it is very easy: after drawing mold in thermal color and past the felt, cut out after risk. Remove the paper film and pass the part onto another piece of felt; The heat of iron activates the glue of the paper, and the strip will stick together. Make stick wands around the entire throw. In the center of the face, lower the muzzle using the line of the skein. Frame with cardboard paper. To finish, draw pink cheeks as well as ears. All is ready!
- Cut out all the parts that make up our sheep according to mold readings.
- We have two felt halves glued with a thermocouple.
Templates:


Working process:
The basis of all bookmarks is the same
consider the example of making bookmarks - chanterelles
Bookmark - Chanterelle made of paper with your own hands for children. Master class with photo
Step by Step Page Marker - The Little Prince. Glue the hair first on a small part of the face, and then on the ends. Finish by drawing eyes and cheeks. The body and structure of the piece with cardboard is the same as we did in the two previous parts.
- Cut out all the parts that make up our Prince, according to the indications of the molds.
- Remembering that a small face was cut with a thermocouple.
- Using hot glue, we glue the collar to the coat.
- Now skip the hot glue on the sides of the body and glue the clothes.
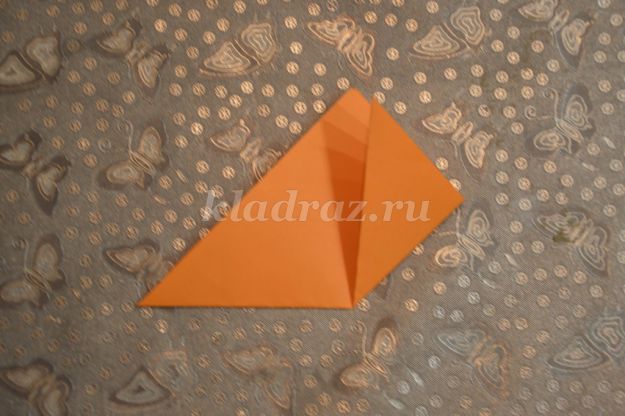
We take paper for Xerox orange.
We need a square measuring 10 cm by 10 cm

Cut out

Fold diagonally

In fact, we have already talked about importance. The necessary materials are: cardboard or well-painted cardboards. With the help of a ruler. He must be very sharp! Then draw the diagonal in the upper square from the upper right corner to the lower left corner. Note that you now have 2 triangles. Scan what is outside the drawing. Do the same with the square below it, as shown in the figures.
Heart-shaped romantic bookmark
Cut the pattern by following the lines and discarding the details that you scratched. The paper will look like a small piece. Place the template over the colored paper that you selected and with a pencil, go around its shape. Remember the triangles we painted before? Use a ruler and a pencil to draw a straight line, as shown in the figure below.
Bend the corners to the top
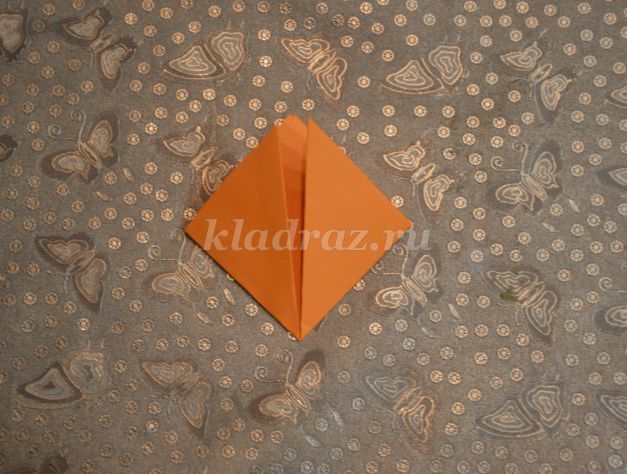
Expand
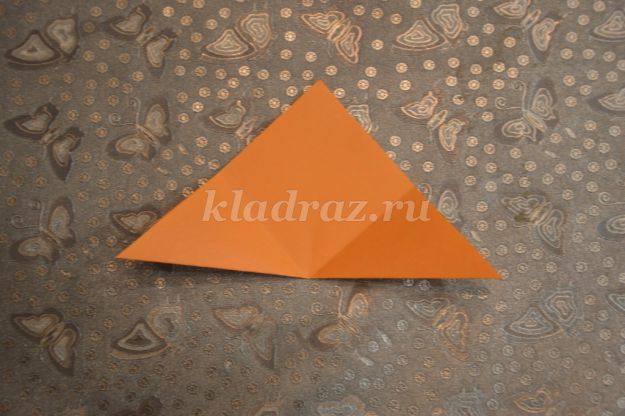
Bend one top corner down
Raise the right corner up
On a different paper than you are already using, and insert it right in the middle. Finally, fold one of the “ears” on top of the square. Apply some glue to another and fold it over the first triangle. Then, if you want, you can cut out a slightly smaller triangle and paste over the one you just created.
Now he can devour the pages of his favorite book. -Good guys! A conversation between the theater and the model. Hence the motivation to create a site rich in advice, information and creative ideas to contribute to the development of our youth. Provide children with activities other than a television or console.
We fill it in a pocket
![]()
We refill the left corner in the same way


Turn over. The workpiece is ready! Can decorate
We wondered if set-top boxes contribute to the development of our kids or not. That's why we interviewed child care professionals. Their unanimous answers can be summarized as follows. Television as many as consoles adopted a child in a situation of great passivity. This reduces the ability to take initiatives or control your imagination; he suffers!
It follows that it would be preferable that television and consoles do not occupy an excessive place in the daily lives of our children. Thousands of creative activities to help children grow and prosper. But also tips and information to accompany parents.
Getting started creating an image
Cut out all the necessary details from colored paper
Glue the head part to the base
Gently glue pink ears, black nose

Moreover, it is not always easy to answer the thousands of questions that children themselves ask, so we provide you with “Knowledge” sheets about nature, animals, history, geography, mathematics, Art, citizenship or the planet. A lot of useful information to help you bring them the knowledge necessary for their growth.
From pregnancy to education, nutrition, prevention and other subjects, you will also find many tips that will accompany you daily. Children flock to them, even if we often went to the library, so the book said bookmarks, especially when the children are old enough to read the chapter of the book. We did it, but my son did not have enough fun. Then we made others that looked like a wedge.
Eyes

We take a black marker and draw cilia, pupils
Our bookmark - the chanterelle is ready!

I met a fox
Prying eyes
Lurking behind a hemp
A bright red light
And calmly observes:
Who walks in her forest ?!
T. Efimova
Materials required for bookmark bookmarks
Easy to make, these bookmarks are decorated in thousands and in one fashion.
Corner Bookmarking Instructions
Then draw the diagonals, and then the symmetrical lines on the diagonals on one side of the square. Cut the pattern to get something that looks like an image. It’s easier to trace it on mesh paper, and this can be a good geometry exercise! You can also download it: it has two templates, 2 different sizes. You will also find a chart to create your own template.From paper you can make a huge number of different funny bookmarks.
It can be the heroes of your favorite fairy tales, or just little animals.
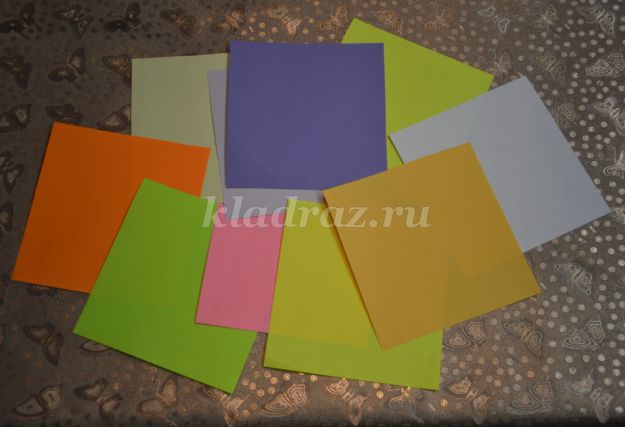
We take multi-colored paper squares
Add bookmark base
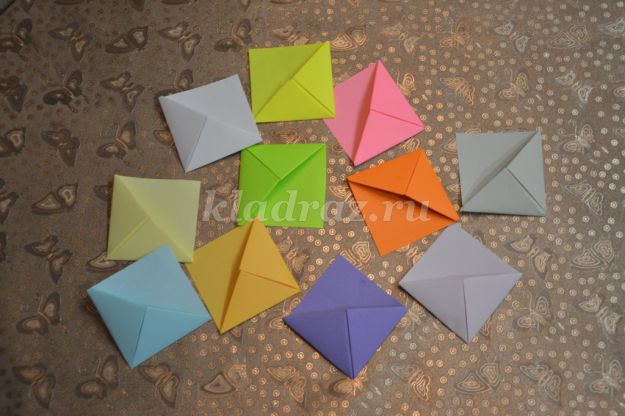
Cut as many shapes as children or bookmarks. To collect a bookmark, collapse the point on the other side. Then the second points above. Here are our small products. It’s good that the surface for decoration is small, so it goes fast enough, it’s a creative activity that takes 3 minutes when the template is cut out.
Bookmarks in the shape of a corner
And at home, can you bookmark? The art of oracle is a great creative way to create paper ornaments through precise bending patterns. This is an educational and entertaining pastime to develop the aesthetic meaning and work of the little ones. Among the many creations that can be done, we find, of course, practical objects of different and original forms that must be used in them to always find the point where reading was interrupted. So, this is a handy guide to creating bookmarks using the origami technique!
Cut out the details from colored paper

Glue the little animals
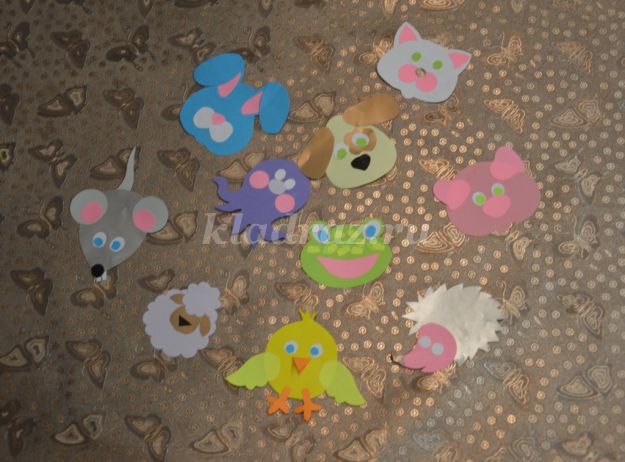
We draw small details with a black marker

Glue the muzzle on the base - blank bookmarks
Bookmark Puppy


Little puppy
I have a funny puppy.
He ate everything he could:
Shoes and a leg from a chair,
And a little more sofa.
Kiskino grief
Crying pussy in the hallway
She has great sorrow:
Angry people poor pussy
Do not let sausages steal!
When reading an interesting and fascinating book, it is useful to have a bookmark, thanks to which you can mark, and if necessary, quickly find the page you need. In order to use the bookmark, it is not necessary to go to the store and buy it, because from improvised materials you can make the original thing yourself.
In this article, master classes will be presented, after familiarization with which, it will become clear how to make a bookmark out of paper for a book in the form of a fox face, in the form of a heart and in the form of a corner.

A selection of training lessons
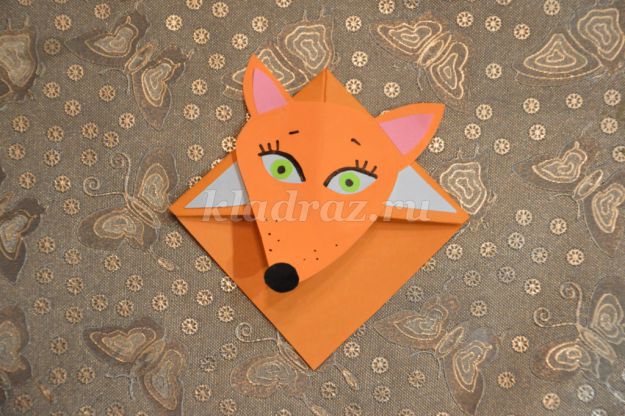
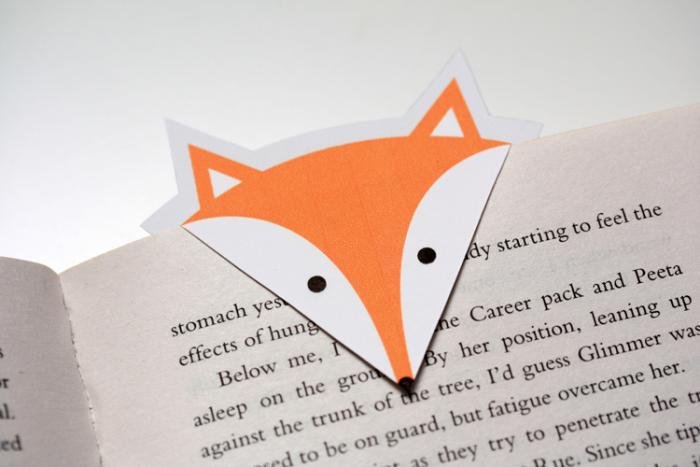
Fox face
In order to make a bookmark in the form of a funny muzzle of a fox, you need a sheet of thick cardboard, sheets of colored paper, a pencil, scissors and glue.
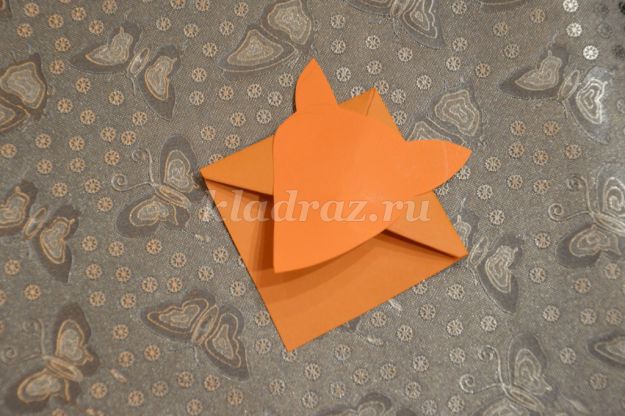
First, on a sheet of cardboard, draw a square with sides ten centimeters, then on both sides draw a square with the same dimensions, in the end you should get a figure in the shape of the letter of the English alphabet L. Then in the upper square you need to draw a diagonal and shade it. Similar actions must be repeated with the opposite square, which is located to the right of the main square. Next, the shaded parts should be cut off, and thus a square and the adjacent triangles should be obtained. Cardboard blank must be cut. Then you should draw a line that will separate the triangles from the square.
Then, from a colored paper of orange color, it is necessary to cut a square in size smaller than the square of the workpiece. Then the square cut out of colored paper should be glued to the square of the workpiece, one of the triangles must be folded inward so that it covers part of the square, the second triangle also needs to be glued.
At the final stage, you must first glue two large white circles, on top you must glue two circles of a smaller green color, and finally, you need to glue two small circles of black color. A mouth can be made of colored red paper.
Romantic heart
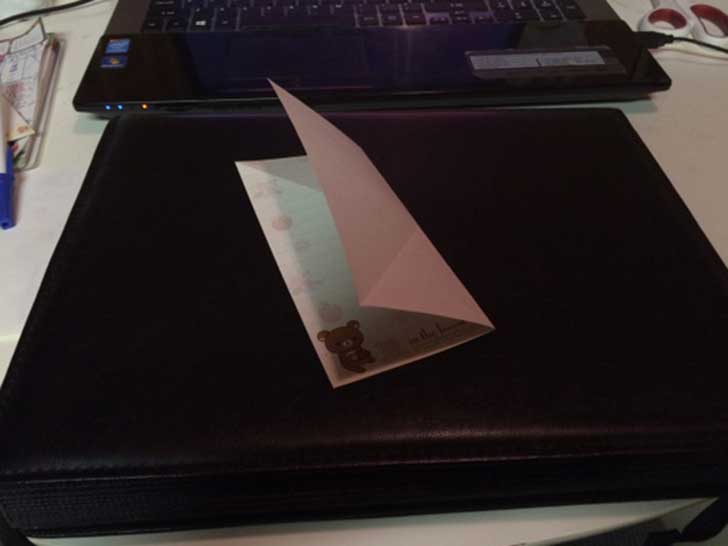
The next master class will describe the process of making a bookmark in the form of a heart. To work, you need a sheet of colored square paper.
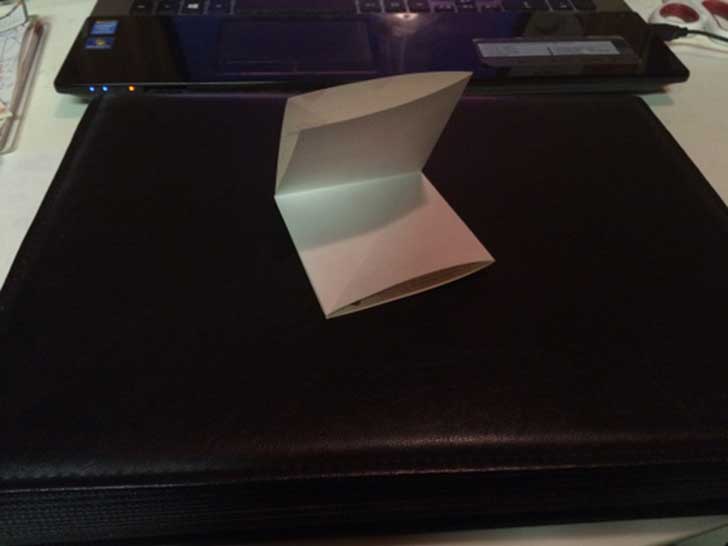
The first step is to fold the sheet of paper in half two times, then open it so that the fold lines are indicated. Then you should bend the lower part, then the workpiece must be turned over and the edges folded in the shape of a triangle. Next, the workpiece should again be turned over and the top of the triangle bent to the very top. After this, the workpiece again needs to be turned over and two triangles formed. Then you need to fold the triangles from each vertex, then turn the workpiece over again and fold the side parts inward.
You can also make a bookmark consisting of several hearts.

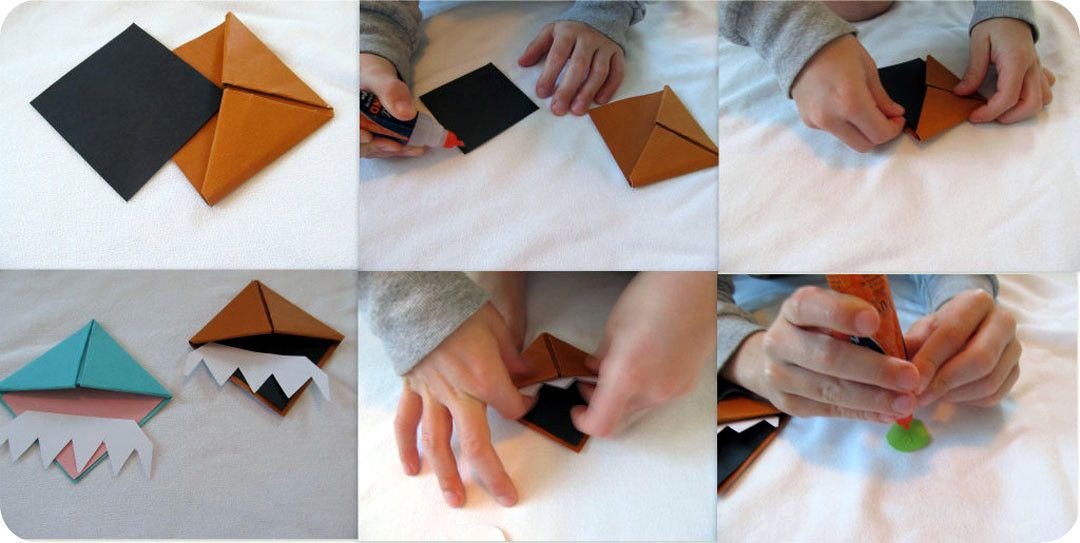
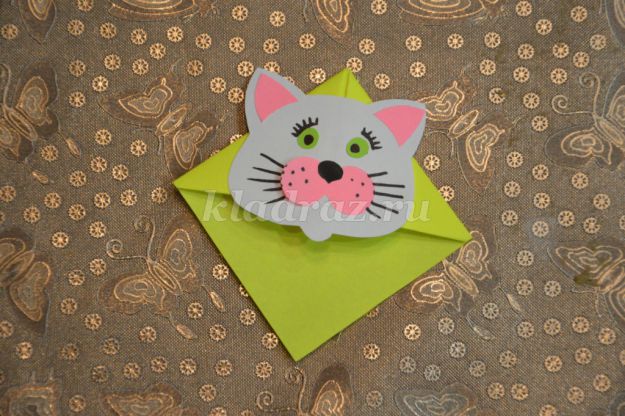
Toothy muzzle
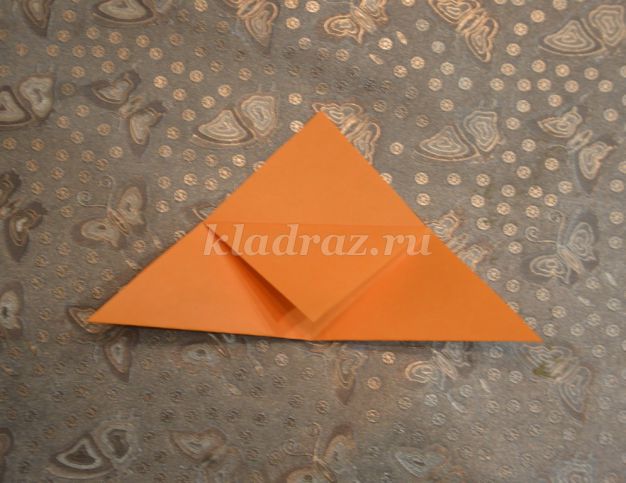
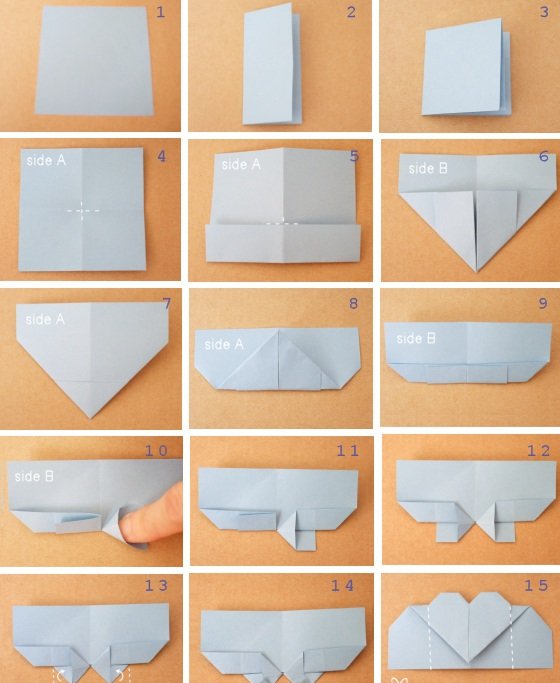
In order to make a corner bookmark, you will need sheets of cardboard and colored paper, scissors and glue.
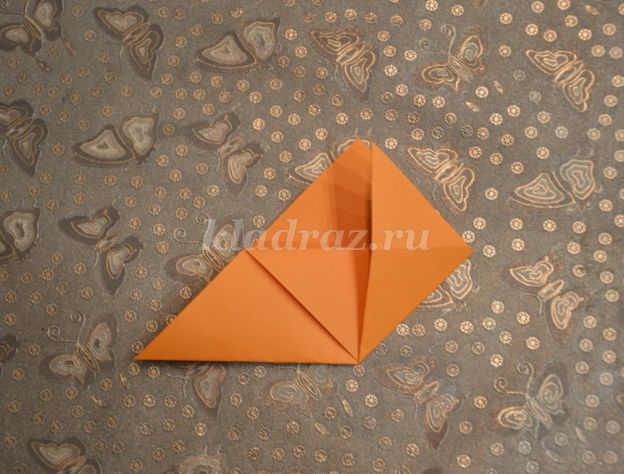
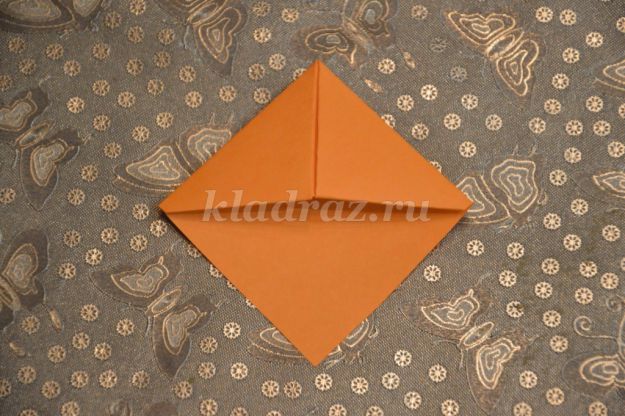
First of all, you need to cut a sheet of square shape with sides six centimeters, then fold it into a triangle. Next, first bend the left, then the right corner to the center point. Then the blank must be deployed and the top layer folded to the bottom. Next, you must first left, then bend the right corners into the pocket, this way you get the base.
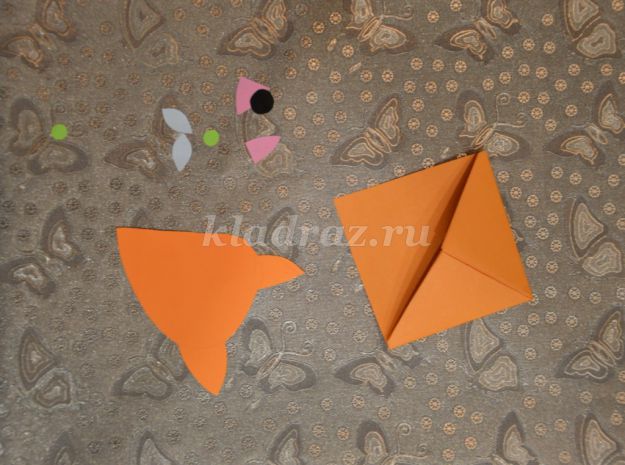
After that, it is necessary to cut a square with sides three centimeters, preferably in a contrasting color, and paste it inside the workpiece. Then, teeth, eyes, nose and mouth should be cut out and the details glued to the base.