class="eliadunit">
At the beginning of 2012, unfortunately, a virus that hides folders and creates only their shortcuts has become relevant. I don't think it's worth going into the details of how this virus works - the main thing for users is to save the previously recorded information and use it under any circumstances. This is exactly what this article is for.
Naturally, the first thing after suspicions of viruses, and this can be the absence of folders in the root of the flash drive, we scan for viruses. After we delete them, we treat the files ... Next, go to Total Commander. Open hidden and system folders and files if they are not visible. How this is done has been described previously and is recommended. But usually, after opening the contents of the flash drive in Total Commander, the damaged folders are visible and can already be used. But this is not the elimination of the disease, but the elimination of its symptoms.
If you have one or two folders with a small amount of information and a small number of files, then you can simply copy the information from the folder to the computer's hard drive, and then, having previously created a new folder on the flash drives, upload all the files back.
But what if there are a lot of folders and there is no time for such operations? You can use special programs. I won’t recommend any particular one, advice - look on the Internet.
I’d better describe the case when there is no Total Commander on the computer and it was not possible to find a cure program. In this case, do not use obscene expressions and despair. In such a crisis case, it's time to recall the contents of this article, namely its second part.
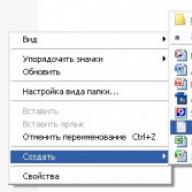
So, we treat the flash drive from viruses. We go to her. Create a notepad file there. It can usually be created via the right-click menu:
class="eliadunit">

Then we write the following magic line:
attrib -s -h -r -a *.* /s /d
The next step in saving hidden folders is to close and save this file. Next, we need to change the extension of this file from .txt to .bat. How to do it? We look. You can only add that the file extension can be changed in Total Commander and Winrar (I don’t focus on this much, users who have had this business will understand). After renaming the extension, an MS-DOS batch file will appear, you can also rename its name, for example, to "Opener of hidden folders!":

Actually it remains to tell how to use it. Yes, simple! We launch this file and wait a bit until the window that appears closes on its own. And when this happens, you will be pleasantly surprised - the folders will again become visible on the flash drive! This method was tested on Windows XP, it should also work on other operating systems.
There may be a need to open hidden files and folders of the operating system, mainly to edit some important system documents.
To do this, you need to know how to make hidden folders visible.
The fact is that in all modern versions of Windows, the default settings assume the so-called "fool-proof".
This means that an inexperienced user simply does not see most of the important system partitions and cannot make potentially dangerous changes to them.
But on the other hand, some fine-tuning of the operating system may require editing these hidden files.
This article will provide a detailed guide to implement this procedure in Windows 7, Windows 8 and Windows 10, which currently occupy the lion's share of the operating systems in use in the commercial and private sector.
Secrets of the Windows 7 system partition
This version of Microsoft's operating system took the lead in popularity from the legendary XP, which was discontinued a few years ago.
Such success is primarily dictated by a user-friendly interface in which it is easy to find the necessary settings.
This also applies to the option to show hidden folders and files, which is most easily activated through the taskbar.
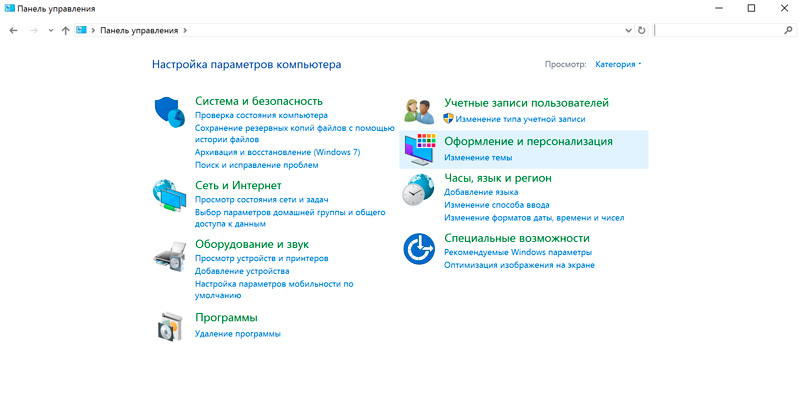
- First you need to get to the taskbar in the standard way: open Start and select "Control Panel".
- Then click on the link "Appearance and personalization".
Advice! For convenience, you must select the display method by category.

- In the variety that opens, we need the “Folder Options” category, or rather, its “Show hidden files and folders” option, which speaks for itself.

- In the window that opens, called "Folder Options", expand the "View" tab and at the very bottom of the list of additional options we see the function of showing / hiding special files. It remains only to set the checkbox in the desired position.

You can get to the "Folder Options" window in Windows 7 in a simpler way: just open any directory and select "Folder and Search Options" in the drop-down menu of the "Organize" option.

Advice! If you choose to use this method, it will only show hidden files in the current directory by default. To apply this rule to all drives, you need to activate the "Apply to folders" item.

Having dealt with the classics, you can move on to more modern systems.
We delve into the intricacies of Windows 8
This version of the operating system is significantly different from Windows 7, which at one time caused many complaints from users.
The changes also affected hidden directories: in Windows 8, there are two types of files and folders that are not visible to the user.
The first one is actually hidden sections. This status is possessed not only by system files and folders, but also by components of various third-party applications.
Moreover, the user himself can assign this type to any object on the disk.
However, this feature is also often used by malicious programs, as a result of which, for example, there are problems with files on a flash drive.
For these two types, the algorithm of actions will be different.
To open regular hidden files and folders, follow these steps:
- First you need to open the "Explorer", for which you can use the standard shortcut in the "Taskbar".

- In the folder that opens, in the top settings panel, click on the "View" menu and select the "Show and hide" function. In the list that opens, you need to activate the checkbox "Hidden items".
In the same way, you can assign the hidden status to any selected file or folder.

In order to see especially important system files, you need to make the following settings:
- In the same "View" menu, go to "Options" - "Change folder and search options."

- As a result, the “Folder Options” settings window will appear, similar to that in Windows 7. Here you should go to the “View” tab and uncheck the “Hide” protected system files function (recommended).

You can get to this window in another way:
- In Start, which in the eight has an unusual Metro interface, click on the gear icon (Computer Settings).

- In the menu that opens, you must click on the lowest link to open the Control Panel, familiar to most users.

- In the "Taskbar", first we select the way to display the functions Large (or small) icons, and then follow the link "Folder Options", which in the end will give access to the settings window of the same name.

It is also worth considering separately the algorithm for enabling the display of hidden and system elements for Windows 10, since, despite their similarity with the eight, the settings of this OS have their own nuances.
Hidden files and folders in Windows 10
In the top ten, there is the same division of hidden files into regular system files, therefore, the methods for enabling their display are similar to those discussed in the previous section.
To see files and folders with the hidden attribute in the top ten, including those on a flash drive or any other external media, do the following:
- Open "Start" and launch "Explorer".

- The appearance of the "Explorer" in the top ten is practically no different from Windows 8. Therefore, it acts according to the already known algorithm: View - Show and hide - set the "Hidden items" checkbox to the active position.

In order to see the system files and folders, we need to get to the "Explorer Options" function (similar to the Folder Options option).
- The fastest way to do this is through the search, the icon of which can be found on the "Taskbar".
Advice! You can also use the keyboard shortcut to access search. Win+Q .

- By clicking on the result of the search results, we will be taken to the function window, which we have already encountered several times in this article. Here we are interested in the option “Hide protected system files (recommended), which is located on the View tab.

In conclusion, it is worth saying once again that editing hidden files, especially system files, can cause serious harm to the computer's software shell.
Therefore, such changes should be treated as responsibly as possible.
Thematic video:
How to open hidden files and folders in Windows 7/8/10 Free lesson
In this video, I show how you can easily open hidden files and folders on Windows 7/8/10 operating systems.
We are all human and each of us can have our own secrets. This doesn't just apply to real life. On computers, we can also store information that belongs to us, and we would not want strangers or family members to have access to it.
Therefore, in this lesson we will consider with you, how to make a folder hidden, which can also contain various files and other folders, and so that all this is not visible. Most often, such a need arises when several people work on the same computer and, as I said above, I would not really want one of them to go into this folder to look at our files, open them, and so on.
In such cases, I would recommend make folder invisible and put there all the files that you want to hide from prying eyes. The folder itself will exist, but it will not be visible to us or anyone else until we perform some actions to open this folder.
How to make a folder hidden?
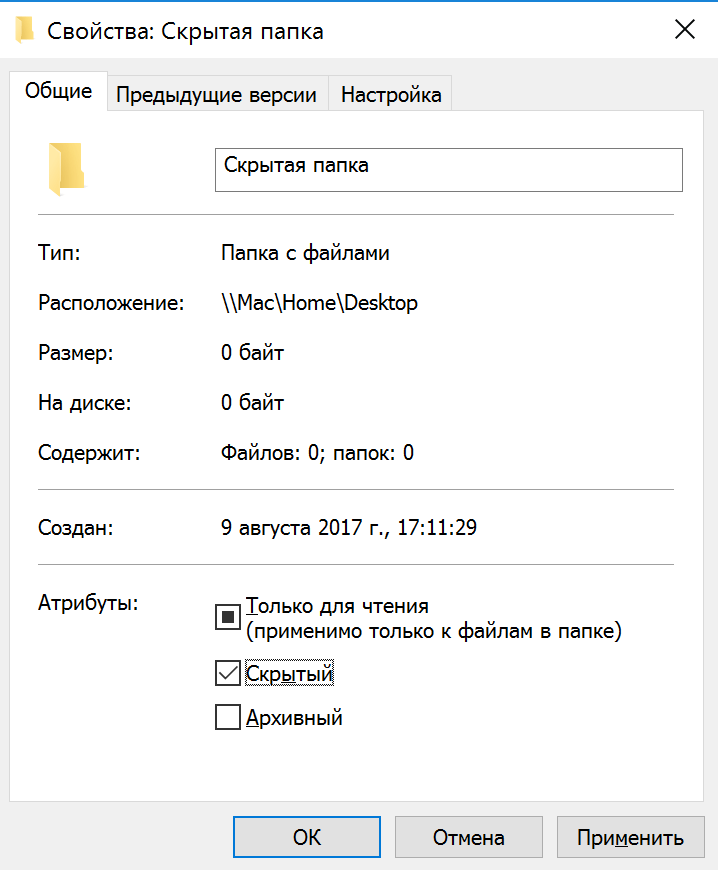
We right-click on the folder that you want to hide, and in the context menu that appears, select the item " Properties».

In the window that opens, you need to check the box next to the item " Hidden", Then click" Apply».

Another window appears where we need to leave the switch
« To this folder and to all attached files and folders” and then everything inside the folder will also be hidden. Then click "OK".

And here, too, "OK".

That's all, now the folder is not visible, only you know about its existence.
And now how do we ourselves find the folder we made invisible?
Well, firstly, we know exactly where the folder is on our computer, and secondly, we need to make some settings so that hidden folders are displayed, I talked about this in detail in the lessons: "" and "".
In them, I tell you how to enable the display of hidden files and folders, this feature is disabled by default. After performing all the operations on the folder that we have hidden, we simply turn on the function of hiding files and folders again and again no one sees our data. In general, everything about this in the above lessons.
In such a simple way, you can make folder or file invisible.
Sometimes you need to hide a file or folder from prying eyes on your desktop: from children, wife or husband, superiors. In our instructions, there are 4 ways to do this in 1 minute.
Method 1: popular
Create a folder
First, create a regular folder. This can be done on your desktop or anywhere you like. Right-click in the free zone → "New" → "Folder". Any name can be put.
Making the icon transparent
Right-click on the new folder and open Properties.
On the Settings tab, click the Change Icon button.
In the list of available icons, find the transparent icon, select it, and click OK. You can also download separately and specify the path to it.

In the folder properties window, click Apply, OK.
Now the folder has become transparent, only the name remains.
Hide folder name
Right click on the folder - Rename. With the Alt key held down on the numeric keypad (on the right), enter the code 0160. This is a non-breaking space character. Release Alt and press Enter. If it doesn't work, try replacing the code with 255, or holding down the Fn button on the laptop together with Alt.
Some laptop models do not have a numeric keypad. In such cases, type a non-breaking space in Word with the key combination Ctrl + Shift + Space. Copy and paste in the folder name.
Method 2: alternative
I did not want to install a hidden icon for a folder on a Windows 10 virtual machine. It turned out to make it only for a shortcut to a folder, but it was given out by an arrow in the corner. So I found an additional way to make the folder invisible.
In the folder properties, check the "Hidden" option.
Open the View tab in File Explorer and check the Hidden Items box.

This option can also be changed through the Control Panel:
Open the Control Panel. It is in Start. Find through the search or right-click on the Start icon - Control Panel.
Select Appearance and Personalization.

On the "View" tab at the very end of the list, select the "Do not show hidden files, folders and drives" option.

Click "Apply" - "OK".
Method 3: simple
If you don't want to mess with the OS settings, use the free program Free Hide Folder, which can be downloaded from the official website: http://www.cleanersoft.com/hidefolder/free_hide_folder.htm. It hides the folder completely: it cannot be found even through the search.

After installation and launch, the program will prompt you to enter a password with confirmation. The next step will be a request for a registration code, you can skip it with the "Skip" button.
To hide a folder, add it to the program with the "Add" button. A warning will appear about creating a backup copy of data to access the folder in case the program is deleted and reinstalled, in order not to lose access to it - click "Backup". Click OK and the folder will hide.
To access a folder in the program, click the Unhide button.
Method 4: ingenious
Another unusual way to hide a folder is inside a picture. Before starting, make a copy of important files so that you don't lose them in case of failure.
For example, let's take a folder with important data and a photo with a secret cat.
 This is a photo with a secret cat.
 Make a secret folder archive (in zip or rar format).
Create a folder, the closer to the root of the disk, the easier it is. For me it's C:\setupik\ . Move the created archive and the photo of the cat inside this folder.
Open a command prompt: press Win + R , type cmd and click OK.
Use the cd command to navigate to the folder you created. Like this: cd c:\setupik\ .
Enter the command COPY /B kot.jpg + secret.rar secret-img.jpg . Change the file names to your own: the first is a photo of a cat, the second is an archive with a hidden folder, the third is a new file with a secret picture.
After executing the command, open the generated secret-img.jpg file. You will see the same picture with a cat. But if you open this file with an archiver or change the extension to rar or zip, you will see hidden files. Magic!

How to find a hidden folder
In the first case, a folder with an invisible icon and name will become visible if you select it. This can be done with the key combination Ctrl + A (select all) or manually select the entire area of the desktop.
In the case of a hidden folder using an attribute, it will be possible to find it when you turn on the display of hidden files and folders through the control panel. That is, you need to repeat the described steps in reverse order.
You can also access a hidden folder if you write down its path somewhere. For example: C:\Users\Admin\AppData\My Hidden Folder. We paste this path into the explorer and the desired folder opens.
As you can see, there is a chance that your hidden folder will be found by accident. Therefore, it is better to remove it from the desktop somewhere far away. And the most reliable way is to put a password on the folder. When archiving a folder in WinRar, there will be an option in the options to set a password and hide file names.
When working with a personal computer, we sometimes need to hide information, files or folders from prying eyes. To do this, many people hide the necessary folders somewhere in the system folders so that it would be difficult to get to them, but there are much easier ways to hide their documents so that they have easy access and at the same time no one sees them. And in this article, I will teach you how to hide and make invisible folders in 3 different ways.
Method number 1 transparent folder
The first method is called "Transparent Folder". As you may have guessed from the name you will not hide the folder. You will make it absolutely transparent and thereby hide from prying eyes. And now I will tell you in detail how to do it:
- Select a folder on the desktop that we want to hide from prying eyes. I will hide the folder called "New Folder".
- Right-click on the selected folder.

- Hover over the item "Rename" and click on it with the left mouse button.

- Then the name of our folder will become highlighted.

- Erase the old folder name. To do this, press the "Backspace" button located on the keyboard.

- Next, we need to press the "Alt" key and without releasing "Alt" we will dial the combination of numbers 0160.

- We press the "Enter" button and your folder now has an invisible name.
- We need to follow the invisible folder name. I described above step by step how to do this if you didn’t read the familiarizer then and follow all the steps so that the name is missing.
- Then you need to right-click on the folder you want to follow invisible.

- Select the property item and press the left mouse button.

- The folder properties will open in front of you. You need to open the Settings tab.

- Next, select Change Icon.

- A window will pop up in front of you in which there will be a large number of different icons. You need to find transparent ones among these icons. They are visible due to the empty space between other icons.

- Select the transparent folder and click OK.

- Now you can see that your folder has become transparent. Click on the "Apply" button, thereby confirming your choice of the appearance of the folder.

- Click on "OK" and you will see that your folder has become completely transparent and in order to see it you need to hover over the place where it is located with the mouse cursor.

- If our description was not clear to you, use the video instruction.
Method number 2 hidden folder
The second method is called "Hidden Folder". In order to hide a folder, you will need much less time, and the result will be much better. After all, the folder will be absolutely hidden and will be noticeable only by the number of folders and the space occupied on the hard drive. Let's take a closer look at this method:

Method number 3 invisible folder
The third way is the most efficient. This method makes the folder invisible instead of hidden. With this method you can hide your folder so that no one can find it unless they know where your folder is saved and what it is called. And so let's look at the step-by-step creation of a hidden folder using the command line:
- Create a folder that we need to hide. I created it in the local drive "C" and called it "hidden folder".

- Next, press the key combination "Win + R" - this combination will call the line "Run".

- In the "Run" line, you must enter the command "cmd" - this command will launch the command line, with which you will hide your folder.

- Then you need to enter the following command at the command line "attrib + s + h "C:\hidden folder"
 "C:\hidden folder" is the path where the folder you want to make invisible is saved. You may have a different address and folder name. But the “attrib +s +h” command should not be changed, this command hides your folder.
 - After entering the command, your folder will become hidden, and even if you use the folder property and make all folders visible, this folder will remain hidden.
How to make a hidden folder visible
After you make your folder hidden, you will need to find it. And now I will tell you how to make a hidden folder visible with step by step instructions and photos.