One of the biggest reasons Linux hasn't taken off in all these years is the lack of games.
sudo apt-add-repository ppa:ubuntu-wine/ppa
Now install Wine:
sudo apt-get install wine
Once installed, the Windows files run just as if we were running in our native OS. We try.
The installer started, but this does not mean that everything will go just as well.
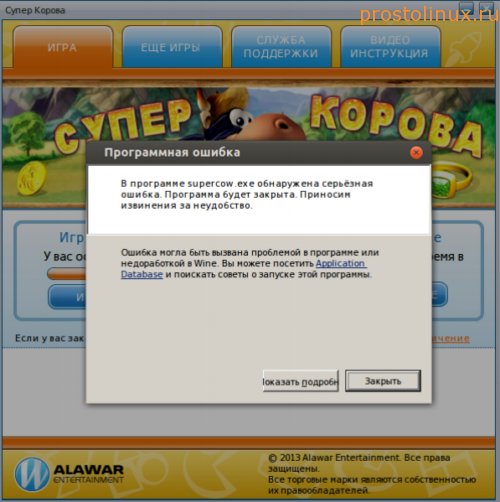
Well, that's it, all good things come to an end. The program gave an error and safely exited. But nothing, there are other options to run this game on Linux.
2. How to install games on Linux via Etersoft?
Etersoft is such a paid version of Wine from Russian developers. [email protected] allows you to use familiar Windows applications in free operating systems of the GNU/Linux family. [email protected] provides Linux popular Windows programs for business.
Although most of their versions cost money, there is also a free version for private use. We go to sales.etersoft.ru/wine/local/order, fill out an application and wait for instructions on how to download the package.

After that, I received an email in which the download page was indicated. I downloaded the license file, and then ordered the package I needed. I received a large manual with links to several packages: the program itself and various add-ons to it. Downloaded all 8 packages.
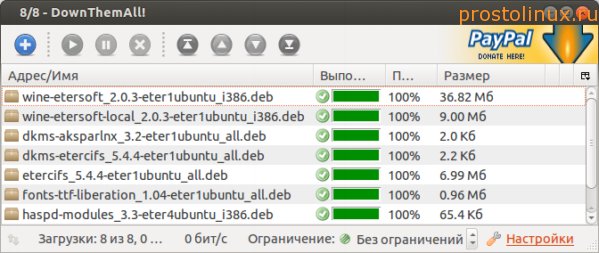
To install all the files at once, you need to go to the packages folder and run the command:
sudo dpkg -i *.deb
All packages are not installed. It turns out that Etersoft is conflicting with Wine. So I had to remove the wine1.5 1.5.22-0ubuntu2, winetricks 0.0+20120912~precise1~ppa1 and fonts-liberation packages. After that, the installation of all packages went well. But, unfortunately, Etersoft did not work at all for some mysterious reason. Not a single program was even launched with it.
I had to remove the packages and revert to Wine. Perhaps it was necessary to remove all packages related to Wine, maybe later I will experiment on a clean system. But this is not the last way how you can install games on Linux.
3. How to install games on Linux through CrossOver Games?
Install the crossover-games package, which is located by default.
sudo apt-get install crossover-games
After installation, a certain analogue of the Wine menu appears in the menu.

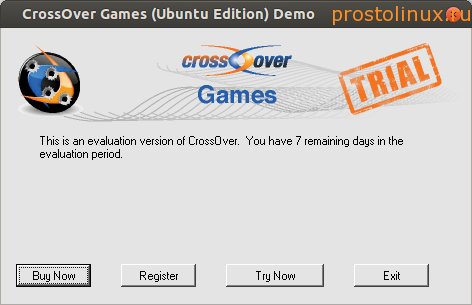
We are trying to install our "Super cow" from this menu "Install Windows Sofyware". But it turned out to be impossible to install our program in this way, since this package is designed to install those games that are on its list. And the Super cow is not included in it.

In addition, the program turned out to be paid, and I definitely won’t pay for this incomprehensible craft.
Well, do not despair, as there are still ways to try installing the game on Linux.
4. How to install games on Linux through Playonlinux?
There is another program for running games on Linux in the Ubuntu repositories - this is playonlinux. Let's try to install it and see what happens.
sudo apt-get install playonlinux
After installation, go to Applications - Games - Playonlinux and run the program. The initial installation will begin.
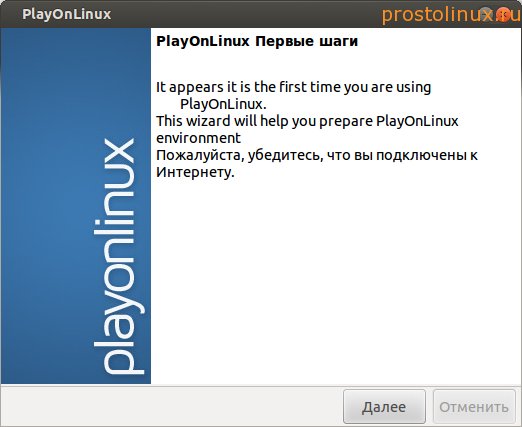
After that, the program started to install the missing windows fonts.


We press the "Install" button and we get the following window:
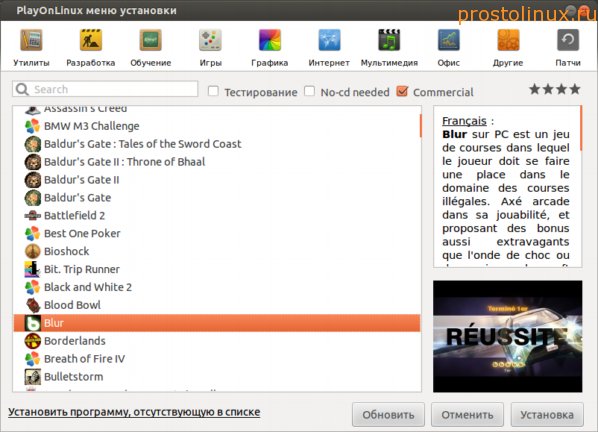
As you can see, we are offered to install games from the list. The choice is large, but of course there is no our program. For interest, I decided to install Blur races, since this game is in my Windows and I really like it. After pressing the INSTALL button, the program began to download the package from Wine, with a very old version of 1.3 (now 1.5)
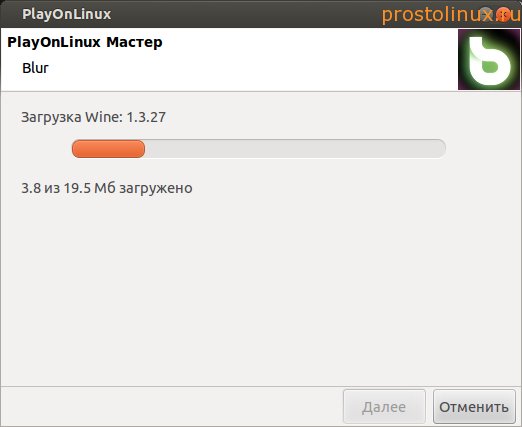
After that, a window appeared offering the choice of installation. I chose the DVD option and the program started downloading other packages, including Directx 10. But since I didn’t have the game on DVD, there was nothing to install. And so, in principle, it is possible.
So my tests have ended so far: none of the four methods allowed us to install the Windows game we needed on Linux. But on the other hand, we saw that it is still possible to install many KNOWN windows games through specially prepared software. And the best program in this regard is playonlinux.
Do you have experience installing Windows games on Linux? Share, if not difficult, as the topic is really relevant for many.
Did not find an answer to your question? Use search...
13 comments
13 comments on the article “How to install Windows games on Linux?”
I put Lara Croft in crossover, everything works fine
I set cs 1.6 everything is clear, through vine
thank you valuable advice has not yet figured out completely but hope has appeared
through wine installed Skyrim in 5 seconds, (mint qiana) it doesn’t even slow down any problems, although on the same machine with Windows it slowed down a bit, now a new problem I want to play 64-bit games on a 32-bit line through wine I can’t find information on this in the net, if anyone encountered a request to suggest
What prevents to install 64 bit Linux?
install playonlinux and crossover smart people have made a crack for crossover for a long time and it's already free why playonlinux tried to install assassin's creed 2 in crossover it doesn't work but through playonlinux it started but crossover looks more relevant but not all games of the norms work on it wine 1.3 install the most norms version and you also said that you can not install your game through crossover you are wrong, you just run it through crossover (install) and not through crossover (run)
dude did you install the game via crossover(install)
you have not gone far, there is also a crossover (run) and it launches your application through the built-in crossover wine and does not require you to select an installer and through install I could install it because there is an option not to select anything
I also did not start games until I set up wine. It also gave errors, now there are no problems. Set up with this link.
http://linuxmint.rf/forum/thread13.html
I wonder if anyone visits this site in 2016? (except me)
The course is visited by more than 3,000 people a day. What is the difficulty?
I always install only wine from http://www.winehq.org, the instructions on the site are in English. Translate with a translator and fix installation errors according to the instructions already made by users, but they are not always helpful or understandable. because everyone works differently. It also lists programs and games that already work in wine. I personally installed so many Linux and Windows and various Windows games that I just got tired of playing them. Games from alavar and other crack manufacturers are hacked, you have to look for them on the internet. There are many hacked-ready games on torrents. OS Ubuntu 32\64, you always need to install additional software for wine, especially older versions! Via winetricks or separately via wine installers. For example DirectX v.9\10\XNA,Java,Net 2\3\3.5\4. Warface still couldn't play, couldn't properly install Net v.2\3\3.5\ , and other games worked fine. Another way is to take a copy of an already installed game in Windows XP and simply copy it to a separate folder. Then run in wine. But! If there is an error when starting the game, then you need to reinstall completely, wine with software. Therefore, first we install wine and software with winetrix. Then backup the entire .wine folder, and if the game gives a little error at startup, then delete .wine from the home directory, You can’t replace it. Only erase it. Then we copy the backup to the home directory again where it was. Otherwise, you will be afraid to install on a new one! After detecting an error, Vine writes it in the registry, and therefore you have to delete this directory, .wine, so as not to climb and not look for errors in the registry. how to make a backup of the .wine folder? Copy it from the home\user-you\ directory to any of your folders. I have it = 2gb. I installed everything there, fonts, codecs, programs, everything is like in Windows. Do not forget what bit depth your OS is running on! If 32 bit then put the software 32 bit!
The coolest thing is that now Steam has very good free and paid games for Linux! Pay, download and play. Or free Dota 2, War Thunder, and many others! Some games from mail ru also work, install the game center and go ahead, but the developers of the mail are still radishes, it’s better not to take risks, they throw trojans, and then you yourself know.
NevoSoft games require IE8 :)
Wine, for those who don't know, it's a shell with which, You can run programs from the Windows operating system in Linux. At the moment, Wine supports a huge number of programs, of course, not all, and especially not new games like GTA 5, but nevertheless, with the right settings, you can run almost any program, published a few years ago.
But working with Wine is not very convenient. To install this or that program, you will have to climb a bunch of forums and blogs in order to understand which packages you need to install and which libraries to add. This is followed by a long process of troubleshooting, installing packages through winetricks and manually tweaking the registry and so on. This is all very difficult even for experienced users, not to mention beginners.
But there is a solution, even several. There are several shells for Wine that try to automate the process of installing programs - you choose a program from the list of supported ones, the installer and the utility itself loads all the necessary libraries and packages. There are such shells for wine as PlayOnLinux, Crossover and the lesser-known Qt4Wine, etc. But we will not touch them today, enough has already been written about them on the Internet. We will look at something new - WineWizard.
The official website of the program is wwizard.net. WineWizard is a new open source wrapper for Wine. With a new idea of approach to business, and much better than all the previous ones. The main feature of WineWizard is its software installation solutions. In order to install a Windows program, you just need to launch winewizard, select the program installer, and then select the program from the list of supported ones.
This is where the differences from the usual PlayOnLinux and Crossover begin. Supported programs are solutions and anyone can create them. All solutions are synchronized to the program server and are available to everyone. It is very easy to create a solution. You do not need to enter anything in the console or write scripts, just select from the list those packages that are needed for the program to work. Then the program itself will download and install the necessary packages.
But the most interesting thing here is that the solutions that you created will be available to all users, and their solutions will become available to you. Thus, it will no longer be necessary to search the forums for a very long time on how to launch this or that program, it is enough for one person to do everything and everyone will be able to use this solution without going into details. A new prefix is created for each program and you can select the wine version. It is also very nice that you can choose the architecture.
The advantages of the program include support for mirrors for downloading packages, now many packages are taken from playonlinux, support for choosing a prefix architecture, tips after installing the program, which, in case of an unsuccessful outcome, can help solve the problem. Installing software through Wine is very fast and easy if you already have solutions.
The program is brand new, so the packages for it have not yet been compiled and it is not in the official repositories. More specifically, there is currently a PPA for Ubuntu and a package in the AUR for ArchLinux, but the versions in those repositories are out of date.
I think that this will be fixed very soon, so I'll still tell you how to install the program from the PPA, but it's better to use another method and install from the sources.
To add a PPA to the system, use the command:
sudo add-apt-repository ppa:nightuser/winewizard
Now you can install:
sudo apt install winewizard
The program is ready to go. Well, now consider the assembly from the source. To build the program, you need libraries and qt5 build tools installed on the system. You also need standard utilities for archiving - unzip, cabextract, bzip2, tar, this is already for the program to work.
Install the Qt5 development tools on the system:
sudo apt install qt5-default
Install the necessary utilities:
sudo apt install unzip cabextract bzip2 tar
First, let's download the sources themselves:
git clone https://github.com/LLIAKAJL/WineWizard
Let's create the necessary directories:
cd WineWizard-version_number
$ mkdir build && cd build
We start the assembly:
qmake-qt5 ..
$make
The last step is installation. You can use the command:
sudo make install
Or use the checkinstall utility in Ubuntu:
checkinstall
$ dpkg -i WineWizard*
That's all, the program is installed and ready to use, now we will consider installing programs through wine using winewizard.
Installing programs in Wine using WineWizard
In this article, we will consider working with WineWizard using the example of installing a popular program for checking the uniqueness of texts - Advego Plagiatus.
First, run the program from the main menu of the system, or by running the command in the terminal:
You will see this minimalistic main window in the form of a menu:
The whole point is that the program can hang in the tray and from there it will be very convenient to launch installed applications, it will be similar to the system menu.
To install the program, click the Install Application button.
In the next window of the wizard, you need to select the installer previously downloaded from the official site:


Next, the most interesting thing, what we talked about, decisions. It is necessary to choose a solution for our program. To do this, enter the name of the program in the search bar. In our case, Advego Plagiatus linux will be installed:


We see a ready-made solution in the list, I have already created it, but most likely there will be no solution for the program you want to install. To create a new solution, click the Add button:

The solution will be created, but now it remains to be edited to specify which packages need to be installed along with the program, you can edit both the 64-bit and 32-bit versions separately. Click the Edit button for the desired version. The next window is divided into three parts, the left column is the packages that will be run without the installer, the middle one is the available packages, and the right one, the packages will be installed before starting the program. Just drag the packages you need to the appropriate column, the left one will be more reliable. In the same window, you can select the Wine version:

After applying the changes, it remains to click OK, then OK again. Then we choose the prefix architecture:


Then the installation of Advego Plagiatus Linux will start, I will not describe the installer, everything is elementary there:


At the end, we can run the program, the installation of programs in wine is completed:

And we see that everything works fine:

When finished, WineWizard will ask if the program is working properly:

Wine(/waɪn/ - between "wine" and "wine") is free software that allows users of UNIX-like x86 architecture systems (and other architectures, if compatible, such as AMD64) to run 16-bit and 32-bit Microsoft applications Windows (64-bit applications are in early development). Wine also provides programmers with the Winelib programming library, with which they can compile Windows applications for porting them to UNIX-like systems. The name Wine is a recursive acronym and stands for "Wine Is Not an Emulator" - "Wine is not an emulator" (meaning that Wine is not a computer emulator, like, for example, qemu or VirtualBox, Wine is an alternative implementation of the Windows API).
4. Installing WINE in Ubuntu
sudo apt-get install wine
After executing this command, all the necessary packages will be downloaded, installed and configured, however, it should be borne in mind that the official Ubuntu repositories, as a rule, contain an old version of WINE. To get access to the latest releases, you need to connect a third-party WINE repository. How to do this is described at http://www.winehq.org/download/deb . Then you should run the command "sudo apt-get update" and install WINE using the command above. You can configure WINE by running the winecfg command (or run "Configure Wine" from the "Wine" menu in "Applications").
There are two ways to launch Microsoft Windows applications: from the console, which is more flexible, since you can specify additional parameters for launching in a line; through a graphical user interface. In the first case, on the command line, you need to do something like this:
Wine-keys /home/user/program.exe
- wine - WINE execution command,
- -keys - keys you want to pass to the program for execution,
- /home/user/ - directory where the program is located,
- program.exe is a Windows executable file.
After installing WINE on the system, Windows executable files can be launched by right-clicking and selecting the menu item “open with WINE”. If you have installed a Windows program in WINE, it will appear in the newly created special "Wine" menu in "Applications", as shown in the picture.
The WINE official website has a special database that displays the performance of a popular Windows application, thanks to which you can find out in advance whether your favorite or necessary program will work. The web interface to the database is located at http://appdb.winehq.org/
5. GUI for Wine -q4wine
First of all, it is needed to facilitate various processes and to make it easier to launch windows applications.
q4wine integrates a very convenient browser for windows applications that have already been launched in Wine before. Thus, you can easily launch the application you need.
Also with q4wine you can access system processes, the system registry of emulated Windows, autoload, etc.
Description of q4wine
- q4wine is a graphical frontend for Wine that makes it easier and faster to install windows applications.
- q4wine has a built-in browser for the database of applications running in Wine - Wine AppDB.
- Through q4wine, you can conveniently manage the running system processes of windows applications.
- It is possible to mount disk images. Supported formats: iso, nrg, mdf.
- It is possible to run a windows application in a different version of Wine of your choice.
- You can set the priority of running system processes.
- Icon selection from *.dll and *.exe is supported.
- With q4wine, you can easily create and edit a Wine prefix (WINEPREFIX). You can also create a backup copy of the created prefix and roll it back.
- You can easily launch the emulated Windows system registry, system console (cmd), Add/Remove Applications window.
- All actions in the q4wine program are logged. In the event of an unfortunate set of circumstances or erroneous actions, you can see your latest actions.
- The q4wine graphical shell is written in Qt, so it looks good and harmonious in any graphical environment.
Installation
To install q4wine on Ubuntu, you need to add an additional repository:
The repository has 2 versions of the project: stable and unstable, which can be installed respectively:
You can install the version of your choice: stable and unstable:
| sudo apt-get install q4wine |
| sudo apt-get install q4wine-unstable |
How to install q4wine in other operating systems can be found on the official page of the project.
Once installed, q4wine can be launched via a shortcut Applications→System Utilities→q4wine
6. How it works
The first time you start Wine, it creates a .wine folder in your home directory. It contains registry files that store program settings, and the drive_c subdirectory. It acts as the C: drive for Windows applications that run with Wine. Here are the files of the programs installed by us. After installing the application, find its executable file in the .wine/drive_c folder. You will then be able to run the program. For these purposes, you can also adapt a shortcut on the desktop. If Windows is installed on the computer, you can go to its directory (it is usually located in the /media or /mnt directory)
For example, to install Adobe Photoshop 7, you need to copy the installation files from the distribution disk to the Photoshop folder in your home directory, launch the terminal and run the following commands
cd photoshop
wine setup.exe
An installer window will appear that will guide us through all the installation steps. It will copy the Photoshop files to the Windows virtual folder .wine/drive_c and add information about it to the registry files (they are also located in the .wine folder). Once the installer has completed its work, we can launch Photoshop with the command
Wine .wine/drive_c/Program\ Files/Adobe/Photoshop\ 7.0/photoshop.exe
That's all! Photoshop runs on Linux.
Leave your comment!
In this article I want to talk about how to install Windows games (or programs) using the PlayOnLinux program. PlayOnLinux makes it easy to install and run Windows games without fiddling with settings. Below I will walk through the steps (with screenshots) of installing and running a game designed for Windows on Linux (in Ubuntu).
Launch PlayOnLinux and in the main window of the program click the button Installation.
A window will open in which you must select the game or program that you will install. I chose the item Games and in it the game 18 Wheels of Steel Haulin. Next, press the button Installation.
A window will open with some information about the game. Just press the button Further.
Then PlayOnLinux will automatically install additional components that are required specifically for this game. In particular, he installed Wine 1.2.3 for me. 
Next, you will need to select the source from which you will install the game. You can select CD-ROM if you are installing the game from a CD, or select the first option " Use a setup file in my computer", if you want to specify the exe file directly on the computer. The setup file (exe file) here refers to the installation file of the game, for example, setup.exe or install.exe. I chose the first item. 
A window will open in which you need to click the button View to select an installation file. 
Next, you need to find the game's installation file. Since my iso image with the game is mounted in the / media / myiso folder, I went to this directory and selected the file there setup.exe.
A window will open again where you can click the button View to reselect the file, or press Further, to continue. So let's press Further.
Now the most interesting. The regular installation of the game should start. That is, the way it would happen in Windows. Here I just pressed the button everywhere Further. Only in the last window stripped off tick " Run...». 


Here, uncheck the "Start ..." box and click the button To complete.
After the regular installation of the game, PlayOnLinux asked me to specify the amount of memory (in megabytes) of my video card. Select the correct value and click Next. 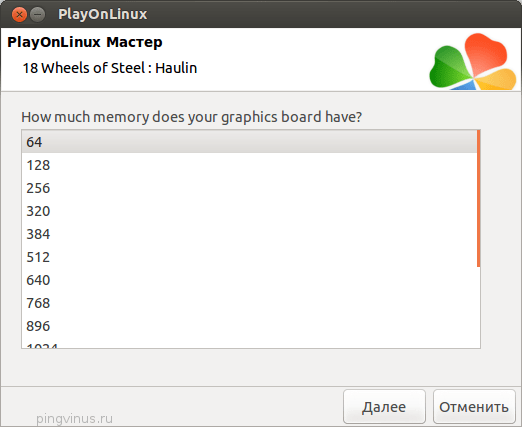
This completes the installation of the game. A new item with the name of the game should appear in the main window of PlayOnLinux. Select it and click the button launch.
And now the game should finally start! By the way, it is at this stage that problems can be encountered. But in my case everything went smoothly. Here is a screenshot of the game running in windowed mode: 
All steps were performed in Ubuntu 12.10.
On the penultimate screenshot in the list of games, I have an item aoe3. This is the result of my attempts to install and run Age Of Empires 3. I still achieved the result, but it was not without problems. I had to spend a lot of time.
A huge number of programs have been written for Linux-based operating systems. Despite this, sometimes it becomes necessary to run Windows programs under Linux. Basically, this applies to games and some specialized programs, which have no analogues in Linux. In addition, some users, moving from Windows to Linux, are already accustomed to a certain set of software and want to use it in the future. In this case, it is still preferable to find similar programs for Linux and master them, since programs usually work better and more stable in the native operating system. Therefore, we recommend that you run Windows programs under Linux only after you make sure that there are no analogues of the necessary programs for Linux, or they do not suit you.
You can run a program written for Windows on Linux in several ways: using Wine and products based on it, using virtual machines and emulators: VirtualBox, VMware, Parallels Workstation, QEMU. Theoretically, it is still possible to port programs from Windows to Linux if you have the source code and programming skills, but we will not consider this option here.
Programs under Wine usually run faster than in virtual machines. This is especially true for modern 3D games. Wine does not require the installation of an operating system and allows you to quickly change the system version, libraries, and other parameters. You can run programs directly in a Linux environment. On the other hand, you still have to spend some time to set up Wine, and possibly repeatedly when launching individual programs and games. Virtual machines run original versions of Windows and other operating systems that must be installed and configured beforehand. Certain computer resources are allocated to the system, standard equipment is emulated. Before executing the program, you must first start the emulator and load the operating system, which requires additional time. It should be noted that some programs are protected from running under virtual machines.
Installing Wine
Open terminal with keyboard shortcut Ctrl+Alt+T. Add a repository with Wine with the command:
sudo add-apt-repository ppa:ubuntu-wine/ppa
Enter the administrator password. During the installation process, you will need to press the " Enter».
If you do a system upgrade, such as upgrading from Ubuntu 13.10 to Ubuntu 14.04, you will have to repeat the above operation after the upgrade because the upgrade process removes the non-standard repositories.
After adding the repository, we update the information about the packages:
sudo apt-get update
Now you can install Wine with the command:
sudo apt-get install wine1.7
The latest, at the time of this writing, test version of the program will be installed. To install an older but more stable version, you need to run the command:
sudo apt-get install wine1.6
Perhaps by the time you read this article, newer versions will already be available, so instead of wine1.6 or wine1.7, you will need to install wine1.8 or wine1.9. The current version number is listed on the official Wine website: http://www.winehq.org
Although it is possible not to specify the version during installation, the version of Wine in this case will depend on the version of the operating system:
sudo apt-get install wine
You can check which version is installed using the command:
wine --version
Setting up Wine
After installation, you need to configure the program with the command:
winecfg
Rice. 1. winecfg settings window
This command will create a .wine directory in the user's home directory, where system files with settings will be located - an analogue of the Windows registry and drive_c - a directory for Windows applications. With winecfg, you can select default and application-specific versions of Windows, library versions, configure graphics and sound, desktop integration, select disks from which Windows programs are allowed to run.
And you can edit the registry using the familiar command:

Rice. 2. regedit window under Wine
After this initial setup, you should be able to install and run programs using Wine. But many programs will not be able to work because they require certain libraries, fonts, etc., which will have to be installed separately. To do this, we will use the winetricks program, which is included in the standard Wine software package. Winetricks, in addition to fonts and libraries, also allows you to install popular programs and games and make Wine settings.
Let's try to install Internet Explorer 7 using winetricks by typing in the terminal:
winetricks ie7
Let's wait a while until the necessary files are downloaded and the installer starts, click the "Next" button and wait for the installation to complete. To launch Internet Explorer later, you will need to run the command:
wine "C:\Program Files\Internet Explorer\iexplore"
But it is better to run programs from the native directory. Go to the directory (if there is a space in the file name, then you need to put a backslash "\" in front of it):
cd ~/.wine/drive_c/Program\ Files/Internet\ Explorer/
And run the program:
wine iexplore.exe
In order not to type these commands every time, you can create a simple script. Change to the home directory:
Create an ie.sh file using the nano editor:
nano ie.sh
Insert lines into the file:
cd ~/.wine/drive_c/Program\ Files/Internet\ Explorer/ wine iexplore.exe
Save file - Ctrl+O and exit the editor - Ctrl+X. Making the file executable:
chmod +x ie.sh
Now, to launch ie, just type:
~/ie.sh
Or you can copy the file to your desktop and run it with the mouse:
cp ie.sh ~/Desktop/
Installing a program from a CD or DVD can be done with the following command:
wine start "D:\setup.exe"
Other programs and libraries can be installed in the same way. You can also use the graphical interface of the program by typing winetricks without parameters. Then select "Select the default wineprefix".


Rice. 4. Select winetricks action
And tick the libraries that need to be installed. You can do the same with the command line, for example:
winetricks d3dx9 dotnet20
Thus, we will install two components at once: d3dx9 and dotnet20. In order for popular fonts to be correctly displayed in programs, install them:
winetricks allfonts
Libraries are a little more difficult. Different programs may require separate settings, certain versions of Windows and libraries. To do this, you can create several Wine configurations by specifying the directory with the settings using the environment variable WINEPREFIX. By default WINEPREFIX=~/.wine To create new settings in the ~/.wine2 directory, type:
WINEPREFIX=~/.wine2 winecfg
Thus, any number of configurations can be created. To configure and install fonts and libraries, type:
WINEPREFIX=~/.wine2 winetricks
To run an installed program:
WINEPREFIX=~/.wine2 "C:/path/to/program/program.exe"
You can end the program execution with the command:
killall -9 program.exe
And to quit all programs running under Wine, you need to type:
wineserver -k
To remove settings and all programs in the ~/.wine2 prefix, simply remove the directory:
rm -r ~/.wine2
You can also remove the main Wine directory in the same way:
rm -r ~/.wine
Be careful, this will also remove all Windows applications that are installed in this directory!
winefile- launching a file manager with which you can run Windows applications, copy and delete files, etc. You can find out what applications and games run under Wine and how to make settings for specific applications on the website: http://appdb.winehq.org/ The site is in English. To search for applications, select "Browse Apps" from the menu and enter the name of the program in the "Name" field. Versions of programs that run and run without errors or with minor problems are rated "Platinum" or "Gold". If the program does not work at all, then it is assigned a Garbage rating.
PlayOnLinux
PlayOnLinux is a program that greatly simplifies the installation and configuration of Windows applications to run under Wine. It automatically downloads from the Internet and installs all the necessary components to run specific programs, as well as the programs themselves, if they are distributed free of charge via the Internet. Otherwise, you will need an installation disk with the program. Install the program in any way, for example in Ubuntu with the command:
sudo apt-get install playonlinux
and run it:
playonlinux
Using the program is extremely simple. Press the "Install" button.

Rice. 5. Main window of PlayOnLinux
Select the program to be installed. If you did not find the program you need in the selection window, you can try clicking "Install a program that is not listed" at the bottom of the window.

Rice. 6. PlayOnLinux program selection window
It remains to click the "Next" button several times, and in some cases select the program configuration. After installation, program shortcuts will appear in the main PlayOnLinux window, from where they can be launched by double-clicking, or by clicking on the "Start" button. It will also be possible to create shortcuts to Windows programs on the desktop using the Shortcut button.

Rice. 7. The main window of PlayOnLinux with the installed Windows program FireFox
Other programs based on Wine
There are also paid software products based on Wine. crossover allows you to run various versions of Microsoft Office, Adobe Photoshop and many other programs and games under Linux. is mainly aimed at supporting popular business programs: 1C:Enterprise, ConsultantPlus, GARANT and others. You can get acquainted with these programs on the official websites: http://www.codeweavers.com/products/ http://etersoft.ru/products/wine
virtual box
virtual box- one of the most popular virtualization programs that allows you to run different operating systems simultaneously on the same computer. Installing VirtualBox on Ubuntu can be done in the standard way by typing in the terminal:
sudo apt-get update
sudo apt-get install dkms
sudo apt-get install virtualbox
You can download VirtualBox for various operating systems here: https://www.virtualbox.org/wiki/Downloads. After the installation is complete, add the user to the vboxusers group, instead of username, you must specify the correct username under which VirtualBox will run:
sudo usermod -a -G vboxusers username
Now you can run the program through the menu, or by typing in the terminal:
virtual box

Rice. 8. VirtualBox manager with operating systems already installed
Now let's install the operating system, for this you need to have an installation disk or its image. Click the "Create" button, the wizard for creating a new virtual machine will start:

Rice. 9. Wizard to create a new virtual machine
Click the "Next" button, enter the name of the virtual machine, for example "Windows XP", and below select the appropriate type and version of the operating system:

Rice. 10. Selecting the version of the operating system
We chose Windows XP because it is less demanding on computer resources, takes up less space, and loads faster. But support for this system has already been officially discontinued. Naturally, you can install other versions of Windows that VirtualBox supports: Windows Server 2003, Windows Vista, Windows Server 2008, Windows 7, Windows 8, Windows Server 2012. Next, select the amount of RAM that will be allocated to the virtual machine:

Rice. 11. Choose the amount of memory
The choice depends on the OS version, the amount of physical memory, scheduled tasks, the number of guest systems running simultaneously. Depending on the version of the operating system, VirtualBox will offer different default settings, but these are usually the minimum, it is advisable to increase them. In any case, for the normal operation of modern operating systems, you need at least 1-2 GB of RAM (for Windows XP, 512 MB is enough) and you still need to leave the memory to the main host system. Next, create a new virtual hard disk or select those already created earlier.

Rice. 12. Virtual hard disk
On the next screen, select the type of disk, the default is standard VDI.


Rice. 14. Select virtual disk attributes
Specify the size of the disk, leave the location by default (the disk will be located in the folder ~/VirtualBox VMs/System Name.

Rice. 15. Choosing the location and size of the virtual disk
It remains to click the "Create" button.

Rice. 16. The last step of creating a new virtual machine
The virtual machine has been created. Select it in the VirtualBox Manager and click the Properties button.

Rice. 17. System selection
Here you can configure the created virtual machine in detail. First of all, you need to specify the disk from which we will install the system. To do this, click “Media” on the left, select an empty disk, click on the disk icon on the right and specify the distribution image, or check the “Live CD / DVD” box and insert a physical disk.

Rice. 18. Selecting an installation disk

Rice. 19. System settings
If the speed of working with graphics is important, go to the "Display" tab, increase the amount of video memory and turn on acceleration.

Rice. 20. Setting display options
Go back to VirtualBox Manager and click the "Start" button. Next, we install the system as usual. After installing the guest system, boot it and select "Install Guest Additions" in the "Devices" menu. Instead, you can press the key combination right Ctrl+D. After installing the add-ons, the system will be ready to work.

Rice. 21. Installed and ready to work Windows XP system in VirtualBox
Loading the guest operating system after starting VirtualBox is carried out by the "Start" button. Switching the mouse pointer between the main and guest systems is carried out automatically, but you can switch forcibly using the button right ctrl(Host key - can be changed in settings) and right Ctrl+I. The same button, in combination with various keys, serves to perform a number of functions:
host key+F- switching to full screen mode and back.
host key+del- replaces the combination Ctrl+Alt+Del.
Host key+I- disable mouse integration.
Host key+C- switching to zoom mode, in which you can set an arbitrary size of the window, return to standard mode occurs using the same key combination.
host key+D- installation of add-ons for the guest operating system.
Host key+T- take a snapshot, save the state of the OS. You can restore the system from a saved state in the main window of the VirtualBox manager by clicking on the "Snapshots" button. A very handy feature for fighting viruses, testing and debugging programs that can damage the system. You can always roll back the system to a stable state.
Host key+S- open the settings window.
Host key+R- reboot the system.
Host key+Q- close the virtual machine (log out).

