Every Mac has Automator installed by default. Using a dedicated user interface, this underrated program lets you automate repetitive tasks and speed up your work. Here are some workflows that you can create in Automator.

Rotate images
One of the most frustrating aspects of digital photography is file management. And if you use a camera without a gyroscope, you can end up with hundreds of photos that are flipped in the wrong direction. Of course, you can view and rotate them manually, but this process can be automated quite simply.
First, add the Query Finder Items action to the workflow window, then click the multiple selection checkbox. If you want to keep the original versions as is, you can add a "Copy Finder Items" action. Now add from the Photos list select the Rotate Image action and save the workflow. If you don't know which way to rotate your images, you can save two versions - one for left rotation and one for right rotation.

Bulk file rename
If you have to work with files from several different sources, their names are often completely incomprehensible. Usually this is not a big problem, but in some cases careful adherence to the classification is required. Instead of manually renaming each file, you can let your Mac do the work for you.
Add a "Query Finder Items" action, switch to multiple selection, and decide whether you want to rename the original files or make copies. If you need to make copies, add a Copy Finder Items action. Now add "Rename Finder Items". After that, use the configuration menu to customize the renaming scheme to your liking. You can select the "Make Sequential" action, as well as "Add Date and Time" (enabled automatically).

Text to speech
The built-in text-to-speech engine in OS X can be very useful for many tasks, and Automator allows you to quickly create an audio file from a text source and save it to disk in AIFF format.
There are many ways to add text to a workflow, but the simplest is to paste text into a TextEdit window and then add a Get Contents of TextEdit Document action. Then add "Text to Audio File", choose which voice you want to use and name the file.

Emergency lock
If you live or work surrounded by people, sooner or later your Mac will be left unattended. To protect your computer from unwanted access, you can simply close all applications and turn off the system, but the whole process can be simplified to one click.
Start by adding a "End all programs" action. If you don't want to deal with additional reminders, uncheck the "Ask to save changes" checkbox. But there is a risk of losing unsaved data, so you need to be careful here. Then add an action to mute the computer. After that, you need to add "Make Screensaver". Assuming you previously set your Mac to require a passcode at sleep (System Preferences > Security > General), your Mac will be locked with a single click.

Script writing
Without a doubt, the most powerful feature of Automator is the ability to run Apple and Java scripts in a workflow. Scripts can be as complex as you need and allow you to greatly extend the standard functionality of Automator.

To run scripts in a workflow, simply add a Run JavaScript, Run AppleScript, or Run Shell Script action. The use cases are almost limitless, but here is one example of using a script in a workflow.
This script automatically resizes the Safari window, which is very handy for testing new website layouts.
Conclusion
Once you start creating workflows, you can get carried away and try to optimize every action on the computer. The burden of routine and tedious work can be lifted off your shoulders with some manipulations in Automator, but it's not worth spending hours on end to save a couple of minutes. Take advantage of automation, but remember that it is not a panacea for every situation.
<<1 >>
Automator first appeared in Mac OS X Tiger (10.4). This program was created so that the user can program various actions that can later be performed with one click. At the same time, in order to create automatic actions using Automator, you do not need to have any programming skills, because the creation of all automated processes takes place in a graphical interface. The user simply needs to arrange the actions in the order of execution by dragging them from one panel to another (programming skills still do not interfere, since Automator supports Apple Script, which allows you to create much more advanced scripts).
What can be entrusted to Automator?
The very essence of Automator is that the user arranges the actions in the order they are performed. In this case, the return values of the previous action serve as input values for the next one. Automator allows you to automate actions with a huge number of programs, ranging from the Finder and Address Book, to numerous third-party products such as Adobe Photoshop, for example.
- Text translation;
- backing up some specific data by simply transferring it to the required folder;
- transferring unread emails from Mail to iPod;
- grouping files according to some attribute;
- the ability to select some songs from the library, import them, and then turn off the iPod.
There is a special section on the Apple website where you can find various scripts for Automator.
Automation examples
Let's consider the most interesting examples of creating an action in the Automator program, designed for beginners. The easiest way to understand what the essence of this program is is to automatically launch an arbitrary application. To some extent, this is an analogue of "Hello World" from the world of programming (usually all books on programming for beginners begin with an analysis of the "Hello World" example).
 |
In order to create the first action, it is necessary, in fact, to launch the program itself. After that, a menu will pop up with the choice of the initial project. Typically, users choose "Custom Project" to get a clean process that can be filled from scratch with their own activities. The next step in creating the simplest automation process, go to the "Actions" tab in the "Utilities" field. From the actions shown, select "Run the program" and drag this item to the right - in the field where the actions are arranged in the order of execution.
All other operations are extremely simple. You just need to select the program that will run. There is nothing interesting in the parameters field in this case. But for other processes, the "Show action in progress" item can be used, as it will allow you to personally observe how the script is being executed. Now you need to save the process. This is done using the File/Save As menu. It is best to save the application as a program.
That's how easy it is to create processes in Automator. The first example was educational. He had no real use for himself. Now let's try to consider something more interesting from a practical point of view.
The simplest, but at the same time very useful action in Automator can be a process that will close all currently open programs. Why might this be needed? Firstly, such a process may be required in a situation where the user is about to turn off his computer and wants to quickly close all programs without fear of losing data. Secondly, this method is quite suitable if the user works with a large set of programs, performing different tasks. For example, when processing photos, one image editor and several additional utilities can be used. When the user wants to do something else, he usually closes all these applications, but doing this one at a time is not very convenient. It is better to use some kind of automatic event. It can be easily created in Automator.
 |
The process of creating this event is very similar to the previous one. Only in this case, in the "Utilities" action set, you need to select not "Run a program", but "End all programs". Here you can not change anything, in this case all programs will be closed, except for the Finder and other system processes. Otherwise, you can add some special programs to the list so that the script closes something specific. Further, it would be nice to notify the user of the system that all programs are closed. You can do this with a voice message. To do this, go to the "Text" field in the actions. There are two points of interest to us: "Get the specified text" and "Pronounce". They must be transferred to the program in the specified sequence. In the "Get the specified text" field, enter what will be pronounced by voice when the last program is closed. In the "Speak" action, you need to select one of the system voices that will do it. After compilation, this application must perform all the described actions. In this example, you could see how to create actions consisting of several others, in which there is a transfer of data from one action to another. In this case, the text was passed to the Speak action.
As a conclusion…
Today Automator offers a huge number of possibilities. It is not possible to describe them all in the framework of a separate article (this would require a whole book). But the most pleasant feature of this application is that the user of absolutely qualified people can work with it. If this is a beginner, then it will not be difficult for him to create his own actions - everything is intuitive. An experienced user, in turn, will appreciate the wide possibilities of Automator, part of which is full support for Apple Script.
Finally, it may happen that the user needs to create an action that he cannot find on the Apple website or in the set of standard actions, but at the same time he does not know Apple Script. In this situation, the solution will be the ability to record events. This means that you need to select the appropriate menu item in Automator and start doing some actions in Mac OS X. All of them will be repeated when you move the recorded action into your process. This is a very convenient opportunity to create new features. And it is extremely simple.
<<1 >>
Computers were designed to handle repetitive tasks efficiently and consistently, so why are we still sitting around manually renaming files on our computer? Or open applications only happy to print? You can probably think of a dozen other things that you could automate for yourself. There must be another way to do this, and there is - Automator and AppleScript. With them, you can put these tasks on autopilot, and you can also teach your Mac to merge PDF files into one, automatically save iWork files, and even instantly print a daily plan.
7 Amazing Automator Actions
Automator lets you automate tasks with a drag-and-drop interface, making them easier for beginners to create.
Released on Mac OS X 10.4 (Tiger) and later, Automator lets you easily create workflows that simulate repetitive tasks. To create a workflow, drag an Automator action from the list of actions (on the left side of the application) to the workspace (on the right side). you can save the workflow as an Automator file, or as a standalone application. In order to save a workflow, you need to complete the desired workflow with all necessary steps. 
Each Automator action has certain input and output functions. To get detailed information about Automator's actions, select them in the list of actions and read the information in the .workflow description, use the standard save dialog (File > Save). To save it as a standalone application that will work like other Mac OS X applications, choose File > Save As. A new save dialog will open, allowing you to enter a filename and save location. Before clicking the "Save" button, select an application from the file format in the drop-down list. This will allow you to run the workflow outside of Automator like any other application.
This shows the main characteristics and save options of Automator. Next, let's build 7 Automator Actions to help you save time while working on your Mac.
1. Batch Rename Search Items
Nobody likes to rename Finder items. If you have a set of files to rename, be it photos, videos, or articles, this can be a time-consuming process...unless you're using the Automator workflow, which lets you rename files in the blink of an eye.
To get started, open Automator and select the "Workflow" template from the template selection, then drag and drop these two actions into the workflow:
>>
>> Rename Finder Items
These two actions will soon become your best friends for renaming files after setting up the Rename Finder Items action. This is a great step for you to learn the different options on how to rename. For our purposes, we'll choose "Make Sequentially" since we have a lot of files.  To perform this workflow, click the Add button in the Get Specified Finder Item action. In the file selection window that appears, select the files you want to rename and click the "Add" button. After adding your files, click the "Run" button in Automator. As soon as the workflow starts, your files will be renamed according to the "Rename Finder Items" section. You can save it as a working file or save it as an attachment if you use the same renaming rules all the time.
2. Export iPhone video using QuickTime
Automator is not all productivity. It can be used in conjunction with some of the QuickTime actions to export iOS compatible video files. To do this, open Automator and select a workflow template. Drag the following actions into the workflow:
>> Request a movie
>> Export movie
The only thing you'll need to configure while within the "Export Movie" action is the file format, which can be selected from the drop-down list. You can choose iPhone, iPhone (Edge), iPod, Apple TV or QuickTime. 
When you're ready to run the workflow and convert video files for Apple device specific, click the "Run" button in Automator or save the workflow as an application. You will first be presented with the iLife Media Browser, allowing you to select a movie file from iTunes, Photo Booth, iMovie, or your own movie folders. After selecting a video, click the "Select" button. This video will be processed and placed in your movies folder.
3. Merge Multiple PDF Files into One
Sometimes it becomes necessary to combine several PDF files into one large one. While you can do this in multiple steps with a preview on your Mac, Automator can help speed up the process and lets you merge multiple PDFs in one go.
To get started, select a workflow template and add the following actions:
>> Get specified Finder items
>> Combine PDF pages
>> Move Finder Items
To start the workflow, drag the PDF files into the Get Specified Finder Items action, and then click the Run button. After a few seconds, a PDF file will appear on the desktop containing several PDF files that were listed in the first step of the workflow. 
4. Download mp3 from open Safari webpages
Sometimes when browsing the Internet, you may come across MP3 files that you want to download from a certain site, but who wants to go through all these pages by clicking one download link after another? Let's repeat it again. Automator can download all MP3 files on the webpage that is currently open in Safari.
To do this, open Automator and select a workflow as a template. Next, drag the following actions into the workflow:
>> Get current web pages from Safari
>> URL Filter
>> Download URLs
We will need to configure the action "Get URL link from web page" by checking the box that says "Return only URLs of the same domain as the start page".  To start a workflow, navigate to a web page that contains MP3 files, and then click the Run button in Automator to activate the workflow. When the workflow is launched, the MP3 files associated with the page opened in Safari will be downloaded to the desktop. You can save this workflow as an application if you plan to use it often.
5. Create thumbnails
In a world where high resolution photos rule, low resolution thumbnails are still needed for use as avatars on websites and apps like Twitter, Facebook, iChat and many more. You don't need to open a thumbnail maker app to make them. You can create a service that allows you to right-click on an image in the Finder and instantly create a thumbnail of that image. To do this, you need to create a new Automator Service Template and drag the following actions into the workflow:
>> Create thumbnail images
To change the file type use the drop down menu at the top of the workflow to select "Image Files" under "Any Application". Next, select a thumbnail size in the Create Thumbnail action.  Then choose File > Save. Enter a name for the new service. To start the workflow, go to Finder and right-click on the image and choose Services > Your Service Name. After clicking on the menu, a new thumbnail will be created and will contain "_tn" in the file name.
2. Easy startup task
When we turn on the computer in the morning, we usually launch applications: Mail, Safari, iCal and Twitter. But we also don't want them to run with the computer since we don't use those work-related apps on the weekends. Why do we have to open these apps manually? One solution is to create a simple AppleScript launcher application that opens the necessary applications with a single click.
To create this task, open the AppleScript editor and enter the following line of code:
Now run the script. Did you notice that Safari started up? You can replace the application name in double quotes with any other application on your Mac.
Repeat a line of code from a new line to launch multiple applications. For example, if you want to launch Mail, Safari, iCAL, and Twitter, you would enter the following:
tell application “Mail” to launch
tell application “Safari” to launch
tell application “iCal” to launch
tell application “Twitter” to launch
Save this script as an application file and double click on it to run it automatically. You can create multiple launchers for different applications, such as one for work, one for entertainment, and one for social networks.
3. Print daily iCal plans
Paper may be considered “old technology,” but when you have a busy day of business planned, sometimes you wish you had it in print for quick reference. This can be done with AppleScript:
tell application “iCal”
view calendar at (my (current date))
switch view to day view
activate
tell application “System Events”
keystroke "p" using command
delay 1 - (seconds)
keystroke return
delay 2 - (seconds)
keystroke return
end tell
end tell
Let's add this script to the AppleScript editor and click the "Run" button. iCal will open the current date and print the daily plan of the day using the default printer. Save as application.
A robot programmed to follow your instructions - who would refuse this? Unfortunately, many users think about Automator'e, Mac's latest automation tool, is like a toy for beginners who are too scared to learn AppleScript. In fact, Automator can be very powerful - especially when combined with other OS X features such as Unix commands, built-in image processing, and even AppleScript.
Here are five useful/fun (underline) Automator routines that will make you the envy of all the geeks in town 😉
You can all 5 procedures that will be discussed.
First, fire up Automator (in your Applications folder) to get started. Now decide on an application that is capable of doing the action you need and click on this application in the "Library" column, then in the adjacent "Actions" column, select the appropriate action and drag it to the script construction area (Workflow). (Applications and their corresponding actions that we will use are highlighted in bold below.)
If you want to save the procedure (Workflow), select File > Save. If you want to save the procedure as an application (so that it can be launched by double-clicking), select "Application" from the File Format drop-down menu in the save dialog.
So, let's get down to practice.
Backing up Word documents
Everyone knows that backing up important files is a good idea, but many people forget to do it. This procedure makes backup easy; when you run it, all recently modified Microsoft Word files in your Documents folder are archived and then burned to a CD. Run the procedure every week and you'll never lose more than the last few days of Word work.
1. Finder: Find Finder Items This action searches for all files on your hard drive that match the specified criteria. First, click on the Where drop-down menu and select Documents, so the procedure will only look in your Documents folder. Next, from the Whose drop-down menus, select Date Modified on the left, and select This Week on the right. Click the plus sign (+) to add another criterion. In the new line of the pop-up menu that appears, set the first menu to Extension. In the following, put the value Is Equal To (equivalent) and then the document type doc in the text field next to this menu. This procedure will now look for files in your Documents folder that have been modified this week and are Microsoft Word files.
2. Finder: Create Archive When you run your procedure, this action takes all the files found in the first step and compresses them into a single ZIP file. In the Save As field, define a name, such as this: Word files backup (Word backup files).
3. System: Burn A Disc This action places the compressed file from step 2 on its own blank CD (or DVD). Specify a name in the Disc Name field, such as "Word Backup CD", and check the "Append Date" checkbox, so the CD name will contain the recording date, which will make it easier to find later.
4. Finder: Move To Trash This action moves the ZIP file created in step 2 to Trash.
Other ideas: If you want to duplicate other than Word files with this procedure, just change the criteria in the first step; you can set any type you want (HTML for example).
To make the procedure even more convenient, use the alarm function in iCal to set it to start automatically. To do this, save the procedure as an application, as described at the beginning of this article. In iCal select File: New Event, select View: Show Info, click on the Alarm drop-down menu, and select Open File. In the dialog box that appears, select your procedure.
Getting information about your Mac
Do all Macs in your class have the latest version of OS X? Do you find yourself frantically looking for information about your computer's RAM when talking to Apple support? Even though OS X includes a System Profiler utility to get information about your Mac, it's still hard to keep track of all the statistics at once. This procedure extracts all profile information from your Mac and returns it as a text file.
1. System: System Profile Click on Options and enable Show Action When Run. When you run the procedure, it will ask you about which part of the computer you would like information on - software, printers, AirPorts, and so on.
2. TextEdit: Filter Paragraphs In step 1, we get one big piece of text containing profile information filtered by your request - but this text contains a lot of empty lines. To remove them, set the drop-down menu for this action to the parameter Return Paragraphs (return paragraphs) to Are Not Empty (not empty).
3. TextEdit: New Text File This action saves the text received after step 2 to its own file. Enter, for example, "Profile.txt" in the Save As field, and then select your Documents folder in the Where pop-up menu - this is where the profile will be saved.
4. Finder: Open Finder Items This action opens the file for viewing. Leave the Open With drop-down menu set to Default Application to open the file with the TextEdit text editor, or, depending on your needs, choose another application that can read plain text, such as Microsoft Word or Apple Safari.
Other ideas: If you need to call Apple Support, print out your profile generated by this procedure so you can refer to it. If you run a computer lab, use the text reports generated on each machine to generate system statistics.
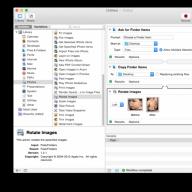
Make man pages more "readable"
When Unix commands are studied, for example, the same grep or uptime, first of all, connoisseurs turn to manuals for help, using the man command. This procedure will save you from opening the Terminal and straining your eyes to read this text in an awkward format. Instead, you can open any manual page in TextEdit and print or save for easier reading.

1. TextEdit: Ask For Text When you run a procedure, this action will help you determine the correct man page. In the Question field, enter something like "What Unix command would you like to learn about today?" what Unix command would you like to learn today? And select the Require An Answer option.
2. Automator: Run Shell Script Use this action to run Unix commands that find and build the TextEdit man page. Select As Arguments from the Pass Input dropdown menu. Then type man “$@” | col -b in a large text field (see first screenshot, A).
3. TextEdit: New TextEdit Document This action opens the newly generated manual page in TextEdit.
Other ideas: Save a frequently used manual page (for programming languages such as Perl or Ruby, say) as a text file, and keep it in your documents for easy access.
Installation of a surveillance camera
If you have a digital camera, then there are some chances that your Mac can force it to take pictures while connected to your computer. (The camera must be able to take a photo when it is connected to USB. The first step in this procedure will tell you if it is capable of doing this). This routine will tell the camera to take a picture every 10 seconds, compress it into a small JPEG, and repeat this until you stop the program. This can be useful in many situations - when you're trying to figure out what your dog is doing when you're not at home, for example, or if you want to make a slow motion video without buying additional software.
1. Image Capture: Take Picture This action tells the camera to take a picture. If your camera is memory limited, select the Delete Image From Camera After Download option. If your camera has a large memory card, you can of course leave this option off, so your photos will be on both your camera and your Mac.
Note that this action automatically saves the pictures in the Pictures folder. If you want to store the photos elsewhere, add a Finder action: Move Finder Items to the procedure and here specify where you would like to store them.
2. Preview: Change Type Of Images This action allows you to convert photos to more economical formats, especially useful if your camera is shooting in TIFF or Raw format. When you insert this action into your procedure, a dialog box will appear asking if you want to add an action that will copy your snapshots before changing them. Click on Don't Add so you don't allow 2 copies of each photo. Then, to save more space, select JPEG 2000 from the To Type drop-down menu if your image editor supports this format - Apple Preview, Adobe Photoshop and Photoshop Elements do. (If you are using Photoshop, you may need some of the plugins from the installation disc). Otherwise, just choose JPEG.
3. Preview: Scale Images This action compresses the size of each photo to save even more space. You will see the same dialog when inserting this action into your procedure. Click on Don't Add again. Unless you need these photos in high resolution, although the standard size of 480 pixels is usually enough.
4. Automator: Pause Add this action to force Automator to pause before taking the next photo. Enter 10 in the text box to make the routine pause for 10 seconds. Before you move on to the next step, save the procedure (as Workflow) and name it.
5. Automator: Run Workflow To make the procedure take the next image, you need to make it repeat the steps. This action restarts it again. From the Workflow pop-up menu, select Other, and then select the procedure you saved in step 4. Now save the procedure with the same name again.
To test your new program, run the script with the Run button. When you have finished making images, you can stop the script execution by clicking on the Stop button.
Other ideas: When you've stopped the procedure, drag the images into iMovie to make a video with a delay. And you can also use the same Automator to make QuickTime Pro make a slideshow - a 2-step task!
Automator creates workflows, which are chains of standard operations, based on typical operations performed by most applications. These generic workflows automate the tedious, repetitive, and routine tasks you often need to perform on your computer. With Automator, you don't even need to know any programming language to create generic workflow actions. For those who are not good at writing shell scripts, or even just afraid of the Terminal command line, the Automator application is the best way to create programs to automate common routine tasks. All you have to do is map out the operations you want to perform and see if there are generic events and actions in Automator that you can use to perform those operations.
For example, imagine that you need to rename, rescale, and then email a set of photos. This entire sequence of operations can be programmed as a chain of Automator actions, which can then be executed automatically. Let's look at another example - let's say you want a specific folder to be backed up every time you put something new into it. Automator can help you here too. Or, say, if you just want to close all your running apps from the Dock, Automator already has a procedure to do just that. All of the examples above cover elementary tasks, but you can create more complex procedures either by writing AppleScript programs or by using Automator's advanced and advanced events and actions.
In this article, I'll show you some simple workflow examples that will show you how to develop solutions with Automator. In addition, I recommend that you visit several Web sites dedicated to Automator programming. These sites provide additional information about the development of workflow procedures, as well as ready-made solutions for download. Here are just a few of the more informative Automator websites:
- Apple Mac 101: Automator Guide (http://docs.info.apple.com/article.html?artnum=304759).
- Automator World (http://automatorworld.com) is a site that provides a large number of ready-to-use workflows, as well as useful tips, recipes, and news about the Automator application.
- Ready-made solutions (actions and workflow procedures) are also available for free download on the Apple website: http://www.apple.com/downloads/macosx/automator.
Automator procedure to close all applications
In our introduction to Automator 2.0, which comes with Mac OS X Leopard, let's start by creating a simple automated procedure that will close all running applications except Finder. If you don't want to see the list of starting points for Automator procedures every time you start this application, click on the Automator option on the left side of the menu bar and select the Disable Starting Points command.
The Automator application, represented by the Otto icon, is located in your Applications folder (Otto is the robot's name). When you open the application, you will see a list of starting points from which to start developing workflow schemes (Figure 3.27). Select the Custom option and click the Choose button.
If you have previously used (or still use) the first version of Automator (which was part of Tiger), then it may have caused (or continues to cause) some complaints for you. It's really possible to create great automated procedures with this early version, but if something goes wrong, the procedure just doesn't work, and it's very hard for the user to figure out what's causing it to fail. This flaw has been fixed in Automator 2.0 and later. Now you have the opportunity to explore each step of the automated procedure and see what results it returns. This feature is very important for those who really want to use Automator to automate routine and repetitive tasks.

At this stage, you will see a window consisting of five parts. In the left column, you will see a list of applications, Finder functions, and utilities that include actions and events set for them. In the same column, you will also find intelligent folder groups, with which you can organize all your actions (elementary operations) and automated procedures. The middle column lists all available actions and events that can be found by searching or by clicking on one of the items listed in the first column. The area below the first two columns provides a brief description of the selected actions. The box below this area provides copyright information for each action. The larger panel, located to the right, is designed to compile a chain of actions that form an automated procedure.
Assembling a procedure is done by dragging actions and events from the middle column. Drag and drop is done using the standard drag and drop technique. The simplest automated procedures consist of a single action or event, while more complex procedures require additional input. Actions and events must be in order. For example, some actions require the identification of one or more files in which information will be passed to subsequent actions and events.
At the top of the window is a toolbar with five buttons. The leftmost button, Hide Library, lets you hide the first two columns. The Media button gives you access to all audio files stored in your iTunes library or created with GarageBand, your photos created with iPhoto and Aperture, and videos created with iMovie ’08, iPhoto, iTunes and stored in your Movies folder. All of these multimedia files can be used to create automated procedures.
The Record button allows you to record sequences of actions. This is a new feature introduced in Automator 2.0. It will be discussed in more detail a little later. The Run button is used to run an automated procedure so that you can test it and see how it works. Of course, there is also a Stop button, with which you can interrupt the work of an automated procedure that is running.
In the Library panel containing the first two columns, click the Actions button and select the Utilities option. Scroll down to the next column and find the Quit All Applications action. Drag this action to the right pane for building the automated procedure. As a result, the Automator application window will look as shown in Fig. 3.28. At this point, you can optionally test the automated procedure by clicking the Run button on the toolbar. As expected, this procedure will close all running applications, including Automator.

If you want the system to prompt you to save changes before closing the application, leave the Ask to Save Changes checkbox checked. If you want certain applications to stay running and not close (if they are running), you can add them to the Do not quit list by clicking the Add button. At the bottom of the window describing the action are three additional options. When performing an automated procedure or action, click the Results button if you want to check if the action was completed successfully. In case of failure, you will receive an explanation of its reasons.
Pressing the Options button allows you to set choices that you can make before or during an automated procedure or action. In this particular example, if you select the Show this action when the workflow runs option, you will be given the option to cancel the action before it is executed, and to add or remove the applications listed in the workflow (Figure 3.29). The Descriptions button provides additional information about how the automated procedure will work and what results it is expected to achieve. In addition, it gives some indications about the actions and events included in its composition.
Once the automated procedure has been written and tested, you will need a method to run it without having to start the Automator application itself. To accomplish this goal, save the workflow as an application. For this purpose, select the command File → Save from the menu. Select the folder where you want to save your new workflow. You may want to keep it in your personal Applications folder, or in a separate folder that you can create specifically for storing all of your automations. Then, from the File Format list, select the Application option (Figure 3.30). Of course, you can save the procedure as a set of actions (to do this, select the Workflow option), but in this case, when you click on your procedure, it will expand in Automator. If the automated procedure is saved in application format, it will behave exactly like any other application installed on your computer.
You can create a similar automated process for selectively closing applications, whereby only applications included in the list will be closed. To do this, drag the Quit Application activity (located directly after the Quit All Applications activity in the list) for each application that you want to close automatically and save the entire automated procedure as an application.
After saving a workflow as an application, you can locate it where you saved it and drag the application's icon to the Dock, placing it next to the Finder icon. This way you will be able to very quickly (in fact, with a single click of the mouse) close all running applications, without having to do this procedure individually for each of the running applications.

Access to view media files
If you are an experienced user of iLife software such as iMovie and iDVD, or iWork software such as Keynote or Pages, then you probably know that each of these applications has a dedicated media browser designed to to select and use images from your iPhoto library (or Aperture 1.5 if you have installed the software).
However, imagine a situation where you need to access your iPhoto or Aperture photos while using applications that do not have media browser functionality. In this case, the Automator application will again come to the rescue. Using Automator, you can create a browser for photos or audio files that you can access from anywhere (for example, from the Finder).
To do this, you will need to do the following:
- Launch Automator 2.0 and select the Custom option.
- In the leftmost column of the Automator browser, select the Photos option. Then go to the second column and select the Ask for photos option. If you would like to create a similar browser for the music files stored in your iTunes and GarageBand libraries, click the Music Actions option in the Automator library, and then select the Ask for Songs option in the middle column.
- Drag the Ask for photos action to the main editing window of the automated procedure.
- In the Prompt field, enter a descriptive text string, such as Get My Photos.
- Now select File → Save As from the menu and save the automated procedure as an application. It is convenient to save a new application to the Applications folder, from where it can be dragged to the Dock for quick access to the application. In addition, you can save the automated procedure as a plug-in file (File → Save As Plug-in), which can be accessed in Mac OS X in several different ways. For example, if you saved the procedure as a Finder plugin, you can access the plugin by Ctrl-clicking or selecting More → Automator → Get My Photos from the context menu. You can save the plugin as a script, after which it will be saved and available through the Scripts menu, which you can add to the menu bar (launch /Applications/AppleScript/AppleScript Utility and select the Show Script Menu in menu bar command).
- Now all you have to do is click on the new application icon in the Dock and the iPhoto or Aperture photo browser will appear on the screen (provided that one or both of these applications are installed on your computer - Fig. 3.31). You will now be able to drag and drop the desired photos into your application, where you can manipulate the high-resolution image however you like.

Watch Me Do function
The more actively you use Automator and explore its capabilities, the more conveniently you will be able to organize and automate your work. In addition to this, if you carefully study Apple's classic automation program, AppleScript, you will learn how to create even more complex and advanced automated procedures. However, if you are unable or unwilling to learn a programming language, you can use Automator to record keyboard and mouse sequences in order to create new actions that are not part of the built-in standard Automator actions.
To do this, use the Watch Me Do function, designed specifically for recording user operations and creating new automated procedures based on them. To use this feature, open the Universal Access preferences panel (System Preferences → Universal Access) and enable access to assistive devices. Keep in mind that activity recording does not work in all cases, but when this feature is available, it is quite useful.
Before testing the feature under discussion, create a WatchMe folder on your desktop and place a few unimportant files that you do not value in it. Then move this folder with the mouse to the Dock, where it will always be easily accessible. Next, perform the following operations:
- Launch Automator and select the Custom option.
- Click the red Record button on the Automator toolbar. As a result, the Automator interface will change - instead of the Automator window, a small black square will appear on the screen, indicating that all keyboard and mouse movement events will be recorded until you click the Stop button.
- In this example, let's perform the following operations. While Automator is in record mode, hover over the WatchMe folder in the Dock and Command-click on it. When the folder opens on your desktop, press the keyboard shortcut Command+A. Then click the Delete button on the toolbar. All files located in the WatchMe folder will be deleted to the Trash. Do not empty the Recycle Bin, but instead press the Stop button in the recorder window. You can return all files back to the WatchMe folder by pressing the keyboard shortcut Command + Z.
- Now it's time to look at the automated procedure Watch Me Do, which reflects the result of recording all the actions performed in the previous step (Fig. 3.32). Click the Run button on the Automator toolbar. You will see how Automator reproduces exactly all the cursor movements and keystrokes that you performed in the previous step. After the execution of the automated procedure is completed, press the keyboard shortcut Command + Z in the Finder window if you want to cancel the deletion of files.
- If you wish, you can perform the operation again, but this time change the playback speed by moving the Playback Speed slider on the right side of the window to 10x so that the operation completes faster than the default.

Placement of automated procedures
After creating and saving workflows, you can expand your home folder and navigate to the Library/Workflow/Application folder. Within it, you'll see folders for all the automations you've saved for your Finder, Folder, or iCal automations.
In addition, you can save your automated procedures for further development or modifications. To do this, expand the procedure you are interested in in Automator, select the command File → Save or Save As from the menu and save the automated procedure in Workflow format. You can save the automated procedure anywhere - when you open it, Automator will start automatically, and you can continue the development process until you are completely satisfied with the result.
It's clear that Automator has much more to offer than what's covered in this section, but this recipe is meant to give you the bare minimum and a basic idea of where to start. Where you want to stop and how much you want to simplify your life with automation is up to you. From myself, I note that the time spent on learning the capabilities of Automator will pay off very quickly, and in the future you will be able to achieve significant savings in time and effort.