21.07.2013 12808 reference Information 0
At the current pace of digital photography, it is easy to guess that the first firmware versions for a particular digital camera model may be imperfect. Manufacturers are constantly updating the firmware of their cameras in order to eliminate the mistakes made, add new features and improve the quality of digital images at the output of digital cameras.
On the pages of manufacturers' websites and on, you can find information about the new firmware of digital cameras, and what problems are solved by this or that upgrade.
How to flash your camera without contacting a service center? Let us consider this simple process sequentially.
1. Training
To update the camera firmware, you will need the following:
. Camera
. Computer equipped with a card reader / writer and connection slot
. One of the following camera power sources:
- Network adapter
- Fully charged lithium-ion battery of the type used in the camera
A memory card formatted directly in the camera (note that when formatting a memory card, all data will be deleted; before starting formatting, save the data you need on a computer or other device)
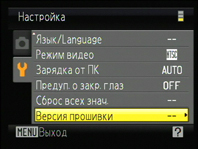
2. Checking the firmware version of the ROM
The menus displayed by your camera may differ from those shown in this article.
1) Turn on the camera.
2) Press the button to open the menu.
3) Select the item Firmware version in the settings menu.
4) The current ROM version will appear on the screen. Ensure that the ROM version displayed is the correct version to update.
"#. ##" is the ROM version.
5) Go to the settings menu and turn off the camera.
1) On the update download site, download the required firmware file.
2) Unzip the downloaded file. Open the folder created during unzipping, double-click on the downloaded file. A folder can be created on the desktop or the folder where the archive with the firmware was downloaded.
3) The folder should usually contain the firmware file “XXXX ###. Bin” and a folder with a description and installation instructions.
4. Copying ROM to a memory card
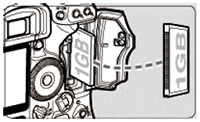
The firmware can be copied to the camera’s memory card using a computer equipped with a card reader / writer or card slot.
1) Insert the formatted memory card into the card reader / writer or card slot. P
2) Copy the file “XXXX ###. Bin” to the memory card.
After copying, make sure that the file “XXXX ###. Bin” is on the memory card. Copy the file to the root directory of the memory card. The camera does not recognize the new firmware if it is located in a folder located in the root directory.
3) If your computer displays the memory card as a removable disk, right-click on the removable disk and select Eject from the menu that appears. Remove the memory card from the card reader / writer.
5. Firmware upgrade of the camera
The menus displayed by your camera may differ from those shown here.
During the upgrade process you should not:
. Remove memory card
. Turn off the camera
. Manipulate with any camera controls
. Remove or mount the lens
. Unplug or unplug the AC adapter
. Remove battery
. Expose the camera to strong electromagnetic noise.
Any of the above actions may cause the camera to malfunction.
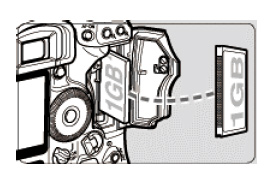
1) Insert the memory card containing the firmware into the memory card slot of the camera.
If the camera allows you to select one slot as the primary slot and the second as the secondary slot, insert the card into the slot that is currently selected as the primary slot. Otherwise, insert the card into slot 1.
2) Turn on the camera.
3) Press the button to open the menu.
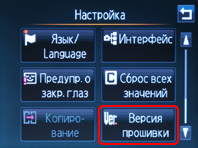
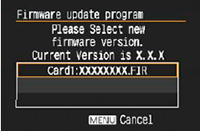
4) In the settings menu, select Firmware version.
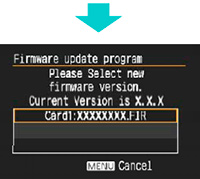
5) The current ROM version will appear on the screen. Highlight Update and press.
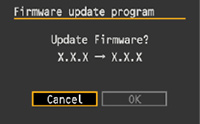
6) A firmware update dialog box will appear. Select "Yes."
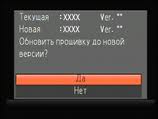
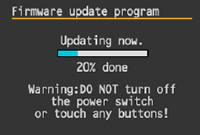
7) The update will begin. Follow the on-screen instructions during the upgrade process.
8) Verify that the upgrade process completed successfully.
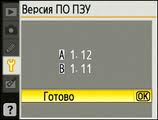
Turn off the camera and remove the memory card. Check the firmware version as described in step 2 “Check the firmware version of the ROM”. If an updated version is displayed, the update process was successful.
"#. ##" is the ROM version.
If the update process has not been successful, contact a service center.
9) Format the memory card in the camera.
The firmware update is completed.
The camera software (software), aka “firmware”, is practically the same as the computer operating system that controls its operation. The manufacturer releases updated versions of the firmware where it can correct errors made at the development stage, or expand the capabilities (functionality) of the camera.
Almost everyone has updated software versions. The update process itself is not as complicated as it seems to many users.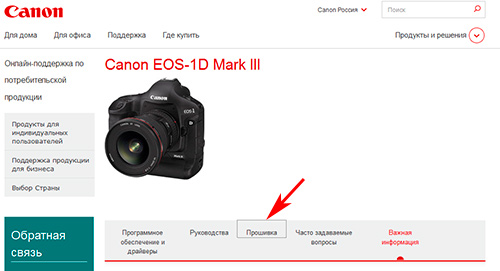
After choosing a model, you get to the page with updates for programs and utilities, select the firmware, just click on the menu item indicated by the arrow in the screenshot.

You take all risks upon yourself, and decided to certainly update the software of your camera - click on the "accept conditions and download" button
Save the archive file. Unzip the archive to a folder. In the folder, in addition to the firmware file itself, you can also find instructions in English and Japanese.
Instructions are written simply and readily. Basic knowledge of English or Japanese is enough to understand the instructions for updating the software, without any difficulties. However, not everyone at school learned English, and even more so in Japanese. For a Russian-speaking audience, the photo technician completed the translation of the instruction.
Almost all (and maybe all) instructions for updating the software are written in a template, that is, only camera models are changed in the texts.
And so ... Once again ... The optimistic manufacturer warning you read. You acknowledge what you are doing and agree that you assume all risks.
We proceed to study the instructions.
Instructions - updating the firmware in the Canon EOS-ID-brand III Camera
Firmware is software embedded in a hardware device to control its operation. Embedded software in the Canon EOS-ID-III brand camera controls the shooting and image processing processes. The instructions below assume that the latest firmware has been downloaded to your computer. At your disposal there is a card reader that supports writing data to a memory card.
 1
. Format the memory card in the camera.
1
. Format the memory card in the camera.
Prepare a CF or SD memory card, depending on what type of card your camera supports. Make sure the memory card does not have important information, videos, photos, etc. Insert a memory card into the camera. In the menu, select "format", then execute the command to perform formatting.
 2
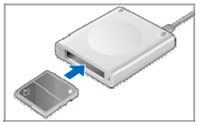
. Insert the memory card into the card reader.
2
. Insert the memory card into the card reader.
3 . Copy the firmware file "1D3xxx.FIR" to the directory directory of the memory card (xxx version of the firmware). Do not copy the firmware file to a folder inside the root directory on the memory card; the camera cannot find the software file.
 4
. Insert the memory card with the firmware file into the camera, close the slot cover and turn on the camera.
4
. Insert the memory card with the firmware file into the camera, close the slot cover and turn on the camera.
Attention!!!
It is recommended that you use the AC adapter while updating the camera software.
If you use the battery pack to power the camera, make sure it is fully charged.
Do not press the buttons, do not turn off the camera until the software update process is complete. In the event of an update failure or other error, your device will not be suitable for further use. Therefore, be sure to follow all the instructions for updating the firmware of the camera.
 5
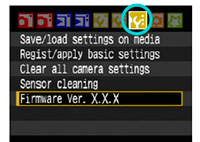
. In the camera menu on the tab (see the figure on the left), select Firmware Ver. - Software version and press the "SET" button.
5
. In the camera menu on the tab (see the figure on the left), select Firmware Ver. - Software version and press the "SET" button.
 6
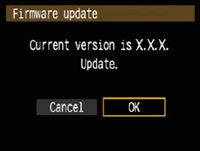
. The display shows information about the current software version. Using the quick select disk (see the instruction manual) select "cancel - cancel" if you change your mind about updating the firmware, or OK to continue the update process and press the "SET" button.
6
. The display shows information about the current software version. Using the quick select disk (see the instruction manual) select "cancel - cancel" if you change your mind about updating the firmware, or OK to continue the update process and press the "SET" button.
 The camera checks for a firmware file on the memory card.
 7
. Using the quick select disk, select the firmware file and press the "SET" button.
7
. Using the quick select disk, select the firmware file and press the "SET" button.
 8
. Using the quick select disk, select "cancel - cancel" if you change your mind about updating the firmware, or OK to continue the update process and press the "SET" button.
8
. Using the quick select disk, select "cancel - cancel" if you change your mind about updating the firmware, or OK to continue the update process and press the "SET" button.
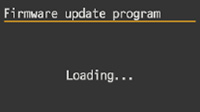
 The display shows the progress of the camera firmware update process.
Do not press the buttons, do not turn off the camera until the software update process is complete.
If errors occurred during the upgrade process, see the recommendations at the end of this manual.
![]() 9
. The display shows information about the completion of the camera software update and the current version number. To complete the update process, press the "SET" button.
9
. The display shows information about the completion of the camera software update and the current version number. To complete the update process, press the "SET" button.
The display shows information about the completion of the camera software update and the current version number. To complete the update process, press the "SET" button.
Your camera with an updated version of the software is ready for further use.
In case of errors during the software update process:
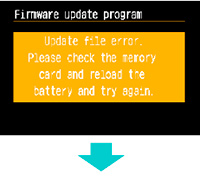 If the camera displays an unfriendly message “file error. You need to check the memory card, remove and insert the battery, try again”. You need to press the "SET" button.
If the camera display turns off after pressing the “SET” button. Download the firmware file again and start the update process from the beginning.
If after pressing the "SET" button the information on the display changes (see the picture below), repeat the procedure starting from step 7 of these instructions.
In conclusion, I would like to note. We updated the software on different camera models. During their work, they performed this procedure not one hundred, but maybe thousands of times. There was never a fatal update result. However ... The phototechnician recommends updating the camera firmware if you have information that the manufacturer in the new software version has made significant corrections and changes that are important to you. Otherwise, leave the update venture alone. Use and enjoy the result of your working camera.
And select your camera model. Then switch to the Drivers & Downloads tab. Below you will find Firmware - this is the firmware. We remember its version and compare it with the one in your camera. To do this, connect it to the computer, launch EOS Utility and go to "Camera settings / Remote shooting":
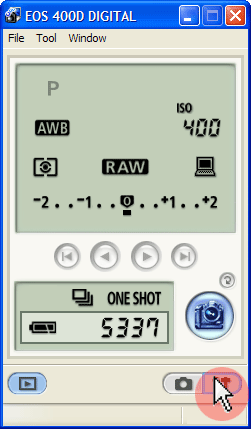

In the settings opposite Firmware, you will see the value of the current software version of your camera. By the way! If Owner’s Name is empty, click on it and enter your name. The beauty of this setting is that the value indicated there will be recorded in EXIF \u200b\u200bof each picture taken by this camera. This way you can sign them with your name, which is especially useful if they are in RAW (it is quite obvious that removing EXIF \u200b\u200bfrom JPG’s is easy).
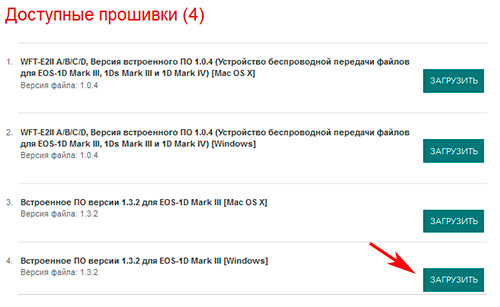
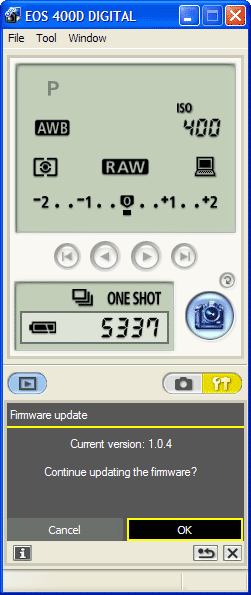
So, if an update is required, download the archive file with the firmware and unzip it. You will get one file with the extension fir. Click on Firmaware Ver. x.x.x ”, a window will appear in which select the fir-file.
![]()
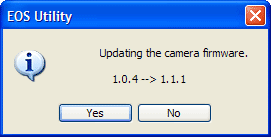
We confirm several times that in spite of everything we are going to update the software. Meanwhile, make sure your camera’s battery is charged. After confirm in the camera that you want to install the update. Next, you need to wait a couple of minutes, then turn off and on the camera. The update will be installed.
Whether this update is useful or not, you can understand by reading the description for the installed firmware. Usually support for new lenses or flashes is added, or errors that occur can be fixed, such as in firmware 1.0.9 for the EOS 450D.
If possible, also check for software updates on software.canon-europe.com and download new versions.
Share post
legal information
In case of copying the article, indicate the author and put an active hyperlink to our website. You can obtain detailed information about the conditions of reprinting in the section "
Re-flashing the camera is another operation (along with cleaning the matrix), which at first raises doubts, concerns and questions, but is performed easily and naturally.
“Firmware”, also known as “Firmware”, is a kind of camera operating system, the updates of which either correct the mistakes made by the manufacturer at the development stage or expand the functionality. One way or another, almost all Canon EOS cameras have updated versions of firmware, and the process of replacing one with another is short and simple.
Paying attention is only to the continuity of the process: since they decided to update the system, then it is not worth interfering with the camera in the process. Hence the two basic rules:
Use a fully charged battery so that there is enough fuel for the entire update process
Do not touch any buttons, levers and control rounds on the camera during the process, do not turn off the camera, do not open the door of the memory card and battery.
Early instructions for replacing the firmware on Canon cameras mentioned the need to remove the lens from the camera first, however, it subsequently disappeared. I refreshed both the well-deserved models (Canon EOS 300D and Canon EOS 5D), and the new ones (Canon EOS 5D mark II) with mounted lenses.
What is needed:
Camera with a fully charged battery.
Internet connection
Memory card
Computer with a card reader.
Directly to the process.
Step 1.
Check the battery. I would advise you not to trust the charge level shown on the camera’s display, but simply to fully charge the battery. I was flashing the Canon EOS 300D, turned on the camera, looked at the battery charge level on the display - full. But vague doubts remained: I remembered that I had not charged the battery for a long time. Took a picture - the battery icon blinked, showing almost complete discharge.
Step 2
We are preparing a memory card. I don’t remember exactly, but I remember that I read somewhere about the fact that you should not use memory cards of large volumes. I use an old CF with a capacity of 512 megabytes. We insert the selected memory card into the camera and format it (it is a requirement of Canon to use a memory card formatted in the camera), after checking if there are any masterpieces, the destruction of which will leave grateful posterity without outstanding examples of the heights of photographic art. Agree, it’s a shame to lose a few pictures from the last walk or, all the more so, a detailed photo report on the celebration of another birthday.
Step 3
Download the new version of the software. Canon's Russian site sends users to the European site, I prefer to use the American one. We go to the update page and select our model of camera. In the dialog box, select the operating system installed on the computer. In the list of “firmware” that appears, go first under the name “firmware update”. We agree to everything and everything and still download the update, saving it to your computer.
We check the firmware version on the camera - in the settings menu we look for the line Firmware ver. H.H.H. or Firmware Ver. X .X .X., If the camera is not Russified.
Software Version Screen
Step 4
We are preparing a new version. Unpack the downloaded archive onto a computer. The description of the new software version on the Canon website contains information on the exact size of the update file. After unpacking the archive, go to the properties of the received file (by clicking on its icon with the right mouse button and selecting “Properties”) and check the size matching the one declared on the site. If the size is different, repeat the download / unpack procedure.
We insert the memory card into the card reader and move the file to it. The update file must be placed in the root directory of the memory card. We take out the memory card from the computer (do not forget to use the Safely Remove Hardware function if necessary).
Step 5
We insert the memory card with the new version of the software into the camera. Set the camera to P, Av or Tv mode. Turn on the camera. In the Settings menu we find the line with the software version, press SET. The firmware update screen will appear. We confirm the desire to update. After downloading a new firmware, the camera will once again ask you to confirm the update. We confirm. Carefully place the carcass on a smooth surface (so as not to hold it in your hands and inadvertently press a button) and observe the progress of the process on the software update screen. After completion, once again confirm the update, turn off the camera and remove the memory card.
On older Canon EOS models (Canon EOS 300D, 350D), before turning on the “updated” camera, it is necessary to remove the battery for a couple of seconds for the new firmware to work. On new models this is not required. We turn on the camera, go to the settings menu and check the presence of a new software version.
Software Update Progress
There is nothing complicated in the process. On the Canon website for each model, a detailed PDF file is available for download with a description of the procedure in pictures. I advise you to download and view carefully.
Instruction manual
It is a good idea to check for updates on the manufacturer’s website immediately after purchasing a new camera. Then you can check the appearance of new firmware several times a year. Unfortunately, camera manufacturers often do not invest in the development of firmware for older models. Therefore, as soon as your camera becomes obsolete for two generations, it makes no sense to look for new software. But do not give up this idea completely. For example, for the Canon Rebel XS, which was released for sale in 2008, new firmware could be found until October 2010.
Find out the current firmware version. Although many digital cameras allow you to update software. However, it is not always easy to check the current firmware version. This information is usually hidden. It may be located inside the date and brightness settings menu of the LCD. Hints for finding the number and firmware version for individual camera models can be found in the user manual.
Find the firmware page for your camera on the Internet. Once you find out the software version, visit the website of the camera manufacturer and check for newer firmware versions. It’s best to search by keyword for the camera model. If this does not help, then try searching for files manually. Firmware updates are sometimes found in the drivers, downloads, or software section.
Read installation instructions and safety precautions. It is imperative to carefully read the detailed instructions for updating your camera. This process is individual for different models. As a rule, fixing errors is very difficult. The flashing process should not scare you, as it is safe if you follow the instructions.
To make the process of software change the most comfortable, follow two simple rules. First, make sure that new batteries are installed in the camera and do not turn it off during the update. If the flashing is interrupted, discharged batteries will not allow it to continue. In this case, it will be necessary to make repairs in the service center. Secondly, make sure that you are using memory cards and USB cords from a certified manufacturer.
Install firmware. Some manufacturers make the firmware upgrade process very easy. For example, Olympus owners can download the Olympus Digital Updater camera app. It will automatically check the devices connected to the computer and offer to update the firmware, if necessary. However, for most brands you will need to do a little more action. A typical update process is as follows: a file or installation application that contains a firmware update for your camera is downloaded to your computer. After downloading, the firmware is copied to the formatted memory card. Then you need to insert the memory card into the camera, and follow the instructions to initiate the update in the device menu.


