Today, there is an Internet connection in almost every home. Some people are limited to one computer. Others buy routers and set up a home local area network on multiple devices (including smartphones). In any case, in order to do everything right, you need to know how to properly configure the local network in Windows 7. This topic is discussed in this article.
Network and Sharing Center
This menu is the heart of all Windows network settings. Configure a local network, change the IP address, find out the MAC address of your network card, create a new PPPoE connection - all this can be done here. Of course, all actions can be performed through command line Windows, but for most users this method will be very inconvenient.
To bring up the "Control Center" in Windows 7, you can go in several ways:

Connecting to new network equipment
Let's say you've connected to your ISP and bought yourself a new router. The configuration of the router itself is not covered in this article - there is too much variety. When the device is fully configured and ready for use, you need to connect your personal computer to it.
You connect the router and PC with a patchcord, and the network connection icon in the Windows tray changes to appearance... This means that everything is fine with the network card and cable. If your router is in DHCP mode, i.e. independently assigns IP addresses to new devices - most likely, no additional settings you don't need it.
The operating system will ask you to select the type of connection: "Public", "Home" or "Work" network. For an ordinary Windows user this step does not matter. Select, for example, home and click "Ok". Try to go online - if everything works, you don't need to do anything else. 
If not, you need to configure the adapter, which is just below.
Note! If you don't have a router and you plug in a cable from your ISP to your computer, it probably won't work for you. Modern ISPs rarely use DHCP technology, preferring PPPoE or Static IP. In this case, follow the further instructions.
Configuring adapter parameters
This section of the manual is intended for those users who need to configure the properties of the adapter (network card). If, according to the agreement with the provider, you need to assign a specific IP or mask, specify a specific gateway - follow the instructions. If the agreement contains a login and password for connection, skip this step and go to the section on PPPoE.

New home connection
If you connect with a cable directly to the provider, bypassing the router, most likely you will need to do the following.
Sometimes it becomes necessary to quickly transfer from one computer to another a large number of data and then the question arises about setting up a local network under Windows 7. After all, it is not possible to use flash drives or other storage media for this task.
However, the process of setting up a local network under Windows 7 is very simple. And having done it once, in the future you will be able to do it very quickly and without problems.
Let's first look at the process of connecting two computers. To do this, you need a crimped network cable. In this article, we will not consider the process of making such a cable. This is a topic for a separate article. Therefore, we will assume that you have such a cable or you bought it together with the connectors already in a crimped form.
Connect the cable to both computers into the network card slot and check that the indicator light near both network connectors is on. This means that the network cable is working and you can continue to configure the local network.
After both computers are connected with network cable, you can start setting up your network connection.
- First, open the window " Network connections". For Windows 7, the path to this window looks like this: Start - Control Panel - Network and Internet - Network and Sharing Center - Change adapter settings.
- In the "Network Connections" window, you can see the icon of your connection. If you have one Network Card there should be only one connection icon in this window. Click on it with the right mouse button and select the "Properties" item.
- In the next window, you will be able to see the list of components. Here you need to select "Internet Protocol TCP \ IP" and click on the "Properties" button.

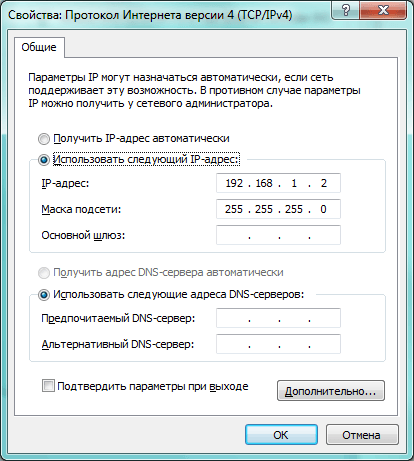
- After that, the properties window of the selected component should open. Here it is necessary to mark the item "Use the following IP address" and enter the required IP addresses (not to be confused with).
- For the first computer:
- "IP address" - 192.168.1.1
- For the second computer:
- "IP address" - 192.168.1.2
- "Subnet mask" - 255.255.255.0
- Leave the rest of the fields blank.
- After that, you need to close all open windows by clicking on the "OK" button.
After that, the configuration of the local network under Windows 7 is complete and the network will work in a few seconds. You can ping to test if the connection is working. To do this, on one of the computers, press the Win-R key combination and enter the “cmd” command. Then in the black window enter the ping command and the IP address of the other computer. The result of the command should be the same as in the picture.

This means that everything is working correctly and now you know how to set up a local network under Windows 7.
Today we will look at how to set up a home local network on devices with operating system Windows 7. Home local area network is a combination of several devices, usually computers, laptops and printers, in order to freely exchange data, organize a play area, and get general access to the Internet and shared devices (printers). The creation of a home network in recent years is an integral part of the pastime of users on the Internet, who have more than one device that allows them to use the computer web (laptop, smartphone, computer, TV). Such procedures are easy to perform, even if the person is not a master of computer equipment.
Types of home networks
Depending on the interface used to create a local network, they are divided into wireless and wired.
Wired network
When formatting a wired home network, a cable is used as a data transfer interface without any intermediaries - computers are connected by twisted pair. Due to the many shortcomings and limitations of such a local network (the impossibility of organizing general access to the Internet without an additional network card, only two devices can be connected), this method of forming a connection is practically not used.
It is more common to use a switch (switch) as an intermediary. The advantage of a local network is the ability to connect more than two computers and the organization of shared access to network devices and the global web. But setting and specifying IP addresses in Windows 7 is done manually, which is not very convenient, especially if you have a significant number of devices.
Wireless network
The most popular method of forming a home network is using a router (router) as a linking device. The advantage over other options is support wireless interfaces data transmission (by radio, support for a significant number of computers, ease of setup).
Configuration process
First of all, it is necessary to connect two or more devices, for example, using a twisted pair network cable (in this example, we will consider the configuration of a local network).
- We go to the local home web settings on all Windows computers. This is done through the "Control Panel" or search string"Start".
- Open the "Control Panel" and call the person responsible for the configuration network connection option as in the screenshot.
- We enter "center" in the search line "Start" and select the same option in the search result.

- This will display the window shown below.

- To configure the home network, click on "Change adapter settings" located in the left frame of the window that opens.

- We perform a double click on the required connection (often it is the only one and is designated as unidentified).
- In the "Connection Status ..." dialog that opens, click on the "Properties" button to configure the network connection.

- We perform a double click on the protocol (TCP / IPv4) or select the name of the item and click "Properties" in order to proceed with manual setting network connection.

- We translate the first trigger switch to "Use the next IP".
- Enter the IP address of the computer and the subnet mask, as in the screenshot.

- We leave the rest of the fields untouched, since they are not needed for connection during the formation of a home local network, and click "OK".
- For the first time, you will have to specify the type of network location, which determines the default firewall and connection security settings recommended by Windows 7.

In total, Microsoft offers three types of network placement:
Home network - used to create a local network that includes devices you know and can trust. For such a connection, the network discovery function is activated, which allows you to see other devices, connect to them and use files opened for general use with the specified privileges.
Working - applicable for a small office, office, computer class or club. As with the homegroup, there is active discovery, file sharing, and device sharing between Windows computers.
Public - Used in public places. The settings of such a web hide the computers connected to it in order to increase security and reduce the likelihood of becoming a victim of hackers.
- We check if all devices are elements of the home network, have different names and IP addresses.
- Computer names are checked and, if necessary, changed by going to the menu Windows configuration... We call the context menu "My computer" and select "Properties" or click on the item "System" located in the "Control Panel".
- In the "Computer" field we check the names, below, in the "Working group", we look at the belonging to the same local network. Remember that Windows 7 device names do not have to be the same, but you must be connected to the same network.

- If you need to change the name of the PC, click on "Change parameters".
As you can see, creating a new connection between computers is a simple process, and you can completely do without a wizard.
We check the performance of the created web
The activity and operability of the network connection in Windows is tested by entering a single short command from the command line.
- We launch it, as before, by entering "cmd" into the search bar.

- We enter the ping command with parameters in the form of the IP address of another device: "ping168.0.1".

At correct settings you will see the delay time and the number of sent packets equal to 4 without loss.
(Visited 34,031 times, 4 visits today)
Hello.
Even 10-15 years ago - having a computer was almost a luxury, but now even having two (or more) computers in the house does not surprise anyone ... Naturally, all the advantages of a PC appear when it is connected to a local network and the Internet, for example: network games, sharing disk space, fast file transfer from one PC to another, etc.
Not so long ago I was "lucky" to create a home local network between two computers + "share" the Internet from one computer to another. I will tell you how to do this (from fresh memory) in this post.
1. How to connect computers to each other
The first thing to do when creating a local network is to decide how it will be built. A home local network usually consists of a small number of computers / laptops (2-3 pcs.). Therefore, most often 2 options are used: either computers are connected directly using a special cable; or they use a special device - a router. Let's consider the features of each option.
Direct connection of computers

This option is the simplest and cheapest (in terms of equipment costs). In this way, you can connect 2-3 computers (laptops) with each other. At the same time, if at least one PC is connected to the Internet, you can allow access to all other PCs in such a network.
What is needed to create such a connection?
1. Cable (also called twisted pair), a little longer than the distance between the connected PCs. It is even better if you immediately buy a crimped cable from the store - i.e. already with connectors for connecting to a computer's network card (if you crimp yourself, I recommend that you familiarize yourself :).
By the way, you need to pay attention to the fact that the cable is needed specifically to connect the computer to the computer (crossover). If you take a cable to connect a computer to a router - and use it by connecting 2 PCs - such a network will not work!
2. Each computer must have a network card (all modern PCs / laptops have one).
3. Actually that's all. Costs are minimal, for example, a cable in a store for connecting 2 PCs can be bought for 200-300 rubles; network cards are in every PC.
It remains only to connect with cable 2 system blocks and turn on both computers for further settings. By the way, if one of the PCs is connected to the Internet via a network card, then you will need a second network card - to use it to connect the PC to the local network.
The advantages of this option:
Fast creation;
Easy customization;
The reliability of such a network;
High speed when sharing files.
Minuses:
Extra wires around the apartment;
To have access to the Internet, the main PC must always be turned on, which is connected to the Internet;
Inability to access the network for mobile devices *.
Creating a home local network using a router
A router is a small box that makes it a lot easier to create a local network and connect to the Internet for all devices in the house.
It is enough to configure the router once - and all devices will be able to immediately access the local network and access the Internet. Now in stores you can find a huge number of routers, I recommend that you read the article:
Stationary computers connected to the router via a cable (usually 1 cable always comes with the router), laptops and mobile devices- connect to the router via Wi-Fi. You can see how to connect a PC to a router (for example, a D-Link router).
The organization of such a network is described in more detail in this article:

Pros:
Configure the router once, and access to the Internet will be on all devices;
No extra wires;
Flexible settings for Internet access for different devices.
Minuses:
Additional costs for purchasing a router;
Not all routers (especially from the low price category) can provide high speed in the local network;
Not experienced users it is not always easy to set up such a device.
2. Setting up a local network in OS Windows 7 (8)
After the computers are connected to each other by any of the options (whether they are connected to a router or directly to each other), you need to configure the Windows OS for the full operation of the local network. Let's show using the example of Windows 7 (the most popular OS today, in Windows 8 the setting is the same + you can familiarize yourself with).
2.1 When connecting via a router
When connecting via a router, the local network, in most cases, is configured automatically. The main task comes down to setting up the router itself. Popular models have already been discussed on the blog pages earlier, I will give a few links below.
After configuring the router, you can start configuring the OS. So…
1. Setting up workgroup and PC name
The first thing to do is set a unique name for each computer on the local network and set the same name for the workgroup.
For example:
1) Computer number 1
Working group: WORKGROUP
Name: Comp1
2) Computer number 2
Working group: WORKGROUP
Name: Comp2
To change the name of the PC and workgroup, go to the control panel at the following address: Control Panel \ System and Security \ System.


Properties Windows systems 7
2. Sharing files and printers
If you do not take this step, then no matter what folders and files you share for public access, no one will be able to access them.
To enable the option to share printers and folders, go to the control panel and open the "Network and Internet" section.


Now click in the left column on the item " change Extra options general access«.

Several profiles 2-3 will appear in front of you (in the screenshot below 2 profiles: “ Home or work"And" General "). In both profiles, you need to enable file and printer sharing + disable password protection. See below.

Setting up sharing.

Additional sharing options
After making the settings, click " save changes”And restart your computer.
3. Sharing folders for shared access
Now, in order to use files on another computer, you need the user to share the folders on it (to share them).
It is very simple to do it - in 2-3 mouse clicks. Open the explorer and right-click on the folder that we want to open. In the context menu, select “ General access - home group(reading)«.

Then it will remain to wait about 10-15 seconds and the folder will appear in the public domain. By the way, to see all computers on the home network - click on the "Network" button in the left column of the explorer (OS Windows 7, 8).

2.2 When connecting directly + sharing Internet access on a second PC
Basically, most of the steps for setting up a local network will be very similar to the previous option (when connected via a router). In order not to repeat, the steps that are repeated, I will mark in brackets.
1. Setting the computer name and workgroup (similarly, see above).
2. Setting up the sharing of files and printers (similarly, see above).
3. Setting up IP addresses and gateways
The configuration will need to be done on two computers.


