One way or another, any user of an Android device is faced with the need to restore factory settings. Sometimes the reason for this is glitches and slow operation of the device, and sometimes restoring factory settings is simply preparing the gadget for sale. In this article we will talk about how to restore factory settings on Android.
First, a little theory. Factory settings are the state in which the smartphone was released from the factory. You need to understand that returning to factory settings will completely delete all user files, applications, photos, videos and contacts from the device memory. Only what is stored on the memory card will be saved, while the internal memory of the device will be completely cleared. Therefore, before starting this procedure, be sure to copy all the data that is important to you.
How to restore factory settings on Android through the device interface
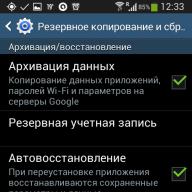
The easiest way to reset your Android to factory settings is to use the Reset Data feature, which can be found in Settings. If you have a pure Android device (without additional launchers), then you need to open the settings and go to the “Recovery and reset” section. On devices with non-standard launchers, this settings section may have a different name. For example, if you have a Samsung smartphone, then you need to open the “Backup and reset” section, which is located on the “Accounts” tab (see screenshot).
After you have opened the “Recovery and reset” section, you need to go to the “Data reset” subsection.

After this, a screen will appear in front of you warning that data will delete all information from the device’s memory. In order to return the factory settings, here you need to click on the “Reset device” button.
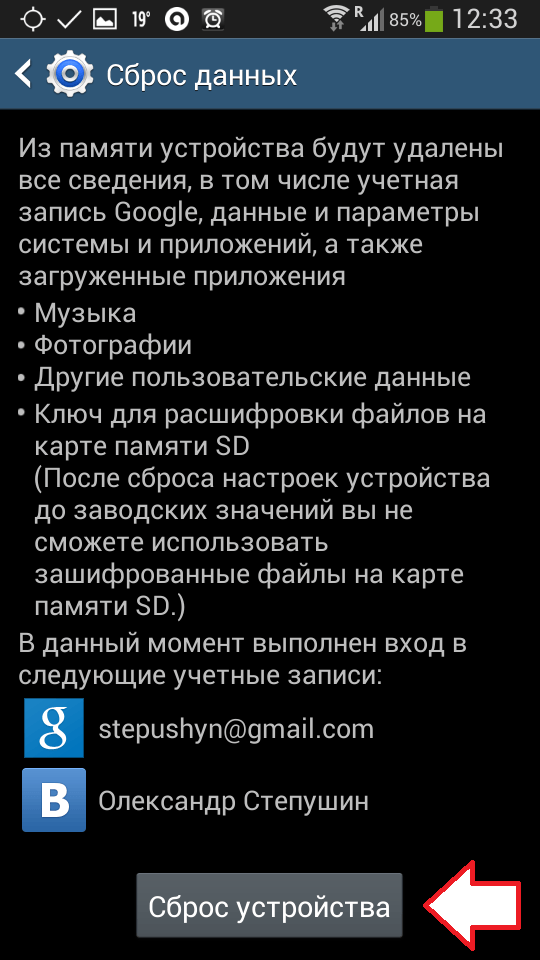
After this, the device will reboot, and after the next turn on Android will return to the state it was in when it was first turned on.
It should be noted that these instructions are for modern versions of the Android operating system. If your device has an Android version lower than 2.1, then in order to return the factory settings you need to open the “Privacy” section, and then go to the “Data Reset” subsection.
How to restore factory settings on Android
In addition, you can restore factory settings on Android using recovery mode (or the so-called Recovery mode). This method of restoring factory settings will be useful if your .
Depending on the model of your Android device, recovery mode opens differently. But, on most devices, to do this you need to perform the following manipulations:
- Turn off your Android device completely;
- Press the volume up key;
- Without releasing the Volume Up key, press the Home key;
- Without releasing the Home and volume keys, press the device's power key;
- Without releasing the keys, wait until the recovery mode starts;
- Open the menu item that is responsible for restoring factory settings;

After this, you just need to wait until the device restores factory settings and reboots.
Factory settings on a laptop may be required in a variety of cases. For example, your computer is very clogged with various programs, or errors occur frequently, the computer slows down a lot and nothing helps. Also, using a reset, you can get rid of the Windows locked problem.
All these problems can be solved by resetting the laptop to factory settings. Let's get started.
By the way, I would like to say that there are times when it is not possible to return to the factory settings. The fact is that some users who bought a laptop immediately, or after some time, reinstalled Windows, which came with the laptop. Often the hidden partition is deleted to allow recovery on the hard drive.
It also happens that after calling a computer technician, he reinstalls Windows, then, most often, the same thing happens - the recovery partition is deleted. So, it’s better to do it all yourself.
If this happens, you will most likely have to look for a data recovery disk; you can try downloading the image online. The best option, of course, would be to reinstall the system.
We will move on to those cases when it is possible to restore a laptop to factory condition.
But this will delete all data from drive C, Windows will be reinstalled and you will not need to enter the key. After reinstalling and starting the system, the installation of drivers and other components will begin.
- First you need to disable the built-in Fast Boot feature Boot Booster, which speeds up booting of the laptop. This is done in . To do this, turn on the device and press F2 Once in Bios, we find where this function is disabled. Go to the tab Boot and there we look for the point Boot Booster, press Enter on it and select Disabled. On the last tab, select Save changes and exit. The laptop will save the settings and reboot. After booting, turn off the laptop again.
- Turn on your device and then press the F9 key. The loading screen will appear.
- The factory reset program will prepare the data for recovery, and then a message will appear asking whether you really want to restore the data. Don't forget that everything from the disk will be deleted!
- Next, don’t touch anything, the recovery process is automatic. During recovery, your computer will restart several times.
So, to carry out this operation on an HP laptop, you need:

To do this on an Acer laptop, you need to do the following:
- Turn on the laptop and, while holding Alt, press F10 several times, the system should prompt for a password.
- If you have not recovered anything before, the standard password is six zeros (000000).
- In the window that appears, select Factory reset(reset to factory settings).
By the way, a return to factory settings can be done in the Windows operating system itself. To do this, you need to find the eRecovery Management utility on your computer, go to the Recovery tab and reset the settings.
In order to restore this laptop to its factory state, you need to use the Recovery Solution utility located in Windows itself. If this utility is not available, then restart the computer and press F4 to launch the recovery utility.
- Select Restore.
- Next, select Complete Restore.
- Select the Computer Initial Status recovery point.
- A message about reboot will appear, click “Yes”
- Follow the system instructions.

After completing the work, you will need to restart the laptop again to activate the recovery made by the program.
To restore a laptop, you will have to carry out the following manipulations:
- Press the 0 key on the keyboard and HOLD.
- We turn on the laptop.
- Release the 0 key when the computer starts beeping.
The second login option on this laptop, if the first one didn’t work out:
- Turn off the laptop, then press F12.
- Without releasing your finger from the F12 key, turn on the laptop.
- Wait for the corresponding window to appear.
The recovery utility will launch, just follow its instructions, it’s not that difficult.

I hope this article helped you in solving your problems; if you have any questions, ask them in the comments.
Friends, I have long promised my regular readers to write an article about system recovery. Many of us have already encountered this situation more than once when we install some program, make some operating system settings, accidentally delete service files and do much more, which ultimately leads to incorrect and unstable functioning of the OS.
Will I tell you today? What needs to be done to return the operating system to working condition.
Friends, do not forget that there are no hopeless situations.
The algorithm discussed below will be useful to everyone. There are no people who don’t make mistakes and always do everything right. As wise people say: “Only those who do nothing make no mistakes.” But you should also be able to correct mistakes.
And for everyone who wants to find out and, if necessary, undo the last actions on the computer, I have written a detailed algorithm.
Recovery checkpoint
So, Friends, a recovery checkpoint is a copy of the operating system service files, program settings, as well as the system registry at a certain point in time.
The operating system, as a rule, creates recovery checkpoints automatically at certain intervals, in the case of installing any software or at the direct direction of the user.
It should be noted that when “rolling back” to the operating system restore point, the user’s personal files, such as music tracks, graphic files, documents, etc., are not affected.
Attention! Returning to a restore point allows you to restore the operating system, but not the user's personal content.
1. Click on the “Start” button at the bottom right of the screen and select “Control Panel”. The main Control Panel window of the Windows 7 operating system will open:
2. Click on the very first section “System and Security” and in the window that opens, select the subsection “Restore the computer to a previous state”.

3. In the window that appears, click on the “Run system recovery” button.

4. The system will collect the necessary information and launch the System Restore Wizard. In the first window that appears, you just need to click the “Next” button.

5. Next, the second Wizard window will open, where you need to select a restore point from the list provided. If you have just made some settings and want to cancel them, then select the topmost entry indicated. You can also select any recovery point entry that suits you.

You can also run “Search for affected programs” by clicking on the corresponding button. The operating system will scan its service records, determine which programs will be deleted or restored during a rollback to a restore point, and present the analysis results in a separate window. After reviewing the lists of affected programs, click the “Close” button.
![]()
7. A warning window will appear on the screen that it will be impossible to interrupt the system recovery. And once again they will ask you to confirm your intentions by clicking the “Yes” button.

After this, the system recovery process will begin. Which usually takes a little time - about 2-3 minutes. After which the system will reboot and you will see this window:

Your computer has been restored to the specified state. Now you can check the operation of the OS and other programs to ensure they are working correctly. Be sure to test the result of the system restore.
If the operating system was unable to restore the system, then the window will be different. This often happens when an antivirus program is running. Disable it and try again.

If you were able to successfully solve the “” problem, then I congratulate you. But in some cases, restoring the system did not lead to an improvement in the situation, but rather to its deterioration. The system began to freeze, some programs would not load at all, desktop icons disappeared, etc. In this case, it is best to cancel System Restore.
To do this, we carry out the entire algorithm, starting from point 1. When you complete step 3, the following window will open:

Select “Cancel system restore” and then follow the algorithm presented above.
So, Friends, we looked at a rather important question: “how to restore the system?”, We learned how to “roll back” the system to restore points and cancel “rollbacks”.
It should be noted that it is possible to restore the system using this method, but only if there was no serious damage to system files, for example, as if the system was infected with a virus. In case of serious malfunctions of the OS, this tool is ineffective and you cannot avoid resorting to one of the advanced methods of system recovery.
In one of the following articles, I will talk about just such a tool - an emergency recovery disk.
Hello, dear readers of the Internet Business blog! Restoring your computer system may be necessary if you see the following failures:
- the operating system runs at a snail's pace,
- programs freeze
- the menu opens by itself and disappears,
- Windows displays numerous error messages while running,
- The computer makes strange noises from time to time.
There is something to be upset about! If this happens, you will want to return to the time when the computer worked well. Do you think time can't be turned back? Believe me, it's possible! The wonderful tool Windows 7 will act as a time machine System Restore.
How to restore the system? Every day, Windows 7 remembers vital OS settings and saves them, creating a restore point. When serious failures occur on a computer, its normal operation can be returned from a restore point, that is, transported to a prosperous past that was saved by the system.
It is important to know that when you access a recovery point, your documents are not deleted by the recovery system. But programs that were installed after the restore point was created will be lost and will need to be downloaded again. You can cancel System Restore and use another restore point.
How to restore your computer system
Click on the button Start, select All programs. Go to section Standard, open submenu Service, select menu System Recovery s, after which a dialog box will appear.

You can use another way: Start ==> Control Panel ==> Recovery ==> Running System Restore. The same dialog box will open.

2. Select a restore point.
The following commands are available in the computer system recovery program:
Cancel system restore. This command is needed in case you are not satisfied with the result of the restore; it appears only after using the restore point.
Recommended system recovery. Use the suggested restore point, this is the best chance to fix the situation with your computer. As a result, the latest updates, drivers, or software installed are uninstalled because they may have caused the crash.

Show other restore points. This command is always available; after selecting it, a list will open from which you can select any recovery point by creation date.

You can test how these settings affect your computer. To do this, click on the button Find affected programs, and you will receive a list of those programs that will be affected by the selected option.

3. Check again that all open files are saved and click on the button Further, then Ready.
After a short pause, the computer will reboot and work normally. Even if there are no crashes on your computer, I advise you to create your own restore point. Give it a descriptive name, for example “Before the doctor was needed” and you can easily find the desired restore point by name.
Creating a restore point
1. In the menu Start click on the folder Computer right click and select command Properties.

A dialog box will open on the screen System, which displays all the most important functions of the computer.


A dialog box will appear Properties of the system.
3. Click on the button Create in the tab System protection.

In the dialog box System protection Enter a name for the new restore point.

Save the restore point by clicking on the button Create. By creating a restore point in advance, you will always be able to choose the state to which it is best to return in the event of a system failure.
If you discover that your computer is infected with viruses, before you disinfect it with an antivirus program, delete all existing restore points. They may contain viruses!
Removing recovery points infected with viruses
In the dialog box Properties of the system you need to click on the disk C (System), then on the button Will set up b.

In the dialog box System protection click on the buttons Delete ==> Continue ==> OK. Close the window and start removing viruses.
After you have disinfected your computer, create a new restore point. Name it accordingly, for example, “After disinfection.”
Restoring your computer system is a simple but very important task to keep Windows 7 in working order. When you know the functions of your computer well, it is no secret to you how to restore the system; you do not need to look for a specialist or knowledgeable friends. You can handle this task perfectly on your own!
Good luck and see you on the pages of the Internet Business blog!
I would really appreciate it if you use these buttons! Thank you!“System Restore restores the state of your computer’s system files to a previous point in time. This allows you to undo changes made to your computer system without affecting your personal files.
Sometimes, as a result of installing a program or driver, unexpected changes occur in your computer or unexpected behavior occurs in Windows. Usually, uninstalling the program or driver will fix the problem.
Restoring Windows 7 and 8
In the last article we looked at how to make a Windows restore point. Now we will learn how to restore the Windows system from this point. If you have not yet read the previous article, I advise you to do so.
We all, sooner or later, install some unknown crap on our computer, and at our own peril and risk. Without thinking about the consequences, we install various programs on our PC in order to test their “wonderful” ability to do something incredible (as we are assured before downloading the program).
Restoring and restoring Windows 8 to its original state
Before the release of the Windows 8 operating system, returning a computer to its original state was neither easy nor quick. But now, with the help of new features, this can be done in minutes. I can’t even believe it, right? However, this is one of the best features of Windows 8.
At work, I have to constantly test various programs, so my computer needs regular maintenance.
Windows 7 System Restore
Most often, the function of restoring the computer to a working state is required if some program was installed and after that the system began to slow down. You should also restore the system to an earlier state if the computer was subject to a virus attack. In most cases, the computer is infected or littered with programs so much that the recovery operation can only be performed from safe mode.
System Restore in Windows 7
Hello, I have already written an article about how to enable system restore and how to create a restore point. Now is the time to write about how to perform a system restore in Windows 7. To put it simply, now I will write about how to perform a system rollback.
If you have some kind of problem with your computer, for example, it has become very glitchy, or even worse, it won’t start at all, then the first thing you need to do is to try a system rollback, thereby we will return the settings and system files from the backup that was created for example two days ago, when the computer was still working normally.
Almost every laptop (except for completely old models) has a hidden system recovery. Under no circumstances should the folder called “Recovery” be deleted.
It stores important information about your system.
Slow operation, freezing of applications or sudden shutdown of the smartphone is a serious problem. To solve it, you need to know how to return or reset the settings on Android to factory settings; these are most often the reason for the incorrect functioning of the gadget.
Resetting settings on Android is an operation during which absolutely all data is erased: photos, cache, videos, RAM, clipboard, applications and various widgets downloaded by the owner himself after purchasing the smartphone.
When you might need to factory reset your Android phone:
- If the owner is going to sell the gadget. In this case, all confidential information that should not reach unauthorized persons will be deleted.
- When the device “freezes” and fails during the simplest operations. This usually happens due to clogged RAM, and the easiest way to clean it is this way.
- A virus has entered the system, and the antivirus program cannot remove it on its own. The only thing that will help here is a hard reset or resetting the settings to those provided by the factory with full memory formatting.
How to find Hard reset on your phone
There are several ways to use the Reset function on Android:
- Through the regular menu. It is the easiest way to do a hard factory reset; moreover, the process will take a minimum of time and does not require special knowledge and skills.
- Using service codes. In most cases, they are universal and are suitable with equal success for both Samsung and HTC, LG, Sony and other manufacturers of smartphones and tablets.
- By pressing hot keys in a certain combination. Suitable for devices of any brands.
- Using a computer (suitable for hard reset only by advanced users).

Before the procedure, it is recommended that you read the instructions for each method: it will help you understand how best to return to the factory settings of a gadget on the Android platform and avoid fatal errors, which could cause the entire system to stop working completely.
Preparing for a factory reset
In order not to lose all data and ensure optimal functioning of the mobile phone after a rollback, it is recommended to carry out preliminary preparations before the procedure:
- Copy important photos, videos and other essential information to a flash drive, PC or cloud. If this is not done, all data will be lost, and you will have to pay the specialist a lot of money for recovery.
- Fully charge the device. During the process, it will discharge if there is not enough charge, and interrupting the procedure will lead to bad consequences, including the impossibility of starting the OS. If a hard reset is performed through a computer, the amount of charge does not matter, since the phone is connected to the PC through a cord and is charged from it.
- Delete your Google account if your smartphone runs Android 5.1 or higher. The fact is that the company has introduced a new security policy, according to which, after rolling back the operating system, users must enter their last account information. Without this, it will be impossible to turn on the device, and you will have to contact service centers, which will take on the work only if they have supporting documents for the gadget.
The steps presented above are relevant for all mobile phones: for example, on Samsung and other brands, Google binding is required, although the owner may not use it.

Backup
There are several simple ways to make a backup before restoring factory settings on Android:
- Using your Google account.
- Via PC and using ADB tools.
- Using custom Racovery.
- Through the DataSync program.
The best option is backup through an account, since full synchronization occurs in it, as a result of which the user gets easy access to backup copies. How it's done:
- Go to “Personal” and “Accounts”.
- After selecting your account, check all the boxes.
- We return to the previous step again, click on “backup” and “reset”, select data archiving and automatic recovery. We perform a full check of the work account and go to the synchronization menu, where we click on “Synchronize”.
- Login to your account. Click on reset to roll back to the previous version.
This option is only suitable for those who remember all the account information (username and password). You will need it later after a rollback and reboot of the system, otherwise you will not be able to use the device.
As a result of synchronization and creation of a backup copy in Google, after turning on the device will automatically download all data from the “account”.
To perform the operation via ADB RUN, you will need a PC and a cord from your smartphone, which must be inserted into the USB connector. The process consists of several stages:
- We activate USB debugging on the smartphone.
- Launch the ADB RUN program.
- If the driver has not been installed previously, install it.
- In the program, select “Backup”, then “ADB Backup”.
- Find the backup menu in your device and click on it.

After completing the procedure, you only need to perform two steps to restore:
- In the program, click on “ADB Restore”.
- On your smartphone, select “Data Recovery”.
If a custom “Recovery” is installed in the OS, a complete copy of the firmware is performed, rather than creating a backup copy. What needs to be done:
- Log in to Recovery, click on “Backup and restore”.
- Select “Backup” to copy, then “Restore” to restore.

Another copying option is to use the DataSync application. It is suitable for users who only need to transfer data from other applications. If you need to create backup copies of them, you won't be able to do this using DataSync.
How to reset settings on Android via Recovery
This option is recommended for those who cannot turn on the phone because the system freezes, or if it is impossible to enter a lock password or pattern. The procedure using Recovery is performed as follows:
- We activate Recovery by simultaneously pressing two keys – volume down and power off. On some gadgets, other combinations may be used: power on + “home” + volume up (for Samsung); power + volume; volume up and down buttons at once.
- When the menu opens, navigate through it using the volume keys.
- Select “Wipe data” or “Clear flash”, then “Yes” or “Yes, delete all user data”.
- When the process is completed, select the OS reboot option – “Reboot system now”.


Some smartphones come with individual instructions describing how to back up or restore settings on Android, and the menu options may vary slightly.
Performing Hard Reset from Fastboot mode
To reset all data on Android, there is a Fastboot utility; it can be downloaded from the developer’s official website. To install this program correctly, you must do the following:
- After installing Fastboot, unzip it to the root of drive “C”, then download the Java Development Kit, install the package, agreeing to the licensing terms.
- Go to the “Android SDK” folder, open it and find the “Android” file, run it.
- Install the package by selecting “Accept license”.
Users of LG, Nexus, Huawei, HTC and Motorola brands will have to pre-unlock the program:
- By selecting the “Fastboot oem unlock” command, if the device is LG, Huawei or HTC.
- For other device manufacturers, activation is only possible by obtaining a code on the official website.

To put your equipment into Fastboot mode, you can use any of the following methods:
- Turn off the mobile phone, then press two keys: the power button and volume down.
- We connect the device to the PC, enter the ADB command in the address bar, running as administrator, and press Enter. When the firmware is loaded, you need to do a hard reset using the commands “./fastboot erase userdata” or “./fastboot-w”. After the reset, reboot the smartphone with the “fastboot reboot” command.
other methods
There are several other rollback methods:
- Through Google's Find My Device service. Suitable for users who have lost their gadget and want to remotely delete personal information.
- Via TWRP service. It allows you to clean individual partitions rather than the entire OS.
- Using a number key combination.

In the latter case, you must enter the codes
- *#*#7378423#*#8
- *#*#7780#*#*
- *2767*3855#
- press call key
After this, the device will perform the operation and reboot. Sometimes the reboot occurs immediately after entering the final character, which is normal.
All the options presented above are the easiest to use for users without specific skills. If other problems appear after the rollback, it is recommended to contact a professional service, otherwise, with independent intervention, the likelihood of complicating the situation increases.
Conclusion
Performing a rollback is an effective way to combat phone freezing and other problems associated with RAM overload and system destabilization. You can perform a reset on Android yourself if you know the detailed instructions and have only one free hour, since the procedure itself will not take much time.
Video
How to reset Android to factory settings with just a couple of clicks? We'll tell you! Has your phone become too slow, freezes when loading, or won’t turn on at all? It is necessary to restore the system to factory settings. Resetting your Android phone to factory settings is not as difficult as it might seem at first; in this article we will describe in detail the entire process from A to Z.
Content:
Has your phone become too slow, freezes when loading, or won’t turn on at all? It is necessary to restore the system to factory settings. To switch to Recovery mode, you need to turn off the phone and then press the key combination. Each manufacturing company has individual combinations.
The most common is to simultaneously press one - or two - buttons that control the volume level and the “Power” key. The most popular companies use the following combinations:
- “LG” - “Power on” + “Volume up”; after the logo appears, release and press this combination again;
- HTC, Nexus, Xiaomi – “Power on” + “Volume down”;
- Lenovo and Motorola – both buttons responsible for volume + “Power”.
After loading Recovery mode, the user will see system lines with different names. Select the line “wipe_data/factory_reset” and confirm the selected action. The phone will perform an operation for some time to reset new and restore old settings. Upon completion, the owner of the gadget will only have to click the line “Reboot_System_Now”. The phone will first turn off and then reboot with the restored Android system.
 The phone must be turned on. To return your Android device to factory settings, go to the general settings section. There we find the “Restore and reset” item, where we select the “Reset settings” action. After this, the system will warn the user about deleting the data and ask you to confirm the operation. After completing the procedure, the phone will reboot and launch the operating system with the old settings.

The owner of the phone must go to the dialing menu and enter a code combination consisting of numbers and symbols. Manufacturers program their products differently, and the codes change over time. Therefore, for each specific model, especially less common ones, it is better to check the code on the Internet.
However, there are a few of the most popular combinations:
- *#*#7780#*#
- *2767*3855#
- *#*#7378423#*#*
After entering one of them, the system will return the phone to its original software state.

How to avoid losing data when resetting Android settings
Restoring default settings will result in the loss of all data stored on the phone. All programs, documents, video and audio files, pictures, passwords and contacts are deleted by the system.
- Transfer data to micro SD drive. If you purchased an external drive when purchasing your phone, all the necessary information can be copied to it using a file manager. If you do not have a card, you can purchase it immediately before you return the factory settings to your Android smartphone.
- Data from your phone can be saved by uploading it to the Google Drive application. In essence, this program is an analogue of “cloud” storage. The user can download and store 5 GB of various information, and if he pays extra, this volume can be increased up to 1 TB. The application is installed from the Google Play market.
A little advice: In addition to saving data on a micro card, copy all important information to your computer. In this case, even if something happens to the external drive, the necessary information will remain with you.
If the user of an Android device has forgotten the password that unlocks it, and no recovery methods have worked, they will have to resort to resetting the settings. This can be done, firstly, by using the Recovery menu (the method is described at the beginning of the article).

Or here’s another way to restore factory settings on an Android gadget. So, the phone is turned on, but locked. When the system prompts you to enter your password, ask someone to call your number. During a call, the user has the opportunity to access the settings menu. Without accepting a call, you need to go to this section and select “Reset all data”. We confirm the operation. After restoring the original settings, the password requirement will disappear.
This brand of phone is one of the most common, so it’s worth mentioning separately. In particular, for Samsung gadgets, to exit to Recovery, press (simultaneously): “Power”, “Home” and the volume key “+”. The combination must be held until the menu appears.

If the reset is performed through the settings menu, you should select the “General Settings” section and go to the “Reset” item (it may also be called “Privacy”, “Backup and reset”). At this point, select the action “Reset data” (or “Reset device”). After confirmation, the phone will return the system to its original form.
How to reset Google account settings on Android
Typically, resetting your settings will require you to re-enter your Google account password. Don't remember this information? There are several ways to solve the problem. The simplest one is as follows.
After you have reset the settings on your Android phone, turn it on. Let's connect to the Internet. When filling out your Google account, write and select any few letters in your email field. A menu will appear above them, offering a choice of one of the actions: select, copy or send. Select “Send”. We indicate “SMS/MMS” as the program that will do all this. In the addressee line we indicate “112”, and in the message we enter a few letters of any kind. After sending, the system will send an SMS indicating that our letter was not delivered. This is what is required. You should go to this SMS message and press the “Call” button located next to the recipient’s number. This action should take the user to the contacts and dialing menu, where you need to erase “112” and dial the code: “*#*#4636#*#*”. The system will display a menu of several items. We choose the second one (something related to statistics). This will move the user to the settings menu, where a new function will appear in the “Reset and Recovery” item - resetting data with deleting the Google account.
Android factory reset apps
Did the above methods on how to reset your Android phone to factory settings not work? You can try downloading one of the specialized applications. These programs independently perform a system rollback to its original state. Examples include:
- "Simple Factory Phone Reset"— upon startup, it opens a screen with a white background with a large “Start” button in the middle, which begins the process of “rolling back” the settings. Able to remove “buggy” programs individually without affecting system data;
- "Phone Hard Reset"— after launch, displays a menu with two windows. One of them suggests reading the instructions, and the second one resets the settings;
- "Phone Factory Reset"- performs a complete rollback and reboot of the system. In the main menu of the program you need to click “Full Factory Reset”.