This guide describes step-by-step ways to change the screen resolution in Windows 10, and also provides solutions to possible resolution-related problems: the desired resolution is not available, the image looks blurry or small, and others. There is also a video that shows the whole process clearly.
Before we talk directly about changing the resolution, I will write a few things that may be useful for novice users. May also be useful: , .
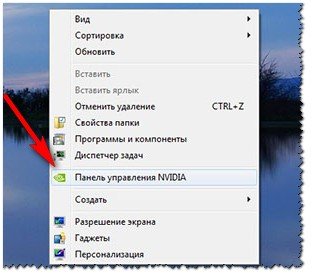
When installing drivers for popular video cards from NVIDIA, AMD or Intel, a utility for setting up this video card is added to the control panel (as well as in the right-click menu on the desktop) - NVIDIA control panel, AMD Catalyst for managing Radeon graphics, Intel HD graphics control panel. To enter the control panel, you can use the search in the Windows 10 taskbar, and after entering it, to see the desired item, change the “View” field at the top right from “Categories” to “Icons”.

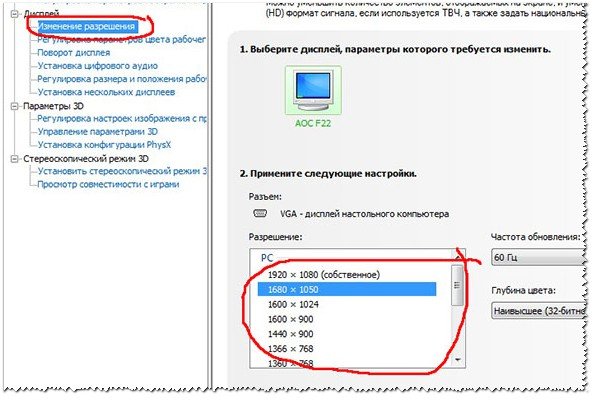
In these utilities, among other things, there is also the ability to change the monitor screen resolution, an example is in the screenshot above.
Using the control panel
Screen resolution can also be changed in Control Panel in the more familiar "old" Display Settings interface. Update: this option to change the resolution has been removed in the latest versions of Windows 10 - when you select the appropriate items, you will be taken to the new System Settings.
To do this, go to the control panel (view: icons) and select “Display” (or type “Display” in the search field - at the time of writing, it returns the control panel item, and not the Windows 10 settings).

In the list on the left, select “Setting screen resolution” and specify the desired resolution for one or more monitors. When you click “Apply”, as in the previous method, you can either confirm or cancel the changes (or wait and they will be canceled themselves).

Video instruction
First, a video that demonstrates changing the screen resolution of Windows 10 in various ways, and below you will find solutions to typical problems that may arise during this procedure.
Problems when choosing a resolution
Windows 10 has native support for 4K and 8K resolutions, and by default, the system selects the optimal resolution for your screen (according to its characteristics). However, with some connection types and for some monitors, automatic detection may not work, and you may not see the one you need in the list of available resolutions.
In this case, try the following options:

Another common problem when changing the resolution is a poor-quality image on the screen (in this context, this may be useful:). This is usually caused by setting an image that does not match the physical resolution of the monitor. And this is usually done because the image is too small. In this case, it is better to return the recommended resolution, then increase the scale (right click on the desktop - screen settings - change the size of text, applications and other elements) and restart the computer.
It seems to have answered all possible questions on the topic. But if suddenly not, ask in the comments, there will be a solution.
Typically, the operating system itself determines the resolution for a particular monitor model. However, the automatically selected parameters do not always suit the user. For example, on a 21-inch monitor I couldn’t get used to the small icons for a long time, so at first I independently changed the resolution to a slightly lower one, which suited me. Today I will tell and show how to do this correctly using the Windows 7 operating system as an example.
There are three ways to solve this issue, but not everyone can use one of them. I'm talking about changing parameters using a proprietary utility, which can be installed along with the drivers. However, many users simply refuse to install it, so this method is not relevant for them.
Method one
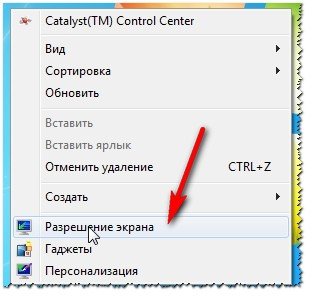
For example, let's take an Ati Radeon video card, along with which the proprietary Catalyst Control Center utility is installed, through which you can change various parameters. We launch the program (usually it is located in the tray), select the “Desktop Management” section, the “Desktop Properties” subsection. Here you will see the current desktop settings, including the screen resolution, which you can change to the one you need.

Second way
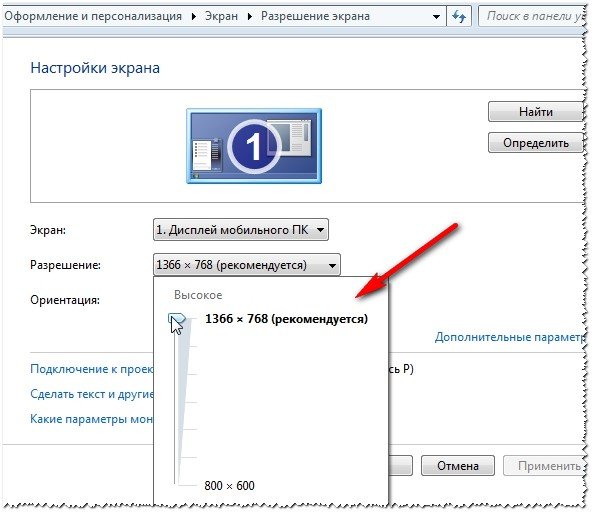
The next option is even simpler compared to the first. We go to the desktop, click on the right mouse button, after which a menu appears, in it select the “Screen resolution” item.

A window will open.

Here we “play” with the screen resolution - select and click OK.

Third way
Finally, the same thing can be done through the control panel.
Click the “Start” button and find the “Control Panel” item. Here we select the “Screen” section.

A window will open with the ability to enlarge icons on the desktop. On the left side of the screen there is an item “Setting screen resolution”, by clicking on which you can change the resolution.

As you can see, this process is very easy and simple even for a beginner. But what you shouldn’t do is change the refresh rate - it is optimal for the monitor, and if you set it to a mode that it does not support, the device may fail. Fortunately, this rarely happens in practice and concerns mainly CRT monitors, which are currently almost out of circulation.
Today we will learn how to change the screen resolution in Windows 10 in several ways and look at the problems associated with this. These include: the inability to change the resolution, small or too large font after changing it, blurred fonts, etc. Finally, it is suggested to watch a video that shows how to change the resolution using the operating system.
Resolution is the number of dots (pixels) that determine the size of the image on the screen of any display. The first number indicates the width of the image, and the second number indicates its height.
So that the image does not look too large, or, conversely, small, this parameter should be set to a resolution equal to the physical one (the number of elements of the display matrix that form the image). This information is indicated in the monitor manual, on the display box, and is often displayed on the screen if the latter’s settings are incorrect.
Let's use the Windows 10 settings dialog
The method that operating system developers propose to use and change the display resolution in Windows 10 is the simplest. This is the operation of the new system settings window.
1. Press Win→I to open the “Options” window.
2. Go to the “Devices” section.
3. On the “Screen” tab, go to “Advanced settings”.

The three previous items can be replaced by calling the Desktop context menu and selecting “Display Settings”.
If there are several information output devices, you must select the one you need in the window.
4. In the list, select the option marked “Recommended” (this is the native, physical resolution of your display) and press “Enter” or “Apply”.
After this, you should evaluate the image quality and, if something happens, the settings can be restored within 15 seconds with a single click. It is not recommended to do this when choosing the native resolution value; in just a couple of minutes the eyes will get used to the new parameters and the picture will not seem unusual, low-quality, too small, etc.
The same thing, but through the Control Panel
In Windows 10, this parameter is changed in the usual way from the “seven”. This is done in the Control Panel.
1. Call it via Win→X.
2. Set up a way to visualize elements in the form of icons.
Or simply find the “Screen” icon through the search bar in the top right corner.
3. Click on this icon.

5. Select a display if there are several of them.
6. Specify the value for each of them.
7. Click “Apply” to write new settings to the Windows 10 registry.

Changing the resolution through the video card settings program
You can change the display resolution using a program that is installed along with the driver for the video adapter.
Let's look at how this is done using AMD as an example.
1. Call the “Setup Radeon” command through the Desktop context menu.

2. Click “Settings”, then “Advanced settings”.

3. We accept the terms of the license agreement.
4. Add a custom permission by clicking “Create”.
5. Specify any values manually and click “Check” to test the new resolution.

What’s interesting is that in this way you can achieve any resolution in both planes, even non-standard.
With nVidia video cards, the same is done through the NVIDIA control panel, which is called up through the desktop context menu.

Possible resolution issues in Windows 10
“Ten” automatically selects the physical resolution of the display and supports high values for this parameter, including 4K and 8K. But in certain cases, this function may not work and the list of supported values may not include the “native” one for the display. Then click “Graphics adapter properties” at the bottom of the advanced display options window.

Then click “List of all modes”. In the dialog that appears with a list of available settings, select the desired option and click “OK” until all windows are closed if the selected value is satisfactory.
Additionally, you should visit the device support site to see if it has a new version of software for controlling the operation of the graphics adapter (you can also check the update through the video card control panel).

It may be necessary to completely remove the old version of the software to integrate the new driver into the system. In this case, you should use the DDU utility, which also supports Intel video cards.
Visit the support resource (developer) of your display for the latest driver for it. Windows 10 does not always cope with the task of updating monitor drivers through Update Center.
Problems often arise when using cheap Chinese cables for connecting a video card and monitor or adapters. Try to get rid of them or change the connection interface if possible.
The image quality of the background image may be low due to the low resolution of the background image itself; it should be replaced with a larger one and the result checked.
Good day! Many users understand permission as anything, so before starting to talk about it, I want to write a few words of introduction...
Screen resolution- roughly speaking, this is the number of image pixels per certain area. The more dots, the clearer and better quality the image. So, each monitor has its own optimal resolution, in most cases, which needs to be set for a high-quality picture on the screen.
In this article I will consider the issue of changing resolution, and typical problems and their solutions to this action. So …
What resolution should I set?
This is perhaps one of the most popular questions when changing resolution. I’ll give you one piece of advice: when setting this parameter, I primarily focus on ease of use.
As a rule, this convenience is achieved by setting the optimal resolution for a specific monitor (each has its own). Usually, the optimal resolution is indicated in the documentation for the monitor (I won’t dwell on this :)).
How to find out the optimal resolution?
2. Next, right-click anywhere on the desktop and select screen settings (screen resolution) in the context menu. Actually, in the screen settings, you will see the option to select a resolution, one of which will be marked as recommended (screenshot below).

You can also use various instructions for selecting the optimal resolution (and tables from them). Here, for example, is a clipping from one such instruction:
- - for 15-inch: 1024x768;
- - for 17-inch: 1280×768;
- - for 21-inch: 1600x1200;
- - for 24-inch: 1920x1200;
- 15.6-inch laptops: 1366x768.
Important! By the way, for older CRT monitors, it is important to choose not only the correct resolution, but also sweep frequency(roughly speaking, how many times the monitor blinks per second). This parameter is measured in Hz; most often monitors support modes of: 60, 75, 85, 100 Hz. To prevent your eyes from getting tired, set it to at least 85 Hz!
Changing the resolution
1) In video drivers (for example Nvidia, Ati Radeon, IntelHD)
One of the easiest ways to change the screen resolution (and in general, adjust brightness, contrast, picture quality and other parameters) is to use the video driver settings. In principle, they are all configured in the same way (I will show a few examples below).
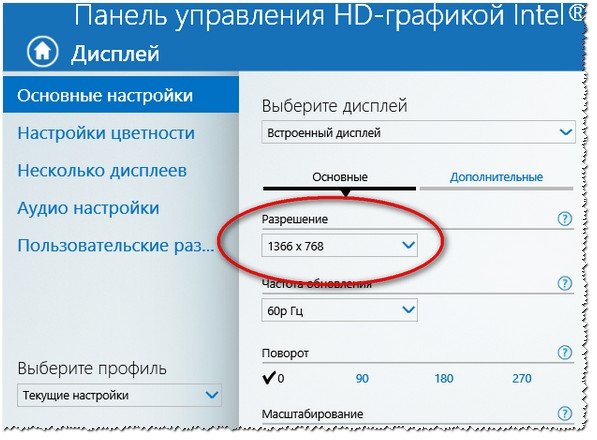
Intel HD
Extremely popular video cards, especially recently. In almost half of budget laptops you can find a similar card.
After installing the drivers for it, simply click on the tray icon (next to the clock) to open the IntelHD settings (see screenshot below).

Actually, in this section you can set the required resolution (see screenshot below).
AMD (Ati Radeon)
You can also use the tray icon (but not every driver version has it), or simply right-click anywhere on the desktop. Next, in the pop-up context menu, open the line “Catalyst Control Center" (note: see photo below. By the way, the name of the setup center may vary slightly, depending on the software version).


Nvidia
1. First, right-click anywhere on the desktop.
2. In the pop-up context menu, select “ Nvidia Control Panel"(screenshot below).
2) On Windows 8, 10
It happens that there is no video driver icon. This can happen for several reasons:
- reinstalled Windows, and you have a universal driver installed (which comes with the OS). Those. there is no driver from the manufacturer...;
- There are some versions of video drivers that do not automatically put the icon in the tray. In this case, you can find a link to the driver settings in the Windows Control Panel.
Well, to change the resolution, you can also use control panel. In the search bar, type “Screen" (without quotes) and select the coveted link (screen below).


3) On Windows 7
Right-click on the desktop and select " Screen resolution"(this item can also be found in the control panel).
Next you will see a menu that will display all the possible modes available for your monitor. By the way, the native resolution will be marked as recommended (as I already wrote, in most cases it provides the best picture).
For example, for a 19-inch screen the native resolution is 1280 x 1024 pixels, for a 20-inch: 1600 x 1200 pixels, for a 22-inch: 1680 x 1050 pixels.
Older CRT-based monitors allow you to set the resolution much higher than recommended for them. True, a very important quantity in them is frequency, measured in hertz. If it is below 85 Hz, your eyes begin to ripple, especially in light colors.
After changing the resolution, click "OK". You are given 10-15 seconds. time to confirm settings changes. If you do not confirm within this time, it will be restored to its previous value. This is done so that if your picture becomes distorted so that you cannot recognize anything, the computer will return to its working configuration.
4) On Windows XP
Almost no different from the settings in Windows 7. Right-click anywhere on the desktop and select “properties”.


Here you can select the screen resolution and color quality (16/32 bits).
By the way, the quality of color reproduction is typical for old CRT-based monitors. In modern ones the default is 16 bits. In general, this parameter is responsible for the number of colors displayed on the monitor screen. Only a person is practically unable to distinguish the difference between 32-bit color and 16-bit (perhaps experienced editors or gamers who work a lot and often with graphics). Whether it’s the butterfly’s business...
PS
For additions on the topic of the article, thank you in advance. I have everything for this, the topic is completely covered (I think :)). Good luck!
Very often users are faced with a situation where the monitor displays a “save mode”, “out of range” or “unsupported resolution” message, or «
»
.
This means that the video card settings have set a resolution that the monitor does not support.
On many forums and websites you can find the following advice:
“To change the screen resolution, you need to press F8 when loading Windows and set some minimum resolution, then reboot in normal mode and enjoy life.”
But, as practice shows, this does not always work.
I want to share 100% way to reset screen resolution on computer.
In order to reset the screen resolution, you really need to boot the computer in Safe Mode, but let's go point by point.
- When loading Windows, press F8;
- Select the item “boot the computer in Safe Mode”;
- Press the Windows + Pause key combination (we get into the properties of my computer), go to the Hardware tab, click the Device Manager button;
- Expand the list of Video adapters;
- Select your video adapter, call up the context menu and select Disable (Windows may ask “Do I need to remove drivers?” You can answer “no”, but sometimes it is necessary);
- Reboot the computer in normal mode;
- And now you don’t need to do anything, we see a miracle, Windows will re-detect the video adapter and reset the monitor screen resolution.
This method has helped out many times.
There is another way to reset the screen resolution - return the old monitor or reinstall Windows :) Why are you laughing, on many forums I have seen advice about reinstalling Windows! Just imagine, a 5-minute problem can be solved in a few hours.
How to boot Windows 10 into Safe Mode to reset your graphics card
In the comments they asked the question (stated): " in windows 10 it is impossible to boot into safe mode without first enabling this option in the OS itself , and since it is impossible to enable this option without a working monitor, your advice for Win 10 users is not relevant. Any other thoughts that would be suitable for Win 10?
PS: I don’t have another monitor at hand, nor do I have a built-in video adapter. "
This is not entirely true... Yes, you can actually enable the boot menu only from the “working” Windows 10. But the boot menu, where there will be “Boot in Safe Mode” (Safe Mode), can be called up several times by rebooting the computer with the Reset button on the system unit. Windows 10 will understand that for some reason it cannot boot and will offer various recovery options. Once you boot into safe mode, you can perform all the necessary steps to reset the screen resolution in Windows 10, which are described above.
FAQ
Q: how to reset screen resolution via bios
A: information about screen resolution settings is stored in the operating system configs; you cannot reset the screen resolution through the BIOS