Any computer or laptop needs a good cooling system to function properly. During operation, elements such as a processor (CPU), video card, and motherboard generate a large amount of heat and become very hot. The higher the CPU performance rating, the more heat it produces. If the PC does not quickly remove air, this can lead to various system failures, incorrect operation of equipment, decreased performance, and cause failure of important elements. Why does the processor get hot? How to cool the CPU in PCs and laptops? Which cooler to choose for optimal PC cooling? We will try to answer these questions in this article.
Reasons for CPU overheating
If the computer starts to turn off, glitch, or freeze, this may be due to overheating of the CPU. The reasons why a PC processor begins to overheat are very different. Therefore, we will consider the main ones, and also give simple ways to solve problems.
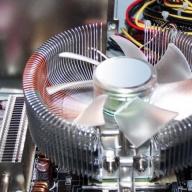
In most PCs and laptops, the main elements of the cooling system are the cooler (fan) and radiator, which are installed on the processor. Thanks to the tightest possible contact, heat transfer between the surface of the radiator and the processor is minimal, which in turn ensures fast, efficient heat dissipation.

The radiator can be monolithic or consist of two parts. In the first case, it is completely fixed on the processor (budget option), in the second case, only a small part of it is attached to the CPU, inside of which there are heat pipes that transfer heated air to the main radiator.
The primary role in the case ventilation and PC cooling system is played by the fan. Regardless of its location, it cools the entire radiator or its main part. The more efficiently it works, the better the heat dissipation from the CPU will be, and, accordingly, the lower its temperature. Heat pipe coolers provide greater CPU cooling.
If the processor starts to heat up, the main reasons include:
- deterioration of contact between the processor and the heatsink;
- speed reduction cooler (fan) operation;
- use of ineffective cooling systems;
- absence ventilation systems in the case, in the PC power supply;
- pollution ventilation holes housings with dust;
- failure cooling systems;
- wrong radiator fixation.
An increase in process temperature can also be caused by the fact that the cooler is trivial clogged with dust. For this reason, its speed and efficiency are reduced. The fan is simply not able to remove heat. To increase heat transfer, after replacing the CPU, it is worth purchasing and installing a new model of case cooler.
Another reason is upgrade PC. For example, after replacing an old CPU, a new, more powerful and productive one was installed. But at the same time, the fan in the cooling system remained the same. Due to the increase in power, the processor cooler simply does not fully cope with its task.
If the processor gets hot, let's consider what to do in this situation.
How can you cool the processor of a PC or laptop?
Overheating of the processor in laptops and desktop computers significantly increases the load on all system elements. To reduce heat generation and reduce energy consumption, you need to:
- check the condition of the cooling system, perform cleaning;
- reduce the load on the CPU;
- overclock the processor cooler;
- replace thermal paste;
- install additional coolers.
You can also reduce processor heat dissipation by BIOS settings operating system. This is the simplest and most accessible method that does not require much time or physical effort.
There are special technologies that reduce CPU frequency when idle. For AMD processor technology is called Cool'n'Quite, For Intel - Enhanced SpeedStep Technology. Consider how to activate it.
On Windows 7 you need to go to " Control Panel", select section " Power supply" In the window that opens, check which mode is active: “ Balanced», « High performance», « Energy Saving" To activate the technology, you can select any one, with the exception of “High Performance”. In Windows XP you need to select " Energy Saving Manager».
Energy Saving Settings must be enabled in the BIOS; if they are not, you can load the default settings.
It is equally important to pay attention to the system housing ventilation. If the cooling system is working properly and is regularly cleaned, but the CPU is still heating up, then you need to look to see if there are any obstacles in the path of air flow, for example, if they are blocked by thick cables.
The system unit or PC case should have two or three fans. One is for blowing on the front wall, the second is for blowing out on the rear panel, which in turn ensures good air flow. Additionally, you can install a fan on the side wall of the system unit.

If the PC system unit is in a bedside table inside the table, then do not close the doors so that the heated air comes out. Do not block the ventilation openings of the case. Place the computer a few centimeters from the wall or furniture.
You can purchase a special cooling pad for your laptop.
There is a large selection of universal models of stands on sale that adapt to the dimensions and size of the laptop. The heat-dissipating surface and the coolers built into it will contribute to more efficient heat removal and cooling.
When working on a laptop, always keep your work area clean. The ventilation openings must not be blocked by anything. Objects lying nearby should not obstruct air circulation.
For laptops you can also do overclocking the cooler. Since a PC has at least three fans installed (on the CPU, video card, built-in storage), and most laptop models have only one. The second one can be installed if you have a powerful video card. In this case, you can overclock coolers:
- through special utilities;
- via BIOS.
Before increasing the fan speed, you first need to clean the cooler and motherboard elements from dust.
Cleaning the cooling system of a laptop or desktop PC should be done at least once every six to seven months.
Cleaning the cooling system
If the processor gets hot, check the condition of the fan and the entire PC cooling system. Dust is a serious enemy of any technology. Clogged between the edges of the radiator, dust, lint, and pet hair impair air circulation.

To thoroughly clean it, you need to disconnect the cooler from the power supply and disassemble it. By removing the fan, you can also clean the dust that has accumulated on the radiator. The radiator and cooler blades can be cleaned with a special plastic spatula or a stiff brush. After removing dust, wipe the radiator with a damp cloth.

In addition to removing dust from the radiator and cooler, wipe the wires located in the case from dust. Blow or wipe the vents on the chassis.
Replacing thermal paste
Upgrading and replacing the thermal paste on the processor will help reduce the heat generated by the processor. Thermal paste is nothing more than a lubricant for cooling the processor. It acts as a heat conductor between the CPU and the heatsink, eliminates microscopic irregularities of the contacting surfaces, and removes air between them, which impedes heat dissipation. Good, high-quality thermal paste will reduce the temperature by 5–10 degrees.
Over time, the paste dries out, loses all its properties, and does not cool the processor. Therefore, it needs to be replaced every six months. If your PC has a more modern CPU, the thermal paste can be changed less frequently. You can purchase it at any computer store. Thermal paste must be of good quality.
Before you apply the thermal paste that cools the CPU, you need to get to the processor itself. For this:

How to choose a good thermal paste
Given the large selection of thermal pastes, many are interested in the question of which thermal paste is better. Note that the difference between pastes from different manufacturers can be from ten to twenty degrees. It all depends on the quality characteristics and heat-conducting properties of thermal interfaces. A good thermal conductivity paste should have low thermal resistance and high thermal conductivity.
According to experts, for cooling the processor you can purchase:
- Arctic Cooling MX-4.
- Arctic Silver Ceramique.
- Noctua NT-H1.
- Prolimatech PK-1.
- Thermalright Chill Factor III.
- Zalman ZM-STG2.
- Glacialtech IceTherm II.
- Coollaboratory Liquid Pro.

Some pastes can also be used to overclock the processor. For example, Arctic Cooling MX-4, Glacialtech IceTherm II, Thermalright Chill Factor III, Coollaboratory Liquid Pro. Knowing which thermal paste is better, how often and how to replace it correctly, you can significantly reduce the temperature of the CPU, thereby extending its service life.
How to cancel CPU overclocking
Many users, in order to improve performance and speed up the CPU, overclock the processor (overclocking). But in some cases, this procedure significantly increases the load on the CPU, which can negatively affect its functioning and lead to a decrease in operating life.
To check the performance of the CPU after overclocking, you need to warm up the processor using special utilities.
If you are interested in how to remove CPU overclocking, go to CMOS and BIOS. Cancel all motherboard voltage settings, return them to normal configuration.
Actions are performed in the following sequence:
- We go into the BIOS by pressing the desired button when starting the computer.
- Select the item “ Set BIOS Default/Use Default Settings", press Enter.
- A window will appear in which you need to press the Y key.
- After this, the original settings that were set before overclocking the CPU will be returned.
- Now we save all the changes made and exit the settings.
- Reboot the computer.
This can also be done by selecting the option “ Restore Fail Safe Defaults", after finding out on the Internet the exact specifications of the installed motherboard and CPU. This is necessary in order to make changes by setting the basic frequency and voltage settings.
In addition, you can change the system bus frequency and multiplier settings to the base value, returning back all the parameters that were changed during overclocking.
You can also remove additional cooling hardware that you installed to prevent the CPU from overheating.
You can manage and monitor the operation of the processor using a special utility - CPU Core, where you need to specify and set the required values of the multiplier and bus frequency.
Installing additional fans
If the CPU continues to heat up after cleaning and canceling overclocking, then in order to increase cooling efficiency, we recommend installing additional fans on the case to increase air circulation. This is necessary if there are many heating elements inside the system unit or if there is a rather small amount of free space inside it.
Give preference to large-diameter coolers, which will provide greater air flow at lower speeds. Such models work efficiently, but are noisy. When installing, consider the direction of their operation.
CPU coolers are classified into:
- Boxed, without heat pipes. The most common models. Consist of an aluminum plate with ribs. May have a copper base with a fan attached to it.
- Cooling systems based on thermal aluminum and copper tubes. They function by removing heat, which is carried out due to the liquid circulating in them. They have high efficiency indicators.
When choosing fans for the cooling system, read the installation instructions, check its compatibility with the socket, motherboard, and which socket is available for the processor. Consider weight, fan size, radiator type.

Too large, high-power fans will create additional stress on the motherboard and may cause its deformation. As for the size, select the housing to match the tire, take into account the location of other components. Choose products from well-known, trusted manufacturers.
If a large number of hard drives are installed, you can additionally install a fan on the front panel of the case, as well as on the rear upper part of the system unit to remove warm air outside. Modern cases allow you to install at least two fans: from the bottom, if there is no perforation on the front panel, and opposite the location of the hard drives.
If the PC has very advanced hardware and the processor gets hot, you can remove the side cover of the system unit. In this case, the cooling efficiency will be increased significantly.
How to overclock a cooler
You can overclock the cooler, as already noted, through the BIOS or using special free utilities that will allow you to monitor and control the speed of the fans. The programs are designed for various types of processors.
Let's look at how to overclock coolers via BIOS:

For processors Intel programs will allow you to reduce or increase the speed of rotation of the cooler Riva Tuner, SpeedFan. They have great functionality, a choice of settings, a clear interface, do not take up much space, and automatically control the operation of coolers.
If third-party PC software does not allow you to adjust the fan speed, the processor cooler can be controlled using original utilities from the manufacturers. For example, in the HP leptota there is a program Notebook Fan Control, in Acer - Smart Fan, ACFanControl. In Lenovo - Fan Control.
Modern “advanced” cooling systems, which are most often used in overclocking, include: radiator, freon, liquid nitrogen, liquid gel. Their operating principle is based on coolant circulation. The intensely hot elements heat the water, which is cooled in the radiator. It can be located outside the case or be passive, operating without a fan.
Conclusion
This article discussed various causes of processor overheating and solutions to this problem. Sometimes the reason for its occurrence can be ordinary dust, which periodically needs to be removed, or the consequences of inexperienced overclocking of equipment, as well as its upgrade. When replacing thermal paste, you must be careful and careful not to damage the equipment.
Video on the topic
Preface
Agree, the temperature is 66 o C for Athlone 1000 MHz (don’t laugh, my principle is that the main thing is not the iron, but what surrounds it) at rest, and at 100% load 75 o C is too much... Therefore, this unit was born.
This SVO was originally conceived as external - I put it in a corner and let it stand there, and only two hoses are suitable for the computer, in my opinion, and with ideas for the future, the system unit can be stuffed with something else, for example - neon lighting, UV lighting, beautiful round trains that glow in UV, etc. Unfortunately, the drawings of some elements have not been preserved, and they are not needed - everyone does everything for themselves, starting from the materials at their disposal. The main principle.
Components for SVO
Pump - Atman-103, sold at any pet store. Installed inside the expansion tank on the wall using suction cups.
The standard outlet fitting of the pump was thrown into the trash due to the fact that its diameter did not suit my needs (the diameter of the hoses). Instead, a homemade one was installed with an inlet diameter of 16 mm, an outlet of 10 mm (external diameters) and a transition cone.
The radiator is from a Toyota car heater, given by a friend for two kopecks of beer that they drank together. Cleaned of dirt with acetone, washed from the inside with the same, and painted on the outside with spray paint. The inlet and outlet fittings were replaced, again, with homemade ones. Installed flush with sealant. It turned out great - it doesn't leak anywhere.


Two fans purchased from an online store are installed on the radiator - they cool and look great!

I thought for a long time about how to attach the fans to the radiator. It turned out everything was simple - away with self-tapping screws and complex fasteners!!! Everything ingenious (well, I’m modest) is simple...
To attach the fans, I needed several rubber bands (erasers) from the nearest office supply store and cable ties.

The rubber bands are cut into cubes, ties are inserted into the mounting holes of the fans and secured with those same cubes.

Then the ties are inserted into the slots of the radiator.

We secure it on the reverse side with cut locks from the same ties. And this is what we get

I think it’s great... and simple!!! The expansion tank is a plastic food container, in my case round, but there are other shapes that can be found in a department store. To add liquid, the neck of a 5-liter water bottle is cut into the tank lid.

Hoses - silicone tube, internal diameter 8 mm, bought a liquid level at a hardware store.

Installed on fittings with pre-heated hoses for a more airtight fit. The landing spots are crimped with clamps from the nearest auto store.
Relay - BS 115C, purchased at a radio store. It is necessary to automatically turn on the CVO simultaneously with turning on the computer power.

The system is mounted on a platform made of plexiglass, I found it in the garage; since it was badly scratched, it had to be made matte. The tank is mounted on rubber gaskets to reduce vibration during pump operation.
To insert hoses into the computer case, an adapter panel is made from a standard plug. There are two fittings on it, a coolant inlet and outlet, and a 12V power connector.

The SVO panel is connected using this tail:

I pay special attention to safety precautions when handling electricity!
All current-carrying elements must be protected from accidental penetration of fingers!
In general the unit looks like this

The general dimensions of the system are: D270, Sh200, H160.
The water block is made of M1 grade copper. This copper blank was purchased at a non-ferrous metal collection point for 200 rubles. Its diameter is 65mm, height 25mm. It is assembled from two parts, a base and a lid, made in the form of a glass with holes for fittings. The thickness of the base is 5 mm, on it there are heat-removing fins 2 mm wide and 7 mm high with a pitch of 2 mm, for a total of 11 ribs. This product is made using lathe and milling machines. The design is absolutely sealed and tested under a pressure of 4 atmospheres.


The side of the bottom adjacent to the processor is polished. In order to prevent the water block from oxidizing and darkening over time (copper, after all), I had to cover it with a thin layer of automotive varnish from a can.
The water block fastening is individual for everyone, it all depends on the type of mother and the processor used. I took the simplest route. I installed metal stands in the holes near the processor on the motherboard (the main thing is not to forget about the dielectric spacers).

Small “ears” are made of fluoroplastic, with the help of which the water block is attached to the motherboard with screws. The beauty of this material is its strength and ease of processing; all you need is a knife. And it is also a little springy and, therefore, when installed on the processor, it will not allow you to tighten the screws until unwanted cracks form on it.

After final installation in the case, everything looks like this:


Computer cooling systems come in different types and varying efficiencies. Regardless of this, they all have the same goal: to cool the devices inside the system unit, thereby protecting them from combustion and increasing operating efficiency. Different systems are designed to cool different devices and they do this using different methods. This is, of course, not the most exciting topic, but that doesn’t make it any less important. Today we will look in detail at what cooling systems our computer needs, and how to achieve maximum efficiency of their operation.
To begin with, I propose to quickly go over cooling systems in general, so that we can approach the study of their computer varieties as prepared as possible. I hope this will save us time and make it easier to understand. So. Cooling systems are...
Air cooling systems
Today this is the most common type of cooling system. The principle of its operation is very simple. Heat from the heating component is transferred to the radiator using heat-conducting materials (there may be a layer of air or a special heat-conducting paste). The radiator receives heat and releases it into the surrounding space, which is either simply dissipated (passive radiator) or blown away by a fan (active radiator or cooler). Such cooling systems are installed directly into the system unit and on almost all heating computer components. The cooling efficiency depends on the size of the effective area of the radiator, the metal from which it is made (copper, aluminum), the speed of the air flow (on the power and size of the fan) and its temperature. Passive radiators are installed on those components of a computer system that do not heat up very much during operation, and around which natural air currents constantly circulate. Active cooling systems or coolers are designed mainly for the processor, video adapter and other constantly and hard-working internal components. Passive radiators can sometimes be installed for them, but always with more efficient heat removal than usual at low air flow speeds. This is more expensive and is used in special silent computers.
Liquid cooling systems
A wonderful invention of the last decade, it is used mainly for servers, but due to the rapid development of technology, over time it has every chance of moving into home systems. Expensive and a little scary if you think about it, but quite effective since water conducts heat 30 (or so) times faster than air. Such a system can simultaneously cool several internal components practically silently. A special metal plate (heat sink) is placed above the processor, which collects heat from the processor. Distilled water is periodically pumped over the heat sink. Collecting heat from it, the water enters the radiator cooled by air, cools down and begins its second circle from the metal plate above the processor. At the same time, the radiator dissipates the collected heat into the environment, cools and waits for a new portion of the heated liquid. The water in such systems can be special, for example, with a bactericidal or anti-galvanic effect. Instead of such water, antifreeze, oils, liquid metals, or some other liquid with high thermal conductivity and high specific heat capacity can be used in order to ensure maximum cooling efficiency at the lowest fluid circulation rate. Of course, such systems are more expensive and complex. They consist of a pump, a heat sink (water block or cooling head) attached to the processor, a radiator (can be either active or passive) usually attached to the back of the computer case, a reservoir for working fluid, hoses and flow sensors, a variety of meters, filters, drain taps, etc. (the listed components, starting with sensors, are optional). By the way, replacing such a system is not for the faint of heart. This is not a fan with a radiator for you to change.

Freon installation
A small refrigerator installed directly on a heating component. They are effective, but in computers they are mainly used exclusively for overclocking. Knowledgeable people say that he has more disadvantages than advantages. Firstly, condensation that appears on parts that are colder than the environment. How do you like the prospect of liquid appearing inside the holy of holies? Increased energy consumption, complexity and considerable price are minor disadvantages, but this does not make them advantages either.

Open cooling systems
They use dry ice, liquid nitrogen or helium in a special tank (glass) installed directly on the cooled component. Used by the Kulibins for the most extreme overclocking or overclocking, in our opinion. The disadvantages are the same - high cost, complexity, etc. + 1 is very significant. The glass must be constantly filled and periodically run to the store for its contents.

Cascade cooling systems
Two or more cooling systems connected in series (for example, radiator + freon). These are the most complex cooling systems to implement, which are able to work without interruption, unlike all the others.
Combined cooling systems
These combine cooling elements of various types of systems. An example of a combined type is Waterchippers. Waterchippers = liquid + freon. Antifreeze circulates in the liquid cooling system and, in addition to it, is also cooled by a freon unit in the heat exchanger. Even more difficult and expensive. The difficulty is that this entire system will need thermal insulation, but this unit can be used for simultaneous effective cooling of several components at once, which is quite difficult to implement in other cases.
Systems with Peltellier elements
They are never used independently and, in addition, have the least effectiveness. Their principle of operation was described by Cheburashka when he invited Gene to carry the suitcases (“Let me carry the suitcases, and you carry me”). The Peltellier element is mounted on a heating component, and the other side of the element is cooled by another, usually air or liquid cooling system. Since cooling to temperatures below ambient is possible, the problem of condensation is also relevant in this case. Peltellier elements are less efficient than freon cooling, but they are quieter and do not create vibrations like refrigerators (freon).
If you have never noticed, there is a constant flurry of activity inside your system unit: current is running back and forth, the processor is counting, the memory is remembering, programs are running, the hard drive is spinning. The computer works, in a word. From a school physics course we know that passing current heats up a device, and if the device gets hot, then this is not good. In the worst case, it will simply burn out, and in the best, it will simply work poorly. (This is indeed a common cause of a weak braking system). It is to avoid such troubles that there are several types of different cooling systems inside your system unit. At least for the most important components.
Cooling the system unit
How is cooling done? Mainly by air. When you turn on the computer, it starts to hum - the fan turns on (very often there are several of them), then it goes quiet. After a few minutes of operation, when your system has reached a certain temperature threshold, the fan turns on again. And so all the time of work. The largest and most visible fan inside the system unit simply blows the heated air out of the box, which cools everything together, including components that are difficult to install their own cooling system on, such as a hard drive. According to the laws of the same physics, instead of heated air, cooled air enters through special ventilation holes in the front part of the system unit. More precisely, one that simply hasn’t had time to warm up yet. While cooling the internal parts of the computer, it heats up itself and exits through holes in the side and/or rear panel of the system unit.
CPU cooling
The processor, as a very important and constantly loaded component of your iron friend, has its own cooling system. It consists of two components - a radiator and a fan, of course smaller in size than the one we just talked about. A heatsink is sometimes called a heat sink, due to its primary function - it dissipates heat from the processor (passive cooling), and a small fan on top blows heat away from the heatsink (active cooling). In addition, the processor is lubricated with a special thermal paste that promotes maximum heat transfer from the processor to the heatsink. The fact is that the surfaces of both the processor and the radiator, even after polishing, have notches of about 5 microns. As a result of such notches, a thin air layer with very low thermal conductivity remains between them. It is these gaps that are covered with a paste made from a substance with a high thermal conductivity coefficient. The paste has a limited shelf life, so it needs to be changed. It is convenient to do this simultaneously with cleaning the system unit, which we will talk about below, especially since old paste can generally have the opposite effect.
Cooling the video card
A modern video card is a computer inside a computer. A cooling system is extremely necessary for it too. Simple and cheap video cards may not have a cooling system, but modern video adapters for gaming monsters absolutely need refreshing coolness, perhaps even more than you do in forty-degree heat.
Dust pollution
Along with the air from the room, dust enters your system unit. Moreover, even in a regularly cleaned and ventilated room, there is surprisingly enough dust to entangle your brand new spinner in long, unpleasant-to-the-eye tufts of wool that came from nowhere, in just a few months of daily work. This has the opposite effect - the ventilation holes become clogged, and the “shags” (besides the fact that they physically prevent the fan from spinning) are no worse than a mink coat and will warm your computer right up to the processor, not only in the tropical heat, but also in the polar blizzard. A person, as far as I know, gets sick from hypothermia, but a computer can easily get sick from overheating. We treat the poor fellow approximately once every six months, not with antibiotics and hot tea with raspberries, but with a vacuum cleaner. Preferably purchased from a special computer store. The usual one will do in a very last resort, but you should be extremely careful with static electricity. The internal components really don't like it.
Cleaning the cooling system
The first sign of a poorly functioning system or not working at all is that the fan does not hum and the system unit heats up. By the way, this is a common reason for the computer to turn off on its own or for the system to work too slowly, and the diagnosis is so simple that it may simply not occur to you. And so it begins: updating drivers, scanning with an antivirus, hardware updating the system, purchasing additional RAM modules and other sad movements. Funny? Rather sad. We urgently open the patient up and see what’s inside. Before doing this, it is advisable to look for the exact algorithm for carrying out the procedure in the technical documentation from the motherboard manufacturers.
In principle, there is nothing complicated in cleaning the system unit. You need to turn off the computer, remembering to unplug the cord from the outlet, disassemble the system unit and carefully clean all the insides from dust. Stores sell special vacuum cleaners that are best used to do this. The most dust accumulates on the radiator with the fan and near the ventilation holes on the system unit. Carefully remove dust accumulations from them and lubricate them if necessary (you need to remove the sticker on the fan and drop a few drops on the fan axis). Sewing machine oil is a good choice. In addition, you need to clean the processor from the old thermal paste and apply new one to it. We repeat similar actions with the video card and the system unit fan. All that remains is to assemble the computer and use it for a few more months before cleaning the system unit again. Laptops also need to be cleaned, and judging by my experience, somewhat more often than stationary ones (small distances between components inside the laptop and the consumption of cookies and sandwiches next to it do their dirty work). Many users easily cope with this procedure without the help of computer specialists, but it is better not to rush, especially with laptops, if you do not feel confident enough. Risks: static electricity can damage the motherboard, processor or anything else, and you yourself, due to inexperience, can easily damage something important. Jokes aside, but you really need to do this, otherwise an infinite number of problems may arise.
If you cleaned your computer, but it did not bring noticeable relief, you may need to install a stronger cooling system. In the mildest cases, an additional fan may help. To find out the degree of heating of system components, you can look at the website of the motherboard manufacturer. It is quite possible that you will find special software there that will help determine this. Average indicators for the processor are 30-50 degrees, and in load mode up to 70. The hard drive should not heat up more than 40 degrees. More accurate indicators should be checked in the technical documentation.
In conclusion, I would like to say that in 90 (if not more) percent of cases, a standard standard cooling system is quite suitable. Tossing between quality and price, as well as implementing a cooling system in your computer (sometimes this is quite risky and not at all easy) is really necessary for owners of servers, powerful gaming computers and fans of experimenting with overclocking. If you are buying a computer for your home or office, you just need to ask what’s inside it, so that the manufacturer’s possible savings don’t come back to bite you.
Support the project
Friends, the Netcloud website is developing every day thanks to your support. We plan to launch new article sections, as well as some useful services.
You have the opportunity to support the project and contribute any amount you consider necessary.
In this article I will try to talk about my attempt to make a water cooling system for a processor at home. At the same time, I will describe the main points and technical subtleties using the example of my own experience. If you are interested in a detailed illustrated guide to the manufacture, assembly and installation of such a system, then welcome to cat.
Traffic, lots of pictures! Video of the manufacturing process at the very bottom.
The idea of creating more efficient cooling for my home computer arose while searching for a way to increase the performance of my computer by “overclocking” the processor. An overclocked processor consumes one and a half times more power and heats up accordingly. The main limiter to buying a ready-made one is the price; buying a ready-made water cooling system in a store is unlikely to cost less than a hundred dollars. And budget liquid cooling systems are not particularly praised in reviews. So it was decided to make the simplest SVO independently and at minimal cost.
Theory and assembly
Main details

- Water block (or heat exchanger)
- Centrifugal water pump (pump) with a capacity of 600 liters/hour.
- Cooling radiator (automotive)
- Expansion tank for coolant (water)
- Hoses 10-12 mm;
- Fans with a diameter of 120mm (4 pieces)
- Fan power supply
- Consumables
Water block
The main task of the water block is to quickly remove heat from the processor and transfer it to the coolant. Copper is most suitable for these purposes. It is possible to manufacture a heat exchanger from aluminum, but its thermal conductivity (230 W/(m*K)) is half that of copper (395.4 W/(m*K)). The design of the water block (or heat exchanger) is also important. The heat exchanger device consists of one or more continuous channels passing through the entire internal volume of the water block. It is important to maximize the surface of contact with water and avoid stagnation of water. To increase the surface, frequent cuts are usually used on the walls of the water block or small needle radiators are installed.


I wasn't trying to make anything complicated so I started making a simple water container with two holes for the tubes. The basis was a brass pipe connector, and the base was a copper plate 2 millimeters thick. Two copper tubes of the same diameter as the hose are inserted into the same plate from above. Everything is soldered with tin-lead solder. When making a larger water block, at first I didn’t think about its weight. When assembled with hoses and water, more than 300 grams will hang on the motherboard, and to make it lighter we had to use additional hose mounts.
- Material: copper, brass
- Connection diameter: 10 mm
- Soldering: Tin-lead solder
- Mounting method: screws to the store cooler mount, hoses are secured with clamps
- Price: about 100 rubles
Sawing and soldering


water pump
Pumps can be external or submersible. The first one only passes it through itself, and the second one pushes it out, being immersed in it. Here we use a submersible one, placed in a container with water. I couldn’t find an external one, I looked in pet stores, and they only had submersible aquarium pumps. Power from 200 to 1400 liters per hour price from 500 to 2000 rubles. Powered from an outlet, power from 4 to 20 watts. On a hard surface the pump makes a lot of noise, but on foam rubber the noise is insignificant. A jar containing a pump was used as a water reservoir. To connect the silicone hoses, steel clamps with screws were used. To make it easy to put on and remove the hoses, you can use an odorless lubricant.


- Maximum productivity - 650 l/h.
- Water rise height – 80 cm
- Voltage – 220V
- Power – 6 W
- Price - 580 rubles
Radiator
The quality of the radiator will largely determine the efficiency of the entire water cooling system. Here we used a car radiator heating system (stove) from a nine, bought an old one at a flea market for 100 rubles. Unfortunately, the interval between the plates in it turned out to be less than a millimeter, so I had to manually move apart and compress the plates several at a time so that weak Chinese fans could blow it through.- Tube material: copper
- Fin material: aluminum
- Size: 35x20x5 cm
- Connection diameter: 14 mm
- Price: 100 rubles
Airflow
The radiator is blown by two pairs of 12 cm fans at the front and rear. It was not possible to power 4 fans from the system unit during testing, so we had to assemble a simple 12-volt power supply. The fans were connected in parallel and connected according to polarity. This is important, otherwise the fan will most likely be damaged. The cooler has 3 wires: black (ground), red (+12V) and yellow (speed value).


- Material: Chinese plastic
- Diameter: 12 cm
- Voltage: 12V
- Current: 0.15 A
- Price: 80*4 rubles
Note to the hostess
I did not set the goal of reducing noise because of the cost of the fans. So a fan for 100 rubles is made of black plastic and consumes 150 milliamps of current. These are the ones I used to blow the radiator, it blows weakly, but it’s cheap. Already for 200-300 rubles you can find much more powerful and beautiful models with a consumption of 300-600 milliamps, but at maximum speed they are noisy. This can be solved with silicone gaskets and anti-vibration mounts, but for me the minimum cost was decisive.power unit
If you don’t have a ready-made one at hand, you can assemble the simplest of available materials and a microcircuit that costs less than 100 rubles. For 4 fans, a current of 0.6 A is required and a little in reserve. The microcircuit provides approximately 1 ampere at a voltage of 9 to 15 volts, depending on the model. You can use any model, setting 12 volts with a variable resistor.


- Tools and soldering iron
- Radio components
- Chip
- Wires and insulation
- Price: 100 rubles
Installation and testing
Hardware
- Processor: Intel Core i7 960 3.2 GHz / 4.3 GHz
- Motherboard: ASUS Rampage 3 formula
- Power supply: OCZ ZX1250W
- Thermal paste: AL-SIL 3
Software
- Windows 7 x64 SP1
- Prime 95
- RealTemp 3.69
- CPU-z 1.58


I didn’t have to test it for a particularly long time, because... the results did not even come close to the capabilities of an air cooler. The radiator of the cooling system has so far been blown by only two Chinese fans out of 4 possible, and they have not yet been moved wider than the plates for better ventilation. So, in energy saving mode and zero load, the processor temperature in air is approximately 42 degrees, and in a homemade air cooler it is 57 degrees. Running the prime95 test on 4 threads (50% load) warms up to 65 degrees in air and up to 100 degrees in 30 seconds in the air cooler. When overclocking, the results are even worse.
An attempt was made to make a new water block with a thinner (0.5 mm) copper base plate and almost three times more spacious inside, albeit from the same materials (copper + brass). The plates in the radiator were moved apart for better ventilation and two more fans were added, now there are 4 of them. This time, in power saving mode and zero load, the processor temperature in the air is approximately 42 degrees, and in a homemade air cooler it is approximately 55 degrees. Running the prime95 test on 4 threads (50% load) warms up to 65 degrees in air and up to 83 degrees in CBO. But at the same time, the water in the circuit begins to heat up quite quickly and after 5-7 minutes the processor temperature reaches 96 degrees. These are readings without overclocking.


Assembling the SVO was, of course, interesting, but it was not possible to use it to cool a modern processor. In older computers, a stock cooler works great. Maybe I selected low-quality materials or made the water block incorrectly, but it doesn’t seem possible to assemble the SVO for less than 1000 rubles at home. After reading reviews of budget ready-made air coolers available in stores, I did not expect that my homemade product would be better than a good air cooler. I concluded for myself that it is not worth saving in the future on components for the air defense system. When I decide to buy an SVO for overclocking, I will definitely assemble it myself from separate parts.
Video
Charging the system is simple. This can be accomplished in two ways. The first one took about two minutes, including deaerating the system. On the second one I had to spend all 15 minutes. Refilling using the second method took 5 minutes, apparently the necessary experience was gained.
The first way to refuel is:
Open the taps and lower the pump and the second tap into the basin so that the taps are covered with water. All other parts of the SVO should be lower in level.

We place the second tap above all the elements of the water supply system. We turn on the pump and watch how all the air leaves the system through it. In the end, a small fountain begins to flow - it’s time to close the second tap.

The second tap is closed. We put it aside and begin to rotate the radiator to remove air from it, after which we close the tap on the pump. This filling method is demanding on the volume of water, and the distillate costs money.
Therefore there is a second way:

For the second filling method, we need a fourth fitting, which is screwed to any of the taps, but preferably to the one on the pump. Moreover, the second faucet should not be higher in level than the entire “structure” on the first faucet. The “design” is a fitting with a piece of hose attached to it and a funnel at the end. Like this! The only difficulty is to hold the funnel, the second tap and the bottle and distillate. This requires one more person. Next, refueling continues as in the first method.

A fan should also be installed (possibly through a casing) and the system is ready. If you decide to hang the radiator from the back of the body, then before refueling you should insert the hoses through one of the places under the plug. The pump and taps are perfectly located inside the system unit.
So, the Gnome project is ready. Its creation took one day. Only publicly available components were used in the creation, except for the water block, which has not yet gone on sale. As for the new water block from ProModz, its use was due to the fact that it was at hand and, of course, because it was able to decorate our project with its appearance.
The cost of the project most depends on the price of the water block. It is quite possible to meet $70 (with a water block price of $22). This is a little more than planned at the beginning of the article, but this amount can be reduced by losing convenience.
For those who still can’t imagine an SVO without the use of an expansion tank, we present a budget version of the tank costing less than 100 rubles (30 minutes of work). Those. costs will decrease by about $5 (item “faucets and fittings”). The final cost of the SVO will be $65, but it will no longer be a “Gnome”.
Making an expansion tank

For the expansion tank we need two fittings with nuts, 4 rubber seals and a container for storing food. You should take a container with a tight lid and thick walls (1 mm), so the tank will be more reliable. In our case, the dimensions of the tank were 9 x 11 x 11 cm. It is quite compact; you can place it, for example, in a free basket for 3.5-inch devices.

After marking the holes, they should be cut out. You can drill holes, but this is for the most patient.

The hole should be cut a little smaller than necessary and as even as possible. Then the edges need to be trimmed with a soldering iron and brought to the desired diameter.

After the holes are ready, we begin to screw in the fittings. Rubber rings should be used on both sides to ensure a tight seal.

The expansion tank is ready.
It is quite difficult to make a leak-free, reliable tank the first time without using sealant or clear silicone glue. However, only such a procedure will preserve the good appearance of the structure. If we can talk about this in the case of a budget option.
The Gnome project can allow the user not to postpone the creation of a CVO for the future and take full advantage of its benefits. This project will either allow you to forget about the problem of good CPU cooling, or give you time to save up and expand the number of cooling points in the future. You can also do, for example, making a beautiful expansion tank from plexiglass, which, as a rule, does not work out the first time.
Do not deny yourself water cooling. Project "Gnome" will give you the pleasure of the advantages of water cooling - silence and high efficiency, at a minimum of costs.