Many users were dissatisfied with the appearance of the radically new Start menu in Windows 8 and in the new version of the operating system, Microsoft decided to listen to the demands of millions of users from around the world and gave them a choice: use the full-screen Start menu or install the classic version familiar to users Windows 7 and older versions of the operating system. Are you new to Windows 10? Here are instructions for changing the appearance of the Start menu in Windows 10.

The traditional Start menu, installed by default in Windows 10.
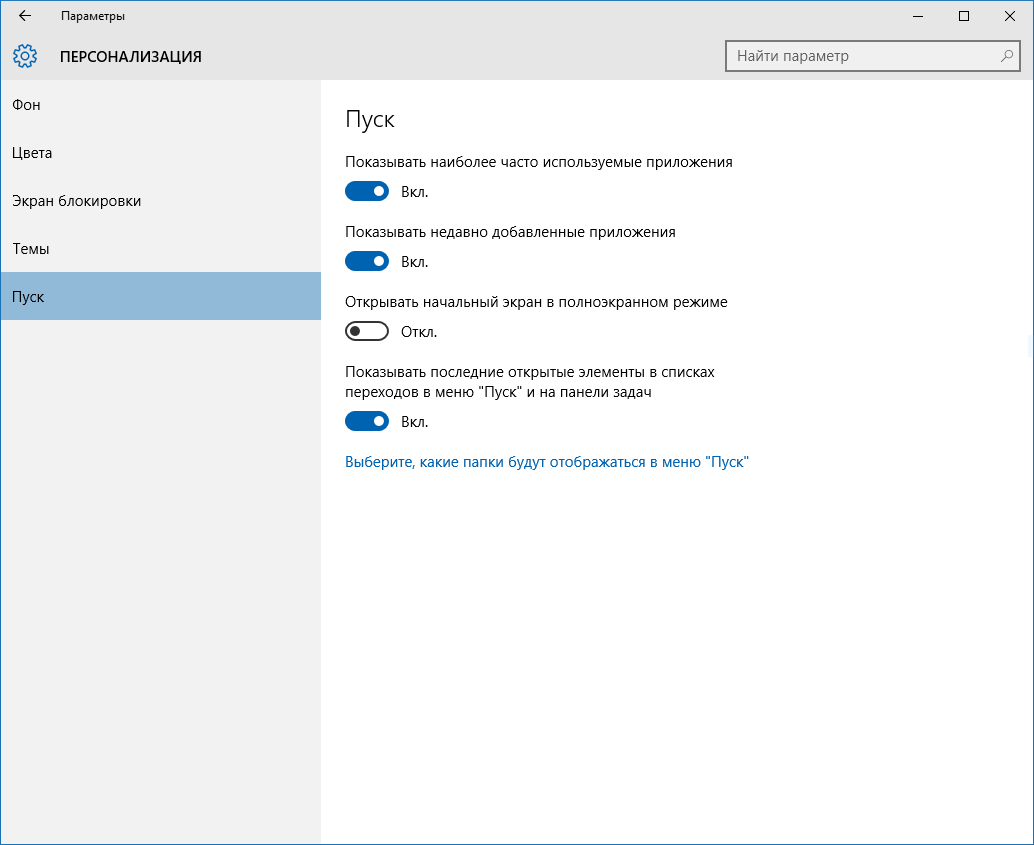
By default, Windows 10 comes with the classic design, which looks like a combination of the Start menu from Windows 7 and Windows 8. On the left side, you will find a list of frequently used applications and recently added ones, as well as a button that will open you a list of all installed applications. The right side of the menu displays all of your apps' pinned tiles, just like Windows 8.
The Start menu personalization window in Computer Settings.
If you prefer full-screen display mode or just want to try an alternative interface, you can change it as follows:

Full screen Start mode in Windows 10.
This will switch the Start menu to full-screen mode, similar to Windows 8. Note that in this case, the computer's power key will appear at the bottom left, along with the all applications button. A list of installed apps will open in the sidebar, and a button in the top left corner will take you to a panel with frequently used apps and four links to File Explorer, PC Settings, All Apps, and Power Management.
How do I turn off frequently used and recently added apps from showing in the Start menu?

Alternative Start Menu from Stardock.
Bonus.
Of course, no one has canceled third-party applications with which you can change the appearance of the Start menu. If you're still unhappy with the way Microsoft has changed the menu, you can install the classic option, which will look exactly the same as what is used in Windows 7. Please note that you need to use third-party applications for this. Stardock provide a great app called Start10 for just such purposes.
"Home Screen" Windows 10 borrowed some elements from previous versions of the OS. With Windows 7, the usual list was taken, and with Windows 8, live tiles were taken. The user can easily change the appearance of the menu "Start" built-in tools or special programs.
This article will look at some applications that change the appearance "Home screen", and will also describe how to do this without unnecessary software.
Method 1: StartIsBack++
StartIsBack++ is a paid program that has many configuration tools. Opening "Desktop" occurs without the Metro interface. Before installation, it is advisable to create a “Restore Point”.

Method 2: Start Menu X
The Start Menu X program positions itself as a much more convenient and improved menu. There are paid and free versions of the software. Next we will look at Start Menu X PRO.

Method 3: Classic Shell
Classic Shell, like previous programs, changes the appearance of the menu "Start". Consists of three components: Classic Start Menu (for the menu "Start"), Classic Explorer (changes the toolbar "Conductor"), Classic IE (also changes the toolbar, but for the standard Internet Explorer browser. Another advantage of Classic Shell is that the software is completely free.

Method 4: Standard Windows 10 Tools
The developers have provided built-in tools for changing the appearance "Home screen".
Hello dear readers of the blog site. The article below will show you one of the ways to install a theme on Windows 10 . By following a few simple steps you can make your computer brighter!
Brief instructions:
- Install the patch using the program " UltraUX Theme Patcher 3+". You can download it from this link
- Install and then configure the program" OldNewExplorer". It is designed to hide and show individual panels in Explorer. And you can download it
- Copy the desired theme to " C:/Windows/Resources/Themes/"
- Select it in the "Personalization" panel.
Detailed installation instructions without patch:
The new operating system offers the user a significant set of tools for personalization. However, to make your computer truly unique, follow a few simple steps:
To enable a pre-installed theme, use " Options". RMB on the desktop will open " Personalization". In the application " Options".
Here you can customize the desktop image, as well as the transparency of interface elements.
Important! Windows 10 themes are stored in the Themes folder.
Important! Themes pre-installed in Windows 10 cannot be deleted because... they are protected.
Installation
If you don’t like any of the proposed options for interface design, you can download and install new themes.

- RMB from the menu Start V Control panels turn on the small icons and " Personalization". Next click on " Other topics from the Internet».
- The official Microsoft website will open with different design options.
- Select the most suitable option and click " Download theme".
- Run the file downloaded from the Internet and after installing it, “ Personalization» changing theme in Windows 10.
- Find a suitable design option for your OS from a third-party creator and download it to your computer.
Good to know! All themes are in archives, for this reason it is better to create a folder with the appropriate name for each of them.
Unpack the archive into a folder and copy the files that appear to the directory Themes where are standard Windows 10 themes.
You can enable the new OS design in the same window where the standard themes are located.

The user may be able to customize the Windows 10 OS interface at his own discretion. It can turn standard themes on and off, download new ones from the Microsoft website or third-party developers, and use the dark version for design. All changes are made in the menu " Personalization».
Quite often, users, when deciding to change the design of their desktop, want to change the theme. In Windows, this feature is not available by default, so you have to change the way some system files work by removing the limitation. In Windows 10, the theme refers not only to the appearance of the taskbar and Start menu, but also to the screen saver, which affects the color scheme. There are different ways to establish a topic in a familiar or updated sense, let’s look at each of them.
Those who have previously installed themes on Windows 7 probably remember the principle of this procedure. Using a special utility, it was necessary to patch certain files. After this, the ban on installing themes was lifted. Now, as a harmless alternative, you can use themes from the Windows Store. They only change the color scheme and background image, but often this is exactly what certain users want.
Method 1: Microsoft Store
A simple method of installing a theme that does not require intervention in system files. To do this, you must have the “App Store” installed in Windows, through which further downloads will be carried out.
As a rule, such themes are just a selection of background images on a certain topic and a general color scheme, without fundamentally changing anything. Therefore, this option is suitable for users who want to replace the usual background with a set of wallpapers in a slide show format.
- Right-click on an empty space on your desktop and select "Personalization".
- Switch to the topic section and find the link on the right "More topics in the Microsoft Store".
- Will start "Shop" with applications and games from Microsoft. You will be immediately directed to the section "Windows Themes".
- Select the theme you like and open it. Some themes may require a fee. If you are not ready to pay, use free options.
- Click the button "Get".
- After a short wait, the download and installation will occur.
- Expand the personalization window - the downloaded design will be there.

Click on the theme and wait for it to install.
- To make the color of the task bar and other elements more suitable, click on "Color".
- Check the box next to the option if it's not worth it. Additionally, you can turn on transparency by clicking on the parameter knob "Transparency Effects".
- Go up and activate the item "Automatic selection of the main color background" or adjust the color manually using the presented color scheme or by clicking on the link "Additional color".


You can delete a topic by right-clicking on it and selecting the appropriate option.

Method 2: UltraUXThemePatcher
Unfortunately, any themes that are radically different from the standard design cannot be installed without tampering with system files. The UltraUXThemePatcher program patches 3 files responsible for the operation of third-party themes. We strongly recommend that you make a restore point before using this software.
Now all you have to do is download the application from the official website and follow our instructions.

- Download and run the program. In the welcome window, click "Next".
- Check the box next to accepting the license agreement and "Next".
- The second part of the license agreement appears. Click here "I agree".
- A new window will open the status of the three files that need to be patched. Usually all three files have the status "not patched", sometimes some do not require change. Click on "Install".
- In the window with status and logs you will see the status of each patched DLL: statuses “Backup completed!” And "File patched!" indicate successful completion of the procedure. The application will inform you that you need to restart your PC to make changes. Click "Next".
- You will be asked to thank the developer by transferring to PayPal. You can skip the step by clicking on "Next".
- In the final window, select the reboot option. "Reboot now"- automatic immediate reboot, "I want to manually reboot later"- manual reboot at any time. Press "Finish".


Now you need to find any theme to your taste and download it. It’s easy to find many sites with topics on the Internet; choose the most well-known and popular sources. Don't forget to check the downloaded files with an antivirus or online virus scanner.
Be sure to check the compatibility of the theme and Windows versions! Installing a theme that does not support your build may seriously disrupt the operating system.

- Download and unpack the theme. Find the folder in it "Theme" and copy the two files that are in it.
- Now open a new folder and navigate to the following path:
C:\Windows\Resources\Themes
- Paste the copied files from "Theme"(folder from Step 1) to the system folder "Themes".
- If a window appears asking you to give administrator rights to add files to the system folder, do this with the button "Continue". Additionally, check the box "Run for all current items".
- Directly from the folder, you can apply the theme by double-clicking with the left mouse button on the corresponding file.

If prompted by the security system, select "Open".
- Done, the theme is applied.

If your taskbar color has not changed, check the setting in "Windows Settings". To do this, right-click on the desktop, open "Personalization".
Switch to tab "Colors" and check the box next to the item "In the Start menu, taskbar, and action center".


The following elements will change color:

In the future, this topic can also be included through the folder "Themes" located inside the Windows folder, or go to "Personalization", switch to section "Themes" and select the desired option.

Right-clicking on a topic opens the item "Delete". Use it if the theme is not installed, you don’t like, or it doesn’t suit you.

Please note that in the downloaded folder with the theme you can also find other design elements: cursor, icons, wallpaper, skins for various software. This is not always all there; in some cases, the creator distributes only the theme without additional elements.

In addition, it is worth understanding that none of the above components are a mandatory part of the theme. Therefore, in most cases, users install the necessary elements separately manually or through special installers created by the developer. We recommend doing this only if you are installing the topic for a long time - otherwise, changing these elements every time may be impractical and time-consuming.
We looked at options for installing themes in Windows 10. The first method is suitable for unassuming users who do not want to manually select wallpapers and colors. The second method will be useful for confident users who don’t mind spending time working with system files and manually searching for topics.
One of the features of the latest version of the Microsoft operating system, Windows 10, is a large number of options and settings that offer the user advanced capabilities. In this article we will talk about themes for Windows 10, their configuration, installation and removal.
Go to the “Personalization” section in one of two ways.

How to Download and Apply New Themes on Windows 10

How to Use Third Party Themes on Windows
In addition to the themes that you can find on the official Windows media, there is a tool called UltraUXThemePatcher. It allows you to install other themes you find online on Windows 10 with the Creators Update.

The next step is to download the themes.

Windows will ask for permission to move files to this folder, after receiving permission the picture should look like the picture. Thus, you have downloaded the theme on Windows OS. Now you need to double click on the selected .theme file. The changes will be applied.
How to remove themes in windows 10
Use one of three methods.
Via control panel

Via Settings

Note! Original operating system themes cannot be removed from settings.
Via Explorer

How to activate black theme?
Many people prefer text on a dark background, especially when navigating menus on their computers. Some visually impaired users also find that a "dark" or high-contrast theme is much easier to read.
By default, Windows widgets, menus, the email client, and the Edge browser have black or blue text on a white or gray background. However, by tweaking a few settings, you can give the entire OS a dark theme.
- Go to Run using the key combination “Win+R”; enter regedit in the field.
- In the window that opens, click HKEY_LOCAL_MACHINE.

- Then press the SOFTWARE button.

- Then click the Microsoft button

- Click the “Windows” button.

- Next step, “Current Version”.

- Click the Themes button.

- Right-click on the panel window and select “New” - “Key”.

Select “New”, - “Key”
- Name the key "Personalization" and open it.

- Right click - click “New - DWORD 32 bit”.

- For the new section, use the name "AppsUseLightTheme".

- Open the DWORD by double-clicking and see if the value “0” is displayed, if not, you need to enter the number “0”.

- Go to the "Personalization" section.

- Repeat steps 9,10,11.

- Close Regedit and restart your computer.

The settings menu should now have white text on a black background (as shown below).

Installing the default aero theme
The storage location for standard Windows 10 themes is the Themes folder.
This PC → system drive → Windows → Resources → Themes.

Save the file and double-click it on your desktop.
The Aero Lite Theme will be applied.
Find out detailed information with step-by-step actions in the new article -
Video - How to install a theme on Windows 10