This software package of modern drivers is unique due to its positive advantages and a more advanced audio hardware control program. Realtek HD Audio is supported and capable of playing various audio formats with the best, and in some places, reference sound.
You can download the Realtek audio driver for Windows computer for free from the link at the bottom of the article.
This installer is suitable for all Windows systems:
The user does not need to think about compatibility with the installed operating system! This software is fully compatible with all popular versions of Windows OS: 7, 8, 10, Server 2003, Server 2008 (older versions are also supported: Windows 2000, Vista).Once you have downloaded the audio driver and installed it on Windows OS, the quality of audio recordings will improve quite significantly, the sound will become clearer and more intelligible. This will be especially noticeable if good speakers with a subwoofer are connected to the computer.

But not only true music lovers are able to hear the difference in sound. The sound will also be appreciated by ordinary users who prefer to communicate via Skype, as well as simple listeners of new music via an Internet browser. With such additions to the audio system, listening to your favorite tunes will become much more enjoyable, and voice communication with friends on the Internet will be richer and of higher quality.
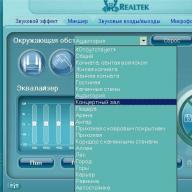
The realtek audio driver includes the Sound Effect Manager and Soundman applications. They match well with Direct Sound 3D, I3DL2, A3D.
The interface of the realtek program of this assembly is extremely clear and can be understood by any user, even those who are remotely versed in the issues of installing and configuring programs. There is an excellent settings system, thanks to which you can adjust the sound to your liking.
Realtek sound has an excellent ten-band equalizer and advanced gaming system capabilities with emulation of twenty-six sound environments. Also, this program supports musical instruments with MIDI and MPU401 drivers.
The provided set of drivers significantly improves the sound quality of the audio/video used. Its undoubtedly distinctive qualities and advantages deserve attention.

After installing Realtek HD Audio on your computer, you will certainly appreciate its capabilities and the improved sound quality of your player.
A very big advantage of this driver package for Windows is the ability to download and install them for free. Therefore, each user will be able to get the most out of their audio system without extra costs.
We present to your attention an updated version of the free driver package for audio devices from Realtek Semiconductor Corp. - Realtek HD Audio Drivers R2.82, which replaced the previous version - Realtek HD Audio Drivers R2.81. The driver for HDMI devices - Realtek HD Audio R2.70 for ATI HDMI Audio Device has not been updated.
Realtek HD Audio Drivers (High Definition Audio Driver) is a free official driver package designed for correct playback of audio streams running Microsoft Windows 2000, Windows XP, Windows Server 2003, Windows Vista, Windows Server 2008, Windows 7, Windows 8 operating systems. , Windows 8.1, Windows 10 - x86/x64. HD Audio (short for High Definition Audio) is a more progressive continuation of the AC'97 specification proposed by Intel in 2004, providing playback of more channels with higher sound quality than was provided using integrated audio codecs like AC "97. HD Audio-based hardware supports 192 kHz/24-bit audio quality in dual channel and 96 kHz/24-bit multi-channel audio quality (up to 8 channels).
The main advantages of the High Definition Audio specification are: full support for new audio formats, higher bandwidth, support for connecting audio devices using Plug and Play technology, more accurate speech recognition and input.

Key Features of Realtek High Definition Audio Driver:
– The driver package also contains Realtek Soundman and Realtek Sound Effect Manager.– WaveRT-based driver for Windows Vista.
– Compatible with Direct Sound 3D.
– A3D compatible.
– Compatible with I3DL2.
– User-friendly interface.
– Emulates 26 sound environments to enhance gaming capabilities.
– 10-band equalizer.
– Advanced settings panel.
– MPU401 MIDI driver to support electronic musical instruments.
Draw your attention to:
There are three driver versions Realtek HD Audio Drivers for audio devices:The first version is intended for integrated HD Audio in the operating system environment Windows 2000, Windows XP, Windows 2003 . Models supported: ALC1220, ALC1150, ALC880, ALC882, ALC883, ALC885, ALC886, ALC887, ALC888, ALC889, ALC892, ALC899, ALC861VC, ALC861VD, ALC891, ALC900, ALC660, ALC662, ALC663, A LC665, ALC667, ALC668, ALC670, ALC671 , ALC672, ALC676, ALC680, ALC221, ALC231, ALC233, ALC235, ALC236, ALC255, ALC256, ALC260, ALC262, ALC267, ALC268, ALC269, ALC270, ALC272, ALC273, ALC275, ALC276, ALC 280, ALC282, ALC283, ALC284, ALC286 , ALC290, ALC292, ALC293, ALC383.
The second version is intended for integrated HD Audio in the operating system environment Windows Vista, Windows 7, Windows 8, Windows 8.1 and Windows 10 . Models supported: ALC882, ALC883, ALC885, ALC886, ALC887, ALC888, ALC889, ALC892, ALC899, ALC861VD, ALC891, ALC900, ALC660, ALC662, ALC663, ALC665, ALC667, ALC668, ALC670, ALC67 1, ALC672, ALC676, ALC680, ALC221 , ALC231, ALC233, ALC235, ALC236, ALC255, ALC256, ALC260, ALC262, ALC267, ALC268, ALC269, ALC270, ALC272, ALC273, ALC275, ALC276, ALC280, ALC282, ALC283, ALC284, ALC 286, ALC288, ALC290, ALC292, ALC293 , ALC298, ALC383.
Version of the third option called ATI HDMI Audio Device Driver used for installation on systems with chip-based motherboards AMD with port HDMI.
DriverPack - full version , contains a driver database of 7 gigabytes in size. Suitable for burning to disk and installing drivers on a computer or laptop without Internet access.
DriverPack - light version , does not contain driver files, but accurately identifies the driver by id and offers downloading via the Internet. Used to install drivers on a computer or laptop via the Internet. It has a small size of only 7 megabytes.
 Updated driver installation and update program for windows 7 and XP- DriverPack Solution 14. Using this program, you can download drivers for a laptop or computer running the Windows 7 or Windows XP operating system. The package includes drivers for printers and cameras, as well as various drivers for radeon and nvidia video cards. The program contains a large archive of the latest drivers for the motherboard, including bluetooth, usb 2.0, ethernet, as well as drivers for netbooks. The new version includes the ability to monitor the system (processor temperature, hard drive), and you can also test RAM and clear the disk of unnecessary files. If the antivirus program is not installed or is outdated, DriverPack Solution 12 will also report this.
DriverPack Solution 14 suitable for various computer configurations and contains drivers for laptops:
Samsung, Asus, Acer, Hewlett-Packard, Lenovo, Toshiba, Fujitsu, emachines, DELL, MSI and other manufacturers.
Accurately determines the driver version and allows you to download and install free drivers for: network card, Wi-Fi, chipset, controller, modem, web camera, card reader, processor, touchpad, monitors, printers and scanners, various usb 2.0 and 3.0 devices. Drivers are installed automatically or manually in a few clicks. If the driver package does not contain the driver you need, the program will offer search for driver by id, which can be downloaded from the developer’s website.
A good place to start would be to make sure the microphone is working at all. This can be done by connecting it, for example, to another computer. If you are sure that the microphone is working, then move on.
Before changing anything in the system settings, first try connecting the microphone to the rear panel and check its operation. If the microphone does not work, try connecting it to the front panel (if you have one) and check the microphone operation again. At the same time, make sure that you do not mix up the sockets. On the back panel of the computer there are usually 3 sockets marked in different colors: pink (microphone), green (speakers), blue (line-in):
There are usually 2 jacks on the front panel: microphone and headphones. Moreover, on the front panel the connectors may not be marked in different colors, then you should pay attention to the icons next to these sockets: icons in the form of a microphone and headphones at the corresponding sockets. If the microphone does not work, then compare your settings with the settings presented in the screenshots. If, after setting the correct settings, the microphone still does not work, try updating your sound drivers, and then check all the settings again and test the microphone.
Driver versions from which the screenshots below with working settings were taken:
SoundMax sound driver for Windows 7
~ 15.3Mb (v.610X6585)
Realtek Sound Driver for Windows 7
~ 54.5Mb (R2.47)
New driver versions:
Attention! In new driver versions, some settings and interface elements of sound panels may differ from those shown in the screenshots!
SoundMax sound driver for Windows 7 (new version)
~ 14.9Mb (v.6.10.01.6620)
Realtek sound driver for Windows 7 32bit (new version)
~ 48.7Mb (R2.67)
Realtek sound driver for Windows 7 64bit (new version)
~ 52.9Mb (R2.67)
Realtek sound driver for Windows 7 32/64bit (new version)
~ 96.7Mb (R2.67)
If the “Front Soundbar” does not work, then you need to do the following:
1. Check the “Control Panel (SoundMax or Realtek)” settings. Bring them in line with the “working” settings in the screenshots.
2. Check the BIOS settings. There is a “Front Panel” setting in the BIOS. Has 2 meanings: HD Audio and AC’97. Try changing these values and test the operation of the “Front Sound Panel”.
3. Well, the “Front Sound Panel” itself must be connected by wires to the motherboard inside the system unit.
Screenshots were taken from computers on which the microphone works. One computer with SoundMax sound, the other computer with Realtek sound.
General system microphone settings
Start button -> Control Panel -> Sound
Select the Recording tab. Select Microphone and click the Properties button

Check the settings on all tabs: General, Listen, Special, Levels, Additional microphone functions, Advanced.


"Working" settings of the "SoundMax Control Panel"
If your computer runs on Windows XP, Vista or 7, and is also equipped with an audio chip from Realtek, then you need to have a special driver for sound to work. To activate it, type “Realtek” in the Start search. When you find Realtek HD Manager in the results, launch it. If this program is not in the search, then this driver is missing on the computer or the version is too old. This article will tell you how to install and configure the Realtek driver.
Installing the Realtek driver
Follow these step-by-step instructions if your computer does not have a driver or it is outdated.
- Download the current version of the required driver from the Realtek website or from our website using the following link: .
- Start the installation by running the downloaded file in “.exe” format.
- To continue the installation, click “Next”.
Attention: if during installation there is a warning that Windows does not know about the driver publisher, then simply click on “Install” to continue the installer.
- After installing the driver, restart your computer for all changes to take effect.
The Realtek HD Audio Manager sign on the taskbar will indicate that the software has been installed correctly. To go to the Realtek manager, simply double-click on the sign.
Realtek High Definition Audio Features and Settings
The Realtek audio codec supports 8-channel audio, Jack-Sensing, and many other features. In addition, it works successfully with Universal Audio Jack, making it easy to troubleshoot cable connection errors.
Realtek Audio Manager supports motherboards that work with Realtek's audio engine.
Note: All menus are listed below for reference and their names may differ greatly from what will be on your computer. In the environment of the above versions of Windows, Realtek HD Manager will automatically find devices connected to the ports. And depending on them, tabs with settings will already be shown. Also, the program interface may differ depending on the driver version or the model of the sound card installed on your computer.
For example:


Speakers Menu
First, a slider will open in front of you to adjust the volume of all devices. The panel located on the right will contain parameters related to the operation of audio output devices.

Digital output
To configure the digital audio input, do the following:
- In the “Advanced device settings” tab, you can configure the input jack separation parameters.
- After that, four more submenus will become available to you.
To set up speaker systems:
1.
Select the "Speakers" menu.
2.
To set the analog output port as the default device, click on “Set Default Device”.
3.
Select the "Speaker Configuration" menu located under "Speakers". The configuration options will be there. There you can also configure surround sound and specify the speaker configuration.

4. In the “Sound Effect” menu, you can set up karaoke, select the environment around you, and also choose one of several modes for the equalizer.

5.
To adjust the speakers, you need to go to the “Room correction” menu. There you can adjust the distance and angles based on your location. This is a very useful feature that comes in handy when you are not directly in front of the speakers, but stand in an asymmetrical position from them. But its operation is possible only in modes 5.1 and 7.1.
6.
The “Standard Format” menu is responsible for the mixer parameters. More specifically, for the sampling frequency and bit depth with which the OS will process outgoing sounds.

Microphone settings
You can configure your microphone in the last menu, which is called “Microphone”. At the top there will be sliders for adjusting the microphone volume and balance. Adjust them until you reach the desired volume.

This section is divided into two tabs: Microphone Effect and Standard Format.
In the “Microphone Effect” tab, you can change the conference mode parameters, as well as enable echo and noise suppression mode.
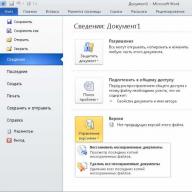
Information menu
By clicking on the information icon, which looks like the letter “i,” you can find out the program version, audio controller, DirectX, codec and select the program language.

Thank you for your attention! Write your clarifications on setting up Realtek High Definition Audio. 🙂