How to recover an unsaved document in Word
Long and painstaking work on a document can be undone by one careless click of a button or a system failure. However, unsaved documents can be restored, and in various ways. All you need to do is follow the steps described in the instructions below.
1. Did you mistakenly refuse to save the document and close it? Do not panic. Restart your computer immediately to prevent data from being overwritten. Open Word and you will see a list of unsaved documents on the left. Select the most complete or latest version of the document, copy the data and save it.
2. If the previous method did not work, check if you have autosave enabled. To do this, select " " - "Options" - "Save". Specify the frequency of automatic saving. Additionally, you can set the backup function to save data until the last change. Follow these steps to protect yourself from future losses.
3. If Word “does not see” a copy of the document, you need to find it manually. At 7 in Word, click "File" - "Open" - "Username" - AppData - Roaming - Microsoft - Word. All temporary files and editor backups are stored here. Click on “Date modified” so that the list starts with the most recent copy, select it and click the “Open and Restore” button.
4. In another version, to find out the path to temporary files and autosave, select in Word " " - "Options" - "Location". Double-click on “found automatically saved” to go to the folder and open the drop-down list to find out the entire path to the folder. In Word 2007, this feature is available by clicking the Microsoft Office button and going to " Options" - "Saving».
Note: If one of the folders is hidden (for example, AppData), click " Organize" - "Folder Options" - "View"" and select the option " Show hidden files, folders and drives" Now you can open any hidden folder through Word.
5. You can use the search to identify temporary or backup copies of documents. To do this, press the Win + F key combination and enter the desired extension * .tmp for temporary files * .asd for backups in the search bar. Specify the search area - “ My computer". Search filter: select the date the document was modified, for example, the current date. Open the found files in Word through “Open” - file type “all files”. Save the recovered data.
6. Sometimes Word saves temporary files with names starting with a tilde ~ . If the search for extensions from the previous paragraph did not produce results, change the parameters to ~ *. * Find a document with your title by selecting sort by type.
7. If none of the options work, there is a small chance to restore the document using special programs. One of these is EaseUS Data Recovery Wizard Free. During installation, do not select the disk on which you will restore data, otherwise the remaining files may be overwritten.
Please note that files with the *.asd extension are deleted when the editor is closed correctly, but are saved if the system crashes. Therefore, if you mistakenly close the program without saving, you are unlikely to find this copy of the document. In this case, the step described above will help - enabling the backup function of Word settings. Take the time to set up, specifying the autosave frequency and enabling other useful functions. In many cases, it is much easier to prevent data loss than to recover it later.
Recover documentWord
possible in several ways. Here we will look at how to find, create a backup copy and How recover unsaved documentWord. If a Word document has never been saved, it is difficult to restore it, although Word tries to save it if it fails.
To recover an unsaved Word document, first, you need to play it safe and configure Word to save the document. Let's consider several ways.
Autosave in Word.
How to setup autosave in Word During work and other ways to save a document, see the article "Saving a document in Word".
Recover documentWord, if autosave is configured. Close Word, then open it again. A dialog box appears on the left side of the Word window asking you to open the document that was saved during the failure. Click on the title of this document. The latest version of the document that is saved will open. Only the most recent, unsaved changes will be lost.
Even if the autosave function is configured, you can manually save the document more often by clicking the “Save” button.
BackupsWord.
Backups inWord are needed to save the document in the last saved version, i.e. no recent changes. Every time a document is saved, be it on a PC or on an external storage device (disk, flash drive, etc.), the backup copy will be updated.
Where are backups stored?Word.
Backups are stored in the same folder as the main document, only with the “wbk” extension. For example, “Copy. Article.wbk.”
Tune Word to create a backup copy on a laptop (PC). For example, we work in a Word document that is located on a flash drive, external drive, on the network, etc., i.e. The document is not on the laptop (PC), it is on external media.
Click on the “Office” button in the upper left corner of the Word window. In the window that appears, click on the “Word Options” button. In the window that appears, click the “Advanced” button. In the “Save” section, check the box next to “Copy deleted files to this computer and update when saving them.”
When you save a Word document on a flash drive, another removable device, it will automatically update and save a copy on your laptop (PC).
To create backupsWord, for documents that are on a laptop (PC), click on the “Office” button. In the window that appears, click on the “Word Options” button and select the “Advanced” section. On the right side of the dialog box, in the “Save” section, check the box next to the words “Always create a backup copy.”
How to open a backup inWord.
Click the “Office” button and select the “Open” function. Then, in the “File Type” section, select “All Files”. Select the folder in which you saved the backup. Now, click on the arrow in the words “Views” and select the “Customize” command.
In the “Name” section the name of the backup will be written like this. "Copy of the title of the document." And in the “Type” section it will be written “Microsoft Word Backup Document”. We find our document and double-click on it with the left mouse to open it.
If you need to open a backup copy in order to work in it, as in a regular Word document, then save the document using the “Save As” function, write the name of the document, indicate the location where to save it.
In Word 2013, when we click the “Office” - “Open” buttons? On the right side of the window that appears, at the bottom of the list of documents, click the “Recover unsaved documents” button.
How to find a Word document.
If the Word document crashed, we didn't find it in the folder, let's find it first. Click on the “Start” button at the bottom left of the monitor.
In the “Start Search” line, write the file name in full or in part.
If the required document is not in the list, the file name may have been written incorrectly. Click the “Show all results” button. An advanced search window will appear where you can enter additional information to search for the document.
We specify either a specific folder, or “Everywhere” - it will search in all folders. If our document was on removable media, a mobile device (flash drive, external drive, etc.), then before searching, we will connect this removable device to the computer. And in the search conditions we indicate “Removable disk...”. We indicate the date of creation or the date of modification, or do not indicate the date. You can specify the name of the author, the keyword that was specified when saving the document earlier (if you saved the document before), etc. We indicate all the information that we remember, the more and more accurate the information, the better. Click the “Find” button.
If there is no result again, click the “Search by file contents” button.
When you find a document, you can simply open it and save it in the desired folder. You can right-click on the document name and select the “Open storage location” function - the folder in which this document is located will open.
How to recover a deleted document inWord.
If you delete a document, you can find it in the Recycle Bin (a folder on your computer desktop). Look there.
If you find a document in the trash, then right-click on its name and select the “Recover” function. But, you must know which folder it will be restored to. Documents from the Recycle Bin are restored to the same folder from which they were deleted. P.e. you need to know which folder they were in. Or restore the document, then find it by searching.
Search for temporary Word files.
If searches yield nothing, you can look for temporary files. Click the “Start” button. In the line “Start search” we write *.TMP (in English letters). If there is no result, click the “Search everywhere” button. Then, you can click the “Advanced Search” function. How to search with advanced search is described above.
Some temporary files have names starting with a tilde (~). They may not appear in search results. Then write this name in the search bar. ~*.* Press “Enter”. If the document is not found, then click “Advanced Search”.
If a document is closed due to a failure, then the next time you open this document, Word tries to automatically restore the document. On the right, in the damaged Word document that opens, document options will be offered. You need to select the required document.
Force a Word document to open you can do this. Click the “Office” button, then click the “Open” function button. The Open Document dialog box appears. At the bottom right of this window, click the “Open” button (this button with an arrow). Select the “Open and Repair” function.Word has a special “Thesaurus” function that will help you find words that are similar or opposite in meaning, translate the word, select reference materials, etc. Read the article about this feature "
Finding and recovering an unsaved Microsoft Office 2010 document (or viewing a previous version) is possible thanks to the auto-save feature of the file at specified intervals. This applies to all documents created in Microsoft Word, Microsoft Excel and Microsoft PowerPoint.
You will need
- Microsoft Word, Microsoft Excel and Microsoft PowerPoint.
Instructions
Instructions
Probably each of you has ever encountered the problem of a lost file. You worked hard, created a document, edited it for a long time and even saved it. Or you spent a long time searching the Internet for a file with your favorite song or an interesting book, successfully downloaded it, and your browser confirmed the end of the download. But where is the file saved?! There are several options for finding a lost document or file.
You will need
Computer running operating system
Sponsored by P&G Articles on the topic "How to find a saved file" How to create a portable program How to save flash games How to clear the cache in opera
Instructions
First, you need to remember the file name or part of the name. If you can’t remember the file name, it doesn’t matter. Remember at least the date or time period when the save was made.
To start the search, right-click on the Start menu button. It is located in the lower left corner of your Windows desktop. Select “Open Explorer” from the context menu that appears. The system will open a window for you to search for your files. In the left part of the window that opens, select the folder in which to search. To search across all drives, select the Computer folder. Next, pay attention to the upper right corner. There you will see a small field with a magnifying glass on it.
If you remember the file name or part of the name, feel free to enter it in this field and press the “Enter” key on your keyboard. The system will search for files with similar names and display a list of results in the same window.
If you couldn’t remember the name of the saved file, try searching by the date it was saved. To do this, left-click on the field with a magnifying glass. In the drop-down menu, select “Date modified”. The system will show you a calendar for the current month and some standard search patterns such as “Yesterday”, “Earlier this year”, etc.
To enter a date, simply left-click on it. If you want to enter a date range, click on the first date in the range and, while holding down the Shift key, click on the second date in the range. The system will highlight the specified range in color and display its results in the search window.
Finally, if you're looking for a file created using one of the Microsoft Office applications, the algorithm is simpler. Use the File menu of the appropriate application. In this menu there is a section “Latest documents”. Take a look at this section and you will definitely find your saved creation there.
How simple
What a shame, typing for half a day and being asked “save or not” - click “no”. Sometimes the lights are turned off, or someone snagged the computer cord, and all the work is down the drain... But not everything is as sad as our thoughts portray to us. There is still an opportunity to restore a document that you have been working on for a long time, although it is not 100% that everything will work out...
First, let's look at Office 2010, they took care of such cases and added a special function to the office:
We return the document using Microsoft Word 2010 as an example:
To begin with, I will open the office, type some long text in a document, and purely by chance, when I close it, when asked “Save changes” I will click “no”
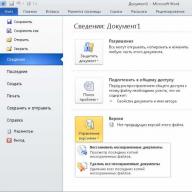
Now, shouting “What have I done” - I’m going to look for it, and what if I can restore it :). To do this, open Word 2010, go to “File” => “Information” => “Version Control” => “Recover Unsaved Documents”. In Excel 2010 - Recover unsaved workbooks. In Power Point - Recover unsaved presentations.

How to recover an unsaved Word document
A folder with auto-saved documents will open in a new window, select the file we need

How to recover an unsaved Word document
In the window that opens, select the document and open it, after opening it will remind you at the top that the document has not been saved. View, save

How to recover an unsaved Word document
By opening automatic saving you can take advantage of recovery! Suddenly the auto save opened with errors, this is where recovery will come in handy...

How to recover an unsaved Word document
You can find automatic saving files manually by going to the following path:
Windows 7/Windows Vista: C:\Users\username\AppData\Local\Microsoft\Office\UnsavedFiles
C:\Users\\AppData\Roaming\Microsoft\
Windows XP: C:\Documents and Settings\\Application Data\Microsoft\
For those who cannot find AppData, this is a hidden folder; how to display hidden folders was written earlier.
Documents are saved automatically in all versions and applications of Office. The default saving frequency is usually 10 minutes, but you can change the automatic saving time for documents:
you need to go to "File" => "Options"

How to recover an unsaved Word document
go to “Save” and set a convenient time for automatic saving of documents. I set myself 3 minutes, you set yourself as you wish

How to recover an unsaved Word document
Office 2007: setting up automatic saving here is the same as in Office 2010 (described just above).
If your document has been saved at least once, or has a name, then even if you are thrown out of the document after half an hour, when you open the old document, you will be prompted to restore the last copy. That is, if the document was not completed correctly, when opening the document you will be asked whether to open the original or auto save

How to recover an unsaved Word document
In Office 2003, too, when opening a document, it offers to restore the automatically saved file, or open the original. The truth here is that to set up automatic saving you need to go to “Tools” => “Options” => “Saving” => check the box “always save a backup copy” and set the time “autosave every”

How to recover an unsaved Word document
in Office 2003-2007, if it does not offer to restore the document itself, we do it forcibly:
- Word 2007: click the Microsoft Office Button => Open, select the Word document, click the down arrow on the Open button in the lower right corner of the "Open" screen => select "Open and Repair".
- Word 2003: file => Open, select the Word document, click the down arrow on the Open button in the lower right corner of the "Open" screen => select Open and restore.
There are a huge number of ways to restore Office 2003-2007 documents, and it all depends on whether the “always create a backup copy” checkbox was checked or not. If it is, you need to go to the search and look on the C: drive for files with the extension *.wbk, right-click on the found file and open it through Word 2003 or 2007.
I hope these methods are enough for you and you will find all your documents, and if not, write comments, I will try to help.
As you already understand, automatic saving is very helpful from various surprises, and the more often it happens, the better for you, because we are not always ready for any failures... Everything is always at the wrong time, when the muse visits us, then it’s sure to something nasty will happen :). Protect yourself from surprises! Good luck to you!
Read also: How to remove unnecessary programs from autostart in Windows;
How to configure automatic computer shutdown;
How to clean your keyboard and keep it clean.
vynesimozg.com
How to recover an unsaved document
Long and painstaking work on a document can be undone by one careless click of a button or a system failure. However, unsaved documents can be recovered, and in different ways. Just follow the steps described in the instructions below.
Did you mistakenly refuse to save a document and close it? Do not panic. Restart your computer immediately to prevent data from being overwritten. Open Word and you will see a list of unsaved documents on the left. Select the most complete or latest version of the document, copy the data and save it.

If the previous method did not work, check if you have autosave enabled. To do this, select “Tools” - “Options” - “Save”. Specify the frequency of automatic saving. Additionally, you can set the backup function to save data until the last change. Follow these steps to protect yourself from future losses.

If Word “does not see” a copy of the document, you need to find it manually. In Windows 7 in Word, click “File” - “Open” - “Username” - AppData - Roaming - Microsoft - Word. All temporary files and editor backups are stored here. Click on Date Modified to start the list with the most recent copy, then select it and click Open and Restore.

In another version of Windows, to find out the path to temporary files and autosaves, select “Tools” - “Options” - “Location” in Word. Double-click on “autosaved” to go to the final folder, and open the drop-down list to find out the entire path to the folder. In Word 2007, this function is available after clicking the Microsoft Office button and going to “Options” - “Saving”.

Note: If one of the folders is hidden (for example, AppData), click “Organize” - “Folder Options” - “View” in Explorer and select the “Show hidden files, folders and drives” option. Now you can open any hidden folder through Word.
You can use the search to find temporary or backup copies of documents. To do this, press the Win+F key combination and enter the required extensions in the search bar: *.tmp for temporary files or *.asd for backup copies. Specify the search area - “My Computer”. In the search filter, select the date the document was modified, for example, the current date. Open the found files in Word via “Open” - file type: “all files”. Save the recovered data.

Sometimes Word saves temporary files with a name starting with a tilde ~. If the search for extensions from the previous paragraph did not produce results, change the parameters to ~*.* Find a document with your name, sorting by type.

If none of the options work, there is a small chance to restore the document using special programs. One of these is EaseUS Data Recovery Wizard Free. You can download it here. During installation, do not select the disk on which you will restore data, otherwise the remaining files may be overwritten.

Please note that files with the *.asd extension are deleted when the editor is closed correctly, but are saved if the system crashes. Therefore, if you mistakenly close the program without saving, you are unlikely to find this copy of the document. In this case, the step described above will help - enabling the backup function in Word options. Take the time to configure settings, specifying the autosave frequency and enabling other useful functions. In many cases, it is much easier to prevent data loss than to recover it later.
SovetClub.ru
Where are temporary Microsoft Word files stored?

The MS Word word processor has a fairly well-implemented document autosave function. As you write text or add any other data to a file, the program automatically saves a backup copy of it at a specified time interval.
We have already written about how this function works, in this article we will talk about a related topic, namely, we will look at where temporary Word files are stored. These are the same backup copies, documents not saved in a timely manner, which are located in the default directory, and not in the location specified by the user.
Lesson: AutoSave Feature in Word
Why would someone need to access temporary files? Yes, at least to find a document whose saving path the user did not specify. The last saved version of the file, created in the event of a sudden termination of Word, will be stored in the same location. The latter can happen due to power outages or due to failures or errors in the operating system.
How to find the folder with temporary files
In order to find the directory in which backup copies of Word documents created directly while working in the program are saved, we will need to turn to the autosave function. More precisely, to its settings.

Note: Before you begin searching for temporary files, be sure to close all running Microsoft Office windows. If necessary, you can cancel the task through the “Dispatcher” (called by the key combination “CTRL+SHIFT+ESC”).
1. Open Word and go to the File menu.

2. Select the "Options" section.

3. In the window that opens in front of you, select “Save”.

4. It is in this window that all standard saving paths will be displayed.
Note: If the user has made changes to the default settings, they will be displayed in this window instead of the default values.
5. Pay attention to the “Saving Documents” section, namely, to the “Data Directory for AutoRecovery” item. The path next to it will take you to the location where the latest versions of automatically saved documents are stored.

Thanks to the same window, you can find the last saved document. If you don't know its location, pay attention to the path indicated next to the "Default local file location" item.

6. Remember the path you need to go to, or simply copy and paste it into the search bar of the system explorer. Press "ENTER" to go to the specified folder.

7. Based on the document name or the date and time it was last modified, find the one you need.
Note: Temporary files are quite often stored in folders named exactly like the documents they contain. True, instead of spaces between words, they have symbols like “%20”, without quotes.
8. Open this file through the context menu: right click on the document - “Open with” - Microsoft Word. Make the necessary changes, remembering to save the file in a location convenient for you.

Note: In most cases of emergency closing of a word processor (network outages or system errors), when you reopen Word, you will be prompted to open the last saved version of the document you were working on. The same thing happens when you open a temporary file directly from the folder in which it is stored.

Lesson: How to recover an unsaved Word document
Now you know where Microsoft Word temporary files are stored. We sincerely wish you not only productive, but also stable work (without errors and failures) in this text editor.
We are glad that we were able to help you solve the problem.
I was working in the program and saved the files I needed somewhere, how can I find them? The fact is that similar situations arise for me quite often, and I lose important information, and then I have to restore it for a long time.
Answer
If you work in Windows XP or Windows 2000 , then most often the files are saved in the following folder - c :\ Documents and Settings \ Name \ My Documents , Where Name- the name under which you log in.
If you have worked with applications MS Office, then you can try to find the files as follows: With:\ Documents and Settings \ Name \ Application Data \ Microsoft \ Office \Latest files . Log in and view all the files in this folder.
Also read about storage periods for documents in details.
When working with other software applications, files are automatically saved in folders with the name of these applications or the name of the manufacturers of these applications (for example, for the Fotoshop program, the folder is Adobe, and in this folder the application files) at the following address: c :\ Documents and Settings \ Name \ Application Data\ folder, with the name of the application in which it was developed or the name of the manufacturer's company . Enter the folders and view all the files in it.
If you've tried all the above tricks and haven't found the files you need, don't despair - there's another radical option. You can search for files using the search engine built into Windows. To do this, click Start, then Search and in the menu that opens, select For Files of Folders. In the window that opens, in the field Search for files or folders named enter the file type, for example:
- *.doc - all MS WORD files will be selected using this mask,
- *.xls for - MS Excel,
- *.jpg - for graphic files (for example, if you worked with a digital camera).
You can set additional search parameters by clicking on the inscription Search options and in the menu that opens, you can refine the search by indicating, for example, the date of modification or creation. To do this, check the box Date. You don’t have to select the search file type mentioned above, but simply click on the checkbox Type and indicate the type of file you are interested in.
This operation was described for Windows 2000. For Windows XP it is somewhat different. Click Start, then Find, Further Files and folders. In the left part of the window that opens, select Files and folders. After this, use either the file type (see above) or configure additional search parameters ( Date, File Type etc.) in the window that opens.
Try never to work from a floppy disk...
If you store your files on a floppy disk, do not work with those files directly from the floppy disk. Before starting work, copy them to your hard drive, and after finishing work, replace the old file on the floppy disk with a new one from your hard drive. As practice shows, the quality of floppy disks has dropped recently, and you can easily lose all your work along with the file. If you have important information, then work from a flash drive, they are not very expensive now. In addition, when you work from a floppy disk, no one can guarantee that the program you are working in does not create temporary files on the hard drive.
If you write files to floppy disks, make at least 3 copies. The author of these lines has more than once witnessed how out of three floppy disks, two successfully failed.
Try not to open letters that come from unfamiliar recipients.
They sent you a letter, but don’t rush to open it. First, make sure that the letter came from a known addressee. But even this is sometimes not a guarantee of safety. First, you need to scan the letter with an antivirus program. If you do not have on-the-fly scanning of incoming mail, copy the file to your disk and scan it using an anti-virus package.
Even if it is a harmless photo or a Word or Excel document, it can contain very nasty viruses that will “help” you lose all your information forever.
Do not work with files over the network without informing the owner of the computer whose files you are working with.
You found a file on the Internet, opened it and are working with it. You've worked hard and are looking forward to a well-deserved rest. Click Save file and….. the machine freezes, and you realize that all your work is irretrievably lost….
How to prevent this? Once you have opened the file over the network, do the following. Ask the owner of the computer on which you found the file not to turn off the machine yet, or simply save this file to your computer.
Be careful, 90 percent of our computer problems are our own fault!
Many inexperienced computer users cannot find a file downloaded from the Internet. It seems that the file was downloaded successfully, but where exactly is unclear. You can try to find it by opening all the folders in a row, but you can spend a year of your life without finding anything. So, what to do? Where are files saved on the computer? Where to look for them then?
Where are files saved in the browser?
But, let's figure it out gradually. Let's look at the procedure for searching for files using the most popular browsers.
If you use Internet Explorer, then before downloading the file, you can save the document to a location convenient for you by clicking “Save As”. After which, a new window should open in which you need to select the required folder and click “Save”. If you just clicked save and have no idea where the file was saved, then go to your browser settings, and then to “View downloads.” As a result, a list of downloaded files will open, from which you need to select the one you need.
The process of saving a file in the Opera browser is similar to the previous one. To search for a previously downloaded file, you need to find “All downloads” in the left functional panel and click on it, after which a list of all downloaded files will open, and all you have to do is find the one you need.
With the Firefox browser, things are somewhat more problematic. The problem is that when saving a file, it does not ask you to specify it for saving, and sometimes it is difficult to find it. To find the required download, follow the following menu chain: "Tools">"Downloads", and then find the required file in the window that opens.
If you are an ardent supporter of the Google Chrome browser, then you can find the just downloaded file in the panel below, or go to “settings”, select “downloads”, and look for it in the list.
It is also worth knowing where downloaded files are saved via the Torrent program. The file is saved in my documents or in the download folder, but the file storage location can be changed by going to the program settings.
If you have not changed the settings in the browser or torrent, then the files are saved by default in the folder at D:\Users\Username\Downloads.
Where are temporary files stored?
Many people are also interested in the question: where are temporary files saved? The location of the temporary files depends on what kind of files you are looking for.
Temporary program files are saved to the hard drive where the operating system is installed. That is, you need to open, for example, drive C, then go to the "Documents and Settings" folder, then to the "Username" folder, then to "Local Settings", and finally to the "Temp" folder (For Windows XP) or first drive C, then “Users”, then the “Username” folder, then “Local Settings”, and “Temp” (for Windows Vista and 7)
If you are interested in the location of the browser’s temporary files, then you should search for them in the chain drive C:\users\Username\Local Settings\Application Data\Browser name.
If all attempts to find a file are unsuccessful, but you remember at least part of its name, then use the standard Windows search.
Probably each of you has ever faced the problem of a lost file. You worked hard, created a document, edited it for a long time and even saved it. Or you spent a long time searching the Internet for a file with your favorite song or an interesting book, successfully downloaded it, and your browser confirmed the end of the download. But where is the file saved?! There are several options for finding a lost document or file.
You will need
- Computer running operating system
Instructions
First you need to remember the name file or part of the name. If you remember the name file If it doesn’t work, it doesn’t matter. Remember at least the date or time period when the save was made.
To start the search, right-click on the Start menu button. It is located in the lower left corner of your Windows desktop. Select “Open Explorer” from the context menu that appears. The system will open a window for you to search for your files. In the left part of the window that opens, select the folder in which to search. To search across all drives, select the Computer folder. Next, pay attention to the upper right corner. There you will see a small field with a magnifying glass on it.
If you remember the name file or part of the name - feel free to enter it in this field and press the “Enter” key on your keyboard. The system will search for files with similar names and display a list of results in the same window.
If you could not remember the name of the saved file, try searching by the date it was saved. To do this, left-click on the field with a magnifying glass. In the drop-down menu, select “Date modified”. The system will show you a calendar for the current month and some standard search patterns such as “Yesterday”, “Earlier this year”, etc.
To enter a date, simply left-click on it. If you want to enter a date range, click on the first date in the range and, while holding down the Shift key, click on the second date in the range. The system will highlight the specified range in color and display its results in the search window.
Finally, if you're looking for a file created using one of the Microsoft Office applications, the algorithm is simpler. Use the File menu of the appropriate application. In this menu there is a section “Latest documents”. Take a look at this section and you will definitely find your saved creation there.
Attention, TODAY only!
Everything interesting
An extension in Windows operating systems is a specific text in a file name that identifies its type and, therefore, the program (or list of programs) in which the file can be opened. Instructions 1Open the folder containing...
Very often, urgently needed files disappear somewhere. We get scared and think that there is no way to detect them. But in fact, finding a file is much easier than it seems. Instructions 1Search for a file by name. If you know exactly how...
The explorer.exe file is the Explorer system application used in Windows operating systems as an explorer. Explorer allows you to open files and folders in windows with a convenient user interface, and also displays...
The file name in Windows operating systems can be changed by the user at his discretion. The user does not have access to renaming only protected system files and files used by any program at a given time. ...
On local drives or external media with large amounts of memory, it is often difficult to find a specific file or folder. In Windows operating systems, the user is offered several ways to search for folders and files. Search for a folderIf...
Windows operating systems have standard tools for searching files, folders and applications on local and external storage media. Standard search engines in Windows are available to all users of a personal computer with Windows...
Total Commander software is designed for quick navigation through local and external drives of a personal computer, as well as for managing user and system files. In Total Commander, the user can delete,...
When there is a shortage of time, it can be difficult to quickly navigate through a huge amount of accumulated information and find the necessary file in the storage folders. If this situation is familiar to you, do not despair: there is a way out. You just need to use...
In the Windows operating system, files, depending on their type, are assigned one or another extension. Sometimes the user needs to find files with a specific extension. To make the search easier, you should use special techniques. ...
As a rule, changing a file type means changing the extension in its name - that part that is added to the right of the file name through a dot. By extension, the operating system determines which of the installed applications should...
The desktop in the graphical interface of the operating system is the main window from which the main interface controls are accessed. In addition to its basic functions, the desktop can be used as a regular folder for storing...
Sometimes it happens that the user forgets in which directory he saved the desired file. In the Windows operating system, it is not necessary to open all folders in a row to find it. It is much easier to use the search component. ...