Italic font is one of the most popular ways to highlight a piece of text and give it a certain significance. It is ideal for quotes, footnotes, titles and proper names. There are two special tags in HTML for displaying italics. In CSS, italic is controlled by the font-style property.
Italic or italic font?
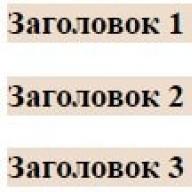
The display of the same font in italics may vary.
The picture shows three blocks of text in the same Playfair Display font. The first one is in normal roman style, while the second and third are italic. They are opened in the same Google Chrome browser, but they look completely different.
The fact is that some fonts have their own italic character sets. If the browser does not have access to this set, but encounters text that should be displayed as italic, it will attempt to slant it on its own.
In the second block - just such a browser-processed version, and in the third - the original italic version of the Playfair Display font, which has a unique style, more like a handwritten one. The browser, on the other hand, simply tilts each character of the text at a certain angle, imitating italics.
When figuring out how to make italics in CSS or HTML, it's important to remember that in the case of specific fonts, you need to make sure the browser has access to their italic sets. In some cases, the result of browser tilt algorithms may be unsatisfactory.
HTML cursive
There are two special tags for italic text in HTML: i (from the word italic) and em. The style of a text fragment enclosed in any of these descriptors will be the same.
The difference lies in the logical allocation. The em tag indicates the special significance of the fragment. This is important for search robots and screen readers, which will highlight the specified text using intonation.
font-style property
In CSS, italic is controlled by the font-style statement. It can take one of three basic values:
- normal - normal font;
- italic - italic style;
- oblique - oblique style.
Currently, most modern browsers treat oblique and italic values the same way, but it was originally assumed that the former was the result of special browser algorithms that slant each character to the right.
If the font you are looking for is not found by the browser, then italic will look exactly the same as oblique.
Unlike the em tag, it does not give the highlighted fragment special importance, it rather corresponds to the i descriptor.
Examples
Quotations are often highlighted in italics. Let's try to make it look nice.
Quote ( font-style: italic; border-left: 5px solid purple; padding-left: 20px; )
In addition to the decorative border on the right and padding, the quote block has a font-style rule with a value of italic.

It sets italic CSS.
Now we will study the main tags. Let's start with what tags are required on the page, forming its structure.
Block . The structure of the simplest page
The site page is a plain text file with the extension .html. Inside this file, the text of the HTML page is stored along with tags. This file must have the following tags: tag , which should contain the text of the entire site (everything that is written outside this tag will be ignored by the browser), and inside it there should be two more tags: tag
for page service content and tag - for the main text, which is visible on the browser screen.In service content, which is located inside the tag
, many different things come in, but for now we only need two of them. This is a tagHow this example looks in the browser, see this link.
I think after you read about the basic structure of the page, you still have some confusion about how it all looks in practice. Therefore, I made a special video in which I will show you how to make your first HTML page and run it in a browser (in it I will also talk about the title of the page, about encodings, about code design). Watch it and only then proceed to further reading:
Well, now, having learned how to create the simplest pages, we will move on to learning useful tags that should be used inside the tag
. These will be tags for paragraphs, headings, lists, links, and other useful things. So let's get started.Block . paragraphs
One of the main elements of the page are paragraphs. They can be compared to paragraphs in a book - each paragraph starts on a new line and has a so-called red line (this is when the first line of the text of the paragraph indents slightly to the right). By default, there is no red line, but it is easy to do (more on that later).
A paragraph is created using a tag
Thus:
This is a paragraph.
This is another paragraph.
And one more paragraph.
This is a paragraph.
This is another paragraph.
And one more paragraph.
Block . Headings h1, h2, h3, h4, h5, h6
In addition to paragraphs, important on the page are headlines. They can also be compared to headings from a book - each chapter has its own heading (the title of this chapter) and is divided into paragraphs, which also have their own headings. Well, the main text of the page is in paragraphs.
Headlines are being created using tags
,
,
,
,
,
. They have varying degrees of importance. In the title h1 should have the title of the entire HTML page, V h2- Name blocks pages, in h3- name of subblocks and so on.
,
,
,
. They have varying degrees of importance. In the title h1 should have the title of the entire HTML page, V h2- Name blocks pages, in h3- name of subblocks and so on.
,
. They have varying degrees of importance. In the title h1 should have the title of the entire HTML page, V h2- Name blocks pages, in h3- name of subblocks and so on.
All headings are bold by default and have a different size (this can be changed via CSS, but more on that later). See example:
Heading h1
heading h2
heading h3
heading h4
heading h5
heading h6
This is the first paragraph.
This is the second paragraph.
This is the third paragraph.
This is how the code will look in the browser:
Heading h1
heading h2
heading h3
heading h4
heading h5
heading h6
This is the first paragraph.
This is the second paragraph.
This is the third paragraph.
Block . Fatty
You already know what the default headers are fatty. However, you can also make plain text bold - just put it in a tag . See example:
This is plain text and this is fatty text.
This is how the code will look in the browser:
This is plain text and this is fatty text.
should be used inside some other tag, such as a paragraph. In this case, paragraphs create the overall structure of the page (paragraphs and headings), and the tag b Makes individual pieces of text bold.
Block . Italics
In addition to fatty, you can also do italics using the tag :
This is plain text and this is italic text.
This is how the code will look in the browser:
Block . Lists
Along with paragraphs and headings, there is another important element of the page - this lists. Such elements are probably familiar to all Internet users. They represent an enumeration of something (a list) point by point. Next to each list item is usually a filled circle (it is called marker list).
Lists are created with a tag
- , which must contain tags
- . Tag ul sets the list itself, and in tags li list items should be laid down (that is, one li corresponds to one list marker). Keep in mind that li tags cannot be used alone. See example:
This is title title - The first item on the list.
- The second item on the list.
- Third item on the list.
This is how the code will look in the browser:
- The first item on the list.
- The second item on the list.
- Third item on the list.
Lists created via tag ul, are called disordered lists. This name was given to them because there are also ordered lists that will have digit markers instead of dot markers. Such lists instead of the ul tag have the tag
- , and items of such lists are also created through tags li.
- The first item on the list.
- The second item on the list.
- Third item on the list.
- The first item on the list.
- The second item on the list.
- Third item on the list.
- face- the font itself. For example, Arial, Courier or Verdana. You can list a few, because. not all users have an extensive set of fonts, and by writing several in the face attribute, the browser will be able to choose which one to use, or rather, which one is present in the system;
- size is an attribute that specifies the size of the text. It can be expressed both in arbitrary units and in pixels;
- color- text color. This attribute can be used both in HTML color codes and in verbal ones. The former look like #FFFFFF (where F is any number or letter from A to F), while the latter are written in simple words (for example, red is red).
- Tag i HTML;
- Tag em HTML;
- CSS property font-style.
Let's make an ordered list using a tag ol:
This is title title
This is how the code will look in the browser:
The convenience of ordered lists is that I can insert a new list item at any place - and the numbering will rebuild itself (that is, I don’t have to follow it in case of any changes, as it would be if I arranged it manually ).
Block . Links
Links are the elements that make the Internet the Internet. By clicking on links, we can move from one page of the site to another. If they didn't exist, the Internet would be just a collection of pages that have nothing to do with each other.
This is title title Link to phphtml.net site.
This is how the code will look in the browser:
Links are absolute And relative, in addition, they can lead both to your site and to someone else's. It is better to show these difficult moments, rather than describe them in text, so I made the following video for you. Watch it and only then proceed to further reading:
Block . Images
Let's now figure out how to place image on a page on your site. This is what the tag is for.
, which has a required attribute src, which stores the path to the image file.
How it works, let's look at the following example:
This is title title 
This is how the code will look in the browser:
Please note that the tag
does not require a closing tag.
Block . Links in the form of pictures
Link can be not only text, but also picture- tag is enough for that
put in a tag , as is done in the following example. Click on the picture - and you will follow the link to the phphtml.net website (to go back to the book later - click the "back" button in the browser):
This is title title
This is how the code will look in the browser:
Block . Line break
Remember what will happen if you make, for example, two paragraphs side by side - in this case, the text that lies in each of them will begin with new lines.
Let's see this with the following example:
This is title title This is the first paragraph.
This is the second paragraph.
This is how the code will look in the browser:
This is the first paragraph.
This is the second paragraph.
There are, however, situations where we would like to have one paragraph, but some of the text in it starts on a new line. Why might this be needed? For example, I want to type a poem, but I don't want to break each line of it into a separate paragraph, as this would not be very logical.
To do this, in the place where the line break should be, write the tag
. Note that this tag is special and does not have a closing tag.Let's see how it works with the following example:
This is title title This is the first line of text
and this is the second one.
This is how the code will look in the browser:
This is the first line of text
and this is the second one.Block . HTML comments
Almost all programming languages have such a thing as "comments".
Hello dear blog readers! This article will talk about text formatting tags. Prominent examples are making text bold or italic. We will also consider the influence of some tags on the internal optimization of the site and the rules for writing them. You can read about that in the article below. By the way, you can find similar text design elements in many text editors, for example, in Word.
Tags are divided into 2 types: block and inline. When using the former, you can change the content of a part of the text (lines, individual fragments or words), and the latter are . The formatting tags we'll cover in this article are predominantly inline.
Rules and order of writing tags
You already know what opening and closing tags are. If not, then read the article at the very beginning of this material. In short, there are two types of tags: single (for example, a line break
) and container (paired). So, all text formatting tags are paired. This means that any element has an opening and closing tag, and the highlight must be placed between them. For example, the correct selection of a phrase would look like this: SelectionWhen the browser processes this fragment, you will see the following text: Selected fragment. By the way, all tags are not displayed in the RSS feed ().
The main thing when writing tags is not to forget to close them. Otherwise, all text on the page will be bold (in the example with the tag ). But there are cases when you need to select a certain fragment both in bold and in italics at the same time. But there is no tag that performs this action. There is only one way out of this situation: use two tags at the same time. It doesn't matter in which order you use them. Therefore, writing the text with tags like this:
Selection
or like this:
Selection
You still get Selection italic and bold at the same time. However, it is preferable to use the first option, because initially it was the only and correct one. Also, do not forget that each browser can process tags differently (), depending on the settings. Now let's move on to the formatting tags themselves.
Making text bold and italic - tags , , And
The most popular text formatting tags - highlighting it bold And in italics. Usually they are used to give importance to any fragment. The first case serves to highlight a fragment containing useful information or keywords. Italics serve the same purpose as bold text, but the information is less important because italics are less visible against the background of body text than bold text.Let's start with making text bold. There are two tags used for this action − And . There is no difference in appearance. Although, given that each browser can interpret each element differently, you should be able to see some differences. This is what the text in the tags looks like And in the form already processed by the browser:
Text in strong tags
Text in b tags
And here is what these two lines look like in the source code of the page:
Text in strong tags Text in b tags
We can observe the same situation in the case of italic tags And . Try to find the differences between the two examples:
Text in em tags
Text in tags I
And here is the source code:
Text in em tags Text in tags I
So, the considered selection tags in bold and italics do not actually differ, but why then do we need, for example, the tag if there ? After all, the latter contains only one character (not counting the brackets) and, therefore, is easier to write. And the thing is that tags And affect . If you surround keywords with these tags, this will have a positive effect on site promotion. The main thing is not to overdo it - the text should have a maximum of 5% bold text in the tag , and the same amount of italics in the tag .
If you just want to highlight some point in the text, then use the tag or . In general, I think that search engines also consider the text in these tags as more important, but on internal optimization they still have less effect than And .
Highlight text slash tags − ,
Now let's look at a few tags that use a stroke in text decoration. The most famous text editor you know is tag or underscore. This tag does not affect the ranking (as far as I know), but it will help to highlight some text and focus on it. I gave an example of using this tag a little higher.AndTwo more similar tags -
And. Both perform the function of strikethrough text. You can use this tag in any situation: if you are updating a document (or rather part of it), you can cross out the old and add a new one; if you are going to write something that deviates from the topic of the material; something that does not meet moral and ethical standards.The differences between these two tags are only in their writing, as a result of which it is preferable to use the first one, because firstly, it is more convenient to write, and secondly, there will be less HTML code on your page, and search engines love it.
Tag and attributes - text font settings
Now consider a tag that is not used without attributes. With it, you can set parameters for a specific piece of text. In general, it is now preferable to use (cascading style sheets), because using them, you can greatly reduce the entire HTML code of the page. So, consider the same tag . For him there is everything three attributes:
This is what the text in the tag looks like using each attribute:
This text is 6px
This text is red This text is in Arial font This text is red and 5px in size.And here is what you will see after processing the written code:

Block Text Design Elements - Headings
-
, paragraph
Finally, we will look at block elements, which are used in almost every document. These are heading and paragraph tags. Let's consider the first. Headings come in 6 types and each has its own tag. Each species has only its own serial number and is recorded using tags.
,
,...,
. Here's what all the headers look like when processed:

The number after the title word corresponds to the number in the tag
Now let's talk about the paragraph selection tag
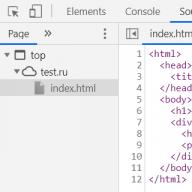
The function of this tag is to separate text between other similar text with an empty line. If you look at the source code of any document, you can see the following:

The green rectangles contain one paragraph, the red rectangles another. And here is how this code looks after processing by the browser (the arrow points to an empty line):

As a result, we get a fairly noticeable separation of one paragraph from another, which is beneficial - reading becomes more convenient.
This is the end of the article about document formatting tags. There are many more than I have described in this article. It’s just that some need to be told quite a lot, as a result of which separate articles with a full review will be devoted to them.!
Greetings Friends.
After another long break, I remembered that I had not written a line for a long time. Of course, there are reasons for this, because there is always some reason to come up with an excuse for yourself, right? In fact, every day I do the Video Course, which I have already mentioned a couple of times, but for now I will not say anything more about it, you will soon find out everything.
So, since nothing came to mind that you can write about. I decided to look at the statistics, what are the interests of Runet users regarding HTML, WordPress, DLE and similar topics. And you know what? There is more to write about. All the questions that I found seem to have answers, but not always in an understandable form. And in general it became interesting to write something like that.
Let's talk about HTML today. Namely, how to make text bold and italic, and also talk about highlighting.
Make text bold.
To make text bold, you do not need to do anything with CSS styles or come up with any other complexity. HTML already has this capability. At the same time, we can not only make the text bold, but also make some emphasis on it with the help of selection. The emphasis may be on search engines or some special browsers or programs. The main thing is not to overdo it with the emphasis of the text in an article or on a page with some kind of information, as this can have a detrimental effect at least on the promotion of this HTML page.
So, to just make text bold, we can use the tag . This tag refers to elements of physical markup, while setting the text to be bold without placing any emphasis on it. This tag is paired, which means that it has both an opening tag and a closing tag. Also, since the element is inline, it must be in a block-level element, such as
Code example:
thumbnail
Result:
thumbnail
In this case, we just made the text bold and that's it.
But it happens that we need not just to highlight the text, but to focus on it. For this we can use the logical markup tag . Not only does the text highlighted with this tag have more weight for search engines. But in theory it should be different from the tag in speech browsers, such as intonation. However, I can neither confirm nor deny this information, is it so?
In this case, everything is exactly the same as in the case, with a simple selection in bold, only we make an accent, and not just a selection.
Code example:
Result:
Everything is quite simple, isn't it?
Italicize text.
In this case, everything is no more difficult than in the first. And our situation is exactly the same. We can highlight text with two options in HTML. Again, using either a physical markup tag or a logical markup tag, with the help of which we again focus on the selected text.
To make text italic we use the tag . This element is paired and inline, which tells us that we should use both the opening tag and the closing tag. And also should use it inside a block element. And in this case, the most appropriate block element is the paragraph tag.
Code example:
text in italics
Result:
text in italics
And of course, we can emphasize the text at the same time by italicizing it using the tag . This element is the same as , except that the text is italicized instead of bold.
Code example:
the text we have focused on
Result:
the text we have focused on
And the last thing I would like to talk about today is highlighting text with color.
Unfortunately, we do not have a tag for highlighting text with color in HTML. But still, there is nothing complicated in this method.
So, in order to highlight a certain part of the text with color, we can wrap the desired part of the text with a tag , which is a generic tag, and is used inside a block element. In our case, the block element is the tag
But add not enough. You also need to specify the style parameter, which will allow you to add CSS properties to the required text, specify the property itself (color), which will help set a specific color. And finally, provide a value for the color property. But the question may arise: “What to indicate?” You need to specify the HTML code of the color in which we want to "paint" the text. HTML color codes can be found.
Now, to make it clearer, let's look at an example.
Code example.
text to highlight color
In this case, we highlight one word: color. I also want to point out that the is a pair, and we must close it where the property should end.
Result:
text to highlight
In such simple ways, we can manipulate the text on our page. I also want to note that everything we just talked about works on both WordPress and DLE, because any engine uses HTML to display pages. That is why HTML can be called the foundation of any site, no matter what CMS you have.
I hope I have explained everything clearly.
Good luck friends. Soon... There will be interesting news...
In the current article, we will talk about how to highlight text. in italics HTML. As with bold text, italic text can be made in three ways:
Let's consider all three options on how to make italics in HTML, discuss the subtleties of this issue and which methods are more convenient and more correct to use in certain situations.
Italic text: tag
Tag i(italic), by analogy with the tag b for bold text, physically emphasizes italic text (meaning that only the style of the text changes). Tag application i:
Website builder "Nubex"
Thus, the desired part of the text is placed between the tags .
Italic text: tag
Although the tag i remains valid, from the point of view of site optimization, it is better to use the tag em to highlight logically important sections of the text. This means that search robots take into account the importance of the text placed between the tags. :
Website builder "Nubex"
Result:
Website builder "Nubex"
But do not forget that the text enclosed in tags i And em, although they are displayed in almost the same way (in all modern browsers), they are inherently not quite identical, as noted above. Therefore, you need to use tags as needed: tag em HTML frame important sections of text, and apply visual italic styling using a tag i or CSS styles. Let's now look at using CSS styles to italicize text.
Italic text with CSS
To set font display styles in CSS, use the property font-style, which can take the values: oblique(Italic text), italic(italics) and normal(regular font).
It is worth remembering that italic font and inclined are, in essence, not the same. Italics is a special font that is analogous to handwritten text, and inclined formed by tilting the regular font to the right.
Applying an attribute font-style on practice:
Italic with CSS - "Nubex" Our sites are really huge step in web development.
We do it for real quality sites.
But you need to remember that some browsers text with the property font-style: oblique; may not be interpreted as italic text, but as italic.