Hello dear readers! Today we are opening a series of articles about optimizing a computer on Windows OS. Let's start with such a thing as . In this article you will find answers to the following questions: Where is the paging file located?; How to properly configure the paging file?; How to set the optimal paging file size for different amounts of RAM? Go!
Swap file (pagefile.sys) is a system file on the hard drive (usually the system drive) of the computer, which serves as a kind of addition (extension) to the RAM. This additional memory is also called the computer's virtual memory.
Virtual memory- a method of managing computer memory for executing programs that require larger amounts of RAM than is actually available on the computer. Such programs obtain the missing RAM from the swap file. In other words, the page file relieves RAM during periods of heavy load.
RAM is many times faster than page file memory. If you simultaneously run several applications on the system that consume a lot of RAM, then the data of unused ones will be unloaded from RAM into slower virtual memory. Active applications will be served directly by random access memory (RAM). Also, if, for example, a minimized application is expanded, then the data from virtual memory will again go into RAM.
How to configure the page file and change its size?
Competent, Correctly setting up the paging file will help significantly speed up your computer. It would be a sin not to take advantage of this. Where can I configure it?
- For Windows XP:
Start > Settings > Control Panel > System > Advanced > Performance > Settings > Advanced > Edit - For Windows 7/8/Vista:
Start > Settings > Control Panel > System > Advanced system settings > Performance > Settings > Advanced > Virtual memory > Change
To the point Performance You can also get there by entering the command sysdm.cpl in the command line Execute(The command line can be opened by pressing WIN+R).

If you did everything correctly, you should end up in the window Virtual memory. 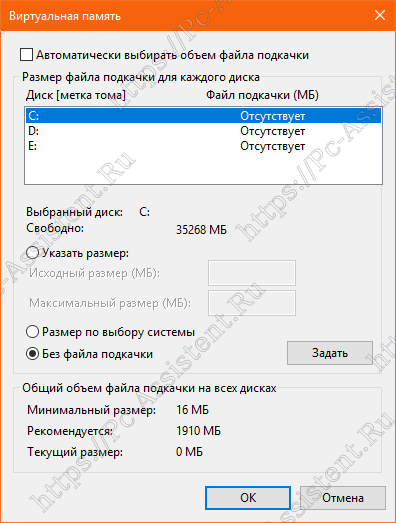 By default, in Windows 7/8/8.1/10, the size of the paging file is determined automatically by the system itself.
As you can see in the picture, the paging file can be configured for each partition (and each disk) separately. To set your paging file size, you need to:
- At the very top of the window, uncheck the box Automatically select the size of the paging file.
- Select the partition (or physical disk) for which the paging file is being configured.
- Select the radio button Specify size, specify the Original size and Maximum size(indicated in megabytes)
- Be sure to click on the button Set.
To disable the paging file, select the switch No swap file.
Windows swap file size. Which one is correct?
There are different versions regarding the optimal size of the paging file. I will express my point of view on this matter, which is based on my observations and experiences with the page file on various equipment. It may coincide with the opinions of some IT specialists. I am an adherent of the version that if the computer has 6-8 GB or more of RAM installed, then The page file can be completely disabled. I think that large volumes of the swap file only slow down the computer. Of course, if the amount of RAM is less than 6 GB, then it is better, of course, to set a certain amount of additional virtual memory.
How to correctly set the size of the paging file? The minimum paging file size must be the same as the maximum. For example: 512-512 , 1024-1024 , 2048-2048 are correct padding, but 512-1024 , 1024-2048 are incorrect padding.
The same minimum and maximum size of the paging file reduces the size of this file, and this consequently speeds up the process of reading information from it.
Now, depending on the amount of RAM, let’s see what size of the paging file needs to be set. There are the following approximate indicators:
- The optimal paging file size for 512 Mb of RAM is 5012 Mb;
- The optimal paging file size for 1024 Mb of RAM is 4012 Mb;
- the optimal paging file size for 2048 Mb of RAM is 3548 Mb;
- the optimal paging file size for 4096 Mb of RAM is 3024 Mb;
- the optimal paging file size for 8 GB of RAM is 2016 Mb;
- optimal paging file size for 16 GB of RAM (or more), - without swap file.
Of course, this is a subjective view and these indicators cannot be absolutely accurate or recommended, but in practice they were the ones that had the effect. You can experiment yourself and find the best combination for your computer. There are also some notes here.
For example:
- Some applications require a page file. Disabling it may lead to errors in the operation of such applications. If you disable virtual memory on the system disk, it will also become impossible to record a memory dump during BSOD (Blue Screen of Death).
- If you, as a rule, minimize several applications, leave them running, and switch to others, then you may also need a large page file, since the data of minimized applications is written to it. Although, here too it all depends on the volume RAM.
Correct paging file location. On which disk should I enable it?
If you have several physical disks on your computer, then you need to install the page file on the fastest disk. It is believed that the paging file is divided into 2 parts:
- The first part on the system disk (partition) (just for recording debug recording information for blue screens of death)
- The second part on the fastest disk
In this case, during operation, the system accesses the least loaded partition without touching the first one.
It is also recommended to create a separate partition for the paging file, with a memory amount equal to or close to the size of the paging file (for example, 2024MB). This trick allows you to get rid of fragmentation of this file.
Results:
I hope the tips given in this article will help you correctly configure the paging file on your computer and optimize its operation. If you have questions, write in the comments, I will try to give comprehensive answers.
Considering that you are already in the “System Properties” menu, then simply follow these step-by-step steps:

Now in the window that opens, we will make changes. 
Almost always, this file is located in the memory of drive C, as the system recommends. But given that this drive is already loaded with the installed operating system, we will move it to another, less loaded drive, for example, drive D. Of course, ideally, the paging file is located on another hard drive, but not everyone has it.
So, moving the paging file from drive C to drive D, we perform the following manipulations:

In the selected line you should indicate the size of the paging file suitable for your system. To select the ideal paging file size, you need to increase the amount of RAM on your personal computer by one and a half to two times. This value will be the best option to improve computer performance. Thus, if the size of RAM is 2 GB, then it is clear that the page file should not be more than 4 GB. Accordingly, in the “Initial size” item we will write 3000, respectively, in the “Maximum size” field - 4000. Next, click “Set” and restart the computer so that the parameters that we have changed are saved.
It is worth noting that the “paging” technology is not recommended to be used constantly, but only when the system is overloaded with large games and applications. In all other cases, you just need to expand the installed amount of RAM.
And also, if you use a swap file, you need to periodically defragment the hard drive.
We hope that our tips will help improve the performance and speed of your system. Especially if you have to work with a weak personal computer. Good luck! Leave comments.
Unscrew the mounting screws located on the rear panel of the PC system unit, remove the cover and lay the case on its side. Look inside the system unit. Find the RAM dies on the motherboard. Usually there are 1-2 of them. To remove memory modules, unclip the clips on both sides and carefully pull them out of the connector.
Look at the memory brand. It is either printed on the module itself or indicated on a sticker. Look at the size of the memory sticks and evaluate the possibilities of expanding the amount of RAM, based on the condition that Windows XP 32-bit can only see up to 3 GB.
If expansion is required and possible, purchase additional memory modules. It is recommended to install RAM dies of the same brand and volume to avoid device conflicts.
Install a new set of modules into the slots. To do this, the die must be correctly installed in the connector and pressed until it clicks. Put the cover back and screw it on.
Increasing virtual memory
Initially, the amount of virtual memory is equal to the amount of physical RAM. To increase virtual memory, you need to right-click on the “My Computer” icon and go to the “Properties” section. After that, go to the “Advanced” tab, select “Options” - “Performance”.
In "Performance Options" change "Virtual Memory". This window is used to configure parameters related to virtual memory, namely, it is possible to adjust the size of the paging file. Typically the default is System Selected Size. The list contains the size of the paging file for each disk.
To increase the page file size, select the Custom Size option. In the dialog that opens, specify the initial (current) file size, and then its maximum size in the corresponding field. The minimum size should be 1.5 times the amount of RAM physically installed on the PC, and the maximum should be 4 times.
Check the total file size on all drives. It is also recommended to remove the paging file from the system drive and move it to another drive.
To remove the paging file from other drives, you need to select the required one and select “Without paging file”. The existing practical experience in deleting the paging file does not clearly answer the question: does this increase performance? Therefore, it is enough to simply remove this file from the system disk.
Select a logical drive where the paging file will be stored. Apply all changes and restart your PC for them to take effect.
Hello, dear blog readers. I bring to your attention an article about increasing the paging file. From this material you will also learn what is the page file (virtual memory, pagefile.sys) and what is it used for.
Users who make the most of their computer have probably encountered a situation more than once when a message similar to the following appears on the screen or in the tray: Running out of free virtual memory" What does this mean?
Everyone knows that a certain amount of RAM is installed on a computer (or, more precisely, in the slots of the motherboard). The volume can vary from 521 MB to 16 GB or more. RAM stores the code of programs that the processor runs. Sometimes situations arise when free (i.e. not occupied by other applications) RAM has a volume less than is necessary for the operation of a particular program.
In such situations, the operating system page file is used(another name for virtual memory). What is a paging file and how does it work?
Page file is a technology, which allows you to slightly mitigate the problem of lack of RAM. If free memory runs out, then part of the unused data is moved from system memory to a special file called pagefile.sys located on the hard disk, thus freeing up the necessary amount of RAM to accommodate the program with which the processor will currently work.
Using a paging file is important if the user is working with resource-intensive programs(for example, applications for video processing, graphics, etc.).
The paging file size can be changed (increase/decrease) and today we will look at how to do this for the Windows 7 and Windows XP operating systems.
Increasing the paging file for Windows XP
1. Press the Win + Break key combination on the keyboard (the blog also has information about others and). The System Properties window will open. Go to the “Advanced” tab.

Fig 1. Increasing the paging file for Windows XP.
2. On this tab, click on the button parameters of the “Performance” section. The Performance Options window opens.

Fig 2. Performance parameters.
3. Go to the “Advanced” tab and click the “Change” button next to the words “Total size of the paging file on all disks.” This will open the Virtual Memory window, which is used to increase/decrease/disable the page file.

Fig 3. Virtual memory.
4. In this window you can manage the swap file:
— manually set the paging file size for any local hard drive (Special size);
— automatic detection of the paging file by the operating system (Size selected by the system);
— disable the swap file (No swap file).
When we have set the paging file size, we need to click the “Set” button, and then Ok. The operation to increase the paging file for Windows XP is completed. You need to restart your computer.
Increasing the paging file for Windows 7
1. Press the key combination Win + Break on the keyboard. The System Information window opens.

Fig 4. System information.
The most annoying thing when loading drivers or applications is that the operating system may freeze for a couple of seconds. The main reason is often the operation of the system with disk virtual memory, that is, in order to leave part of the RAM for higher priority tasks, the hard drive begins to be used to “pump” information. There is a special file on the hard drive for storing temporary files - it is called swap file(pagefile.sys.) It is this file, together with the system’s RAM, that makes up computer virtual memory.
By default, the Windows system generates the required amount of virtual memory and automatically adjusts its size.
But there are still cases when a warning window pops up on the desktop stating that the virtual memory is running low and the paging file needs to be increased. In this case, I suggest not relying on the system to increase the page file. The computer will still use all virtual memory. The operating system provides the ability to independently change the amount of this memory.
If we use Windows XP, we do it as follows:
- « Start»
- « Control Panel»
- « System»
- « Additionally»
- We find " Performance" button " Options"
- In the window that opens " Performance Options" tab " Additionally"
- In the section " Virtual memory", indicate total size of the paging file across all disks— currently available memory capacity.
- To change settings, click " Change".
http://youtu.be/9UImDSfzpZA
Now let's move on to direct configuration of virtual memory. There are several configuration options.
The first, and probably the simplest way, is to ask the operating system to automatically manage the amount of memory by clicking “ Size according to system choice.”
In the second option we choose "No swap file." But this method is recommended only in a situation if our PC has a large amount of RAM, and we are sure that we do not need virtual memory.
Well, the third option: we click on "Special size" and enter first the initial size, and then the maximum size (the first parameter is the same as the amount of RAM, and the second parameter should be 2 times larger). For example, if the amount of RAM is 2 GB, then we set the initial size of the paging file to 3072 MB, and the maximum size to 4096 MB. (We know that 1024 MB is equal to 1 gigabyte).
In Windows 7, the reason for poor performance is the page file: its size grows and shrinks - quickly becoming fragmented. Setting a fixed page file size may resolve the issue. Creating a file will ensure a more or less constant amount of free disk space. You can also prevent Windows from using free space if the last bit remains.
We increase the paging file on the Windows 7 operating system:
- "Start", right-click on "Computer" and choose "Properties", Then "Advanced system settings".
- Select a tab "Additionally" click "Options" in the column "Performance".
- On the page that opens to us, select the tab "Additionally" and click "Change".
- To gain access to the settings, check the box "Select paging file size automatically".
On each disk, virtual memory settings are made separately. If more than one disk is used, virtual memory will automatically be enabled only on the disk where Windows is installed. We find the disk on which the paging file is located (it is located on the right in the “Paging file size” list for each disk). I recommend moving the swap file to another drive:
- Select the drive (for example, D:)
- Check the box “Without paging file”
- Click “Set”.
- If a warning pops up, click “Yes”.
- Then in the dialog box, select the disk to which we will transfer the file.
- Click “Specify size”. And don’t forget that the initial size is equal to the size of the physical RAM, and the maximum size must be set to half that size.
- Click “Set” and reboot.