Samsung Galaxy A3 SM-A300F is a branded smartphone running on Android 4.4. Here you will find out the characteristics, how to get root or reset the settings, and you can also download firmware (for Odin, for example) and instructions for Samsung.
Root Samsung Galaxy A3 SM-A300F
How to get root for Samsung Galaxy A3 SM-A300F see instructions below.
If the applications did not help, ask in the topic or use the full list of root utilities from the topic header.
Characteristics
- Type: smartphone
- Operating system: Android 4.4
- Case type: classic
- Control: mechanical/touch buttons
- Number of SIM cards: 2
- Weight: 110 g
- Dimensions (WxHxD): 65.5x130.1x6.9 mm
- Screen type: color Super AMOLED, touch
- Touch screen type: multi-touch, capacitive
- Diagonal: 4.5 inches.
- Image size: 540x960
- Pixels per inch (PPI): 245
- Automatic screen rotation: yes
- Type of ringtones: polyphonic, MP3 ringtones
- Vibration alert: yes
- Camera: 8 million pixels, LED flash
- Camera functions: autofocus
- Video recording: yes
- Front camera: yes, 5 million pixels.
- Video playback: H.263, H.264(AVC), MPEG4, VP8, VC-1, Sorenson Spark, MP43, WMV7, WMV8
- Audio: MP3, AAC, WAV, FM radio
- Voice recorder: yes
- Standard: GSM 900/1800/1900, 3G, LTE
- LTE bands support: Cat4
- Internet access: WAP, GPRS, EDGE, HSDPA, HSUPA, HSPA+
- Interfaces: Wi-Fi, Bluetooth 4.0, USB, ANT+, NFC
- USB host: yes
- Satellite navigation: GPS/GLONASS
- A-GPS system: yes
- Protocol support: POP/SMTP, HTML
- Processor: 1200 MHz
- Number of processor cores: 4
- Built-in memory: 16 GB
- RAM capacity: 1 GB
- Memory card support: microSD (TransFlash), up to 64 GB (combined with a slot for a second SIM card)
- Additional SMS features: text entry with dictionary
- MMS: yes
- Battery capacity: 1900 mAh
- Sensors: light, proximity, compass
- Search by book: yes
- Exchange between SIM card and internal memory: yes
- Organizer: alarm clock, calculator, task planner
- Announcement date: 2014-10-24
»
Firmware for Samsung Galaxy A3 SM-A300F
Official Android 4.4 firmware [stock ROM file] -
Samsung custom firmware -
If custom or official firmware for Samsung has not yet been added here, then create a topic on the forum, in the section, our specialists will quickly and free of charge help, including. with backup and manuals. Just don’t forget to write a review about your smartphone - this is extremely important. Firmware for Samsung Galaxy A3 SM-A300F will also appear on this page. Please note that this Samsung model requires an individual ROM file, so you should not try firmware files from other devices.
What custom firmware are there?
- CM - CyanogenMod
- LineageOS
- Paranoid Android
- OmniROM
- Temasek's
- AICP (Android Ice Cold Project)
- RR (Resurrection Remix)
- MK(MoKee)
- FlymeOS
- Bliss
- crDroid
- Illusion ROMS
- Pacman ROM
Problems and shortcomings of a Samsung smartphone and how to fix them?
- If the Galaxy A3 SM-A300F does not turn on, for example, you see a white screen, hangs on the splash screen, or the notification indicator only blinks (possibly after charging).
- If stuck during update / stuck when turned on (needs flashing, 100%)
- Doesn't charge (usually hardware problems)
- Does not see the SIM card (SIM card)
- The camera does not work (mostly hardware problems)
- The sensor does not work (depends on the situation)
Hard Reset for Samsung Galaxy A3 SM-A300F
Instructions on how to do a Hard Reset on a Samsung Galaxy A3 SM-A300F (factory reset). We recommend that you familiarize yourself with the visual guide called on Android. . 
Reset codes (open the dialer and enter them).
- *2767*3855#
- *#*#7780#*#*
- *#*#7378423#*#*
Hard Reset via Recovery
- Turn off your device -> go to Recovery
- "wipe data/factory reset"
- “yes - delete all user data” -> “Reboot System”
How to log into Recovery?
- hold down Vol(-) [volume down], or Vol(+) [volume up] and the Power button
- A menu with the Android logo will appear. That's it, you are in Recovery!
Reset settings on Samsung Galaxy A3 SM-A300F You can do it in a very simple way:
- Settings->Backup and reset
- Reset settings (at the very bottom)
How to reset a pattern key
How to reset your pattern key if you forgot it and now you can’t unlock your Samsung smartphone. On the Galaxy A3 SM-A300F, the key or PIN can be removed in several ways. You can also remove the lock by resetting the settings; the lock code will be deleted and disabled.
- Reset graph. blocking -
- Password reset -
Knox - obtaining RUT rights on new Samsung smartphones. When obtaining Root rights on the latest Samsung smartphones after updating to the latest versions of Android 4.3 or 4.4, it is not possible to obtain full-fledged super rights.
At the moment, when updating to the latest firmware from Android 4.3 Jelly Bean or 4.4 Kit Kat, Samsung smartphones experience problems obtaining Root rights, for example models such as:
Sasmung S4 - I9190, I9192, I9500, I9505
Samsung Note3 - N900, N900*
and others…
What's the problem?
Samusng is increasingly implementing protection on its Android smartphones. If you got Root, then you will get an error if you go into the SuperSU administrative application - “The SuperSU application tried to access the system element on your device without permission. This attempt has been blocked. To improve security, you can remove applications downloaded from unauthorized sources."

or a message in the Android information area

Root will not work fully!
Why did such problems arise?
Samsung has implemented the Knox security system, according to the manufacturer:
“Samsung KNOX is a comprehensive mobile solution for enterprises. Given the increasing use of smartphones in business, it is aimed at meeting the security requirements of IT departments of enterprises without compromising the privacy of workers." -
In other words, this is an additional introduction of security for business.
Go to / system/app and delete the files
- KLMSAgent.apk
- KNOXAgent.apk
- KnoxAttestationAgent.apk
- KNOXStore.apk
- KNOXStub.apk
- KNOXAttestationAgent.apk

Then restart your Android smartphone!
Method 2
Enter the command in the terminal (preserve the case of letters, this is important, after each command press the Enter button)
su pm disable com.sec.knox.seandroidMethod 3
Install the application KNOXDisablerFree_v1.0.1.apk. Go to the application and press the button " Disable»

Method 4
Call up an additional menu from the desktop by pressing the button

Select Knox Settings

Select remove Knox from the menu.
Method 5
Install Titanium Backup or System app remover. Uninstall the following applications using them
- com.sec.enterprise.knox.attestation
- com.sec.knox.eventsmanager
- KLMS Agent
- KNOX Notification Manager
- KNOX Store

Instructions for installing custom recovery and obtaining superuser rights on the 2017 Samsung Galaxy A3 (SM-A320F, SM-A320FL, SM-A320Y) running Android 6.0 Marshmallow.
Drivers and programs
Files
Attention!
Obtaining root rights, installing a custom recovery or flashing unofficial firmware can cause the KNOX VOID WARANTY status to be set to 0x1 or 1x1, which automatically removes the device from warranty. There is currently no way to reset the counter to 0x0.
Installation instructions
- “Install” to install the file.
- Find and select the Update SuperSU archive, then confirm your decision by swiping from left to right.
- Then install the no-verity-no-encrypt_a320.zip file in the same way.
- After installation is complete, reboot your phone by selecting “Reboot” > “System”.
Make backup copies of all necessary data and files and save them to your computer, removable media or cloud.
Run Odin PC as administrator.
Put your phone into Download Mode.
To do this, you need to simultaneously hold down the Volume Down, Home and Power keys. Then wait until the device reboots and agree to the warning by pressing the Volume Up key.
If in this mode you see the line FRP LOCK: ON, installing TWRP is not recommended, because there is a possibility of getting a “brick”.
In this state, connect the device to the computer. “COM” should light up in Odin.
Click on the “AP” button and select the TAR recovery archive, uncheck the “Auto Reboot” option, and then click the “Start” button.
After the operation is completed, the smartphone needs to be rebooted into recovery.
To do this, you need to turn off the phone by simultaneously holding down the Volume Down, Home and Power buttons. Immediately after the device screen goes dark, release the Volume Down key and immediately hold down the Volume Up key, while continuing to hold the Power and Home buttons.
When entering recovery mode, you must allow writing to the system partition by swiping to the right and refuse the password prompt.
After this, you need to format the “Data” section.
ATTENTION!
This operation will erase all your files on the phone's internal memory. It is strongly recommended to make backup copies of all necessary data to removable media or a PC, including backup partitions.
To format the “Data” section, you need to go to “Wipe” > “Advanced Wipe” and activate the “Data” and “Internal Storage” items.
Go to the “Mount” menu and activate the “Data” section.
If the “Data” partition is not mounted, then you need to format the internal memory again and reboot the phone into recovery mode by selecting “Reboot” > “Recovery”.
Copy the files Update-SuperSU.zip and no-verity-no-encrypt_a320.zip to the internal memory of the device.
Go to the “Settings” menu and on the first tab “General” uncheck the “Promt to install TWRP app if not installed” item.
In recovery mode, select the following items to obtain superuser rights:
If you receive a request from TWRP to obtain superuser rights, you must refuse.
After obtaining superuser rights, it is recommended to make a backup of the EFS partition.
ATTENTION!
If this is neglected, then if the device firmware is incorrectly installed, information about IMEI, Bluetooth and WiFi MAC address may be lost and the phone will no longer be able to make calls, connect via 3G/4G connection or WiFi. It can be treated by simply restoring a backup or going to a service center for a fee.
I have prepared instructions for obtaining root for Samsung Galaxy A3 (2016) SM-A310F. Customize your smartphone as you please along with superuser rights.
In the right hands, root rights will become a universal tool that will allow you to control the operation of your smartphone or tablet without restrictions, delete and edit system files, optimize the processor, RAM, and much more. If you are interested in the internal structure of the operating system, want to experiment with it, or simply get the most out of your gadget, rooting the Samsung Galaxy A3 (2016) SM-A310F will become an indispensable assistant for you.
How to get Root rights for Samsung Galaxy A3 (2016) SM-A310F?
What do we need?
- Smartphone.
- Computer.
- latest version.
- CF AutoRoot File:
Sequencing
- If there was Kies on the PC, delete it.
- Installing drivers.
- Unpack Odin on PC.
- On your smartphone go to “ Settings«, « For developers"(if there is no such item, go to " About the phone" and click many times on " Build number"), turn on " USB Debugging" And " Unlocking, provided prod.«.
- We transfer the smartphone to Dowload Mode. To do this, turn it off completely, hold down the buttons at the same time Home+Power+Volume down.
- After the screen appears with the message Warning, confirm the choice by pressing the button Volume up.
- The phone has entered download mode.

- Let's launch One. In field PDA select the previously downloaded file CF Auto Root having previously unpacked it from the archive.

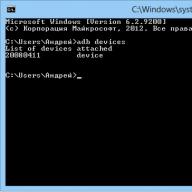
- We connect the smartphone to the PC via USB.
- If the smartphone is detected, as shown in the screenshot below (the number may differ) - click Start.

- The installation will begin. If everything went well, a green message will appear in the Odin window PASS .

- Once finished, the device will reboot itself. Disconnect it from the PC.
- Root for Samsung Galaxy A3 (2016) installed!
Instructions for obtaining superuser rights on the Samsung Galaxy A3 (SM-A300x) running Android 4.4 KitKat and Android 5.0 Lollipop.
Drivers and programs
Attention!
Obtaining root rights, installing custom recovery or unofficial firmware can cause the KNOX VOID WARANTY status to be 0x1 or 1x1, which automatically removes the device from warranty. There is currently no way to reset the counter to 0x0.
Installation instructions
Download and install drivers for your phone.
ATTENTION!
If Samsung Kies is already installed, there is no need to install drivers. You just need to completely unload Kies from memory through the task manager, and then continue.
Disable the option " Activation Lock» in the device security settings.
Run Odin PC as administrator.
Put your phone into download mode ( Download Mode).
To do this, you need to simultaneously hold down the Volume Down, Home and Power keys. Then wait until the device reboots and agree to the warning by pressing the Volume Up key.
In this state, connect the device to the computer. In Odin the message “ COM».
Click on the “ AP" and select the TAR/MD5 archive CF Auto Root, then click " Start».
After the operation is completed, disconnect the phone from the computer and reboot if it did not reboot automatically.
When the device is fully booted, you need to update the installed SuperSU application from Google Play (or install it if it is missing), launch it and agree to the offer to update the SU binary file by selecting " Normal» installation method. When the application requests a proposal to disable KNOX, you must agree and reboot the phone again.
If everything went well and superuser rights were obtained on the device, it is recommended to make a backup of the EFS partition.
ATTENTION!
If this is neglected, then if the device firmware is incorrectly installed, information about IMEI, Bluetooth and WiFi MAC address may be lost and the phone will no longer be able to make calls, connect via 3G/4G connection or WiFi. It can be treated by simply restoring a backup or going to a service center for a fee.