The lessons of photoshop. Processing photo in fantasy style.
Approximately this result we must get in the final:
To work, we will need:
1. Two third-party plugins to Photoshop: ImageNomic Portraiture and Nik Color Efex Pro 3.0. Find them in the network is very simple. Natural thing can be done without them, the means of Photoshop itself, but in my opinion they make a lot of life
2. Source photography, preferably not a phone quality and not the size of a matchbox

3. Photo for creating the background. It can be an image of a forest, flower garden, nettle thickets, etc. In general, something vegetable, with a sufficiently large number of parts and the transition of the tones. Even not necessarily high quality. I used the following Stock Image:
4. Couple of cliparts: grass in PNG format and snail for creating rozhkin:


So:
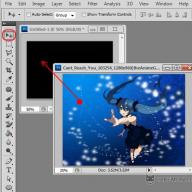
1. Open the original photo. It is clear that in order to substitute a new background, you first need to remove the old one and we will deal with the most convenient way to us. Usually I prefer to simply remove the background around the object with a hard eraser with a strong approach, but this time I used the Magnetic Lasso Tool, allocated the figure and moved it to a new layer using Layer Via Copy:

I hide the background layer, most likely he will no longer need it.
2. When using Lasso Tool, there are most often some extra details, pieces of an old background, dark unnecessary outlines, and therefore we take hard erase and carefully pass on the edges of the figure, subordinating this disgrace:

3. In some places closer to the edge, the figure is still dark, for example, hair, and we need it to get better in the future, pretty light background, so we take the Dodge Tool with Exposure equal to 15-20% and lighten the edges:

4. Now you can substitute the background. We carry it on our picture, put the lower layer and quite very much in the Gaussian Blur to almost a homogeneous state:


5. Let us leave the background and we will deal with the retouching of the face (in general it is always the most painstaking part of the work). To begin with, delete all defects (only defects, and not the whole texture from the face) with the help of Clone Stamp Tool and Healing Brush Tool:

Now you can slightly soften the texture of the face, here the Imagenomic portraiture plugin is just useful. We duplicate the layer with the figure (now there should be three, except for the hidden background). The plugin is applied to the top layer, only it is desirable not to overdo it with the settings so as not to get quite plastic skin:

And then reduce the opacity of the upper layer of percent to 60-70 (but in general it is all done on the eye and depending on the size of the source) and the soft eraser of the erect of the region around the eyes, the mouth and other strategically important details of the person who do not have to acquire indity. They come from the bottom layer:

6. Let's give the eyes a little shine and color saturation. To do this, you can copy the eye iris on a new layer, I usually select the rectangular marquee tool, it is reset to a new layer using the Layer Via Copy and use the Color Dodge overlay mode for the layer. Unnecessary parts are simply removed with a soft eraser of a small diameter:


I sat down a bit with color (and we can change it in general). We go to HUE / SATURATION (there must be a layer with iris) and move the slider to taste. When the result is arranged, we click OK and we can reduce the two top layers. To give even greater shine and some effect of the glow, you can slightly walk along the lower arc iris eye Dodge Tool:

7. Now we will deal with painting works) to subsequent sections of the face. To do this, select the body-pink color of the soft brush with low intensity (5-7%) and on the new layer with the overlay overlay mode we go through the forehead, cheeks, nose and chin, especially intense - on the cheeks:

In the same way, we care with the lips:

8. I was slightly wedged into the process of makeup in that with a clone Stamp Tool with a soft brush and Opacity \u003d 25-30% a little softened wrinkles under the eyes, uneven specks over the lips and areas of the chin and tray (tray is not a tray on which Digging, and what is under the nose):

9. We continue the coloring personally to me, I wanted to add shadows forever and necessarily some fresh spring-summer colors, and the salad is suitable here as it is impossible. The same principle as in paragraph number 7:

10. What seemed to me here is relevant to add, so it is freckles. I love freckles very much, and my tassel helped me here, which is very easy to do, and you can find on the network. In the form of placer points of irregular shape. I chose a black brush color and applied freckles to a new layer, everything with the same overlay overlay mode:

11. Reverse the attention to the fact that the contours of the figure contrast the background with the background, because it is blurred, and the contours are very clear and in general somehow looks unhealthy so we will take Blur Tool and we will warm them up, rising on the shoulders and hair and not much learning - on hands:

12. It is time of third-party details. Open the file with the grass, drag it with its upper layer on our document, placing as it is convenient for us and imitate the raffle, eroding it with Gaussian Blur. To fit the grass on the tone, for the original it is dark, as it seems to me, I took advantage of Photo Filter, adding yellowness:

You can not be limited to grass, add leaves, flowers, that only the soul wishes, the main thing is not to turn the forefront in the smeared vinaigrette finally
13. Finally, I decided to turn myself in the utility utility battery with the help of the sink of that very snail the image of the snail and caught it so that the sink is formed by Rozhkin, and then we remove the snail with a small transparency (the poor fellow "src \u003d" http: / /Planetaphotoshop.ru/images/smilies/swoon.gif "title \u003d" (! Lang: SWOON" />) и часть основания раковины так, чтобы она по возможности плавно переходила в виски (надо признать, что этот момент у меня несколько прихрамывает). Чуть размываем улиточки, ибо они должны быть не сильно четкими:!}

Snail is too dark, so it took it a little clarify and aggravate all this case Dodge Tool with Range - Highlights:

14. I tried to combine whiskey (the temple - m. Side head ... (c) Dal) and the horns of some kind of hair, came out, right, not very, maybe you will get better choosing a smudge tool, and a soft brush with a sooo small diameter 2-3 pixels (if a photo of a very small size, then at all 1 pixel) connect horns with hair and vice versa:

You can reduce layers.
15. In my opinion, there is not enough of some messenger, as one comrade was expressed - pseudoscience glare
I create glare as follows: on a new document with a transparent background in disorder, we put the blurred spots of white, different sizes. It turns out a kind of peculiar falling snow not in focus:

This snow is placed on top of our work and put the Mixing mode overlay (again this overlay "src \u003d" http://planetaphotoshop.ru/images/smilies/nea.gif "title \u003d" (! Lang: NO" />). Снег превращается в желтые блики, но очень яркие, поэтому немного снижаем непрозрачность слоя и мягким полупрозрачным ластиком стираем блики с области лица, чтобы они не создавали впечатление какой-то экзотической кожной болезни :!}

16. The picture is practically ready, but she would not prevent some generalizing all elements final processing. This moment is the most beloved. For this, I use the Nik Color Efex Pro plugin. I can hurt him for a whole hour, selecting the settings and effects to taste:

A photo of a balcony I used in this lesson was deleted from a file sharing. Therefore, look at my screenshots and do similar operations.
Open the photo of the balcony in Photoshop. Pen Tool (P) in PATHS mode Draw the circuit along the fencing and capture the top of the image. As a result, the contour should be discovered around the background of the balcony. Right-click on the circuit and select Make Selection (or use the Ctrl + Enter combination). After that, click Delete to remove the background.
Go to the Image\u003e Canvas Size menu and change the canvas size to 2000x1500 pixels. Open the background image provided at the beginning of the lesson in Photoshop and the Move Tool tool (V) drag it to the first document. Position this layer under the layer with a balcony, while retaining the original size.
Step 2.
Open the photo of the girl in Photoshop and the Pen Tool (P) tool remove it from the background. You can also use the method of highlighting the girl through the channels or the Magic Wand Tool (W) tool. Insert the girl to the main document above the layer with a balcony. FREE TRANSFORM (Ctrl + T) to change the layer size with a girl up to 43% (this can be prescribed in the tool parameters at the top of the program).

Step 3.
Before you continue to work, make a color correction of the balcony and the sky. Color corrections are needed so that all colors coincide with the color of the sky. You need to increase the number of blue balconies. I always advise you to use correction layers, as they do not harm the main layer.
Over the layer with a balcony, create an adjusting layer HUE / SATURATION (LAYER? NEW ADJUSTMENT LAYER? HUE / SATURATION) and increase the SATURATION value to +25. Then create an adjusting layer of LEVELS (Layer? New Adjustment Layer? Levels) and enter the value of the left slider 176. At the end, create a correction layer Color Balance (Layer? New Adjustment Layer? Color Balance) and configure how cocked in the screenshot below.
To improve the edges of the brick fence, make a copy of the layer with a balcony (Ctrl + J) and go to the Filter menu? Stylize? Glowing Edges. Install the Blending Mode copies of the balcony on Screen, and opacity to lower up to 50%.

Step 4.
For a girl, you also need to make several colors and light corrections. All this must be done with the help of corrective layers. Make two copies of a layer with a girl, click on them with the right mouse button (in turn) and select Create Clipping Mask. One copy is designed to enhance sharpness, and the other to mitigate the skin.
To one of the copies of the layer with a girl apply the Unsharp Mask filter (Filter? Sharpen? Unsharp Mask): Radius - 0.3 pixels, Amount - 215%, Threshold - 3 levels. To the second copy apply the Surface Blur filter (Filter? Blur? Surface Blur) with the RADIUS 2 pixel value. Then apply to the second copy of the layer mask that will hide everything. To do this, go to the Layer menu? Layer Mask? Hide all. Select the Brush Tool (B) tool with soft edges and white color only the skin of the girl.

Over the layers with girls, you need to create several corrective layers, and to each apply Clipping Mask (Ctrl + Alt + G). Create the following corrective layers (clicking on the black and white circle icon at the bottom of the layer palette, you will see a list of corrective layers):
- Levels.
- Photo Filter.
- Color Balance
Adjusting layers settings are shown below:

Step 5.
Remove the crown, owl and rose in the main document. With the help of the Corrective Color Balance layer, change their colors so that they fit our picture.

Step 6.
The main element of all photo manipulations is the shadow. The correct shadows can make the usual picture very spectacular. There are several ways to create shadows.
In our case, we will create a soft shadow, as it does not have a certain source of light, and there are no other shadows in the picture, which would suggest us the direction of light. Select the Brush Tool (B) tool with soft edges and low opacity. Draw a shadow under a girl, owl and rose.
Detailed process Drawing can be seen in it is video.

Step 7.
It's time to apply clarifying and dimming tools in order to highlight each item item. Create a new layer (CTRL + SHIFT + N) over all the layers and go to the Edit\u003e Fill menu, select the color of 50% GRAY. Install the Blending Mode layer on Overlay.
Dodge Tool (O) and Burn Tool (O) tools. Observe light and dark areas. Use the small Exposure value of both tools (10%).
So it should look like a layer at Blending Mode installed on Normal.
And this is the result before and after operation tools for clarification and dimming.
Step 8.
Two all layers into one separate (Ctrl + Shift + Alt + E) and name it "Final". Click on it right-click in the layer palette and select Convert to SMART OBJECT. Now all the filters that we apply to this layer will not damage the pixels of the layer itself. Make this layer (Ctrl + J) and name it "Final Adjustments". Install the OPACITY of this layer by 70%.

Step 9.
Select "Final" layer and go to the Image menu? Adjustments? Shadows / Highlights. Enter the values \u200b\u200bshown below.

Then go to the Filter menu? Render? Lighting Effects and configure as shown below.

Since we transformed a layer into a smart object, it is possible to change the filter settings at any time.
Step 10.
Select the "Final Adjustments" layer and go to the Image menu? Adjustments? Variations: Select More Cyan and click OK.

Being on the same layer, go to the Filter menu? Distort? Diffuse Glow. Use these settings:

Step 11.
At the end, create a Gradient Map adjustment layer (Layer? New Adjustment Layer? Gradient Map): Adjust the gradient colors as shown below. Blending Mode of this layer - Overlay and Opacity - 15%.

Conclusion
With similar photo-manipulations, I advise you to do a few things:
- Use the Dodge Tool (O) and Burn Tool (O) tool to soften the skin and improve the glow and shadow on the body parts. Shadows are very important, do not forget about them.
- Use methods that do not harm the main pixels of the image (corrective layers, smart objects, etc.).
- Use the Lighting Effects filter. It improves the picture by 99% in most cases.
- Do not be lazy to organize a palette of the layer. Group layers and give clear names. With a large number of layers, it will be easier for you to figure out where and what is located.
Final result:

Share the lesson
legal information
Translated from www.psdbox.com, the translation author is specified at the beginning of the lesson.
Create a document with dimensions of 1000 × 1100 px and poured it in black. Press CMD / CTRL + SHIFT + NTo create a new layer. Activate the tool Brush Tool. (B.) Color # 4E1502 and 1200 px size. Draw in the center of the Black Canvas:
Step 2.
Create a new layer, change the color of the brush on # F6BC2F. Draw inside the dark red region and change the mode to Color Dodge. 100%:


Step 3.
We use the same brush to draw again on the new layer, and change the mode to Overlay 70%:


Step 4.
Open the image of the nebula. Use the tool Move Tool (V.) to drag it to our canvas:

Step 5.
Click on the second button at the bottom of the set of layers to add a mask to this layer. Use a soft black brush with opacity about 40-45% to reduce the effect of nebula on some parts. You can see how we did in the layer mask and the result in the image:


Step 6.
Duplicate this layer and erase some parts using a layer mask to get such a result as shown below:


Go to Filter FILTER-BLUR-GAUSSIAN BLUR and choose the radius of 2 Px:

Step 7.
Open the image of the girl. First we use the tool Polygonal Lasso Tool.To create a selection around the girl (no need to be too neat with hair):

Click twice on the background layer to remove the lock.

Click on the layer mask button to hide the background part:

Step 8.
Press the right button on Layer 0, choose Refine Mask.:

Use the tool Refine Radius Tool. With about 100 px size to draw around the head and show more hair.

Here is our result after cleaning (we used a red background to show you it more clearly):

Step 9.
We have a girl after extracting on our main canvas, over all layers:

Step 10.
I want to reduce the brightness on the bright parts of the model, so we create a new layer above the model with Clipping Mask.:

Use a brush with color # E6E2E9 to paint bright hair, face and part of the hands and change the mode to Multiply. 100%:


Step 11.
We continue to reduce the brightness of the face model, hands using a new layer ( Clipping Mask.) And the same brush. We changed the mode on Multiply. 50%:


Step 12.
We would like to add more details on the hair of the model, so on the new layer we used a brush with a color # 5A595B and about 20 px. Here we had the result:

Step 13.
To add models a little red, we used the correction layer with Clipping Mask.. Go to B. Layer-New Adjustment Layer-Hue / Saturation:


Step 14.


Step 15.
Create a lot Curves.To darken the model:

In a layer mask Curves. We used a soft brush to remove and reduce the darkening intensity.


Step 16.
Create a new layer and use a brush with color # F66E2B to paint your hair and hands. Change the regime on Color 100%:


Step 17.
On the new layer, use the brush to add more bright red shades on your hair and body contour. Install the Mode on Overlay 100%:


Step 18.
We used a brush with color # F5C25F to paint the outline of the model and add a little orange shade. Change the regime on Hard Light 100%:


Step 19.
Create a new layer and use the same brush to paint some hair tips and change the mode to Overlay 100%:


Step 20.
Create a new layer, we used the color # F66E2B to draw an eye inside, and then change the mode to Dodge Mode. 100%:

Step 21.
Click on the brush menu, choose RESET BRUSHES.To activate the default brushes settings. Now on the new layer, change the color of the foreground on the # F66E2B and click on the brush Fuzzball.:

We reduce the size of the brush to 80 px and create stains inside your eyes. We changed the mode on Linear Dodge. 100%:

Step 22.
To improve some features of the face, we created a new layer, changed the mode to Overlay 100% and flooded 50% gray:

Use the tool Dodge and Burn Tool (O.) With setting Midtones Range., Exposure About 20-25% to make a brighter effect in the eyes, the edges of the face and the nose, darken the eyebrows, the bridge. You can see how we did in mode. Normal and result in mode Overlay:

Step 23.
Create a new layer at the top, use a soft brush with color # BD5733 to paint the bottom of the image:

Step 24.
To get a stronger effect here, we used a soft brush with color # F6BC2F and changed the mode to Overlay 100%:


Step 25.
On a new layer, use a brush with color # F6BC2F to draw on two hands. We changed the mode on Hard Light 100%:


Step 26.
Move the image of fireworks on our canvas and install the mode Color Dodge. 100%:


We called the SPARKS 1 layer.
Step 27.
Add a mask to this layer. Use the brush to remove and reduce the intensity of fireworks in some parts shown below:

Step 28.
On the SPARKS 1 layer go to the filter Filter-Distort-Twirl:


Apply Gaussian blur 2 px:

Step 29.
Duplicate this layer, we use CMD / CTRL + TTo rotate it and get the result shown below. You can use the layer mask to remove unnecessary parts:

Step 30.
Open the image of the flame. We chose the first two images for work:

Use the tool Rectangular Marquee Tool (M.) to create a selection for part of the fire on the image1:

We have it at the bottom of the body of the girl, change the mode to Screen. 100%:


Step 31.
To remove the white edges left after changing the mixing mode, press twice on this layer, choose Blending Options.. Hold Alt / Option and move the black slider This Layer. As long as the white edges disappear:


Step 32.
We take other parts of the flame and have them around the hair model and its body. We applied the same settings. Blending Options. To all these layers and used the layer mask to remove unnecessary parts.


For effect, we used 14 layers.
Step 33.
We highlight all layers with a flame, then click CMD / CTRL + GTo group them. Change the group mode with Pass Through. (default mode for groups) Screen. 100%. On the layer 14 go to the menu Layer-New Adjustment Layer-Curves:

In a layer mask Curves. Use the brush to erase in the field of hands, hair and lower part, since we do not need to do these parts too light:

Step 34.
Final step: click CMD / CTRL + Option / Alt + Shift + ETo merge all visible layers. Go to Filter
In this lesson, I will show you how to create a fantastic SCI-Fi style portrait. You will learn how to impose a portrait snapshot to a space background, add effects using textures, work with mixing modes, improve color and more.
1. Create background
Step 1
Create a new document of 1500 x 900 pixels with the following parameters:
Fill color background # 010E27.
Step 2.
Go Layer. - New Adjustment. Layer. - Curves. (Layer - a new correction layer - curves) and reduce the brightness by pulling the diagonal line down. In the layer panel, choose the appliant layer mask and activate Brush. Tool. (B) (brush). We spend the soft circular circular tassel on the sides of the document so that in these areas the background is not too dark. Later we add details.


Step 3.
Move the cosmic background to the working facility and change the mixing mode of the layer on Screen.

At the bottom of the layers panel click on the button Add. layer. mask. (Add a layer mask) to add a mask on a layer with a cosmic background. The soft black tassel is chaotic paint some areas in the center and on the sides.

Step 4.
Above Curves. (Curves) and transform it into a clipping path with a Ctrl + Alt + G key combination. We reduce the brightness of the picture to get a softer and neat effect.

2. Add a model
Step 1
Open a photo with a model, cutting it using Polygonal LASSO. Tool. (L) (straight Lasso) and tool Move. Tool. (V) (move) Move into the center of the working path.

A black soft brush edit the mask so to hide the neck, shoulders, hair and forehead model.

Step 2.
Create a new layer and transform it into a clipping mask (Ctrl + Alt + G). Activate Stamp. Clone Tool. (S) (stamp) and delete earrings:

Step 3.
Add a correction layer to reduce the brightness on the lower edge of the chin and cheeks. We edit a soft black brush with a mask in those areas where we do not need an effect from the corrective layer.

Step 4.
We add a correction layer Hue./ Saturation. Saturation. (Saturation) to -16:

Step 5.
We add a correction layer Color Balance (Color balance) to adjust the color of the model according to the background. Set up Midtones. (Medium Tone):

Step 6.
Take LASSO. Tool. (L) (Lasso) and highlight the mouth. Then go Layer. - New Adjustment. Layer. - Curves. (Layer - a new correction layer - curves). Increase the brightness of the lips.

3. Create Makeup
Step 1
Open a picture with a light ring and insert it to a working paper using Move. Tool. (V) (relocation). We change the mixing mode of this layer on Screen. (Lightening) with opacity 100%.

Step 2.
Go Filter. - Liquify. (Filter - plastic) and activate Twirl Clockwise. Tool. (C) (twisting clockwise). Then twist the ring until we obtain the result, as in the picture below, pay attention to the central area in the form of the eye. We carry the resulting figure on the eye model.

With the help of masks, we delete too much.

Step 3.
Duplicate layer (Ctrl + J) and reflect a copy Edit. - Transform - Flip. Horizontal (Editing - transformation - reflect horizontally). Move the copy to the second eye.

Step 4.
We choose both layers with the eye and click Ctrl + G to add them to the group. Change the mixing mode of this group on Screen. (Clarification) with opacity 100% and add correction layer Hue./ Saturation. (Color tone / saturation) to change the color of the eyes.

Step 5.
Create a corrective layer Color Balance Midtones. (Medium Tone):

4. Add nebula
Step 1
Move the image Nebula 1 to the working paper and change the mixing mode to Screen. (Lightening) with opacity 100%. Go Edit. - Transform - Warp. (Editing - transformation - deformation) and distort the form of nebula so that it corresponds to the perspective of the head and eyes.

Using the mask, adjust the edge of the nebula.

Step 2.
Duplicate (Ctrl + j) several times this layer and distribute copies around the head and face, trying to achieve a clearly visible effect on the cheeks. If necessary, use a mask to get rid of unnecessary parts.

Step 3.
We allocate all layers with the nebula and add to the group (Ctrl + G). Install the mixing mode of the group on Screen. (Lightening) with opacity 100%. Then add a correction layer Color Balance (Color Balance) and configure Midtones. (Middle tones) and Highlights. (Shine):


Step 4.
We add a correction layer Levels. (Levels) to hide the remaining borders and soften the effect slightly.

Step 5.
We add a second picture to the working web. The Nebula 2 and place it at the bottom. Activate free transformation (Ctrl + T) and rotate the image as shown below. Install the layer mixing mode on Screen. (Lightening) with opacity 100%.


Step 6.
Create a corrective layer Levels. (Levels) to hide the boundary of the picture and soften the effect.

Step 7.
We add a correction layer Color Balance (Color Balance) and configure Midtones. (Medium Tone):

5. Add fantastic lighting
Step 1
We insert a fantastic light into the workspace. We place it on your head and install the mixing mode on Screen. (Lightening) with opacity 100%.

Use the filter Liquify. (Plastic) (tool Forward Warp. Tool. (Deformation)) to deform the image and get the result as shown below:

Step 2.
Double duplicate (Ctrl + J) this layer and distribute copies throughout the head and on the right side of the model. Use the mask to remove all the extra details.

Step 3.
Open a separate picture with fantastic light, take LASSO. Tool. (L) (Lasso) and highlight a part. Copy (Ctrl + C) and insert (Ctrl + v) a selected fragment in the lower left side of the head. Using tools Forward Warp. Tool. (Deformation) give a fragment the arcuate form.

Using a mask, hide the hard edges on the fragment.

Step 4.
We allocate another fragment and, using the same technique, insert it on the right side of the head.

Step 5.
Using the same method, add more small parts.

Step 6.
We group all layers with fantastic light and above inside the group add a correction layer Color Balance (Color Balance). Set up Midtones. (Medium Tone):

Step 7.
Add a correering layer Hue./ Saturation. (Color tone / saturation) and reduce Saturation. (Saturation) Blues. (Blue) to -81:

Step 8.
We add a correction layer Levels. (Levels) to fully hide the remaining visible borders:

6. Additional Makeup
Step 1
Create a new layer. Take Elliptical. Marquee. Tool. (U) (oval) and draw a small circle. Activate Gradient. Tool. (G) (gradient) and fill the circumference with a radial gradient, colors - # F8B2F2 and # 834115.

Via Forward Warp. Tool. (Deformation) pull the circumference in length and place the model of the jaw model along the contour.

Step 2.
We change the mixing mode of this layer on Color Dodge. (Clarification of the base) with the opacity of 100%. We add a mask and edit the effect so that it looks soft enough.

Step 3.
Double duplicate layer. One copy by placing near the nose on the cheek, and the second reflect horizontally Edit. - Transform - Flip. Horizontal (Editing - transformation - reflect horizontally) and insert on the second cheek.
Approximately this result we must get in the final:
To work, we will need:
1. Two third-party plugins to Photoshop: ImageNomic Portraiture and Nik Color Efex Pro 3.0. Find them in the network is very simple. Natural thing can be done without them, the means of Photoshop itself, but in my opinion they make a lot of life
2. Source photography, preferably not a phone quality and not the size of a matchbox
3. Photo for creating the background. It can be an image of a forest, flower garden, nettle thickets, etc. In general, something vegetable, with a sufficiently large number of parts and the transition of the tones. Even not necessarily high quality. I used the following Stock Image:
4. Couple of cliparts: grass in PNG format and snail for creating rozhkin:
So:
1. Open the original photo. It is clear that in order to substitute a new background, you first need to remove the old one and we will deal with the most convenient way to us. Usually I prefer to simply remove the background around the object with a hard eraser with a strong approach, but this time I used the Magnetic Lasso Tool, allocated the figure and moved it to a new layer using Layer Via Copy:
I hide the background layer, most likely he will no longer need it.
2. When using Lasso Tool, there are most often some extra details, pieces of an old background, dark unnecessary outlines, and therefore we take hard erase and carefully pass on the edges of the figure, subordinating this disgrace:
3. In some places closer to the edge, the figure is still dark, for example, hair, and we need it to get better in the future, pretty light background, so we take the Dodge Tool with Exposure equal to 15-20% and lighten the edges:
4. Now you can substitute the background. We carry it on our picture, put the lower layer and quite very much in the Gaussian Blur to almost a homogeneous state:
5. Let us leave the background and we will deal with the retouching of the face (in general it is always the most painstaking part of the work). To begin with, delete all defects (only defects, and not the whole texture from the face) with the help of Clone Stamp Tool and Healing Brush Tool:
Now you can slightly soften the texture of the face, here the Imagenomic portraiture plugin is just useful. We duplicate the layer with the figure (now there should be three, except for the hidden background). The plugin is applied to the top layer, only it is desirable not to overdo it with the settings so as not to get quite plastic skin:
And then reduce the opacity of the upper layer of percent to 60-70 (but in general it is all done on the eye and depending on the size of the source) and the soft eraser of the erect of the region around the eyes, the mouth and other strategically important details of the person who do not have to acquire indity. They come from the bottom layer:
6. Let's give the eyes a little shine and color saturation. To do this, you can copy the eye iris on a new layer, I usually select the rectangular marquee tool, it is reset to a new layer using the Layer Via Copy and use the Color Dodge overlay mode for the layer. Unnecessary parts are simply removed with a soft eraser of a small diameter:
I sat down a bit with color (and we can change it in general). We go to HUE / SATURATION (there must be a layer with iris) and move the slider to taste. When the result is arranged, we click OK and we can reduce the two top layers. To give even greater shine and some effect of the glow, you can slightly walk along the lower arc iris eye Dodge Tool:
7. Now we will deal with painting works) to subsequent sections of the face. To do this, select the body-pink color of the soft brush with low intensity (5-7%) and on the new layer with the overlay overlay mode we go through the forehead, cheeks, nose and chin, especially intense - on the cheeks:
In the same way, we care with the lips:
8. I was slightly wedged into the process of makeup in that with a clone Stamp Tool with a soft brush and Opacity \u003d 25-30% a little softened wrinkles under the eyes, uneven specks over the lips and areas of the chin and tray (tray is not a tray on which Digging, and what is under the nose):
9. We continue the coloring personally to me, I wanted to add shadows forever and necessarily some fresh spring-summer colors, and the salad is suitable here as it is impossible. The same principle as in paragraph number 7:
10. What seemed to me here is relevant to add, so it is freckles. I love freckles very much, and my tassel helped me here, which is very easy to do, and you can find on the network. In the form of placer points of irregular shape. I chose a black brush color and applied freckles to a new layer, everything with the same overlay overlay mode:
11. Reverse the attention to the fact that the contours of the figure contrast the background with the background, because it is blurred, and the contours are very clear and in general somehow looks unhealthy so we will take Blur Tool and we will warm them up, rising on the shoulders and hair and not much learning - on hands:
12. It is time of third-party details. Open the file with the grass, drag it with its upper layer on our document, placing as it is convenient for us and imitate the raffle, eroding it with Gaussian Blur. To fit the grass on the tone, for the original it is dark, as it seems to me, I took advantage of Photo Filter, adding yellowness:
You can not be limited to grass, add leaves, flowers, that only the soul wishes, the main thing is not to turn the forefront in the smeared vinaigrette finally
13. Finally, I decided to turn myself in the utility utility battery with the help of the sink of that very snail the image of the snail and caught it so that the sink is formed by Rozhkin, and then we remove the snail with a small transparency (the poor fellow "src \u003d" http: / /Planetaphotoshop.ru/images/smilies/swoon.gif "/\u003e) and part of the base of the sink so that it is smoothly smoothly in whiskey (it is necessary to admit that this moment I am twisted somewhat). I have a slightly blurry, for they must be not very clear:
Snail is too dark, so it took it a little clarify and aggravate all this case Dodge Tool with Range - Highlights:
14. I tried to combine whiskey (the temple - m. Side head ... (c) Dal) and the horns of some kind of hair, came out, right, not very, maybe you will get better choosing a smudge tool, and a soft brush with a sooo small diameter 2-3 pixels (if a photo of a very small size, then at all 1 pixel) connect horns with hair and vice versa:
You can reduce layers.
15. In my opinion, there is not enough of some messenger, as one comrade was expressed - pseudoscience glare
I create glare as follows: on a new document with a transparent background in disorder, we put the blurred spots of white, different sizes. It turns out a kind of peculiar falling snow not in focus:
This snow is placed on top of our work and put the Mixing mode overlay (again this overlay "src \u003d" http://planetaphotoshop.ru/images/smilies/nea.gif "/\u003e). The snow turns into yellow glare, but very bright, so We slightly reduce the opacity of the layer and a soft translucent eraser erase glare from the face of the face so that they do not create an impression of some exotic skin disease:
16. The picture is practically ready, but she would not prevent some generalizing all elements final processing. This moment is the most beloved. For this, I use the Nik Color Efex Pro plugin. I can hurt him for a whole hour, selecting the settings and effects to taste: