Unpack the archive on your PC and copy its contents to the folder C:\Program Files\TeamSpeak 3 Client\plugins, agreeing to replace it (if an error occurs that says it cannot replace/delete because some program is using this file, reboot PC and try again)
Working version of the overlay:
In TC3, the overlay plugin is already included in the distribution. It just needs to be activated and configured correctly. This is what we will do now.
The good thing about the plugin is that it works on all Windows systems, be it XP, Vista, 7, both i386 and x64. Moreover, the plugin is active only in DirectX and OpenGL applications, regardless of full screen or windowed mode! There is a HUGE advantage to this. There is also a minus, after each correction of the settings, you need to reboot the IR, only then you will see the changes.
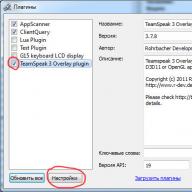
1) Launch the vehicle, go to Settings (2nd menu on the right) -> Plugins (alternative: just press the key combination CTRL+SHIFT+P).
2) In the window that opens, on the left side we see the plugins installed in TS3. Activate the TeamSpeak 3 Overlay plugin
3) After activation, the Settings button at the bottom left becomes active - these are the settings of the Overlay itself. Click on it.
4) The window that opens contains the settings that we will edit.
"Overlay" tab: do not change anything (the first 2 checkboxes are not checked, the value in the window is "0").
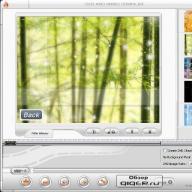
Tab "Display": These are the settings for the position of the Overlay window in the game.
The first setting "Initialization mode" has 3 modes:
a) Minimal - only those users who are speaking at the moment appear
b) Normal - all users in the channel are visible.
c) Full - you see all users of the TS server (if you have rights, of course =))
I believe that we only need a regimeNormal. (I have Full, it has the advantage of moving from channel to channel right in the game (if you have already entered this room and entered the password for it) )
Next is the block for the location of the Overlay window in the game window, the size of the window (left columns) and the position of the TC3 logo (right columns, unnecessary)
Here the position is set based on the screen resolution in the game (or window size in windowed mode).
The lower block of settings is a pop-up window (shows who has entered/exited the server/channel, channel chat, etc.) I am happy with everything here, I see a bar at the very top of the screen, which disappears 5 seconds after the event (this block can be leave with default values).
"Colors" tab: Color and transparency settings.
The first block of settings is the transparency of the window, scrollbar (if nicknames do not fit into the window, a scrollbar appears), window title and background color.
Values from "0" (not visible at all) to "100" (no transparency).
set the transparency lower (30-50).
The second block shows the colors of user nicknames in different stages (speaking, silent, microphone off, etc.
Tab "Input": Manage the window in the game. Assign a key to activate the control, checkboxes are better don't put
Something like that.;
Thanks for the material provided: http://forum.72ag.ru/index.php?showtopic=19322
A selection of 10 plugins for TeamSpeak 3. You can download any plugin directly from this page for free.
TSNotifier
The simplest overlay for Teamspeak 3, not yet abandoned by the developers (like other overlays). Supports API 21.
Connection History
Connection History, as its name suggests, saves the history of connecting to servers, which can be accessed through the TeamSpeak menu, or by pressing Ctrl+H.
Radiobot "Sinus Bot"
The Sinus Bot plugin allows you to listen to Internet radio and regular music files directly in Teamspeak.
TS3MassMover
With TS3MassMover you can quickly move customers from one channel to another. You can also move the entire server at once.
TS3MusicBot
With the power of TS3MusicBot you can create your own music bot for Teamspeak. The latest version supports API 20.
TS3Soundboard
TS3Soundboard plugin is a soundboard for Teamspeak that allows you to not only play and listen to music with your friends, but also play fun sounds and even create your own music bots (on Linux server only).
TessuMod
The TessuMod plugin is designed for World of Tanks players. Now you can see right in the game which user is currently speaking on a channel in TeamSpeak. An animation will appear near the speaker's tank, indicating that the sound is coming from him.
ROCCAT
If you have a ROCCAT device, with this plugin you can configure its feedback to TeamSpeak and change the appearance of your client to match your equipment. The plugin has settings for blinking the LED on the ROCCAT device; you can set it to glow in different colors during a call.
TeamSpeak 3 is a popular program among gamers for group communication during gameplay in online games. This is a kind of virtual walkie-talkie with unlimited capabilities and number of channels. With its help, an arbitrarily large number of users can communicate in the “all at once” and “everyone listens to one” modes.
Let's look at ten of the most popular extensions for TeamSpeak 3, which will make the program indispensable for conferences and joint games.
TSNotifier
Popular overlay for TeamSpeak. An overlay is a tiny utility that overlays informational alerts on top of the game, making them part of the entertainment experience. With TSNotifier, TeamSpeak displays the nicknames of users who connect to the channel, where the user is currently located, who is disconnecting from him, who is speaking, who has changed their status, etc.
Connection History
The name of the plugin indicates its purpose: saving and viewing the history of connections to servers. From the settings, the add-on allows you to change the date display format and the type of connection grouping: by server, connection date and time. You can view the history by pressing Ctrl+H or by calling the Show History command through the “Plug-ins” main menu item.
Radiobot "Sinus Bot"
The add-on gives you the opportunity to listen to radio stations broadcast on the Internet and publicly available audio files through TeamSpeak.
TS3 Mass Mover
Client Add-on provides the user with the ability to move clients from a channel or server to a pre-specified channel. All actions are carried out through the console, which allows you to specify clients and their groups in text mode, select target channels and servers.
The plugin has not been supported by the developer for several years, although enthusiasts do not forget about it.
TS3MusicBot
The add-on gives you the ability to play music tracks on your own TeamSpeak 3 channel. The extension supports playing any music files stored on your hard drive or external media, managing music directories, broadcasting online radio stations, and playing audio from YouTube or SoundCloud.
To work, it requires the latest version of Java and the .NET Framework, no older than version 4.5.
TS3Soundboard
Soundbar with functions for playing music and streaming radio, adding third-party sounds and adjusting the volume level of any user and selected files. Supports adding your own music bots.
TessuMod
Addition for fans of World of Tanks. It will show who is currently on the air of the channel (speaking) by displaying an animation of the speaker's nickname near his tank.
ROCCAT
Setting up TeamSpeak feedback with the device. Allows you to change the color of the LED flashing during a conversation.
Logitech G-Key Plugin
It will help you use the G-keys of the Logitech keyboard to control the client part of the program.
FALNET G19 Display Manager
Introduces support for Logitech G19 keyboards to control the TeamSpeak application.
Hello all fighters!
As it turned out, many clan players were interested in setting up the TeamSpeak overlay in the WoT client. Well, the main criteria for setting it up will be given below; their individuality is a purely personal matter for everyone.
So, for correct setup, we will need to install TeamSpeak 3 Client downloaded from the client’s official website - http://www.teamspeak.com and configure its operation. Because my client is Russified, a description will follow referring to menu items and windows using translation.
To configure the overlay, you need to select the menu item Settings -> Plugins or press the key combination Ctrl+Shift+P.
The Plugins dialog box will open. In the list of plugins installed with the program, you must select the “TeamSpeak 3 Overlay plugin” plugin and then click on the “Settings” button.

In the “Overlay Options” window that appears, first select the “Input” tab and configure the hotkey combination for calling overlay windows in various applications (in our case, the WoT client). To do this, click on the “Set Hotkey” button and set a key or key combination. I have the “Alt+X” key combination configured, but you can choose those that are more convenient for you, this is not so critical, as long as this key combination is not used by your operating system and the WoT client.

After completing the setup of the hotkey(s), we go to the “Colors” tab, in which we configure the colors and size of font display and the transparency of the overlay windows, according to the screenshot below (in our mutual opinion with Mikhail (technik_305) the given settings are the most optimal).

Individual settings, depending on your monitor and personal preferences, can be applied when choosing and font size for displaying the list of conversation participants and system or private messages (marked in green in the screenshot).
That's it, the basic settings are done.
We launch the “World of Tanks” client and see that the participants in the conversation are displayed on the left side, and messages on the right.

But, most likely, the location of these areas will not be optimally selected. To arrange these areas as you see fit or repeat their location as in the example, to do this, in the game client, press the hotkey combination or the keys that we specified when setting up the “Input” tab (remember that I use the “Alt+X” key combination "), the game client will take the following form.

By dragging and stretching the overlay windows, achieve their optimal location or position them as in the example, then press the hotkey combination again to return to the normal mode of the game client. These window location settings can be applied not only when you are in the Hangar, but also directly in battle (if the game situation allows it).
So, we have completed the basic settings for displaying the overlay. If you want to make them completely individual, the TeamSpeak toolkit offers this opportunity. It's just a matter of your desire and imagination.
Thank you for your attention! Good luck on the battlefields!
Setting up voice overlay in PlayClaw 5 for TeamSpeak 3 (RU)
Introduction
To activate the TeamSpeak 3 overlay in the PlayClaw 5 program, we need to copy the plugin from PlayClaw to the TSki plugins folder, then activate the plugin itself in the TS and PlayClaw settings.
Step by step guide
1. We go to the folder where PlayClaw 5 is installed, for me this path looks like this: "D:\games\Steam\SteamApps\common\PlayClaw"
2. Open the ts3plugins folder (it is located in the PlayClaw root directory)
3. You need to copy the required TeamSpeak plugin ( Right click on the file->Copy or just select the desired file and click CTRL+C). For 32-bit systems (x86) this is ts3-playclaw5-plugin-32.dll, for 64-bit systems (x64) this will be ts3-playclaw5-plugin-64.dll. If you don’t know what bit depth your system or TeamSpeak program is, see 3a And 3b.
3a. To find out what bit depth your operating system is, just open the properties of my computer and look at the line "System type:"
3b. If you have a 64-bit system, then it may be that you installed the 32-bit version of TS3 (this happens when you go to the site and click on the “download TS3” button, rather than going to the “Download” section). To make sure that you are using the 64-bit version of TS3, just launch it and go to the task manager (CTRL+ALT+DEL), find the TeamSpeak 3 process there and click RMB->Properties. And at the very top where the name of the executable file is written there will be a publication note.
4.
Go to the folder with TeamSpeak 3 installed; it is located at the following address: “D:\Program Files\TeamSpeak 3 Client”, go to the folder called “plugins” and paste our file ( RMB on an empty area->Paste or click CTRL+V)
5.
Launch TeamSpeak 3, go to Settings->Plugins and in the left column put a checkbox against the PlayClaw 5 TS3 plugin.
6. All is ready! If you do not see TS3 while PlayClaw 5 is enabled, make sure that TeamSpeak 3 is enabled in the overlay settings.
Set up the overlay TeamSpeak 3 in PlayClaw 5
To activate the TeamSpeak 3 overlay in the program PlayClaw 5 , we need to copy the plugin from PlayClaw to the plugins folder TS, then activate the plugin in the settings of TS and PlayClaw.
1. Go to the folder where you installed the PlayClaw 5, I"ve got this way is as follows: "D:\games\Steam\SteamApps\common\PlayClaw"
2. Open the folder ts3plugins(it is located in the root directory of PlayClaw)
3. You need to copy the necessary plug TeamSpeak ( Right -click on the file -> Copy or just select a file and press CTRL + C). For 32-bit systems (x86) is a ts3-playclaw5-plugin-32.dll, for 64-bit systems (x64) it will be a ts3-playclaw5-plugin-64.dll. If you do not know what system bitness you have or program TeamSpeak see paragraph 3a and 3b.
3a. To find out what the bit your operating system is enough to open the properties of my computer and look at the line "System type:"
3b. If you have a 64-bit system, it may be the case that you have installed the 32-bit version of TS3 (it happens when you go to the site and poke the button "Download TS3", and do not go in the section "Download"). To make sure that you use the 64-bit version of TS3 enough to run it and go to the task manager (CTRL + ALT + DEL), there is a process to find TeamSpeak 3 and press Right-click -> Properties. And at the very top where it says the name of the executable file will be standing mark the bitness.
4.
Go to the folder containing the TeamSpeak 3 I have it located at the following address: "D:\Program Files\TeamSpeak 3 Client", go to the folder named "plugins" and paste your file ( Right click the blank area -> Paste or press the CTRL + V)
5.
Run TeamSpeak 3 , go to Settings->Plugins in the left column and put the checkbox against the plug on PlayClaw 5 TS3.