And now it happened! Finally, the decision was made to buy an iPhone 6s, and it even lies in its packaging on the table at home. Before you can start using it, you need to activate and set up your phone.
The first steps
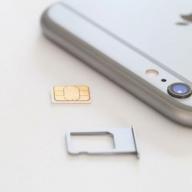
First you need to insert a SIM card. On the phone taken out of the package, you need to find the connector on the right side surface and insert the prepared SIM card there. To open this connector, use a special tool called an i-clip. If you have not purchased a SIM card yet, you can skip this step. But nevertheless, it is better to start working fully, so that after activating the iPhone, you can check if there are already ready-made settings for the US operator on the phone, and how efficient the radio module is.
After the SIM card is installed, you need to turn on the phone. For iPhone 6s, the button for this is located on the right side surface, at the top of it. The phone will turn on if you press and hold this button for a few seconds. The fact that it has turned on will be indicated by a welcome message that appears on the screen. Then, according to the instructions, you need to select the country of residence and language.
IPhone Activation
Now you can start activating your phone. To do this, you need to connect it to a computer or Wi-Fi. It is also permissible to use the 3G / LTE network. If there is a wireless network, then connecting to it is the most convenient option. If it is not available, then you need to select "use the mobile Internet" from the cellular operator of the installed SIM card.
It would seem that you can use a Wi-Fi network from a tablet or other smartphone, but this will not work with an iPhone.
After that, a request will appear on the phone screen to enable geolocation. You can enable this function after activation, or immediately upon request. Experts recommend the second option.
Then the screen will display three options for activating the phone:
- The first sentence "use as" will suit the vast majority of users, especially those who are working with an iPhone for the first time. As a result, only standard settings will be set on the smartphone.
- If you turn to "restore from iCloud copy", then on the new phone all the settings that were on the user's previous iPhone will be recreated. All folders containing applications will also be restored, and all notes and tabs will be saved in the browser.
- The third option "restore from iTunes copy" is suitable for those users whose iPhones did not support iCloud, and the iTunes function was used to save the backup.
Those who choose the first activation option, the device will offer to create an account to log into Apple services - Apple ID. Then you need to go to the phone already under your created data and agree to the "Terms and Conditions" by touching at the end of the text.
You will have to wait while the device finishes activation and settings. At the end, a corresponding inscription will be displayed on the screen, and the smartphone will offer to connect various services and protect the device from someone else's intrusion. Almost all of the services offered are free and can be turned on right away. There will also be asked various questions from the "Diagnostics" and "Display Magnification" sections. The phone will then be ready for use.
Output
Judging by the reviews, the ease of use of the iPhone 6s and its technical characteristics cause only positive emotions among the owners. However, the Apple store is always happy to make its customers happy with quality goods from the world of technology. Recently, a lot of positive reviews have been heard about another Yabloko product - the macbook pro. However, this laptop should be discussed separately.
If you are reading this article, you must be congratulated - you bought a brand new iOS device and now you need to configure it, in particular, create an Apple ID (Apple ID) account, which will help to fully reveal the functionality of the gadget.
This article will show you how to create an Apple ID on iPhone, but the guide can also be used to create a personal account on any other iOS device.
However, let's start in order and understand the concepts - what is Apple ID and why it is so necessary to register this ID.
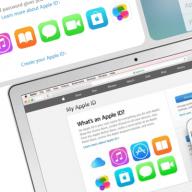
Apple ID is a personal account that is unique for each iOS user, which allows you to access all of the Apple giant's branded services, including the App Store, iCloud, iMessage, FaceTime, etc.
Of course, it is possible to exist without an Apple ID, but in this case it is a very correct word - to live in full force, as they say, without a personal account, the iPhone cannot. Look for yourself, without an Apple ID it is impossible even to download applications in the App Store, that is, you will only have access to the “native” preinstalled programs, the range of which can hardly be called wide and comprehensive. Apple does not even pre-install the most popular social networks - so without an ID, you will have to watch fresh photos in Instagram exclusively through a browser.

With regard to other Apple services, here too, you can suffer serious losses. Don't have an Apple ID? This means you can't send messages via iMessage for free and make calls via FaceTime. And you can't access iCloud cloud storage, activate the "Find iPhone" option, and so on and so forth. In short, wherever you go, an Apple ID is required everywhere.
How to create an Apple ID on iPhone?
Don't worry, though, as creating an Apple ID takes very little time. Many, however, are frightened by the fact that when registering an identifier, they need to provide bank card details, which is logical, because you need to buy applications for something. Nevertheless, there are many users who are afraid to enter card data and the lack of an opportunity to buy a program or content does not bother them. For those users, we have great news - entering billing information is optional, and in our guide we'll show you how to “skip” this step.
Well, let's figure out how to register an Apple ID. It should be noted that there are two ways to perform this procedure - registration can be done directly from the iPhone, or you can use the "intermediary" - the iTunes program. We will provide instructions for both the first and second methods, however, we note that there will be practically no differences in them. That is, the choice of this or the new method of creating an Apple ID account will be determined only by the fact with which device it is more convenient for you to work - if it is easier to use the i-device directly, then read the first instruction, but if the PC and iTunes are “closer”, then the second ...
Registering Apple ID from an iOS device
So, first of all, since in our opinion it is easier, we will tell you how to create an Apple ID from an iPhone. It doesn't matter if you have a brand new iPhone 7 or another model, the instructions will be the same:

As soon as the account is activated, the application that you selected in step 1 of the instructions will start downloading.
Apple ID registration via iTunes
Now let's take a look at the process of registering an account through iTunes. As we said above, the methods are very similar, and therefore here we will briefly summarize the essence. If anything is confusing, refer to the first tutorial:

Apple's technique is one of the easiest to use. With each new version of iOS, developers are trying to simplify the system and make it as comfortable as possible for owners. But despite this, inexperienced users still have problems with setting up Apple gadgets when they first activate. We will analyze in detail all the settings and their nuances.
Setting up iPhone, iPad and iPod from scratch: a description of all points
The initial setup largely determines the level of quality and ease of interaction with the device. Despite the fact that many of its items can be skipped or changed later, for optimal operation of the gadget, it is recommended to perform all the necessary manipulations at the start.
Country selection, time and date setting
When your Apple device starts up, a welcome screen appears. Swiping it aside takes you to the language options for the interface. Next, you need to select a country. After that, based on the data on the time zone of the selected region, the time and date will be determined automatically.
Connecting to a wireless network
Connecting to Wi-Fi will be useful when performing the next steps in setting up the device, in particular, creating a new Apple ID or connecting an existing one (in case you use the same authentication system on several Apple gadgets). However, if you intend to save time or simply do not have access to a Wi-Fi network at the moment, this step can be skipped.
Geolocation
In this item of device settings, it is proposed to enable or disable geolocation. Geolocation services are responsible for collecting information about your geographic coordinates. They are used by applications such as Maps, Instagram, Camera, etc. to calculate your approximate location. You can also use location services to track your Apple device. This function will come in handy in case of loss or theft of a gadget. As for the advantages of turning off geolocation, it will save battery power.
You can activate and deactivate geolocation services at any time by going to the Apple settings. Also, their action is allowed to be limited for some programs.
Setting up iPhone, iPad, iPod
At this stage, it is proposed:
- set up your Apple device as new
- restore it from an iCloud backup;
- restore the device from a backup to a local disk.
If your smartphone or tablet is brand new and you are setting it up from scratch, do not hesitate to choose the first item. However, when setting up a gadget after upgrading the firmware or restoring the system, the use of data backups will be more relevant.
Apple ID
The next step is to create an Apple ID or sign in to an existing account. Apple ID is an account that gives access to applications such as the App Store, Apple Music, iCloud, iMessage, FaceTime, etc. To create one, you will need to fill in the following information:
- FULL NAME.;
- e-mail to which the account will be linked;
- account password;
- select security questions and answers to them (required to restore your account);
- date of Birth;
- spare e-mail;
- mailing address.
If you decide to skip this step, you can add or create a new Apple ID through the device settings at any time.
Terms of Use
Next, you must accept the terms of the license agreement for use. This item is mandatory and cannot be skipped. It's no secret that 99% of Apple users accept the terms of use without reading them. But if you decide in good faith to familiarize yourself with the full list of the nuances of the user agreement and still disagree with some point, the only way out is to reject the terms of use and return the device to the store.
Touch ID and password
Acceptance of the terms of use brings you to the final stages of setup - creating a fingerprint using Touch ID and password. These options will help protect your smartphone or tablet from unauthorized use. Confirmation of the password and / or fingerprint is required when unlocking the gadget (switching from the lock screen to the desktop) and logging into the App Store. You can skip this step and create a password and fingerprint at any other time by going to the iOS settings.
Touch ID works on Apple devices with a fingerprint reader, i.e. iPhone 5s and up. Older gadgets use a standard password.
Diagnostics
The final step requires you to agree or refuse to send system diagnostic data to Apple. The request is quite standard and there is nothing in it that would violate confidentiality. On the contrary, information about bugs and crashes in the iOS system will allow developers to improve it and fix deficiencies in future updates.
Having finished with the last stage of setup, all that remains is to click the "Get Started" button and enjoy using your Apple device.
First launch and setup of an iPad, iPhone or iPod immediately after purchase - video
Apple's initial setup doesn't take long and requires minimal tinkering. Most of the steps, namely connecting to Wi-Fi, geolocation, creating an Apple ID, Touch ID and password, can simply be postponed until later. The iOS system makes it possible not only to return to setting up all these options at any time, but also to change them in the future, based on personal preferences.
Often, after purchasing an iOs device, the user does not know what to do with it next, in connection with which the newbie has a question: "How to set up the iPhone and start using it?"
According to advanced Yablovodov, the initial setup is an extremely important stage, which determines the quality and usability of the device in the future.
The article will discuss in detail how to properly set up a new, freshly purchased iPhone.
You will have the opportunity to enjoy all the advantages of Apple technology and not pay store managers for the initial settings of your device.
General settings
So, you took your iPhone out of the box and pressed the power button.
If you are setting up a new Apple device, then this setting is optional and you can skip this step by clicking Next.
If you decide not to skip this step and are in the range of Wi-Fi networks, then select the desired one and enter the password, and then click "Next".
In the next window, you will be asked to choose: enable or disable geolocation services.
Important! Responsible for the operation of geolocation servicesGPS module. When activated, the iPhone will track your location, use maps, receive an up-to-date weather forecast, be able to change the time zone when you move, and much more. But, the moduleGPS consumes a lot of battery iOs device.
Basically, when setting up a new iPhone, you can turn off location services, which you can always turn on as needed.
We press "Disable" and confirm our decision by clicking "Yes".

After you have decided on the geolocation, you will see the screen for setting up your "apple" gadget.
Since we are considering a new, "boxed" iPhone, we need to “tap” on the line “Set up as a new iPhone”.

Create an Aplle ID account
You have now gone to the most important process - setting up the Aplle ID.
Using this account, you will subsequently log into Aplle services, buy applications, music, synchronize multiple devices, make free video calls between them, chat in chats, etc.
This step is not considered mandatory and you can skip it when setting up a new iOs device, but experienced Apple growers recommend creating this identifier right away.
Choose "Create Aplle ID Free"

Important! It should be noted that if the owner of the "apple gadget" at the time of creating the account is under 18 years old, the system will refuse to registerAplleID.
After entering the data, the system will ask which mailbox to use. You can enter an existing email address, or get it for free from iCloud.
In this article, we will consider registering with an Aplle ID with a pre-existing address.

Use current mailbox
- enter an email address available to you;

E-mail address
- create a password and confirm it;

In order to use the mobile Internet, you must:
- Insert a sim card into the iPhone and then go to the "Settings" application.
- After that, go to the "Cellular" section and turn on the Internet in the "Cellular data" column.

The data for the operation of the iOs device on the Internet comes immediately after installing the sim card in the iPhone. You just need to save SMS with settings in your phone.
In order to use iPhone as a Wi-Fi modem, you must:
- We enter the "Settings" iPhone.
- Go to the "Modem Mode" section and move the slider to the ON position.

After such a simple procedure, your iPhone can distribute Wi-Fi, working as a modem. A blue bar with the number of connections will signal that the wireless connection is working.
If your Mac computer is not equipped with a Wi-Fi module, then the iPhone can still be used as a modem and broadcast Internet traffic via a USB cable.
This requires:
- Go to "system settings" Mac. In the "Internet and wireless network" section, click on the "Network" icon.

- In the left column of the lower part of the window, click "+", and in the drop-down menu, select "USB to iPhone". After this procedure, press "Create" and the button "Show all".

- In the drop-down window, click the "Apply" button.
We connect the iPhone to the computer with a USB cable and turn on the modem on the phone. As described above.
The main thing - do not forget to connect the phone itself to the Internet, via Wi-Fi or 3G.
There is another way how to broadcast the Internet from an iPhone and use it as a full-fledged modem: via Bluetooth.
For this you need:
- Turn on Bluetooth on both iPhone and Mac and create a connection between devices.
- Then turn on the iPhone in modem mode, as described above.
- Click on the Bluetooth icon on Mac, select iPhone from the drop-down list, and "Connect to the network".

The fact that your gadget works as a modem will be indicated by a blue bar with the number of connections.
Advice: If you use 3 to connect to the InternetG or 4G network, then choose unlimited tariffs, since mobile Internet does not differ in cheapness.
First launch and setup of iPhone and iPad
How to set up an iPhone: Instructions for dummies
In any case, it makes sense to register your iPhone in order to be able to recover data from the device in case of theft or damage. Registration does not affect AppleCare plans or warranties that accompany your mobile purchase. However, registration speeds up the process of providing smartphone support. If iTunes doesn't recognize your iPhone, there are several troubleshooting steps you can take to fix the problem. Once registered with iTunes, you can sync important business documents, apps, and other content from your iPhone.
So, how to register an iPhone online
Step 1
Go to Apple's product registration page.
Step 2
Select "Choose your location" from the drop down menu and find your country.
Step 3
Find the appropriate language from the "Select the desired language" tab in the drop-down menu.
Step 4
Enter your Apple ID and password in the required fields. Select the "Continue" button.
Step 5
Press the "One Product" radio button. Select "Continue".
Step 6
Select iPhone twice from the menu. Then select the iPhone version you are registering. This article provides an example of how to register an iPhone 4c, but the process is the same for all modifications. Then - "Continue".
Step 7
Enter your iPhone. Click on "Continue" and then "Finish" to complete the registration.

Troubleshoot iTunes recognition issues
Step 1
Open iTunes, then click the Apple menu and choose Check for Updates on your Mac. On Windows, select the Help menu and search here for Check for Updates.
Step 2
Check that you have no foreign objects or dirt stuck inside the iPhone-4g connector (specifications for all models and port structures are identical). Make sure the pins on the computer USB port are not dirty or damaged.
Step 3
Open "Start", in it - "Control Panel" and open "Add or Remove Programs" on your Windows computer. Then check to see if Apple Mobile Device Support is installed. If it is missing, uninstall iTunes, and then download the service again and install a fresh copy.
Step 4
And the computer. Then connect your iPhone to your computer and try syncing again after restarting iTunes.
Ending
Completing the instructions on how to register an iPhone, find the serial number by clicking on the "Settings" menu and then "General". Go to the appropriate option to view your serial number.

Additional registration to download free software
One of the things that really surprises users is that there is no way to download apps for free on the App Store without registering credit card information. However, this can be circumvented. Below is an instruction on how to register an iPhone in iTunes without providing payment card information.
Step 1
Open iTunes, in it click on any of the free applications in the App Store.
Step 2
By clicking on the app, you will see a description page open. After that, click on the "Receive" button located next to. This will open a new window. Select "Create New Account".
Step 3
You will see a welcome message from iTunes. Click Continue. This will display the terms and conditions for purchases. You must check the box "I agree" and proceed further.
Step 4
Now enter the required information - a valid email address. After you enter the details, click "Continue".
Step 5
You can see that there is a "No" option in the "Payment Method" titles. Previously, this option was not available. Set the radio button to None and enter your personal information and "Continue".
Step 6
You will receive a message stating that a confirmation has been sent to the email address you provided.
Step 7
Check your email, you should receive a confirmation from the iTunes Store. The email will ask you to click on the link to activate the account you just created in the iTunes Store.
At this point, the instruction on how to register an iPhone can be considered complete. You can now log in and start downloading all the apps that are available for free without entering any credit card details.