How to make a collage from photos in Photoshop? This question is asked not only moderators of groups in social networks, but also simple owners of pages. Often after vacation, I want to create a new photo album about the trip. And great when the title photo is a collage. So the album will attract more attention. To make a simple collage in Photoshop, enough basic knowledge of the program. Perhaps you are interested in how to create a collage in photoshop of several photos? Then you need to connect fantasy and gain patience, and the knowledge of the program will need a little more.
Collage in photoshop quickly and easily
Consider how to make collages in photoshop on examples, from simple to complex. The easiest photo collage may consist of one photo.
Take any recreation with a rest, for example, from the amusement park. Of these familiar pictures, you can make an interesting photo collage quickly and easily.
Open the image in Photoshop. On the right side of the workspace is the "Layers" palette, which shows the separation of the image in the layers.
For further work, you need to remove the fastening from the layer of your image. It is very easy - sufficiently click on the image of the lock on the layer.

Combination of keys Ctrl + J. We make two duplicate layer. To duplicate in the middle we use a correction layer "Color Tone / Saturation" / (Hue / Saturation) In toning mode. Upper layer while hiding by pressing the icon "Eye" On the contrary. Call the correction layer on the palette of the layers below. Corrective layers list icon - a circle, sharpened by half.

To the correction layer, it works in toning mode, in the settings window that opens after the layer call, click Tick "TONING" / COLORIZE. Now, moving checkers "Color Tone" / Hue, "Saturation" / Saturation and "Brightness" / Brightness Left or right, achieve shades similar to the old photo. Then apply to the same duplicate layer Blur over Gauss. Become on the layer and in paragraph "Filter" / Filter The main menu is chosen "Blur" / Blur, "Blur in Gauss" / Gaussian Blur.

In the appeared window, moving to the right sliders, pick up the blur comfortable for the eye. Click OK.. This layer will serve us with the background.

Now go to the topmost duplicate layer. Press your empty icon to appear icon "Eye" And the layer became visible.

We stay on this layer and choose the selection tool "Rectangular Region" / Rectangular Marquee Tool. Create a portrait for the first element of the collage. We highlight an arbitrarily frame by holding the left mouse button: Just stretch as much as we need in the image. Allocation will designate dotted line.

Then immediately, without removing the selection, click the icon "Creating a mask". A mask will appear next to the layer, and the image limited to the selection will remain.

Click on the clipboard between the layer and the mask. It will disappear, and the mask will become free to move through the layer and transformation. Go from the layer on the mask (on the layer palette).

Now, choosing the tool "Move" / Move (The key is called V.) You can, grab a mask, move it to any place of the image. And if you click the keyboard key Ctrl + T., you can stretch or reduce the size of the mask. Clash for the angular point of the transformation frame and holding the left mouse button, stretch or squeeze the size. In order for the transformation, the rectangle distortion occurred, click on the clip on the control panel.

You can also deploy an angle mask. To do this, move the cursor to the angular point of the transformation frame and wait until the rounded arrow appears. Now, holding the left mouse button, rotate to the inclination you need. Upon completion click ENTER.

On the same layer, go from the mask on the layer (on the palette of the layer).

Staying on the layer, press the right mouse button. In the console list that appears, select item.

In the settings window, select "Run stroke" / Stroke. By moving the top slider, select the frame size. The color can be changed by calling the palette with double clicking on the color sample window. After completing all the selections, click OK..

Now create a duplicate layer with a mask by clicking Ctrl + J.. On the new layer, call the tool "Move" / Move (key V.) And, grasping, drag the mask to a new place. It is advisable to highlight another portrait. If necessary, change the size of the mask or turn it otherwise, as was done on the previous layer. So you will receive the second element of the collage. Repeating steps from creating a duplicate before finding a new mask position, create as many collage elements as you need. Do not forget: to move the mask on the image, on the layer palette, go from the layer on the mask. If you need to cancel any actions, press the key combination Ctrl + Alt + Z.

To make a picture even more interesting, selectively adjusting the layer to the layers of the collage "Color tone / saturation"As we applied it to the layer-background. You can apply the correction layer "Black and white".
To the effect of the correction layer applied only to one layer, and not to all, between the corrective layer and the layer, to which the effect apply, make one mouse clicking, hold down Alt.. Opposite the correction layer, an arrow appears, indicating the binding to the layer below. And the effect only applies to the specified layer.
Apply correction layers to your taste. At the end, save the file ( SHIFT + CTRL + S) In PSD format, in case you want to change anything. Ready collage Save in any format convenient for you, JPG or other ( SHIFT + CTRL + S And specify another format).

That's just just from one ordinary photo you can create an interesting collage. If desired in the window "Blending Option" / Blending Option You can, except for the stroke, set another shadow and glow around each element of the collage.
How to make a collage of several photos in Photoshop
Consider how from several photos to make a collage in Photoshop.
An ordinary collage can be attributed to a selection of beautiful photos in one color scheme. Such collages can be found entitled "Inspiration with Color". Either these are simple collages from travel pictures and other events. Simply put, these are several rectangular photos, beautifully placed in the same frame.
Prepare the necessary images in advance. It is desirable to choose photos of large sizes and good quality. Run the Photoshop program. In the conductor, highlight all the prepared images and drag them with the music button in the PhotoShop window.

On messages when opening a file respond OK..

Switch the image windows if it is too much, you can in the list on the control panel. Click on a double arrow and select the desired one.

On all images you should remove the icon "Lock" on the layer. Think in advance, in what order will post pictures on collage. Select an image that will be a reference center frame. Install the cursor on the layer with the image, click Ctrl + T.If everything suits you and cut a fragment is not needed. When the transformation frame appears, on the control panel, click the icon "Clip". In this case, when transformation does not violate the image proportions. We sum up the cursor to the corner of the frame and reduce the image to the desired size. Press ENTERTo complete the transformation.

If we need only a fragment of the image, then the selection tool (key M. Ctrl + C. and Ctrl + v. We will have a new layer with the desired workpiece. Old layer remove. Tool "Move" / Move (The key is called V.) Move the image to the desired position. To do this, we sum up the cursor to the image and, holding the left mouse button, move the image to the selected position.

We prepare the following fragment of collage. Go to the bookmark with the desired image. Options tool "Rectangular Region" / Rectangular Marquee Tool (key M.) Cut the desired area, click Ctrl + C.. We return to the bookmark with the first fragment of the collage and click Ctrl + V.. A new layer appears with the image. Put the cursor on it, click Ctrl + T. and customize the transformation of the desired size. Press ENTERTo complete the transformation. Tool "Move" / Move (The key is called V.) Move the image to the desired position.

The bookmark with the used image can be closed to not be confused among their sets. If there is a desire, you can set the stroke to each element of the collage. Staying on the layer, press the right mouse button. In the console list that appears, select item "Blending Option" / Blending Option. In the settings window, choose "Run stroke" / Stroke. By moving the upper slider, select the size of the frame. The color can be changed by calling the palette with double clicking on the color sample window. After completing all the selections, click OK..

Repeat all the steps with cutting, copying, adding to collage and transformation with all the selected pictures. Complete your collage. Save in any of the desired formats ( SHIFT + CTRL + S), Jpg, etc. Your collage is ready. If it is suddenly a desire to change something in it, save your collage PSD file ( SHIFT + CTRL + S) and choose PSD format). Then, opening this file in Photoshop, you can easily make changes.

You learned what to do collages in Photoshop is simple and interesting. Now you can show the example of your works to friends, as in Photoshop to make a collage of several photos. Perhaps the creation of collages in Photoshop will be your favorite occupation. Good creative works! Try, share your works in social networks. You will definitely get!

At today's occupation, we will clearly consider the creation of an emotional, sensual drawing in the dark forest. The main hero of the picture will be a deer. To purchase a solid episode, different pictures are combined into a general image, for this use correction layers, a layer mask and eventually get light, shadows, etc.
This occupation is performed using the Adobe Photoshop program of SS 2014, but it is possible to use other versions of SS 2014 and newer.
Applied materials:
- deer
- voron
- nebula texture "nebula"
- the texture of burning lights ("Starry 4").
Chronology of creation
Action 1.
Create a new document. Commands File - Create (File - NEW). Set the dimensions, they must be no lower:
Sh.: (Width): 894 PC
W: (Height): 708 PC
Resolution: 300 (PC / inch) 
Action 2.
Open the starting drawing "Forest", using the Move Tool command to transfer it to the new document created earlier, if necessary, then transform it. Press the keyboard key (Ctrl + T) and to save the proportions clap and hold SHIFT. Position the picture, as depicted in the photo. 
Action 3.
Change the initial drawing "Forest" into the smart object, for this you click on the right button on the layer with the forest and select "Convert to the Smart Object" (CREATE SMART OBJECT).
To add depths to the future drawing, use the "Blur over Gauss" filter. Transfer to the filter - Blur - Blur in Gaussian (Filter - Blur- Gaussian Blur) and set the blur radius by 8.2 ° C. 
Action 4.
Choose the brush tool (Brush Tool). Brush soft, black color. In setting up the tool, install by 30% "opacity" (opacity) and "Press" (Flow). Being on the Mask-layer of the filter "Blur in Gauss", clean the blur. The photo below shows the zone: 
The result was the depth in the future Figure: 
Action 5.
Adjust the "Bright / Contrast" layer (Brightness / Contrast), use a form that hides another image so that only the circuits of the clipping mask remain noticeable, in other words, it is necessary to attach the adjusting layer "Brightness / contrast" to a layer with a forest. It is necessary to hold the key (ALT) and bring the bright / contrast between the corrective layer "Brightness / Contrast" and a forest layer. Then click the left button. As a result, they attribute a corrective layer to a layer with the forest.
Install brightness indicators - 62 and contrast - 46 
Action 6.
Add the correction layer "Color Balance" (Color Balance) and use the "Create Clipping Mask" with it.
After executing the previous step, where correction layers were added, the following indicators are used for shadows: for the red shade, it is set to 19, green - 7, blue +7. For halftone (Midtones): Red - 24, green - 21, blue +5. For light (Highlights): Red - 15, green - 10, blue - 2. 
As a result, it turns out: 
Action 7.
In this action you need to reduce the amount of yellow shade in the picture. In this case, use adjustment. To do this, select the "Selective Color" command and use "Create Clipping Mask".
The settings panel looks like this: yellow - 19, blue - 100%, purple - 4%, black is not used and exhibited - 0. 
As a result, it turned out: 
Action 8.
The next step adds a special nebula. To do this, you open the starting picture "Nebula" and using the Move Tool (Move Tool) tool to the main document, using the key combination (Ctrl + T) transform it.
To save the proportions clap the Shift button, you apply a picture: 
Before seeing how particularly the nebula, it looks like, renamed a layer in the "Nebula", reduce the "opacity" (opacity) to 33% and transform the order of overlaying on the "screen" (Screen): 
Action 9.
Add a layer of adjustment "Color Tone / Saturation" (HUA / SATURATION) to "Nebula", and also use "Create Clipping Mask). Color tone indicators - 92, saturation - 13. The tag on the Toning command (Colorize). 
Action 10.
Reveal a PSD file with a raven, pick up any liked the object, then place it on the main document. For a more realistic image of the fusion of the crow, the filter "Blur in Gaussian" is used (Filter - Blur - Gaussian Blur). 
Action 11.
Go to the creation of a light source. Create another layer of "light source" using the combination of buttons (Ctrl + Shift + Alt + N). Choose "Brush" (Brush Tool). Make it soft using the "opacity" and "Press" settings (FLOW) to 50%. Makes changes in the foreground color palette on (# 1B3A5D) and create a beam of light. It can be seen in the figure below:
Change the procedure for applying for a "light source" layer on a "Linear Liner" (Linear Dodge), and reduce "opacity" (opacity) to 88%. 
Action 12.
At this stage, it is necessary to add the picture to the "Starry4" texture, which is contained in the set and add it using the "Move" tool to the main document and so that only half is visible. Below in the figure shows how it looks: 
To eliminate a black background and harmoniously enter the texture in the picture you need to change the order of overlaying the texture on "Screen" (Screen): 
Go to the color change texture. Add a "Color / Saturation" adjustment layer (HUE / SATURATION), then the "clipping mask" apply to this layer.
In this case, the saturation rate is 100: 
For the completed picture, a couple of burning objects are added, create a new layer "Glow 2". Choose "Brush" (Brush Tool). Make it soft, color white, as in the picture: 
Action 14.
Add external glow "Glow 2". This can be done by clicking on the layer of the left mouse button 2 times and use the following sizes of "external glow" (Outer Glow) - Basics Lightening (Color Dodge), Opacity (OPACITY) - 54%, Color (# 166082), Size (Size) : 32 px.
Dubbing the layer "Glow 2" by a key combination (Ctrl + J) and have a glowing point in different places of our document where you consider it necessary. The preliminary result that should turn out: 
Action 15.
It has time to add a deer to the Dark Forest. To do this, open the main picture and using tools allocate and extract the image and placed it on the main document. Change, for this you need a key combination (Ctrl + T). To save the proportions clap and hold the SHIFT button. They feature a picture, as shown below: 
The lower limbs of the animal are masked using the layer mask. It is necessary to create a realistic effect of a deer standing in the grass: 
Action 16.
Next, you need to create an external sensation falling on the grass shadow. The natural beam of light is directed to the back of the animal, hence the shadow will fall from its lower extremities. Form a new layer "Shadow", it is located above the layer with animals. Choose "Brush" (Brush Tool). They make it soft, color black, set the level of "opacity" and "push" to 30%, then apply the shadow as in the picture: 
Action 17.
Reduce the brightness of the animal pattern, add a "color tone / saturation" layer (HUA / SATURATION), change the "saturation" rate to - 34. It is necessary to use the "Create Clipping Mask) to a layer with a deer. 
Action 18.
At this stage, the brightness indicators of the deer and the main picture are distinguished. To do this, you add the correction layer "Curves" (Curves), while using the "Create Clipping Mask) to a layer with a deer. 
As a result, it turned out: 
Action 19.
For a harmonious fit, the image changes and add a "color balance" of a deer in order to enter it even better. The following tones are used: red - 20, green - 17, blue - 15; For halftone: red - 29, green - 3, blue +12. For light: red + 11, green +7, blue +6. In this case, use the "Create Clipping Mask" to a layer with a deer. 
As a result: 
Action 20.
Form another layer over the entire "lighting", in the palette, the tone is changed at the first plan on (# 2B5463). Choose "brush". Make it soft, set the level of "opacity" and "push" to 30%, focus a natural light source, falling on the back of the animal as in the picture: 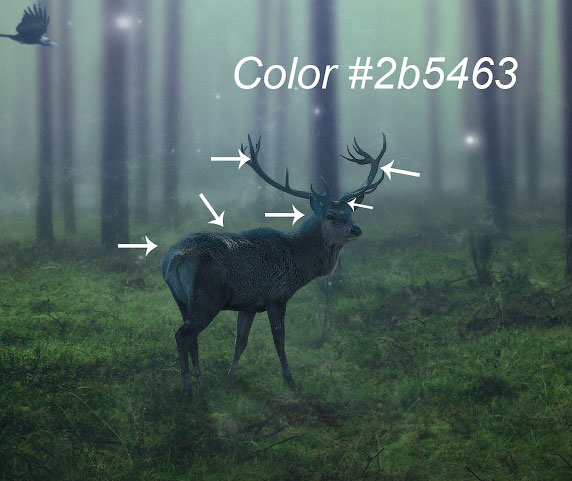
Transform the procedure for applying the "Lighting" layers to the "Linear Liner" (Linear Dodge) and reduce the "opacity" to 55% 
As can be seen in the drawing, the deer perfectly fit into the main image.
Action 21.
We repeat the s No.11. Color brush (# 1D506D), layer "Forest lighting" 
Action 22.
Change the procedure for the imposition of layers "Lighting of the Forest" on the "Replacement Light" (Lighten) and reduce the "opacity" to 66% 
Action 23.
We begin the final correction of the picture, adding a fixing layer "Gradient Map" (Gradient Map). 1 click on the color strip of the gradient and set up the specified colors: left (# 000000) to the right (# 143D4E) (from black to dark blue). 
Change the order of the imposition of the "Gradient Maps" on the "Clarification of the Basics" (Color Dodge), in order to make the gradient lighter. 
Action 24.
Adjust the "Selective Color" layer (Selective Color) and configure the following indicators: the settings panel looks like this (green): yellow - 100%, blue - 100%, purple - 100%, black is not used and set - 0.
The settings panel looks like this (color - yellow): yellow - 5%, blue - 13%, purple - 26%, black is not used and exhibited - 0.
It is necessary to eliminate extra green. 
As a result: 
Action 25.
Add a layer to adjust "brightness / contrast" with indicators: brightness - 67, contrast - 32, opacity to 64%.
Immediately add the correction layer "Color Search" (Color Lookup). At the same time, it is important to note that the presets were used here: "Kodak 5218 Kodak 2383". Those who do not use the PHOTOSHOP CC version are recommended to achieve similar results by reducing the level of opacity for the corrective layer "Color Search" to 55%. 
After using corrective layers, it turned out: 
Action 26.
And in conclusion using correcting layers, add finite "brightness / contrast" with indicators: brightness - 49, contrast - 1. 
As a result: 
Action 27.
Being on the last adjusting layer "Brightness / Contrast" need to get rid of unnecessary shades, for this, go to the mask-layer of the correction layer and choose the "brush". Make it soft, set the level of "opacity" and "push" to 30%, black color, it will save bright light lights in the center of the image: 
As a result: 
Action 28.
If you wish to make fewer luminous lights, you do not need to take an "brush again", but it is enough to install the cursor on the "Brightness / Contrast" layer and click twice with the left mouse button. A window appears: 
Reduce the "density" (DENSITY) of C 100% to 65%, drag the slider to the left. The decrease in density leads to a change in color from black to gray. 
Let's look at the final result of our Labor:

As it can be seen reduced brightness in the center of the picture, using a layer-mask density. If a
Collage "Winter" with a lesson in PhotoshopThe material is taken from open sources on Yandex - photo.
Filters
Unlimited2 - Graphicsplus.
Unlimited2 - Simple.
Unlimited2 - Tramages.
Unlimited2 - PaperTextures.
AAA Frames - Foto Frame
Alienskinxenofex2.
DRAGONFLY- SINEDOTS11
1. Create a new document (Ctrl + N) with 620 sizes to 480 pixels.
2. Prepare colors: Basic blue # 515079 and white #FFFFF background.
3. Thebell bucket and pour the primary color.
4. Filter - Texture - Mosaic Fragments - 93,3,9
5. Filter - distortion - polar coordinates - rectangular in polar.
6.Sloe - create a duplicate layer.
7. Print the filter Unlimited2 - Graphicsplus- QuickTile11 - 0,0,0,59
8. Layers - Create a duplicate layer.
9. Apply Unlimited2 Filter - Simple- Topbottom Wrap
10. The overlay layer is overlapping.
11.Sloe - combine with the previous one.
12. Layers - create a duplicate layer.
13. . Applicable Filter Unlimited2 - Tramages- MARBLE- MADNESSONE - 124,118,21.0
Change the layer overlay mode - hard light.
14. Layers - Combine with the previous
fifteen. . Apply the Unlimited2 filter - PaperTextures- FIBROUSPAPER, COARSE- 88,128
16. Equality Clipart.

We transfer to our collage and stretch to the whole document.
17.Sleva on collage Install a girl

Editing - Transform - reflect horizontally.
Change a little color tone by clicking on Ctrl + U (+29; +50; -13)
Click on FX at the bottom of the layers and add the shadow to sinking (just clicking on OK)
18.Turn on the bottom layer.
Image - canvas size - changing the size: width - 750pix. and height - 580 pixes.
Free transform stretch the layer to a new size.
19. Applicable Filter Unlimited 2 - Tramages - Marble Madness One - 26,0,0,0
20. Applicable Filtaa Frames - Foto Frame -43,0,0,0,0,0,0,100
21. Press on FX at the bottom of the layers and add the stroke inside the white pixel.
22. Print Alienskinxenofex2 filter - cracks

23. We form a new layer.
24. Print the filter Dragonfly- Sinedots11 -

And get such veil

24. We create a new layer.
25.Sloe - Arrange - to the background.
26. Image - Size of the canvas - changing the size: Width - 800Pix. and height - 620 pix.
27. Play blue # 191964.
28. Apply Alienskinxenofex2 filter - Cracks the same settings.
29.Sloe - combine visible.
Good luck and good mood.
With respect * GP *
Today we will create a collage in Photoshop, a very interesting way to create collages.
Today we will learn to impose and docile photos. The result is very interesting! Material:


Let's start: 1. Open the image with a waterfall:


And with the MOVE tool (Move) drag the image with the lock on the waterfall

2. Next, I will change the height of the canvas of the image-canvas size up to 5000 pixels. Using the Crop tool (collapse), select our image area and go Image-CROP (image-crop) to trim unnecessary.
3. Select a layer with a lock and reflect its horizontally Edit-Transform-Flip Horizontal:

4. Reduce the size of the Edit-Transform lock (edit-transform):

5. We take the swamp with soft edges and erased on the layer of this area. Upon again using the Crop tool, we remove excess on the left side, cutting out our image:

we get ...

6. Using the RECTANGULAR MARQUEE tool, we highlight a rectangular area on a layer with a waterfall:

And duplicate the layer, after which we transform the selection, we have it in the desired part. We take the kneon with soft edges and erased superfluous:

7. Open the image with the sky and with the MOVE tool drag the image to our picture. The layer with the sky should be on top of all layers. We transform photos with the sky, reflect horizontally and set the layer settings as indicated below:

8. Shift the sky is a bit down so that the dark part is visible more and the cooler with the soft edges will pass by the horizon:

9. Next, we go to the image settings and reduce the saturation of the Image-Adjustments-Hue / Saturation, move the Saturation slider to the left. And so with all the layers. 10. Next, we go to the Layer-New Fill Layer-Solid Color or Gradient menu and poured either a gradient or clean color, if desired. Layer mixing settings install Soft Light (soft light) OPACITY 40%.
In this lesson you will learn how to create a winter collage using Photoshop action. The lesson "Zima approach" in Photoshop was inspired by the famous television series. We will create a medieval scene with the knight and the castle in the background. To create a winter landscape, we will add the effects of falling snow, fog and, of course, change the color tone to change the time of the year.
Final image:
Note: The author used paid materials. In the archive you will find an alternative image option for the lesson. Instead of a paid action (transformation of summer in the winter) you can use the lesson.
Step 1
In this lesson you will learn how to create a winter collage with realistic snow and snowfall effect. At this lesson, I was inspired by the popular fantasy series "Game of Thrones". You can apply the winter effect to any other photo with the same results.
Let's start with an image of a beautiful medieval castle on the lake. Name this layer Castle on background.
Duplicate a layer Castle on background And name it Lock. Change the size up to 75%, as shown in the image below.

Step 2.
Add a layer mask to a layer Lock.

With a soft round Brush. Tool. (Brush) Black Make a seamless transition between two layers. You must paint the lake and the surroundings of the castle. Play with different levels of opacity, as well as change the size of the brush to get good results. The layer mask is a non-destructive way to hide the image area. With the help of black, you hide, and with the help of white, you show certain areas.

To expand the bottom area of \u200b\u200bthe image, you can take advantage Clone Stamp Tool. (Stamp) or you can use Edit. > FILL (Edit\u003e Run fill), Content-Aware. (Taking into account the contents) - a new feature of CS5.

Step 3.
In this step I will add a correction layer Gradient map (Gradient map) to change the color shades of the castle. For gradient Take two colors # 65282F / # FEF9E8, also set the overlay mode Color (Chromaticity) with Opacity (Opacity) 27%.

Duplicate a layer Gradient map (Gradient map). Install overlay mode Overlay (Overlapping) with Opacity (Opacity) 100% to get a similar result.

Step 4.
And now add the medieval knight on the new layer. Add a mask to this layer.

Use again Brush Tool. (Brush) of black with different levels of opacity to hide some areas, as shown in the preview window. Around the knight, use a rigid round brush to make accurate selection. Around other areas, use a soft round brush to create a smooth effect.

Step 5.
Add Gradient map (Gradient map) with the same colors that were used for the castle. Install the overlay mode on Color (Chromaticity) with Opacity (Opacity) 40%, specify this layer as a clipping mask.

Add a layer Brightness / Contrast. (Brightness / contrast) as a clipping mask for a layer with a medieval knight.

Add a corrective layer Gradient map (Gradient map) above all layers with the following colors: # 65282F / # FEF9E8 and set the overlay mode on Color (Chromaticity) with Opacity (Opacity) 27%.

Step 6.
Create a new layer on top of all other layers, name it Medieval knight And press the SHIFT + CTRL + ALT + E key combination to make a combined copy of all layers. Duplicate this layer in a new PSD file.
For quick and realistic winter conversion you will need actionWinter approaching (fee). Download the action and download PAT and ATN files. Go to the menu Window\u003eActions (Window\u003e operations) to open the tab Actions (Operations). Select the action "Winter EFF by PSDDEDE" and click Play. (Playback).
Note: Instead of a paid action, you can take advantage of the lesson by turning the summer in the winter in Photoshop.

Action will stop to set the threshold value. Levels. (Levels). Install it in position 230; The idea is to get a few white details, but not too much. Click OK to continue.

The action will stop for you so that you paint the areas you want to show, and then continued to play. Via Brush Tool. (Brush) White Fold the knight. You will be able to adjust the effect after the action is over, therefore it is not worth paying a lot of attention. Resume playback!

The action will stop for you so that you paint the areas you want to make more colorful and resumed playback. Take Brush Tool. (Brush), this time in black and squeeze the same knight area. You can adjust the effect after the action is over, so again do not pay much attention. Resume playback!

Action will stop here on this layer style Pattern Overlay. (Pattern Overlay). To move the template, hold the mouse and across it on the screen to change the effect of fog.

After the action is completed, you all layers will be untouched, so you can adjust the result. To correct the knight, you must walk inside the mask with a white color to show the desired areas, and black to hide the necessary areas. Click on the miniature of the layer masks and just shine the image. To give the knight an original color effect, you must draw inside the layer Hue / Saturation. 1 (Color Tone / Saturation) Black to manifest effect, and white to hide it. Click on the thumbnail of the mask and just crush the image.

Step 7.
If you do not want to use this action, you can try some of these wonderful learning lessons to create the effect of winter and snow in, but it will be a longer process.

Step 8.
To add the effect of sun glare, I used the rays of the light Photoshop. Slightly configuring some adjustments, I got such a result. You can use one of the textures of the flare with the overlay mode. Screen. (Screen) or Lighten. (Lighter).

As the last strokes, I used the filter High Pass (Color Contrast) to increase the sharpness of the image and get an ice clear effect.
Note: You can use this lesson to increase sharpness.
Here is the final result of our collage. Winter approaching in Photoshop. I hope you liked this photoshop lesson!