Greetings, dear visitor of the PenserMan blog! Who doesn't know what is Windows 7 backup and went to this page to find out, I'll explain. The concept of archiving means the processing of data for their subsequent storage, and in relation to computer data, that is, its files, also recoding and compression.
What is it for? Everything is very simple. In order to restore all our data in the exact same form in which they were before in the event of a system failure. How to do this, what you need for this and what you should pay attention to, we will consider in this topic.
What do you need and where to start
Well, first of all, you need to take care of the place where the data will be archived. It is best to have a separate external hard drive for this. Because in the case of using a Windows 7 disk, there is a high probability that after the “system cataclysms” the files of the archive itself will also be damaged. That is, “don't put all your eggs in one basket”!
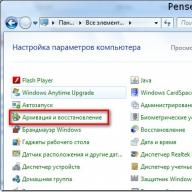
Now about where on the computer this place is archived. So, click “Start” then “Control Panel” and in the window that appears, select “Archiving computer data”:
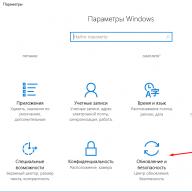
Or, if your “Settings” window is not in the “Category” mode, but in the “Small Icons” mode, for example, then we find “Backup and Restore” and click there:

But regardless of the appearance of the top window, you will still get to the window, which we will consider in the next section of our topic. Please do not get annoyed by “advanced” PC users about such a detailed description, but still, my blog is primarily designed for pensioners and dummies.
Choosing a location for the archive
Above, I already talked about which disk it should be placed on. To accurately specify this, you need to do the following steps. Click on "Change settings":

Don't be afraid of the next window. This is not the beginning of the process yet, although for some reason it says “Starting data archiving”, but at the top there is an inscription “Archiving settings”:
We waited until the flashing of the green bar calmed down and next choose your external hard drive. In my case, it is “ZHST-PENSERMAN (I:)”. Then click "Next":

With the choice of the place of archiving finished. Go ahead.
Selecting archiving objects
At the next stage of the configuration, we determine “What to archive?”. I advise you to put an end to “Give me a choice”. The fact is that if you provide a choice of Windows, then archiving of the system disk will also be done. It is of no use to us. I'll explain why later. Here is the window:

After you clicked “Next” above, the following window will appear, where we are required to check the boxes where necessary. Of course, the inscriptions will differ between us, but their meaning will not change from this. First of all, you need to check the boxes in the places that are enclosed in red rectangles, the rest are up to you, but it’s better if you also put them there:

Let's take a look at what all the above inscriptions mean.
- Archiving the data of new users is if several users work on your computer.
- The “HOUSE s” libraries are what is stored in the “My Documents” folder.
- Libraries “Guest s”, if there is one, is when you allow strangers to work on your computer with limited rights.
- The new volume (X:) is a logical drive that has no system files. Some may have more than one.
- Enable Disk System Image is what I was talking about above when I suggested putting an end to “Give me a choice”.
On the last point, I hope you now understand that if we put an end to “Give Windows a choice” at the very beginning, then the drive (C:) would be backed up twice. And this is already redundant.

Now we need to decide how we will archive manually or automatically. Let's consider each of them.
Manual way to back up Windows 7 data
There is absolutely nothing complicated here. Again, as at the very beginning, go to Start / Control Panel / System and Security / Archiving computer data and get into the “Backup and Data” window. Here we click to archive and the process went:

Just remember to connect an external hard drive. Although if you do not connect it, you will immediately see that the “Archive” button will be inactive, that is, gray.
During the archiving process, you can track how the process is going. To do this, click on the "View Details" button and an additional window will appear. There it will be written how many percent of the archiving has already been completed and which files are being copied and to which disk it goes. You can also stop the archiving process from it by clicking on “Stop backup”:

Of course, all this can be done automatically if you suddenly need it.
Automatic way to back up Windows 7 data
In order for the backup to be performed automatically, you need to make the necessary settings, and more specifically, you need to specify the start time. It is better to do this immediately after selecting archiving objects, in the last window, where we checked the archiving parameters again. Click "Change Schedule":

And here you already indicate the time you think is necessary. I think every Monday at one in the morning would be the most acceptable option. You, of course, set the day of the week at your discretion, depending on when you usually accumulate data changes, but it is better to choose the time at night. Still, the process is long, and responsible, and it is better not to interfere with it at this moment:

Then click "Save Settings and Exit". Everything now, every time at the specified time, archiving of your data will automatically begin. Well, of course, if you do not connect an external hard drive to your computer. This is what the archive looks like:

Everything about archiving Windows 7 data. Let's take the next point.
Restoring data from an archive
You can restore data from the archive either completely or partially. This is done in the following way. We go to the main window of the archiver and click on the "Restore my files" button. This, of course, is not the only method of entering the recovery archive, but in my opinion the most convenient:

After that, the following window will open for us, where we must either find the folder or file we need through the “Search” button, or do the same through the browse:

After clicking on “Browse Folders”, it usually takes about twenty seconds, or even more, until the next window appears. So do not be nervous and calmly wait. Then choose what you need and click "Add Folder":

By the way, you can add more than one folder, but as many as you need. And if, for example, you need a folder that is inside “Documents”, as in our case, then just double-click with the left mouse button and so on until you find what you need. After that, the following window appears, where the added folder will be visible and we need to click “Next”:

In the next one, choose the location where you would like to restore this folder and click on “Restore”:

After all these manipulations, corrupted or lost files or folders will be restored.
And the last point concerns the free space on the hard drive. Over time, archives will be added and added, and you need to monitor this, especially when Windows 7 automatic data archiving is configured. Otherwise, you may not notice and hope that everything is archived for you, but it turns out not. To prevent this from happening, old unnecessary archives must be deleted. To do this, go to the main window of the archiver and click "Space Management":
![]()
Well, it’s probably not necessary to show and describe further - everything is simple there. I think you will figure it out yourself. But if you have questions, comments are at your service. I will answer.
That's all I wanted to convey to you about such a wonderful tool as Windows 7 backup. Hope you can use it. But from the bottom of my heart I wish you that you don’t have any failures in the system and that you don’t have to restore data!
Good luck to you! See you soon on the pages of the Penserman blog.
Archiving is the most effective and best tool for ensuring the safety of data. Timely backup of information can not only save you from losing important files, but also allow you to restore your computer after serious failures.
Introduction
Purely theoretically, modern Windows operating systems should be able to work on computers without failures for a very long time. To do this, many software mechanisms are built into the OS that are responsible for the security and reliability of the system, designed to independently resolve various problems that arise during the operation of the PC. The same applies to the hardware component of a computer, the components of which, under normal operating conditions, should serve the user for at least several years.
But in practice, things look a little different. In some situations, Windows stability is not as perfect as the developers claim, and PC parts can fail after only a few days of operation. At the same time, all this can happen, as always, at the most inopportune moment. So sooner or later, an unpleasant situation can happen to any of you, as a result of which the operating system becomes inoperable or important data is lost. It is possible that both will happen at the same time.
In order to help users avoid serious troubles associated with the loss of information and the occurrence of failures in the operation of the OS, Windows has several tools that allow you to back up the necessary data, as well as create system restore checkpoints, a system image or a system recovery disk. In the future, the created copies can be used to reanimate certain information or the entire system as a whole.
All recovery and backup mechanisms can be found in Control panels system.

If in the computer settings window you have category browsing (by default), then you need to find the link Archiving computer data In chapter system and safety. If the view of all panel elements is set, then we are looking for the option Backup or restore.

After launching it, a window will open in front of you, containing links to various tools for backing up and restoring data.
Data archiving
Archiving data is the periodic creation of copies of files and folders that you work with most often, as well as your account settings. If in paragraph Archiving you will see the inscription Data archiving is not configured, then this means that archiving was not performed earlier in this system, and in case of data corruption, you risk losing them once and for all.
To correct this situation, click on the link Set up backup, after which the archiving setup wizard will start.

At the first stage, the utility will scan and identify all storage devices that are connected to your computer and display their list (except for the system drive) in a new window. From this list, you should select the disk on which you plan to store the created archives.
The most optimal storage for backups is an external (removable) hard drive that can be stored separately from the computer. At the same time, portable magnetic drives, in fact, being ordinary HDDs, dressed in a case with a controller, can store the same large amounts of information as their internal ones. And this means that, if necessary, in many cases you can make a complete copy of your disk and transfer all its contents, for example, to another computer. In cases where the archived data is small, USB flash drives, memory cards or writable optical discs (CD, DVD) can be selected as storage objects.
In addition to external drives, you can store archive copies of files on any non-system partitions of internal hard drives. For example, this is advisable when several hard drives are installed on the computer at once. If, however, a logical partition physically located on it is selected as the place to save the backup copy of data from the disk, then in the event of a hard drive failure, you will still say goodbye to all your information. So it is better to store data and their backups on different physical media.
Windows also provides the ability to save archive files on a local network on remote computers.
After selecting the location to save the backup copy, press the button Further, after which a window will open in front of you.

Here we are invited to make a choice between automatic and manual selection of archiving objects. In the first case, the system itself will back up files from key user libraries and folders. In the second - the choice can be made independently.
- Data files saved in folders and libraries: Documents, Music, Pictures, Videos, AppData, Contacts, Desktop, Downloads, Favorites, Links, Saved Games and Searches.
- A system image that is an exact copy of the system disk partition and includes the system itself and all its parameters, user settings and files, as well as installed programs.
Of course, many users (especially beginners) will find this type of backup easier, but it still has its drawbacks. First of all, this concerns the automatic creation of a system image archive, which can be very large and lead to a rapid overflow of the drive intended for storing backups. At the same time, individual elements cannot be selected from the system image during data recovery, for example, only a library with documents, and therefore it is poorly suited for restoring individual files or folders. So it is better to take the process of preparing a planned archive under your own control, and do the image of the system partition manually, as needed.
After selecting an item Give me a choice a window will open in front of you, where you can independently check the necessary objects for archiving with the help of checkboxes.

Particular attention should be paid to the fact that the system separates the data of different accounts, as well as data on hard drives. That is, you can choose to archive both libraries of all computer users at once, or individually. Also, for each user, it is possible to select the necessary archived components. In addition, you can add the necessary files and folders located on hard disk partitions to the backup. To do this, simply expand the desired section (click on the triangle on the left) and select the necessary objects. If you want to create a complete copy of a logical drive, check the box next to it without expanding it.
Under the list of libraries and components for archiving, in the lower part of the window, there is a separate item for creating a system disk image. In this case, if your computer has several operating systems installed in different partitions, then Windows will include all of them in the created image. This is just clearly visible from our screenshot, which was taken on a computer with two installed operating systems.

True, we agreed that in this example we will not create an image of the system, but leave this matter for later. So for now, uncheck the box Include disk system image.
After you make a selection of the necessary components and click the button Further, a control window will open, in which you will be asked to check all the main archiving parameters again.

Here you can also change archiving schedule by clicking on the link with the talking title.

In the schedule settings window, you can select the frequency, days of the week, and time for automatic archiving. When choosing a time, do not forget that the computer must be turned on at that moment and it is better not to be used by you, since the archiving procedure can seriously slow down the workflow. In addition, in this window, you can completely disable the automatic creation of scheduled backups and subsequently do it only manually.
Finally, when all the parameters are specified and the settings are made, to start the procedure for archiving the selected objects, press the button Save settings and start archiving. Windows will immediately begin the process of creating a backup copy according to the created rules. At this moment, you will be able to visually monitor the progress of archiving using the indicator located in the window.

To view more detailed information, you can click on the View Details button, after which an additional window will open in front of you, which will reflect the progress of the running procedure.

The duration of the archiving process directly depends on the number of objects you specified, as well as their total volume, and can take from several minutes to several hours.
After the completion of the backup, in the archiving window already familiar to us, information about the size of the created archive and its contents, the time the next copy was created, and the date of the last archiving will appear.

Here you can also change or disable the schedule, perform an unscheduled backup (Backup button), create a system image or a system recovery optical boot disk, and manage backup disk space.

From the same window, you can access the general list of backups by clicking on the button View archives, as well as change the parameters of the system image.

In order to free up disk space in case it is full, you can delete unnecessary (outdated) copies in the archive list display window by selecting the required entry and pressing the button Delete.
So, we have just reviewed the planned and manual archiving of information, which allows you to systematically save the necessary data, including personal files and folders, to selected media, thereby ensuring the possibility of their quick recovery. But do not forget about the operating system, which is the main and most important tool for the user when working with a computer.
There are frequent cases when, under the influence of various external factors, the normal operation of the system is disrupted. For example, this can happen when a computer becomes infected with a virus or there is a sudden power outage. In certain situations, with serious failures, restoring Windows to working order can be very difficult, and sometimes it can not be done at all. In this case, users not only have to completely reinstall the system, but also configure its settings, reinstall device drivers, as well as all programs and applications.
To avoid such unpleasant troubles and make life easier for yourself in the event of an OS crash, Windows has a standard tool that allows you to create exact copies of the partitions in which the system is installed. By creating an image of the system partition, in the future you can restore the entire operating system from it with the settings already configured, personal libraries and applications you installed in a matter of minutes.
As you may have guessed, the same tool is used to create a disk image in Windows. Backup and restore, which we discussed above when studying the procedure for archiving data. Having opened this component, in the left column of the window, you can see a link with a telling name, by clicking on which the mechanism for creating a copy of the system disk will start.

First, as in the case of regular data archiving, you will be prompted to choose a location to store the created image. The most preferred option here is On hard drive. In this case, it is better to store the system image on a separate internal or external drive, and not on another logical partition of the hard drive with the installed system. Only then will you provide yourself with the opportunity to restore the OS in the event of a mechanical failure of the HDD.
The option of storing the image on DVDs is also not bad. But here everything will depend on how much space your backup copy of the system partition takes up. For example, in our case, archiving two system partitions may require about 145 GB. This means that to burn such an image, 31 regular (single-layer) DVDs are required.

If the system image does not exceed 30-40 GB, then optical disks can be used to store the system. Although messing around with 8-10 carriers will also seem like a burden to many users.
A final alternative for storing system images is a network location. Frankly, this option can not be called optimal. Indeed, in order to pull a backup copy from a remote resource, it is necessary to connect the computer to the network, which can be very problematic or simply impossible without a fully installed operating system.
After you select the location of the system image, a window will open in front of you, in which you will need to select the disks included in the backup.

In fact, the figure clearly shows that in addition to system partitions, images of other logical disks can also be included in the backup. True, there is one condition here - you cannot include a disk image in the archive if it is selected as the storage for the system copy.
Having selected the sections necessary for archiving, click Further. Finally, a control window appears in front of us with confirmation of the archiving parameters. The most important thing here is to pay attention to the size of the required space for the archive. If the predicted volume is at least slightly higher than the amount of free space on the media or almost equal to it, then it is better not to start archiving. Otherwise, you risk wasting a lot of time.
After making sure that the selected parameters are correct, click on the button Archive to launch the system image creation procedure directly. If something does not suit you during the archiving process, you can click the button Cancel and set all parameters again.
After the backup of the system partition is completed, the wizard will prompt you to create system recovery disk. This disk will be very useful to you in cases where you need to restore the system from an image, but at the same time it will be impossible to start a previously installed copy of Windows, which means that it will not be possible to launch the built-in standard recovery tool. At the same time, keep in mind that during the occurrence of failures or virus infections, it is the boot area of the system or the components responsible for starting the OS that is often damaged. So the likelihood that you will encounter just such a situation is very high.
What is a recovery disk? In fact, this is a boot disk (you can boot your computer from it) containing the main diagnostic and recovery tools for Windows, with which you can reanimate your computer after serious failures, including from a previously created system image.
If you don't have a blank optical disc after you've finished creating the system image, you can postpone the creation of the recovery disc until later. Subsequently, this can be done from the already familiar system component - Backup and restore by clicking on the link in the left column Create System Recovery Disc.

The process of creating this disc is very simple. In the window that opens, you select the desired drive (if you have several), insert a blank DVD into it and press the button Create disk. The system will do the rest for you automatically.
Conclusion
Remember that regular archiving of data (backup), which is very important to you, is a guarantee that one day you will not have to mourn for irretrievably lost personal documents, photos, family videos and other unique files.
Also, do not forget about your main working tool - the operating system. After all, having a backup copy of the system partition, in the event of critical Windows failures or even a hard drive failure, you can always quickly restore not only the working state of the computer, but also all your personal libraries, installed applications and system settings.
Due to our own erroneous actions of working on a computer or a virus attack, it is not possible to download Windows 7 in any way?! Or the operating system is loaded, but it is simply unbearable to work in it?! If you are familiar with these situations and would like to correct the situation within a minimum time, you need to prepare in advance for such problems and sometimes (once a month / once every two months) make an image of the system and, if necessary, restore the operating system by rolling back to the created image. Windows 7 has a built-in system archiver, which is intuitively very simple and clear, you do not need to install additional programs to create an image of your system, and even more so spend money on these programs.
How to make a system image of Windows 7? There are several ways to start System Backup, here is one of them. Come along the way
In the window that opens, on the left you will see "Creating a system image"- this tool will allow you to create a system archive once, if you look to the right side of the window, you will see a button, i.e. It is possible to configure archiving automatically.  You choose which method suits you, in this article I will describe both of these methods.
Creating a system image
Click "Creating a system image", in the window that opens, select the place where the system backup will be stored, the ideal option is an external hard drive, you can use CD / DVD, but keep in mind that you will need a lot of them. It is also better not to use a local disk, since during a virus attack, recovery from a local disk is not always possible.
 After choosing a backup location, you need to choose what to archive. If you have enough space, save all local drives. In this example, I will save only the C drive.
 In the next window, confirm our choice and click "Archive".
 Next comes the process of archiving / creating an image of the system, it can last quite a long time, it all depends on the amount of space to be archived and the power of the computer.

At the end of archiving, the system will offer to write data to disk, since I am archiving to an external hard drive, I don’t need it, click “no”, besides, I don’t really want to write 32 GB :)
 This completes the process of creating a system image, the backup is located on a removable disk, the name of the folder is WindowsImageBackup.
Configuring automatic system imaging
I remind you initially we went along the way "Start - Control Panel - Backup and Restore", press "Set up backup", in the window that opens, select the location where the system backup will be stored, please note that the specified backup location must be available when it is scheduled to run. The ideal option is an external hard drive, CD / DVD are not entirely suitable, since it would not be very advisable to spend several disks on each backup. It is also better not to use a local disk, since during a virus attack, recovery from a local disk is not always possible.
 In the next window, we select what we will archive or present the choice to the system, i.e. leave the default, in this example I will leave the default. Click "Further".
 In the next window, select the schedule for running the system image, I recommend once a month, although this is individual, it all depends on how often you make changes to the system.
 After pressing "Save settings and start archiving", the archiving process will begin. Archiving the system may take a long time, up to several hours, it all depends on the amount of data and the speed of the computer.

I hope you will never need a backup of the system, but situations are different and for safety reasons I strongly recommend making an archive image of the system.